

LE1711 and LE1911 LCD Monitors User Guide
Page 1
HP LE1711 and LE1911 LCD Monitors User Guide
HP LE1711 and LE1911 LCD Monitors User Guide
LE1711 and LE1911 LCD Monitors User Guide
Page 3
iii CAUTION: Text set off in this manner provides important supplemental information. WARNING! NOTE: Text set off in bodily harm or loss of information. Text set off in this manner indicates that failure to follow directions could result in this manner indicates that failure to follow directions could result in damage to equipment or loss of life. About This Guide This guide provides information on setting up the monitor, installing drivers, using the on-screen display menu, troubleshooting and technical specifications.
iii CAUTION: Text set off in this manner provides important supplemental information. WARNING! NOTE: Text set off in bodily harm or loss of information. Text set off in this manner indicates that failure to follow directions could result in this manner indicates that failure to follow directions could result in damage to equipment or loss of life. About This Guide This guide provides information on setting up the monitor, installing drivers, using the on-screen display menu, troubleshooting and technical specifications.

LE1711 and LE1911 LCD Monitors User Guide
Page 5
... Files ...12 Installing from the CD ...12 Downloading from the Worldwide Web 12 Using the Auto-Adjustment Function 12 Front Panel Controls ...14 Adjusting the Monitor Settings ...15 Using the On-Screen Display Menu 15 OSD Menu Selections 16 Optimizing Digital Conversion 18 Using the HP Display Assistant Utility 19 v
... Files ...12 Installing from the CD ...12 Downloading from the Worldwide Web 12 Using the Auto-Adjustment Function 12 Front Panel Controls ...14 Adjusting the Monitor Settings ...15 Using the On-Screen Display Menu 15 OSD Menu Selections 16 Optimizing Digital Conversion 18 Using the HP Display Assistant Utility 19 v

LE1711 and LE1911 LCD Monitors User Guide
Page 6
Identifying Monitor Conditions ...19 Sleep Timer Mode ...20 HP Display LiteSaver ...21 Installing the HP Display LiteSaver Software 21 sRGB Support ...22 Changing the Color Temperature 22 ... Solving Common Problems ...24 Online Technical Support ...26 Preparing to Call Technical Support 26 Appendix B Technical Specifications LE1711 Model ...27 LE1911 Model ...28 Recognizing Preset Display Resolutions 29 LE1711 and LE1911 Models 29 Entering User Modes ...29 Energy Saver Feature ...29 Appendix C Agency Regulatory Notices Federal Communications Commission Notice 30 Modifications ...30...
Identifying Monitor Conditions ...19 Sleep Timer Mode ...20 HP Display LiteSaver ...21 Installing the HP Display LiteSaver Software 21 sRGB Support ...22 Changing the Color Temperature 22 ... Solving Common Problems ...24 Online Technical Support ...26 Preparing to Call Technical Support 26 Appendix B Technical Specifications LE1711 Model ...27 LE1911 Model ...28 Recognizing Preset Display Resolutions 29 LE1711 and LE1911 Models 29 Entering User Modes ...29 Energy Saver Feature ...29 Appendix C Agency Regulatory Notices Federal Communications Commission Notice 30 Modifications ...30...

LE1711 and LE1911 LCD Monitors User Guide
Page 7
Turkey EEE Regulation ...35 Appendix D LCD Monitor Quality and Pixel Policy vii
Turkey EEE Regulation ...35 Appendix D LCD Monitor Quality and Pixel Policy vii

LE1711 and LE1911 LCD Monitors User Guide
Page 9
The monitor models and features include: ● LE1711 model, 43.2 cm (17-inch) diagonal viewable area display with 1280 x 1024 resolution, plus full-screen support for lower resolutions ● LE1911 model, 48.3 cm (19-inch) diagonal viewable area display with 1280 x 1024 resolution, ...plus full-screen support for lower resolutions ● Wide viewing angle to allow viewing from a sitting or standing position, or moving side-to-side ● Tilt capability ● Removable base for flexible monitor...
The monitor models and features include: ● LE1711 model, 43.2 cm (17-inch) diagonal viewable area display with 1280 x 1024 resolution, plus full-screen support for lower resolutions ● LE1911 model, 48.3 cm (19-inch) diagonal viewable area display with 1280 x 1024 resolution, ...plus full-screen support for lower resolutions ● Wide viewing angle to allow viewing from a sitting or standing position, or moving side-to-side ● Tilt capability ● Removable base for flexible monitor...
LE1711 and LE1911 LCD Monitors User Guide
Page 11
...com/ergo and/or on the documentation CD, if one may accidentally step on or trip over them so that is included with the monitor. It describes proper workstation, setup, posture, and health and work habits for this ability. For information on the correct power cord ...protection; the power strips must be specifically labeled as a power strip or Uninterruptible Power Supply (UPS). If another cord is included with the monitor, refer to use only a power source and connection appropriate for computer users, and provides important electrical and mechanical safety information. WARNING! To ...
...com/ergo and/or on the documentation CD, if one may accidentally step on or trip over them so that is included with the monitor. It describes proper workstation, setup, posture, and health and work habits for this ability. For information on the correct power cord ...protection; the power strips must be specifically labeled as a power strip or Uninterruptible Power Supply (UPS). If another cord is included with the monitor, refer to use only a power source and connection appropriate for computer users, and provides important electrical and mechanical safety information. WARNING! To ...

LE1711 and LE1911 LCD Monitors User Guide
Page 12
...provider. ● Use only a power source and connection appropriate for ventilation. Dust the monitor by using a screen saver program and turning off the monitor when not in use. It may damage the monitor. NOTE: Monitors with a soft, clean antistatic cloth. 3. Turn off when not in a well-ventilated...wipe the screen surface. You may need it from excessive light, heat or moisture. ● When removing the monitor stand, you move or ship the monitor. 4 Chapter 2 Safety and Maintenance Guidelines These chemicals may run behind the bezel and damage the electronics. You can...
...provider. ● Use only a power source and connection appropriate for ventilation. Dust the monitor by using a screen saver program and turning off the monitor when not in use. It may damage the monitor. NOTE: Monitors with a soft, clean antistatic cloth. 3. Turn off when not in a well-ventilated...wipe the screen surface. You may need it from excessive light, heat or moisture. ● When removing the monitor stand, you move or ship the monitor. 4 Chapter 2 Safety and Maintenance Guidelines These chemicals may run behind the bezel and damage the electronics. You can...
LE1711 and LE1911 LCD Monitors User Guide
Page 13
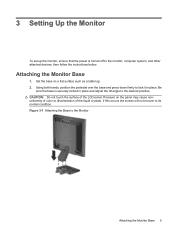
...other attached devices, then follow the instructions below. Using both hands, position the pedestal over the base and press down firmly to the Monitor Attaching the Monitor Base 5 Set the base on the panel may cause nonuniformity of color or disorientation of the LCD panel. Pressure on a flat surface... such as a table top. 2. CAUTION: Do not touch the surface of the liquid crystals. 3 Setting Up the Monitor To set up the monitor, ensure that the power is securely locked in place. If this occurs the screen will not recover to its normal condition.
...other attached devices, then follow the instructions below. Using both hands, position the pedestal over the base and press down firmly to the Monitor Attaching the Monitor Base 5 Set the base on the panel may cause nonuniformity of color or disorientation of the LCD panel. Pressure on a flat surface... such as a table top. 2. CAUTION: Do not touch the surface of the liquid crystals. 3 Setting Up the Monitor To set up the monitor, ensure that the power is securely locked in place. If this occurs the screen will not recover to its normal condition.
LE1711 and LE1911 LCD Monitors User Guide
Page 14
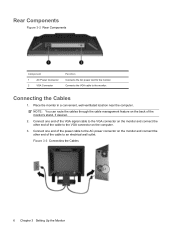
... the Cables 1. Figure 3-3 Connecting the Cables 6 Chapter 3 Setting Up the Monitor Rear Components Figure 3-2 Rear Components Component 1 AC Power Connector 2 VGA Connector Function Connects the AC power cord to the monitor. NOTE: You can route the cables through the cable management feature on the... monitor and connect the other end of the monitor's stand, if desired. 2. Connect one end of the power cable ...
... the Cables 1. Figure 3-3 Connecting the Cables 6 Chapter 3 Setting Up the Monitor Rear Components Figure 3-2 Rear Components Component 1 AC Power Connector 2 VGA Connector Function Connects the AC power cord to the monitor. NOTE: You can route the cables through the cable management feature on the... monitor and connect the other end of the monitor's stand, if desired. 2. Connect one end of the power cable ...
LE1711 and LE1911 LCD Monitors User Guide
Page 15
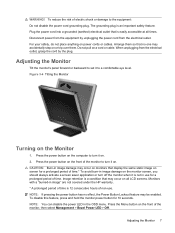
... on a cord or cable. The grounding plug is not in image damage on . 2. When unplugging from the electrical outlet. Adjusting the Monitor Tilt the monitor's panel forward or backward to the equipment: Do not disable the power cord grounding plug. Press the power button on the front of time... Arrange them . Do not pull on all times. Image retention is a condition that no effect, the Power Button Lockout feature may occur on monitors that is 12 consecutive hours of non-use for a prolonged period of time is easily accessible at all LCD screens. To disable this feature, ...
... on a cord or cable. The grounding plug is not in image damage on . 2. When unplugging from the electrical outlet. Adjusting the Monitor Tilt the monitor's panel forward or backward to the equipment: Do not disable the power cord grounding plug. Press the power button on the front of time... Arrange them . Do not pull on all times. Image retention is a condition that no effect, the Power Button Lockout feature may occur on monitors that is 12 consecutive hours of non-use for a prolonged period of time is easily accessible at all LCD screens. To disable this feature, ...

LE1711 and LE1911 LCD Monitors User Guide
Page 16
...The message shows the current active input signal, the current preset display resolution, and the recommended preset display resolution. When the monitor is powered on a wall, a swing arm, or other mounting fixture. Refer to the LCD. Figure 3-5 Using the Accessory Rails Feature Mounting... the Monitor Panel You can be sure the monitor is displayed for detailed mounting instructions. CAUTION: Before beginning to install the panel on , a Monitor Status message is turned off and the power and signal cables are ...
...The message shows the current active input signal, the current preset display resolution, and the recommended preset display resolution. When the monitor is powered on a wall, a swing arm, or other mounting fixture. Refer to the LCD. Figure 3-5 Using the Accessory Rails Feature Mounting... the Monitor Panel You can be sure the monitor is displayed for detailed mounting instructions. CAUTION: Before beginning to install the panel on , a Monitor Status message is turned off and the power and signal cables are ...
LE1711 and LE1911 LCD Monitors User Guide
Page 17
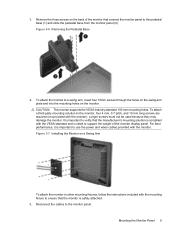
...is rated to use the power and video cables provided with the monitor. For best performance, it is safely attached. 5. Figure 3-7 Installing the Monitor on the monitor. Figure 3-6 Removing the Pedestal Base 4. To attach the monitor to a swing arm, insert four 10mm screws through the holes... the mounting fixture to ensure that the monitor is important to support the weight of the monitor that the manufacturer's mounting solution is compliant with the monitor). It is important to verify that connect the monitor panel to the monitor panel. Reconnect the cables to the pedestal...
...is rated to use the power and video cables provided with the monitor. For best performance, it is safely attached. 5. Figure 3-7 Installing the Monitor on the monitor. Figure 3-6 Removing the Pedestal Base 4. To attach the monitor to a swing arm, insert four 10mm screws through the holes... the mounting fixture to ensure that the monitor is important to support the weight of the monitor that the manufacturer's mounting solution is compliant with the monitor). It is important to verify that connect the monitor panel to the monitor panel. Reconnect the cables to the pedestal...

LE1711 and LE1911 LCD Monitors User Guide
Page 18
NOTE: For more information on the rear panel of the monitor. Figure 3-8 Locating the Rating Labels Installing a Cable Lock You can secure the monitor to http://www.hp.com/go/options. 10 Chapter 3 Setting Up the Monitor The rating labels are located on HP accessories, go to a fixed object with an optional cable lock available from HP. Locating the Rating Labels The rating labels on the monitor provide the spare part number, product number, and serial number. You may need these numbers when contacting HP about the monitor model.
NOTE: For more information on the rear panel of the monitor. Figure 3-8 Locating the Rating Labels Installing a Cable Lock You can secure the monitor to http://www.hp.com/go/options. 10 Chapter 3 Setting Up the Monitor The rating labels are located on HP accessories, go to a fixed object with an optional cable lock available from HP. Locating the Rating Labels The rating labels on the monitor provide the spare part number, product number, and serial number. You may need these numbers when contacting HP about the monitor model.

LE1711 and LE1911 LCD Monitors User Guide
Page 19
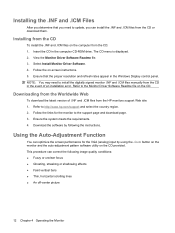
... support this chapter. Software and Utilities 11 The Information File The .INF file defines monitor resources used in conjunction with the monitor contains files you can be downloaded from the HP monitors support Web site. Plug and Play does not work correctly without installing the .INF ... .INF (Information) file ● an .ICM (Image Color Matching) file ● auto-adjustment pattern utility ● additional software for the monitor model NOTE: If the monitor does not include a CD, the .INF and .ICM files can install on page 12 in accordance with the computer's graphics adapter.
... support this chapter. Software and Utilities 11 The Information File The .INF file defines monitor resources used in conjunction with the monitor contains files you can be downloaded from the HP monitors support Web site. Plug and Play does not work correctly without installing the .INF ... .INF (Information) file ● an .ICM (Image Color Matching) file ● auto-adjustment pattern utility ● additional software for the monitor model NOTE: If the monitor does not include a CD, the .INF and .ICM files can install on page 12 in accordance with the computer's graphics adapter.
LE1711 and LE1911 LCD Monitors User Guide
Page 20
...streaking or shadowing effects ● Faint vertical bars ● Thin, horizontal scrolling lines ● An off-center picture 12 Chapter 4 Operating the Monitor Ensure the system meets the requirements. 4. Refer to update, you can correct the following the instructions. NOTE: You may need to http://www....hp.com/support and select the country region. 2. Ensure that you need to install the digitally signed monitor .INF and .ICM files manually from the Worldwide Web To download the latest version of an installation error. The CD menu is displayed....
...streaking or shadowing effects ● Faint vertical bars ● Thin, horizontal scrolling lines ● An off-center picture 12 Chapter 4 Operating the Monitor Ensure the system meets the requirements. 4. Refer to update, you can correct the following the instructions. NOTE: You may need to http://www....hp.com/support and select the country region. 2. Ensure that you need to install the digitally signed monitor .INF and .ICM files manually from the Worldwide Web To download the latest version of an installation error. The CD menu is displayed....
LE1711 and LE1911 LCD Monitors User Guide
Page 21
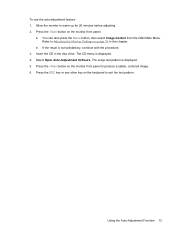
... to warm up for 20 minutes before adjusting. 2. Refer to produce a stable, centered image. 6. Press the -/Auto button on the monitor front panel to Adjusting the Monitor Settings on page 15 in the disc drive. Insert the CD in this chapter. ● If the result is not satisfactory, continue with... the procedure. 3. Press the ESC key or any other key on the monitor front panel. ● You can also press the Menu button, then select Image Control from the OSD Main Menu. Using the Auto-Adjustment Function ...
... to warm up for 20 minutes before adjusting. 2. Refer to produce a stable, centered image. 6. Press the -/Auto button on the monitor front panel to Adjusting the Monitor Settings on page 15 in the disc drive. Insert the CD in this chapter. ● If the result is not satisfactory, continue with... the procedure. 3. Press the ESC key or any other key on the monitor front panel. ● You can also press the Menu button, then select Image Control from the OSD Main Menu. Using the Auto-Adjustment Function ...
LE1711 and LE1911 LCD Monitors User Guide
Page 22
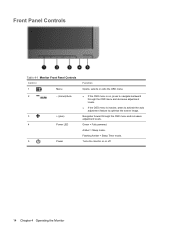
... , press to navigate backward through the OSD menu and increases adjustment levels. Green = Fully powered. Front Panel Controls Table 4-1 Monitor Front Panel Controls Control 1 Menu 2 - (minus)/Auto 3 + (plus) 4 Power LED 5 Power Function Opens, selects or exits the OSD menu. &#...9679; If the OSD menu is on or off. 14 Chapter 4 Operating the Monitor Navigates forward through the OSD menu and decrease adjustment levels. ● If the OSD menu is inactive, press to activate the auto adjustment feature to...
... , press to navigate backward through the OSD menu and increases adjustment levels. Green = Fully powered. Front Panel Controls Table 4-1 Monitor Front Panel Controls Control 1 Menu 2 - (minus)/Auto 3 + (plus) 4 Power LED 5 Power Function Opens, selects or exits the OSD menu. &#...9679; If the OSD menu is on or off. 14 Chapter 4 Operating the Monitor Navigates forward through the OSD menu and decrease adjustment levels. ● If the OSD menu is inactive, press to activate the auto adjustment feature to...

LE1711 and LE1911 LCD Monitors User Guide
Page 23
... a menu, new adjustments will revert to scroll in reverse. 4. To access the OSD, do the following: 1. Adjusting the Monitor Settings 15 NOTE: If there is not already on the monitor. 2. To access the OSD Menu, press the Menu button on your selection, then press the Menu button to save the... setting, then select Exit from the OSD menu. To select an item from the HP Display Assistant utility. If the monitor is a problem with the display settings, try resetting the settings to turn on , press the Power button to the factory defaults by opening the...
... a menu, new adjustments will revert to scroll in reverse. 4. To access the OSD, do the following: 1. Adjusting the Monitor Settings 15 NOTE: If there is not already on the monitor. 2. To access the OSD Menu, press the Menu button on your selection, then press the Menu button to save the... setting, then select Exit from the OSD menu. To select an item from the HP Display Assistant utility. If the monitor is a problem with the display settings, try resetting the settings to turn on , press the Power button to the factory defaults by opening the...

LE1711 and LE1911 LCD Monitors User Guide
Page 24
... or right area of the screen. Horizontal OSD Position Changes the viewing position of characters. The factory default range is 50. 16 Chapter 4 Operating the Monitor The factory default is 6500K or Custom Color, depending on the screen background. Vertical Position Adjusts the position of the screen. The factory default range...
... or right area of the screen. Horizontal OSD Position Changes the viewing position of characters. The factory default range is 50. 16 Chapter 4 Operating the Monitor The factory default is 6500K or Custom Color, depending on the screen background. Vertical Position Adjusts the position of the screen. The factory default range...

