
Wireless Setup Guide
Page 2
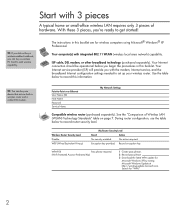
...required. Record encryption key. ISP cable, DSL modem, or other broadband technology (purchased separately). TIP: You can buy a wireless PC Card to record this information. Wireless Router Security Level Disable WEP (Wired Equivalent Privacy) My Router Security Level Result Action No ... both a wireless router and a cable/DSL modem. Your Internet connection should be operational before you can buy a wireless-enabled notebook, you begin the procedures in this booklet. Start with integrated 802.11 WLAN (wireless local area network) capability. During router configuration...
...required. Record encryption key. ISP cable, DSL modem, or other broadband technology (purchased separately). TIP: You can buy a wireless PC Card to record this information. Wireless Router Security Level Disable WEP (Wired Equivalent Privacy) My Router Security Level Result Action No ... both a wireless router and a cable/DSL modem. Your Internet connection should be operational before you can buy a wireless-enabled notebook, you begin the procedures in this booklet. Start with integrated 802.11 WLAN (wireless local area network) capability. During router configuration...
Wireless Setup Guide
Page 4
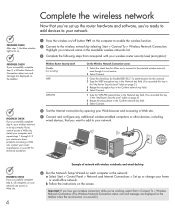
... selecting Start > Connect To > Wireless Network Connection. Highlight your network name in the Available wireless networks list. 3 Complete the following steps that correspond with wireless notebooks and wired desktop PROGRESS CHECK If you 're ready to add devices to the selected wireless network, even though it is set up the router...
... selecting Start > Connect To > Wireless Network Connection. Highlight your network name in the Available wireless networks list. 3 Complete the following steps that correspond with wireless notebooks and wired desktop PROGRESS CHECK If you 're ready to add devices to the selected wireless network, even though it is set up the router...

Maintenance and Service Guide
Page 4
... iv Service Manual Bottom View...1-10 Figure 1-4. Back View ...1-12 Figure 1-6. Removing an SDRAM Module 2-6 Figure 2-5. Removing the Display Assembly 2-24 Figure 2-18. Resetting the Notebook ...1-17 Figure 1-8. Removing the Switchboard PCA 2-18 Figure 2-14. Removing the CD/DVD Drive 2-21 Figure 2-16. Removing the Mini PCI Card 2-7 Figure 2-6. Removing the...
... iv Service Manual Bottom View...1-10 Figure 1-4. Back View ...1-12 Figure 1-6. Removing an SDRAM Module 2-6 Figure 2-5. Removing the Display Assembly 2-24 Figure 2-18. Resetting the Notebook ...1-17 Figure 1-8. Removing the Switchboard PCA 2-18 Figure 2-14. Removing the CD/DVD Drive 2-21 Figure 2-16. Removing the Mini PCI Card 2-7 Figure 2-6. Removing the...

Maintenance and Service Guide
Page 5
... 2-60 Figure 2-38. Basic Troubleshooting Steps ...3-3 Figure 4-1. Main Status Lights (front of Diagnostic Tools...3-7 Table 3-3. Keyboard Status Lights...1-15 Table 1-5. Specifications...1-18 Table 1-7. Scope of notebook 1-15 Table 1-4. POST Messages ...3-24 Table 3-6. Replaceable Parts ...4-4 Table 4-2. Removal Cross-Reference ...2-1 Table 2-2. Recommended Screw Torque Values 2-2 Table 2-4. ASP Support Options...3-2 Table 3-2. POST Terminal-Error...
... 2-60 Figure 2-38. Basic Troubleshooting Steps ...3-3 Figure 4-1. Main Status Lights (front of Diagnostic Tools...3-7 Table 3-3. Keyboard Status Lights...1-15 Table 1-5. Specifications...1-18 Table 1-7. Scope of notebook 1-15 Table 1-4. POST Messages ...3-24 Table 3-6. Replaceable Parts ...4-4 Table 4-2. Removal Cross-Reference ...2-1 Table 2-2. Recommended Screw Torque Values 2-2 Table 2-4. ASP Support Options...3-2 Table 3-2. POST Terminal-Error...

Maintenance and Service Guide
Page 6
...will train you can follow it even without having equipment available. Source HP Notebook Web site Address or Number http://www.hp.com/notebooks Comments Compaq Notebook Web site HP Business Support Web site HP Asia Pacific Channel Support Centre for... ze4700, ze4600, ze4500, ze4400, ze4300, ze4200, and ze4100 Notebook PCs, HP Compaq nx9010, nx9008, nx9005, and nx9000 Notebook PCs, Compaq Evo Notebook 1050v and 1010v Series, and Compaq Presario 2500, 2100, and 1100 Series Mobile PCs. Introduction This manual provides reference information for Windows operating systems. ...
...will train you can follow it even without having equipment available. Source HP Notebook Web site Address or Number http://www.hp.com/notebooks Comments Compaq Notebook Web site HP Business Support Web site HP Asia Pacific Channel Support Centre for... ze4700, ze4600, ze4500, ze4400, ze4300, ze4200, and ze4100 Notebook PCs, HP Compaq nx9010, nx9008, nx9005, and nx9000 Notebook PCs, Compaq Evo Notebook 1050v and 1010v Series, and Compaq Presario 2500, 2100, and 1100 Series Mobile PCs. Introduction This manual provides reference information for Windows operating systems. ...

Maintenance and Service Guide
Page 7
...) Mobile Intel Pentium 4 (2.4-, 2.66-, 2.8-, and 3.06-GHz) Up to 1 GB (1024 MB) SDRAM using 512-MB modules. 1 Product Information The following list of HP and Compaq notebook products is current at the time of publication but is subject to change. At least 256 MB SDRAM preinstalled. 15.0-inch XGA (1024 × 768...
...) Mobile Intel Pentium 4 (2.4-, 2.66-, 2.8-, and 3.06-GHz) Up to 1 GB (1024 MB) SDRAM using 512-MB modules. 1 Product Information The following list of HP and Compaq notebook products is current at the time of publication but is subject to change. At least 256 MB SDRAM preinstalled. 15.0-inch XGA (1024 × 768...

Maintenance and Service Guide
Page 12
... MB) SDRAM using 512-MB modules. Operating System Windows XP Professional or Home preinstalled Power States On, Standby, Hibernate, Off Compaq Evo Notebook 1010v Processor Memory Display Video Operating System Power States Intel Celeron (1.6-GHz) Up to 1 GB (1024 MB) SDRAM using 512... UMA graphics memory, 4x AGP graphics capability Operating System Windows XP Professional or Home preinstalled Power States On, Standby, Hibernate, Off Compaq Evo Notebook N1050v Processor Mobile Intel Pentium 4-M (1.8-GHz) Intel Celeron (1.6-GHz) Memory Up to 1 GB (1024 MB) SDRAM using 512-...
... MB) SDRAM using 512-MB modules. Operating System Windows XP Professional or Home preinstalled Power States On, Standby, Hibernate, Off Compaq Evo Notebook 1010v Processor Memory Display Video Operating System Power States Intel Celeron (1.6-GHz) Up to 1 GB (1024 MB) SDRAM using 512... UMA graphics memory, 4x AGP graphics capability Operating System Windows XP Professional or Home preinstalled Power States On, Standby, Hibernate, Off Compaq Evo Notebook N1050v Processor Mobile Intel Pentium 4-M (1.8-GHz) Intel Celeron (1.6-GHz) Memory Up to 1 GB (1024 MB) SDRAM using 512-...

Maintenance and Service Guide
Page 14
... Front View HP Pavilion ze4x00, HP Compaq nx9005 and nx9000, Compaq Evo Notebook N1050v and N1010v, and Compaq Presario 2100 and 1100 1. One-touch buttons 3. Keyboard status lights 4. Microphone option (not available) 8. Battery 11. Notebook open/close latch 2. Power button, turns the notebook on -off button 6. CD-ROM,...light* 10. Main status lights (left to right), power mode, hard disk activity, and battery 7. For an exploded view of the notebook, see page 4-2. PS/2 keyboard or PS/2 mouse port (supports Y adapter) * on -off 5. Infrared port* 9. Wireless on ...
... Front View HP Pavilion ze4x00, HP Compaq nx9005 and nx9000, Compaq Evo Notebook N1050v and N1010v, and Compaq Presario 2100 and 1100 1. One-touch buttons 3. Keyboard status lights 4. Microphone option (not available) 8. Battery 11. Notebook open/close latch 2. Power button, turns the notebook on -off button 6. CD-ROM,...light* 10. Main status lights (left to right), power mode, hard disk activity, and battery 7. For an exploded view of the notebook, see page 4-2. PS/2 keyboard or PS/2 mouse port (supports Y adapter) * on -off 5. Infrared port* 9. Wireless on ...

Maintenance and Service Guide
Page 15
... this port for logo. 13. Floppy drive* * on certain models Service Manual Product Information 1-9 Figure 1-2. Back View HP Pavilion ze4x00 HP Compaq nx9005 and nx9000 NOTE: Compaq Evo Notebook N1050v, N1010v, and Compaq Presario 2100 and 1100 are very similar, except for a serial mouse, modem, printer, or other parallel device 18. S-Video port* 17. Modem port...
... this port for logo. 13. Floppy drive* * on certain models Service Manual Product Information 1-9 Figure 1-2. Back View HP Pavilion ze4x00 HP Compaq nx9005 and nx9000 NOTE: Compaq Evo Notebook N1050v, N1010v, and Compaq Presario 2100 and 1100 are very similar, except for a serial mouse, modem, printer, or other parallel device 18. S-Video port* 17. Modem port...

Maintenance and Service Guide
Page 17
..., Select buttons, plus on -off button and indicator light* 9. Wireless on -off 5. Volume controls* 12. Keyboard status lights 4. Power button, turns the notebook on certain models Service Manual Product Information 1-11 Infrared port* 8. Universal Serial Bus (USB) port * on and off button 6. CD-ROM, DVD, or other... 7. Audio jacks (left to right): external microphone and audio out (headphones) 13. One-touch buttons 3. Front View HP Pavilion ze5x00, HP Compaq nx9010 and nx9008, and Compaq Presario 2500 1. Audio mute button and audio mute light* 10. Figure 1-4.
..., Select buttons, plus on -off button and indicator light* 9. Wireless on -off 5. Volume controls* 12. Keyboard status lights 4. Power button, turns the notebook on certain models Service Manual Product Information 1-11 Infrared port* 8. Universal Serial Bus (USB) port * on and off button 6. CD-ROM, DVD, or other... 7. Audio jacks (left to right): external microphone and audio out (headphones) 13. One-touch buttons 3. Front View HP Pavilion ze5x00, HP Compaq nx9010 and nx9008, and Compaq Presario 2500 1. Audio mute button and audio mute light* 10. Figure 1-4.

Maintenance and Service Guide
Page 20
...Hibernation mode. 1-14 Product Information Service Manual allow timeout Shut down (Windows 2000) -or- NOTE: This manual describes the notebook in RAM Restarts quickly Restores network connections Power mode status light blinks Press the power button -or- Power mode status light is...press the power button for 4 seconds (only if the Start menu procedure doesn't work) To turn on power considerations, types of the notebook's operation. Table 1-2. select Start > Shut Down > Hibernate (Windows 2000) -or- allow timeout Hibernation mode Saves maximum power Saves current ...
...Hibernation mode. 1-14 Product Information Service Manual allow timeout Shut down (Windows 2000) -or- NOTE: This manual describes the notebook in RAM Restarts quickly Restores network connections Power mode status light blinks Press the power button -or- Power mode status light is...press the power button for 4 seconds (only if the Start menu procedure doesn't work) To turn on power considerations, types of the notebook's operation. Table 1-2. select Start > Shut Down > Hibernate (Windows 2000) -or- allow timeout Hibernation mode Saves maximum power Saves current ...

Maintenance and Service Guide
Page 21
...The AC adapter is connected and the battery is active. otherwise, cursor control is accessing the hard disk drive. Hard disk drive activity On: notebook is active (as marked on (even if the display is active (Fn+F8). Off: The AC adapter is missing or has a fault. ...status, battery status, and hard disk activity. Table 1-3. The keyboard status lights, located above the keyboard, indicate the states of notebook) Meaning Power status On: notebook is on an external keyboard). Blinking: The AC adapter is connected and the battery is not connected. Keypad Lock The embedded keypad...
...The AC adapter is connected and the battery is active. otherwise, cursor control is accessing the hard disk drive. Hard disk drive activity On: notebook is active (as marked on (even if the display is active (Fn+F8). Off: The AC adapter is missing or has a fault. ...status, battery status, and hard disk activity. Table 1-3. The keyboard status lights, located above the keyboard, indicate the states of notebook) Meaning Power status On: notebook is on an external keyboard). Blinking: The AC adapter is connected and the battery is not connected. Keypad Lock The embedded keypad...

Maintenance and Service Guide
Page 23
... • Use a ballpoint pen or a straightened paper clip to restart. • If possible, shut down (about 4 seconds) and then release the power button. Resetting the Notebook NOTE: To boot from a CD, insert a bootable CD (such as the temporary boot device. If the system will not allow a software shutdown, press and hold... in the order listed. Figure 1-7. Service Manual Product Information 1-17 Press the power button to press the reset button on the bottom of the notebook. Resetting the Notebook Occasionally, Windows or the notebook might stop responding, so that you cannot turn the...
... • Use a ballpoint pen or a straightened paper clip to restart. • If possible, shut down (about 4 seconds) and then release the power button. Resetting the Notebook NOTE: To boot from a CD, insert a bootable CD (such as the temporary boot device. If the system will not allow a software shutdown, press and hold... in the order listed. Figure 1-7. Service Manual Product Information 1-17 Press the power button to press the reset button on the bottom of the notebook. Resetting the Notebook Occasionally, Windows or the notebook might stop responding, so that you cannot turn the...

Maintenance and Service Guide
Page 24
...-power processor with Intel Speed Step technology, 512-KB L2 cache, and 1.2- Specifications The following tables list the specifications for the notebook and its accessories and are subject to 1.3-V core low-power processor with 400-MHz processor system bus -or2.6-GHz Mobile Intel Celeron... processor-D with 400-MHz processor system bus HP Pavilion ze4700 and ze4600: 1.9- For the latest versions, see the HP Notebook Web site http://www.hp.com/notebooks. Physical Attributes Processor and Bus Architecture Table 1-6. to change. Specifications Size (14-inch display): 328 × 272 ×...
...-power processor with Intel Speed Step technology, 512-KB L2 cache, and 1.2- Specifications The following tables list the specifications for the notebook and its accessories and are subject to 1.3-V core low-power processor with 400-MHz processor system bus -or2.6-GHz Mobile Intel Celeron... processor-D with 400-MHz processor system bus HP Pavilion ze4700 and ze4600: 1.9- For the latest versions, see the HP Notebook Web site http://www.hp.com/notebooks. Physical Attributes Processor and Bus Architecture Table 1-6. to change. Specifications Size (14-inch display): 328 × 272 ×...

Maintenance and Service Guide
Page 25
to 1.3-V core low-power processor with 400-MHz processor system bus Compaq Presario 2100: 1.8-, 1.9-, 2.0-, or 2.2-GHz Mobile Intel Pentium 4 Processor-M with Intel Speed Step technology, 512-KB L2 cache, and 1.2- Low-battery warning Suspend/resume capability ... cache and 1.45-V core low-power processor with Intel Speed Step technology, 512-KB L2 cache, and 1.2- Processor and Bus Architecture (continued) Video Power Compaq Evo Notebook N1050v: 1.8-GHz Mobile Intel Pentium 4 Processor-M with model, usage, and power settings) Fast battery recharge: 2 hours when system is off, 3 hours ...
to 1.3-V core low-power processor with 400-MHz processor system bus Compaq Presario 2100: 1.8-, 1.9-, 2.0-, or 2.2-GHz Mobile Intel Pentium 4 Processor-M with Intel Speed Step technology, 512-KB L2 cache, and 1.2- Low-battery warning Suspend/resume capability ... cache and 1.45-V core low-power processor with Intel Speed Step technology, 512-KB L2 cache, and 1.2- Processor and Bus Architecture (continued) Video Power Compaq Evo Notebook N1050v: 1.8-GHz Mobile Intel Pentium 4 Processor-M with model, usage, and power settings) Fast battery recharge: 2 hours when system is off, 3 hours ...

Maintenance and Service Guide
Page 29
Table 1-8 on page 1-25 lists the roles that these modules play in virtually all system functions. The following figure shows the connections among the notebook's replaceable electronic modules. Replaceable Module Diagram Service Manual Product Information 1-23 It plays a role in the notebook's functional subsystems. Figure 1-8. Internal Design The motherboard PCA is the central component of the notebook's design. The CPU module and most other subsystems connect to the motherboard.
Table 1-8 on page 1-25 lists the roles that these modules play in virtually all system functions. The following figure shows the connections among the notebook's replaceable electronic modules. Replaceable Module Diagram Service Manual Product Information 1-23 It plays a role in the notebook's functional subsystems. Figure 1-8. Internal Design The motherboard PCA is the central component of the notebook's design. The CPU module and most other subsystems connect to the motherboard.

Maintenance and Service Guide
Page 31
... removal steps. The items marked by • in the following table are displayed throughout this chapter to remove and replace the notebook's components and assemblies. NOTE: Reassembly steps are included at the left represents an M2.5×4.0mm T-head screw). Removal Cross-...Rubber screw plugs, display (page 2-12) CAUTION: Always provide proper grounding when performing repairs. Installing a wrong-size screw can damage the notebook and its components. Reassembly notes are the reverse of screws before you how to show approximate full-size screw outlines. 2 Removal and ...
... removal steps. The items marked by • in the following table are displayed throughout this chapter to remove and replace the notebook's components and assemblies. NOTE: Reassembly steps are included at the left represents an M2.5×4.0mm T-head screw). Removal Cross-...Rubber screw plugs, display (page 2-12) CAUTION: Always provide proper grounding when performing repairs. Installing a wrong-size screw can damage the notebook and its components. Reassembly notes are the reverse of screws before you how to show approximate full-size screw outlines. 2 Removal and ...

Maintenance and Service Guide
Page 33
Disassembly Flowchart The following diagram shows the general "path" you will use when disassembling the notebook to access any particular component. Figure 2-1. Disassembly Flow Service Manual Removal and Replacement 2-3
Disassembly Flowchart The following diagram shows the general "path" you will use when disassembling the notebook to access any particular component. Figure 2-1. Disassembly Flow Service Manual Removal and Replacement 2-3

Maintenance and Service Guide
Page 35
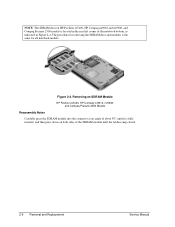
...connector. Carefully pull the SDRAM module out of module prevents the notebook from booting. Removing an SDRAM Module HP Pavilion 4x00, HP Compaq nx9005 and nx9000, Compaq Evo Notebook N1050v and N1010v, and Compaq Presario 2100 and 1100 Models Removal and Replacement 2-5 Required Equipment 1 Phillips ...factory installed. NOTE: HP Pavilion ze5300, ze5200, ze4300, ze4200, and ze4100, HP Compaq nx9010, nx9005 and nx9000, Compaq Evo Notebook N1050v and N1010v, and Compaq Presario 2500, 2100, and 1100 notebooks use only DDR266 SDRAM modules. Press outward on the latches at the sides of the...
...connector. Carefully pull the SDRAM module out of module prevents the notebook from booting. Removing an SDRAM Module HP Pavilion 4x00, HP Compaq nx9005 and nx9000, Compaq Evo Notebook N1050v and N1010v, and Compaq Presario 2100 and 1100 Models Removal and Replacement 2-5 Required Equipment 1 Phillips ...factory installed. NOTE: HP Pavilion ze5300, ze5200, ze4300, ze4200, and ze4100, HP Compaq nx9010, nx9005 and nx9000, Compaq Evo Notebook N1050v and N1010v, and Compaq Presario 2500, 2100, and 1100 notebooks use only DDR266 SDRAM modules. Press outward on the latches at the sides of the...
Maintenance and Service Guide
Page 36
The procedure for all notebook models. Removing an SDRAM Module HP Pavilion ze5x00, HP Compaq nx9010, nx9008, and Compaq Presario 2500 Models Reassembly Notes Carefully press the SDRAM module into the connector at an angle of about 30°, until the latches snap closed. 2-6 Removal ... module until it is the same for removing the SDRAM door and modules is fully inserted, and then press down on HP Pavilion ze5x00, HP Compaq nx9010 and nx9008, and Compaq Presario 2500 models is located in the rear left corner of the notebook bottom, as indicated in Figure 2-4. Figure 2-4.
The procedure for all notebook models. Removing an SDRAM Module HP Pavilion ze5x00, HP Compaq nx9010, nx9008, and Compaq Presario 2500 Models Reassembly Notes Carefully press the SDRAM module into the connector at an angle of about 30°, until the latches snap closed. 2-6 Removal ... module until it is the same for removing the SDRAM door and modules is fully inserted, and then press down on HP Pavilion ze5x00, HP Compaq nx9010 and nx9008, and Compaq Presario 2500 models is located in the rear left corner of the notebook bottom, as indicated in Figure 2-4. Figure 2-4.


