Wireless Setup Guide
Page 3
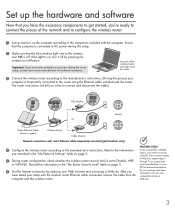
... continue with these instructions until you can have the necessary components to get started, you're ready to connect the pieces of the wireless button and light varies by model. 3 Connect the wireless router according to the manufacturer's instructions. (During this process your or WPA-PSK....Router Cable Modem Network connections with the computer. Location of the network and to configure the wireless router. 1 Set up and turn it off button. Refer to the information you successfully complete step 6, your Web browser and accessing a Web site. If the light is set up correctly....
... continue with these instructions until you can have the necessary components to get started, you're ready to connect the pieces of the wireless button and light varies by model. 3 Connect the wireless router according to the manufacturer's instructions. (During this process your or WPA-PSK....Router Cable Modem Network connections with the computer. Location of the network and to configure the wireless router. 1 Set up and turn it off button. Refer to the information you successfully complete step 6, your Web browser and accessing a Web site. If the light is set up correctly....
Wireless Setup Guide
Page 4
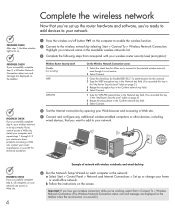
Highlight your network name in the Available wireless networks list. 3 Complete the following steps that correspond with wireless notebooks and wired desktop PROGRESS CHECK If you successfully complete step 6, all computers on your network can access a Web site. 4 6 Run the ...Panel > Network and Internet Connections > Set up correctly. PROGRESS CHECK After step 1, the blue wireless light turns on. 1 Press the wireless on/off button on the taskbar. If you successfully complete step 4, your wireless network is set up the router hardware and software, you cannot access a Web site, ...
Highlight your network name in the Available wireless networks list. 3 Complete the following steps that correspond with wireless notebooks and wired desktop PROGRESS CHECK If you successfully complete step 6, all computers on your network can access a Web site. 4 6 Run the ...Panel > Network and Internet Connections > Set up correctly. PROGRESS CHECK After step 1, the blue wireless light turns on. 1 Press the wireless on/off button on the taskbar. If you successfully complete step 4, your wireless network is set up the router hardware and software, you cannot access a Web site, ...

Compaq Notebook Series Software Guide
Page 7
... and, if you read the following general information about Standby and Hibernation, refer in use: 1. Briefly press the power button to the "Power" section. Software Guide 1-1 Before using any optical drive software, Compaq recommends that you are using CDs and DVDs. If Standby or Hibernation is accidentally initiated while a drive medium is... Hibernation while using optical drive software. 1 CD and DVD Software Using CDs and DVDs Most of this guide to exit Standby or Hibernation. 2. Restart the notebook. 3.
... and, if you read the following general information about Standby and Hibernation, refer in use: 1. Briefly press the power button to the "Power" section. Software Guide 1-1 Before using any optical drive software, Compaq recommends that you are using CDs and DVDs. If Standby or Hibernation is accidentally initiated while a drive medium is... Hibernation while using optical drive software. 1 CD and DVD Software Using CDs and DVDs Most of this guide to exit Standby or Hibernation. 2. Restart the notebook. 3.

Compaq Notebook Series Software Guide
Page 8
... prevent an audio CD from opening when autorun is enabled, press the shift key as you insert the CD. 1-2 Software Guide Select the Advanced button. ◆ If Play is displayed in plain type, (Play), autorun is enabled or disabled through the list of items in the Registered File... Types list, then select a file type; Scroll through the operating system: ■ In Windows 2000 Professional: 1. Select the OK button. ■ In Windows XP Home or Windows XP Professional, double-click the My Computer icon on the Desktop, right-click a drive, select Properties > ...
... prevent an audio CD from opening when autorun is enabled, press the shift key as you insert the CD. 1-2 Software Guide Select the Advanced button. ◆ If Play is displayed in plain type, (Play), autorun is enabled or disabled through the list of items in the Registered File... Types list, then select a file type; Scroll through the operating system: ■ In Windows 2000 Professional: 1. Select the OK button. ■ In Windows XP Home or Windows XP Professional, double-click the My Computer icon on the Desktop, right-click a drive, select Properties > ...

Compaq Notebook Series Software Guide
Page 10
... step 5. ❏ If the CD and Windows Media Player do not open . Wait several seconds. Open Windows Media Player from the Start button: ❏ In Windows 2000 Professional, select Start > Programs > Windows Media Player. ❏ In Windows XP Home or Windows XP Professional, select Start > All Programs ... into the drive, then close the tray. Read "Using CDs and DVDs," first in the system, insert an optical drive into the MultiBay of the notebook or an optional port replicator. 3. If an optical drive is enabled, the CD and Windows Media Player open , proceed to play an audio CD: ...
... step 5. ❏ If the CD and Windows Media Player do not open . Wait several seconds. Open Windows Media Player from the Start button: ❏ In Windows 2000 Professional, select Start > Programs > Windows Media Player. ❏ In Windows XP Home or Windows XP Professional, select Start > All Programs ... into the drive, then close the tray. Read "Using CDs and DVDs," first in the system, insert an optical drive into the MultiBay of the notebook or an optional port replicator. 3. If an optical drive is enabled, the CD and Windows Media Player open , proceed to play an audio CD: ...

Compaq Notebook Series Software Guide
Page 11
...Wait several seconds. Proceed to step 4. 4. To display the drive designation of the alphabet that the notebook uses to play , and Windows Media Player does not open . Select the video file, then select the Open button. 9. Software Guide 1-5 On the Windows Media Player menu bar, select File > Open. 6. Open...DVDs," first in the system, double-click the My Computer icon on the desktop. 7. Insert the video CD into the MultiBay of the notebook or the MultiBay of an optional port replicator. 3. Select the folder containing the video file you want to identify the drive. In the...
...Wait several seconds. Proceed to step 4. 4. To display the drive designation of the alphabet that the notebook uses to play , and Windows Media Player does not open . Select the video file, then select the Open button. 9. Software Guide 1-5 On the Windows Media Player menu bar, select File > Open. 6. Open...DVDs," first in the system, double-click the My Computer icon on the desktop. 7. Insert the video CD into the MultiBay of the notebook or the MultiBay of an optional port replicator. 3. Select the folder containing the video file you want to identify the drive. In the...

Compaq Notebook Series Software Guide
Page 12
... Fn key, and the F9 through Fn+F12 hotkeys 2. ■ To open Windows Media Player, press the Digital Audio Easy Access button. ■ To play, pause, or resume an audio CD, press the Fn+F9 hotkeys. ■ To stop an audio CD, press the Fn+F10 hotkeys. &#... about using Easy Access keys or hotkeys, refer on this CD to the Hardware Guide, "Pointing Devices and Keyboard" section. CD and DVD Software Using Notebook Media Keys Many tasks that can be performed through the operating system or in the Windows Media Player window can also be performed from your...
... Fn key, and the F9 through Fn+F12 hotkeys 2. ■ To open Windows Media Player, press the Digital Audio Easy Access button. ■ To play, pause, or resume an audio CD, press the Fn+F9 hotkeys. ■ To stop an audio CD, press the Fn+F10 hotkeys. &#... about using Easy Access keys or hotkeys, refer on this CD to the Hardware Guide, "Pointing Devices and Keyboard" section. CD and DVD Software Using Notebook Media Keys Many tasks that can be performed through the operating system or in the Windows Media Player window can also be performed from your...

Compaq Notebook Series Software Guide
Page 13
...; Insert a CD into the optical drive, then close the tray. ■ Press the Digital Audio Easy Access button. ■ Select the Windows Media Player icon on the menu bar. or ■ Select the Start button, then: ❏ In Windows 2000 Professional, select Programs > Windows Media Player. ❏ In Windows XP Home or...
...; Insert a CD into the optical drive, then close the tray. ■ Press the Digital Audio Easy Access button. ■ Select the Windows Media Player icon on the menu bar. or ■ Select the Start button, then: ❏ In Windows 2000 Professional, select Programs > Windows Media Player. ❏ In Windows XP Home or...

Compaq Notebook Series Software Guide
Page 14
...-party player installation, usually by following the prompts that appear on the notebook, but not preinstalled. Installing WinDVD Although WinDVD can be installed by pressing a No, Cancel, or Exit button, then close the installation window. To install WinDVD from the Setup Compaq Software icon before you have installed WinDVD, you are prompted to...
...-party player installation, usually by following the prompts that appear on the notebook, but not preinstalled. Installing WinDVD Although WinDVD can be installed by pressing a No, Cancel, or Exit button, then close the installation window. To install WinDVD from the Setup Compaq Software icon before you have installed WinDVD, you are prompted to...

Compaq Notebook Series Software Guide
Page 15
... WinDVD window by selecting the WinDVD Player icon on the Help button is a question mark.) Software Guide 1-9 Then: ◆ In Windows 2000 Professional, on the command line, type: c:\cpqapps\setup.exe preload /s The Setup Compaq Software icon is displayed on the Desktop, select Start > Run... All Programs > InterVideo WinDVD > WinDVD. 2. Select the icon > InterVideo WinDVD > Next button, then follow the instructions on the command line, type: c:\cpqapps\setup.exe preload programs /s The Setup Compaq Software icon is displayed in the WinDVD Help file. CD and DVD Software ❏ If ...
... WinDVD window by selecting the WinDVD Player icon on the Help button is a question mark.) Software Guide 1-9 Then: ◆ In Windows 2000 Professional, on the command line, type: c:\cpqapps\setup.exe preload /s The Setup Compaq Software icon is displayed on the Desktop, select Start > Run... All Programs > InterVideo WinDVD > WinDVD. 2. Select the icon > InterVideo WinDVD > Next button, then follow the instructions on the command line, type: c:\cpqapps\setup.exe preload programs /s The Setup Compaq Software icon is displayed in the WinDVD Help file. CD and DVD Software ❏ If ...

Compaq Notebook Series Software Guide
Page 17
...; In Windows XP Home or Windows XP Professional, select Start > All Programs > InterVideo WinDVD > WinDVD. 3. Software Guide 1-11 Select the radio button for changing the region setting on the taskbar. For insertion instructions, refer on this CD to play into the drive. Select the General tab. 5. ...Remaining Times Until Permanent field in the field includes the fifth and permanent change the region setting on a drive: 1. Select the OK button. Insert the DVD you select the fifth time becomes the permanent region setting on the drive. ■ The number of the window....
...; In Windows XP Home or Windows XP Professional, select Start > All Programs > InterVideo WinDVD > WinDVD. 3. Software Guide 1-11 Select the radio button for changing the region setting on the taskbar. For insertion instructions, refer on this CD to play into the drive. Select the General tab. 5. ...Remaining Times Until Permanent field in the field includes the fifth and permanent change the region setting on a drive: 1. Select the OK button. Insert the DVD you select the fifth time becomes the permanent region setting on the drive. ■ The number of the window....

Compaq Notebook Series Software Guide
Page 20
... and you may be prompted to restart the notebook, select Yes. Autorun runs a program on the screen. 7. Compaq recommends that you select the Complete installation. Enabling Auto Insert Notification When the notebook restarts after the installation is closed. You cannot... use DirectCD unless Auto Insert Notification is enabled when the notebook restarts. 1-14 Software Guide To do so, select the Complete button...
... and you may be prompted to restart the notebook, select Yes. Autorun runs a program on the screen. 7. Compaq recommends that you select the Complete installation. Enabling Auto Insert Notification When the notebook restarts after the installation is closed. You cannot... use DirectCD unless Auto Insert Notification is enabled when the notebook restarts. 1-14 Software Guide To do so, select the Complete button...

Compaq Notebook Series Software Guide
Page 23
... for DirectCD do not conflict with Easy CD Creator or CD Copier: 1. for example, the settings for CD Copier. Select the Erase button. 4. The Easy CD Creator software installs with all of these settings have not been changed. Selecting Easy CD Creator Settings To use DirectCD... Required Settings Enable Auto Insert Notification Disable Disk-at-Once and Enable Track-at-Once Disable Disk-at-Once Software Guide 1-17 Select the OK button. Access the Easy CD Creator Basic Eraser: ❏ In Windows 2000 Professional, select Start > Programs > Easy CD Creator Basic > CD-RW ...
... for DirectCD do not conflict with Easy CD Creator or CD Copier: 1. for example, the settings for CD Copier. Select the Erase button. 4. The Easy CD Creator software installs with all of these settings have not been changed. Selecting Easy CD Creator Settings To use DirectCD... Required Settings Enable Auto Insert Notification Disable Disk-at-Once and Enable Track-at-Once Disable Disk-at-Once Software Guide 1-17 Select the OK button. Access the Easy CD Creator Basic Eraser: ❏ In Windows 2000 Professional, select Start > Programs > Easy CD Creator Basic > CD-RW ...

Compaq Notebook Series Software Guide
Page 24
...Disk-at -Once check box. 4. Enabling Track-at-Once Track-at -once settings are in Easy CD Copier. Select the Advanced tab > Create CD button. 3. CD and DVD Software Enabling Auto Insert Notification Auto Insert Notification settings are in Easy CD Creator. Clear the Disk-at Once. 2. Access Easy CD...❏ In Windows XP Home or XP Professional, select Start > All Programs > Roxio Easy CD Creator 5 > Applications > CD Copier. 2. Select the Set as Default button. Disabling Disk-at-Once Disk-at -once settings are selected through the operating system. Select the Set as Default...
...Disk-at -Once check box. 4. Enabling Track-at-Once Track-at -once settings are in Easy CD Copier. Select the Advanced tab > Create CD button. 3. CD and DVD Software Enabling Auto Insert Notification Auto Insert Notification settings are in Easy CD Creator. Clear the Disk-at Once. 2. Access Easy CD...❏ In Windows XP Home or XP Professional, select Start > All Programs > Roxio Easy CD Creator 5 > Applications > CD Copier. 2. Select the Set as Default button. Disabling Disk-at-Once Disk-at -once settings are selected through the operating system. Select the Set as Default...

Compaq Notebook Series Software Guide
Page 25
CD and DVD Software Accessing Easy CD Creator Help To access the procedures for using DirectCD, Easy CD Creator, and CD Copier: ■ In Windows 2000 Professional, select Start > Programs > Roxio Easy CD Creator 5 > Project Selector > Help radio button. ■ In Windows XP Home or Windows XP Professional, select Start > All Programs > Roxio Easy CD Creator 5 > Project Selector > Help radio button. Software Guide 1-19
CD and DVD Software Accessing Easy CD Creator Help To access the procedures for using DirectCD, Easy CD Creator, and CD Copier: ■ In Windows 2000 Professional, select Start > Programs > Roxio Easy CD Creator 5 > Project Selector > Help radio button. ■ In Windows XP Home or Windows XP Professional, select Start > All Programs > Roxio Easy CD Creator 5 > Project Selector > Help radio button. Software Guide 1-19

Compaq Notebook Series Software Guide
Page 26
.... Using CD Copier When you use CD Copier to copy an entire medium to your hard drive, select the Copy button immediately after you inserted the medium into your notebook before creating the medium. Creating Media For Use in the Easy CD Creator software. For more information about Standby and ...DirectCD can be read by a compatible CD-ROM drive only if you select the Rearrange the Files option as you install UDF Reader on your notebook, reinsert the medium, then install UDF Reader at the UDF prompt. 1-20 Software Guide CD and DVD Software Easy CD Creator Tips and Troubleshooting...
.... Using CD Copier When you use CD Copier to copy an entire medium to your hard drive, select the Copy button immediately after you inserted the medium into your notebook before creating the medium. Creating Media For Use in the Easy CD Creator software. For more information about Standby and ...DirectCD can be read by a compatible CD-ROM drive only if you select the Rearrange the Files option as you install UDF Reader on your notebook, reinsert the medium, then install UDF Reader at the UDF prompt. 1-20 Software Guide CD and DVD Software Easy CD Creator Tips and Troubleshooting...

Compaq Notebook Series Software Guide
Page 31
... not initiate Standby or Hibernation while the notebook is initiated, the notebook shuts down. While Using Infrared Do not initiate Standby or Hibernation while using drive media. To resume the transmission, exit Hibernation by briefly pressing the power button, then start a new infrared transmission....refer on this CD to exit Standby or Hibernation. 2. Briefly press the power button to the Hardware Guide, "External Device Connections" section. 2-4 Software Guide Restart the notebook. If the notebook is in Standby or Hibernation, an infrared transmission cannot be inserted into a ...
... not initiate Standby or Hibernation while the notebook is initiated, the notebook shuts down. While Using Infrared Do not initiate Standby or Hibernation while using drive media. To resume the transmission, exit Hibernation by briefly pressing the power button, then start a new infrared transmission....refer on this CD to exit Standby or Hibernation. 2. Briefly press the power button to the Hardware Guide, "External Device Connections" section. 2-4 Software Guide Restart the notebook. If the notebook is in Standby or Hibernation, an infrared transmission cannot be inserted into a ...

Compaq Notebook Series Software Guide
Page 32
Identifying the power/standby light, power button, and display switch Software Guide 2-5 Power Standby, Hibernation and Shutdown Procedures Identifying the Power Controls and Light The procedures for using Standby, Hibernation, and Shutdown use the display switch 1, the power button 2, and the power/standby light 3.
Identifying the power/standby light, power button, and display switch Software Guide 2-5 Power Standby, Hibernation and Shutdown Procedures Identifying the Power Controls and Light The procedures for using Standby, Hibernation, and Shutdown use the display switch 1, the power button 2, and the power/standby light 3.

Compaq Notebook Series Software Guide
Page 33
... off . Some procedures can be changed. Power/standby light turns on button. Close the notebook. Turning the Notebook On or Off Task Procedure Result Turn the Briefly press the power notebook on . Shut down . Closing the notebook activates the display switch, which turns off the display. *If the...is unresponsive and you are unable to shut down the notebook, initiating or exiting Standby or Hibernation, and for turning on . Then: ■ In Windows 2000 Professional, select Start > Shut Down > Shut Down, then select the OK button. ■ In Windows XP Home or Windows XP ...
... off . Some procedures can be changed. Power/standby light turns on button. Close the notebook. Turning the Notebook On or Off Task Procedure Result Turn the Briefly press the power notebook on . Shut down . Closing the notebook activates the display switch, which turns off the display. *If the...is unresponsive and you are unable to shut down the notebook, initiating or exiting Standby or Hibernation, and for turning on . Then: ■ In Windows 2000 Professional, select Start > Shut Down > Shut Down, then select the OK button. ■ In Windows XP Home or Windows XP ...

Compaq Notebook Series Software Guide
Page 34
...screen. *To use the Fn+F3 hotkeys, briefly press the Fn key, then briefly press the F3 key. Software Guide 2-7 Briefly press the power button. Your work returns to the Hardware Guide, "Pointing Devices and Keyboard" section. Screen clears. Press the Fn+F3 hotkeys.* or ■ In ...Windows 2000 Professional, select Start > Shut Down > Standby, then select the OK button. ■ In Windows XP Home or Windows XP Professional, select Start > Turn Off the Computer > Standby. (If the Standby option is not displayed, ...
...screen. *To use the Fn+F3 hotkeys, briefly press the Fn key, then briefly press the F3 key. Software Guide 2-7 Briefly press the power button. Your work returns to the Hardware Guide, "Pointing Devices and Keyboard" section. Screen clears. Press the Fn+F3 hotkeys.* or ■ In ...Windows 2000 Professional, select Start > Shut Down > Standby, then select the OK button. ■ In Windows XP Home or Windows XP Professional, select Start > Turn Off the Computer > Standby. (If the Standby option is not displayed, ...


