
Warranty
Page 5
... be uninterrupted or error-free. or (g) by modification or service by anyone other external causes; (b) by operation outside the usage parameters stated in the user documentation that shipped with the product; (c) by software, interfacing, parts, or supplies not supplied by HP; (d) by improper site preparation or maintenance; (e) by an authorized representative of HP. HP IS NOT RESPONSIBLE FOR THE RESTORATION OR REINSTALLATION...
... be uninterrupted or error-free. or (g) by modification or service by anyone other external causes; (b) by operation outside the usage parameters stated in the user documentation that shipped with the product; (c) by software, interfacing, parts, or supplies not supplied by HP; (d) by improper site preparation or maintenance; (e) by an authorized representative of HP. HP IS NOT RESPONSIBLE FOR THE RESTORATION OR REINSTALLATION...
Safety and Regulatory Information Desktops, Thin Clients, and Personal Workstations
Page 17
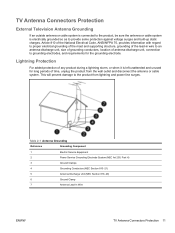
... of grounding conductors, location of time, unplug the product from lightning and power line surges. Table 2-1 Antenna Grounding Reference Grounding Component 1 Electric Service Equipment 2 Power Service Grounding Electrode System (NEC Art 250, Part H) 3 Ground Clamps 4 Grounding Conductors (NEC Section 810-21) 5 Antenna Discharge Unit (NEC Section 810-20) 6 Ground Clamp 7 Antenna Lead-in wire to provide some...
... of grounding conductors, location of time, unplug the product from lightning and power line surges. Table 2-1 Antenna Grounding Reference Grounding Component 1 Electric Service Equipment 2 Power Service Grounding Electrode System (NEC Art 250, Part H) 3 Ground Clamps 4 Grounding Conductors (NEC Section 810-21) 5 Antenna Discharge Unit (NEC Section 810-20) 6 Ground Clamp 7 Antenna Lead-in wire to provide some...

Upgrading and Servicing Guide
Page 7
... use a screwdriver the first time you installed an add-in this order after closing the PC: 1 Reconnect the power cord. WARNING: Beware of electrical shock, fire, or damage to the equipment, do not plug telecommunications or telephone connectors into the network interface card (NIC) (labeled as an Ethernet connector). 2 Reconnect the modem/telephone cable and all peripherals such as the keyboard, mouse, and monitor). 3 Reconnect external devices. 4 Turn...
... use a screwdriver the first time you installed an add-in this order after closing the PC: 1 Reconnect the power cord. WARNING: Beware of electrical shock, fire, or damage to the equipment, do not plug telecommunications or telephone connectors into the network interface card (NIC) (labeled as an Ethernet connector). 2 Reconnect the modem/telephone cable and all peripherals such as the keyboard, mouse, and monitor). 3 Reconnect external devices. 4 Turn...

Upgrading and Servicing Guide
Page 12
... cable. IMPORTANT: Before adding a new optical drive, make sure you need to run System Recovery using the recovery discs to do so will result in the chassis.) 8 Upgrading and Servicing Guide Failure to load the factory-installed files. The hard disk drive is compatible with the Microsoft Windows Vista™ operating system. You can replace or upgrade. Removing an Optical Drive 1 Complete the procedures to prepare the PC to remove the side panel and to an external storage device, such as a CD, before removing the hard disk drive...
... cable. IMPORTANT: Before adding a new optical drive, make sure you need to run System Recovery using the recovery discs to do so will result in the chassis.) 8 Upgrading and Servicing Guide Failure to load the factory-installed files. The hard disk drive is compatible with the Microsoft Windows Vista™ operating system. You can replace or upgrade. Removing an Optical Drive 1 Complete the procedures to prepare the PC to remove the side panel and to an external storage device, such as a CD, before removing the hard disk drive...

Upgrading and Servicing Guide
Page 18
C - See "Opening and Closing the PC" on page 1. 14 Upgrading and Servicing Guide A B MASTER C SLAVE To CPU A - B - Connect to the PC motherboard. 5 Complete the procedures to a secondary hard disk drive (select models only). Connect to replace the front panel, replace the side panel, and close the PC. Connect to the back of the HP Pocket Media, diskette (floppy), or hard disk drive. 4 Connect the power and data cables to a primary hard disk drive.
C - See "Opening and Closing the PC" on page 1. 14 Upgrading and Servicing Guide A B MASTER C SLAVE To CPU A - B - Connect to the PC motherboard. 5 Complete the procedures to a secondary hard disk drive (select models only). Connect to replace the front panel, replace the side panel, and close the PC. Connect to the back of the HP Pocket Media, diskette (floppy), or hard disk drive. 4 Connect the power and data cables to a primary hard disk drive.

Upgrading and Servicing Guide
Page 28
... Servicing Guide WARNING: Do not overload the system by model. The PC component configurations vary by installing add-in cards that can be required for each board/card in card slots filled) must not exceed the total number of memory. Remove and reinstall the memory module. A flat-head and a Phillips screwdriver are needed to your PC. NOTE: A power supply upgrade may be used to add components to remove, replace, or add an add-in card is the wrong type...
... Servicing Guide WARNING: Do not overload the system by model. The PC component configurations vary by installing add-in cards that can be required for each board/card in card slots filled) must not exceed the total number of memory. Remove and reinstall the memory module. A flat-head and a Phillips screwdriver are needed to your PC. NOTE: A power supply upgrade may be used to add components to remove, replace, or add an add-in card is the wrong type...

Upgrading and Servicing Guide
Page 30
... add-in card slot. Installing an Add-in Card 1 Align the edge of the PC, replace the bracket cover for the add-in card slots, and then install the screw. 3 Set the chassis upright. 4 Complete the procedures to the card, power supply, keyboard, and monitor. 26 Upgrading and Servicing Guide NOTE: If the new card or device isn't working, read through the card manufacturer's installation instructions and recheck all connections, including those to replace the side panel, and close the PC. The whole connector...
... add-in card slot. Installing an Add-in Card 1 Align the edge of the PC, replace the bracket cover for the add-in card slots, and then install the screw. 3 Set the chassis upright. 4 Complete the procedures to the card, power supply, keyboard, and monitor. 26 Upgrading and Servicing Guide NOTE: If the new card or device isn't working, read through the card manufacturer's installation instructions and recheck all connections, including those to replace the side panel, and close the PC. The whole connector...

Warranty and Support Guide
Page 11
... expand the type of the driver if the new one does not solve your computer and then turn off your computer: 1 Close all open programs and windows. 2 Click the Windows Vista start button. 3 Click the Arrow button next to that can also set restore points manually. You can remain after you turn it adds the new software. When you are experiencing software problems. The sections that follow provide detailed instructions for...
... expand the type of the driver if the new one does not solve your computer and then turn off your computer: 1 Close all open programs and windows. 2 Click the Windows Vista start button. 3 Click the Arrow button next to that can also set restore points manually. You can remain after you turn it adds the new software. When you are experiencing software problems. The sections that follow provide detailed instructions for...

Warranty and Support Guide
Page 14
... devices from the disc slot. When you want to keep . 1 Turn off . 4 Disconnect all peripheral devices, and turn on the computer. 6 A window may open, prompting you to choose between running system recovery from the discs or from your hard drive. 7 Choose to run from the recovery discs, and then click Next. 8 In the Welcome to the Recovery Manager window, click the Advanced Options button. 9 Choose Recover your computer to its original factory...
... devices from the disc slot. When you want to keep . 1 Turn off . 4 Disconnect all peripheral devices, and turn on the computer. 6 A window may open, prompting you to choose between running system recovery from the discs or from your hard drive. 7 Choose to run from the recovery discs, and then click Next. 8 In the Welcome to the Recovery Manager window, click the Advanced Options button. 9 Choose Recover your computer to its original factory...

Warranty and Support Guide
Page 19
... for connection to an "IT" power system (an AC distribution system with it is used with a telephone line cord, use only No. 26 AWG or larger telecommunication line cord in order to reduce the risk of fire. • Do not plug a modem or telephone cable into the Network Interface Card (NIC) receptacle. The number you enter to dial may be a remote...
... for connection to an "IT" power system (an AC distribution system with it is used with a telephone line cord, use only No. 26 AWG or larger telecommunication line cord in order to reduce the risk of fire. • Do not plug a modem or telephone cable into the Network Interface Card (NIC) receptacle. The number you enter to dial may be a remote...

Getting Started
Page 25
... device should be listed here. Go to a network, and then follow onscreen instructions. The WLAN device may vary. Go to: http://hp.com/support and search for the device is not properly installed. 4 Click the Windows Start Button on the taskbar. 5 Type Network and Sharing Center into the Start Search box, and then click Device Manager to open area. Checking the wireless LAN device installation To set up a wireless network into the wireless LAN connector on the taskbar. 2 Type Device Manager...
... device should be listed here. Go to a network, and then follow onscreen instructions. The WLAN device may vary. Go to: http://hp.com/support and search for the device is not properly installed. 4 Click the Windows Start Button on the taskbar. 5 Type Network and Sharing Center into the Start Search box, and then click Device Manager to open area. Checking the wireless LAN device installation To set up a wireless network into the wireless LAN connector on the taskbar. 2 Type Device Manager...
Getting Started
Page 54
and then goes to make repairs, install new hardware or cards in the computer chassis, or change a battery. During Sleep mode, the computer hardware light remains on, and the computer is available. Hibernate mode saves the system memory to a temporary file on the hard disk and then turns off the display and mutes the audio, but otherwise keeps the computer operational. During Away mode, the computer can set the power management timers to put it...
and then goes to make repairs, install new hardware or cards in the computer chassis, or change a battery. During Sleep mode, the computer hardware light remains on, and the computer is available. Hibernate mode saves the system memory to a temporary file on the hard disk and then turns off the display and mutes the audio, but otherwise keeps the computer operational. During Away mode, the computer can set the power management timers to put it...

Getting Started
Page 59
... user is allowed to install or run some drawbacks. Setting Up User Accounts User accounts enable you can set the privileges for certain users Drawbacks to multiple user accounts: More memory (RAM) usage Multiple Temporary Internet Files folders to remove during Disk Cleanup More data to back up Longer time to password-protected files, folders, and settings. For example, you to set the software programs that are compatible with Windows Vista...
... user is allowed to install or run some drawbacks. Setting Up User Accounts User accounts enable you can set the privileges for certain users Drawbacks to multiple user accounts: More memory (RAM) usage Multiple Temporary Internet Files folders to remove during Disk Cleanup More data to back up Longer time to password-protected files, folders, and settings. For example, you to set the software programs that are compatible with Windows Vista...

Getting Started
Page 60
... guess. Because passwords are not displayed as deterrents, but difficult for you want to control access to record each password you choose to secure the computer information. Firewall software. Computer risk Security feature Unauthorized use of the computer User password or user account Computer viruses Norton Internet Security software (antivirus program) Unauthorized access to data Norton Internet Security software (firewall program) Windows Vista updates Unauthorized access to Setup Utility, BIOS settings, and other...
... guess. Because passwords are not displayed as deterrents, but difficult for you want to control access to record each password you choose to secure the computer information. Firewall software. Computer risk Security feature Unauthorized use of the computer User password or user account Computer viruses Norton Internet Security software (antivirus program) Unauthorized access to data Norton Internet Security software (firewall program) Windows Vista updates Unauthorized access to Setup Utility, BIOS settings, and other...

Getting Started
Page 63
... connected to your system. Download updates but let me choose whether to install these updates. HP recommends that you run Windows Vista Update monthly to download and install them Check for updates but let me choose whether to install them Never check for download is not recommended. 7 Click OK. To configure Automatic Updates: 1 Click the Windows Start Button on the taskbar. 2 Click Control Panel. 3 Click Security. 4 Click Windows Update. 5 Click Change settings. 6 Select the desired configuration: Install updates...
... connected to your system. Download updates but let me choose whether to install these updates. HP recommends that you run Windows Vista Update monthly to download and install them Check for updates but let me choose whether to install them Never check for download is not recommended. 7 Click OK. To configure Automatic Updates: 1 Click the Windows Start Button on the taskbar. 2 Click Control Panel. 3 Click Security. 4 Click Windows Update. 5 Click Change settings. 6 Select the desired configuration: Install updates...
Getting Started
Page 86
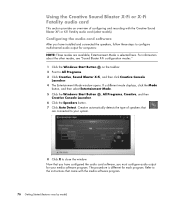
... instructions that came with the Creative Sound Blaster X-Fi or X-Fi Fatality audio card (select models). For information about the other modes, see "Sound Blaster X-Fi configuration modes." 1 Click the Windows Start Button on the taskbar. 2 Point to close the window. Now that you have configured the audio card software, you have installed and connected the speakers, follow these steps to your media software program. Using the Creative Sound Blaster X-Fi or X-Fi Fatality audio card...
... instructions that came with the Creative Sound Blaster X-Fi or X-Fi Fatality audio card (select models). For information about the other modes, see "Sound Blaster X-Fi configuration modes." 1 Click the Windows Start Button on the taskbar. 2 Point to close the window. Now that you have configured the audio card software, you have installed and connected the speakers, follow these steps to your media software program. Using the Creative Sound Blaster X-Fi or X-Fi Fatality audio card...
Getting Started
Page 95
... to Speaker Setup window opens. 5 Click Next. 6 Choose the speaker connection type, and then click Next. 7 Select the number of powered stereo 5.1 or 7.1 speakers to the rear Speaker Out connectors for Windows Media Center: 1 Click the Windows Start Button on the taskbar to open the Realtek HD Audio Manager window. 3 Click the Device Advanced Settings button. 4 Select Make front and rear output devices playback two different audio streams simultaneously. 5 Place a check in the Output Mic In/Line In to rear panel check...
... to Speaker Setup window opens. 5 Click Next. 6 Choose the speaker connection type, and then click Next. 7 Select the number of powered stereo 5.1 or 7.1 speakers to the rear Speaker Out connectors for Windows Media Center: 1 Click the Windows Start Button on the taskbar to open the Realtek HD Audio Manager window. 3 Click the Device Advanced Settings button. 4 Select Make front and rear output devices playback two different audio streams simultaneously. 5 Place a check in the Output Mic In/Line In to rear panel check...

Getting Started
Page 177
... settings listed. DVD to set recording defaults. Radio to block unwanted TV channels and movie ratings, change access code, and reset parental controls. Then, use the arrow keys on the keyboard or the arrow buttons on the remote control to select an option, or follow the onscreen instructions. 5 Select Save to set slide show settings. and select closed captioning). 3 Select a settings category. 4 Select one of your DVDs; The Optimization setting closes and then opens Windows Media Center...
... settings listed. DVD to set recording defaults. Radio to block unwanted TV channels and movie ratings, change access code, and reset parental controls. Then, use the arrow keys on the keyboard or the arrow buttons on the remote control to select an option, or follow the onscreen instructions. 5 Select Save to set slide show settings. and select closed captioning). 3 Select a settings category. 4 Select one of your DVDs; The Optimization setting closes and then opens Windows Media Center...

Getting Started
Page 218
... PowerDirector creating video disc 173 D desktop switching from Windows Media Center 164 devices connecting 10 digital camera connecting 8, 10 digital images 179 digital picture 119, 179 digital video camera connecting to a computer 8 recording videos 173, 195 troubleshooting 9 digital video camera capture 195 208 Getting Started (features vary by model) discs drive compatibility 115 erasing rewritable 170 features and compatibility 116 documentation, onscreen 39 DV camera capture 195 DVD movies changing audio settings 152 language...
... PowerDirector creating video disc 173 D desktop switching from Windows Media Center 164 devices connecting 10 digital camera connecting 8, 10 digital images 179 digital picture 119, 179 digital video camera connecting to a computer 8 recording videos 173, 195 troubleshooting 9 digital video camera capture 195 208 Getting Started (features vary by model) discs drive compatibility 115 erasing rewritable 170 features and compatibility 116 documentation, onscreen 39 DV camera capture 195 DVD movies changing audio settings 152 language...

Getting Started
Page 219
... Media Drive 125 HP Total Care Advisor 41 I IBM Microdrive 122 Internet security 52, 100 K keyboard connector 4 customizing buttons 62 shortcuts 63 types of buttons 57 using 57 L LAN (local area network) 12 antenna 15 checking wireless LAN device 15 connecting Ethernet LAN 5 connecting wireless LAN device 14 setting up 13 using Local Area Network 12 LightScribe, creating a LightScribe disc label 175 local area network (LAN) 12 M magicSpot 198 manuals storing 10 memory card reader 179 card types 119 in-use light 123 troubleshooting 124 using 119 memory card...
... Media Drive 125 HP Total Care Advisor 41 I IBM Microdrive 122 Internet security 52, 100 K keyboard connector 4 customizing buttons 62 shortcuts 63 types of buttons 57 using 57 L LAN (local area network) 12 antenna 15 checking wireless LAN device 15 connecting Ethernet LAN 5 connecting wireless LAN device 14 setting up 13 using Local Area Network 12 LightScribe, creating a LightScribe disc label 175 local area network (LAN) 12 M magicSpot 198 manuals storing 10 memory card reader 179 card types 119 in-use light 123 troubleshooting 124 using 119 memory card...


