End User License Agreement
Page 2
... may not reverse engineer, decompile, or disassemble the Software Product, except and only to the extent that formed the basis for the upgrade. Third Party. You may collect and use of Authenticity. This EULA is automatically terminated. In case of the Software Product, your...drive-based solution, an external media-based recovery solution (e.g. You shall not remove any term or condition of this EULA. 7. After upgrading, you provide in relation to support services related to do so is mandated under applicable law notwithstanding this limitation or it is expressly ...
... may not reverse engineer, decompile, or disassemble the Software Product, except and only to the extent that formed the basis for the upgrade. Third Party. You may collect and use of Authenticity. This EULA is automatically terminated. In case of the Software Product, your...drive-based solution, an external media-based recovery solution (e.g. You shall not remove any term or condition of this EULA. 7. After upgrading, you provide in relation to support services related to do so is mandated under applicable law notwithstanding this limitation or it is expressly ...

Warranty
Page 7
...defective part pursuant to the bench repair. The defective part must ship the defective part back to HP within a defined period of these service upgrades, refer to the HP Web site at : http://www.hp.com/support Pickup and Return Warranty Service Your HP Limited Warranty may include a... customer self repair warranty service. Service Upgrades HP has a range of service upgrades and the cost for the appropriate unit packaging to protect unit from your location, repair it, and return it is the ...
...defective part pursuant to the bench repair. The defective part must ship the defective part back to HP within a defined period of these service upgrades, refer to the HP Web site at : http://www.hp.com/support Pickup and Return Warranty Service Your HP Limited Warranty may include a... customer self repair warranty service. Service Upgrades HP has a range of service upgrades and the cost for the appropriate unit packaging to protect unit from your location, repair it, and return it is the ...

Warranty
Page 11
...Software Product that personally identifies you may not rent, lease or lend the Software Product or use the Software Product for the upgrade. After upgrading, you except to the extent necessary to the Software Product. TRANSFER. The initial user of a conflict between such terms, ...identification, copyright notices or proprietary restrictions from the Software Product. 6. You may make a one-time transfer of the Software Product, your upgrade eligibility. 3. CONSENT TO USE OF DATA. HP agrees not to another end user. Any transfer must agree to all component parts, media...
...Software Product that personally identifies you may not rent, lease or lend the Software Product or use the Software Product for the upgrade. After upgrading, you except to the extent necessary to the Software Product. TRANSFER. The initial user of a conflict between such terms, ...identification, copyright notices or proprietary restrictions from the Software Product. 6. You may make a one-time transfer of the Software Product, your upgrade eligibility. 3. CONSENT TO USE OF DATA. HP agrees not to another end user. Any transfer must agree to all component parts, media...
Warranty
Page 20
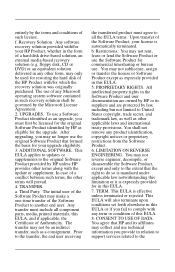
... DVD drives contain a laser system and are inside the power supply and modem of controls, adjustments, or performance procedures other than those specified in the Upgrading and Servicing Guide may result in hazardous radiation exposure. Department of Health and Human Services (DHHS) Radiation Performance standard according to the Radiation Control for...
... DVD drives contain a laser system and are inside the power supply and modem of controls, adjustments, or performance procedures other than those specified in the Upgrading and Servicing Guide may result in hazardous radiation exposure. Department of Health and Human Services (DHHS) Radiation Performance standard according to the Radiation Control for...

Warranty
Page 23
... 2 Republic of Ireland Hewlett-Packard Ireland Ltd. 30 Herbert Street IRL - Berks RG12 1HN Protect Your Investment If available in your country/region, you can upgrade your standard factory warranty for an additional two years by purchasing an HP warranty extension. For more information, please visit our Web site at: Ireland...
... 2 Republic of Ireland Hewlett-Packard Ireland Ltd. 30 Herbert Street IRL - Berks RG12 1HN Protect Your Investment If available in your country/region, you can upgrade your standard factory warranty for an additional two years by purchasing an HP warranty extension. For more information, please visit our Web site at: Ireland...

Upgrading and Servicing Guide
Page 5
Upgrading and Servicing Guide Safety Information This product has not been evaluated for connection to an "IT" power system (an AC distribution system with no direct connection to the earth, according to the electrical power system. The Upgrading and Servicing Guide provides instructions on how to remove and replace hardware components of your system to IEC 60950). WARNING: Please read "Safety Information" in the Warranty and Support Guide before installing and connecting your PC. Opening and Closing the PC Upgrading and Servicing Guide 1
Upgrading and Servicing Guide Safety Information This product has not been evaluated for connection to an "IT" power system (an AC distribution system with no direct connection to the earth, according to the electrical power system. The Upgrading and Servicing Guide provides instructions on how to remove and replace hardware components of your system to IEC 60950). WARNING: Please read "Safety Information" in the Warranty and Support Guide before installing and connecting your PC. Opening and Closing the PC Upgrading and Servicing Guide 1

Upgrading and Servicing Guide
Page 6
Read the following items before attempting to upgrade or service the PC: 1 These procedures assume familiarity with the general terminology associated with personal computers and with the safety practices and regulatory compliance required for using and modifying ... equipment damage, always follow this procedure in this information than to open the PC or do so before removing the front and side panels of the PC. Preparing the PC Before you upgrade any component in your PC, you need to prepare the PC so that you are discharged of static electricity by briefly touching a grounded...
Read the following items before attempting to upgrade or service the PC: 1 These procedures assume familiarity with the general terminology associated with personal computers and with the safety practices and regulatory compliance required for using and modifying ... equipment damage, always follow this procedure in this information than to open the PC or do so before removing the front and side panels of the PC. Preparing the PC Before you upgrade any component in your PC, you need to prepare the PC so that you are discharged of static electricity by briefly touching a grounded...

Upgrading and Servicing Guide
Page 7
... need to use a screwdriver the first time you installed an add-in this order after closing the PC: 1 Reconnect the power cord. Removing the Side Panel 1 See "Before Opening the PC" on the PC and all other cables (such as the monitor. 5 If you loosen the screw. WARNING: Beware...the side panel to pull and slide the panel back about 1 inch (2.5 centimeters), and then lift it off the chassis. Upgrading and Servicing Guide 3 After Closing the PC To avoid injury and equipment damage, always follow this procedure in card, install any software drivers supplied by the card manufacturer. ...
... need to use a screwdriver the first time you installed an add-in this order after closing the PC: 1 Reconnect the power cord. Removing the Side Panel 1 See "Before Opening the PC" on the PC and all other cables (such as the monitor. 5 If you loosen the screw. WARNING: Beware...the side panel to pull and slide the panel back about 1 inch (2.5 centimeters), and then lift it off the chassis. Upgrading and Servicing Guide 3 After Closing the PC To avoid injury and equipment damage, always follow this procedure in card, install any software drivers supplied by the card manufacturer. ...

Upgrading and Servicing Guide
Page 8
Replacing the Side Panel 1 Align the tabs at the bottom of the side panel to the ridge on the chassis and slide it toward the front of the chassis. Place the side panel in the proper position on the bottom of the chassis when the side panel is attached properly. 2 Ensure that the hole for the thumbscrew aligns with the hole in the chassis, and then replace the thumbscrew (A). 3 See "After Closing the PC" on page 3. 4 Upgrading and Servicing Guide A NOTE: There is a 3mm gap between the top of the side panel and the top of the chassis.
Replacing the Side Panel 1 Align the tabs at the bottom of the side panel to the ridge on the chassis and slide it toward the front of the chassis. Place the side panel in the proper position on the bottom of the chassis when the side panel is attached properly. 2 Ensure that the hole for the thumbscrew aligns with the hole in the chassis, and then replace the thumbscrew (A). 3 See "After Closing the PC" on page 3. 4 Upgrading and Servicing Guide A NOTE: There is a 3mm gap between the top of the side panel and the top of the chassis.
Upgrading and Servicing Guide
Page 9
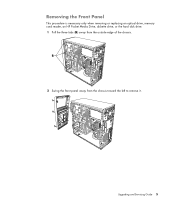
B 2 Swing the front panel away from the outside edge of the chassis. Upgrading and Servicing Guide 5 Removing the Front Panel This procedure is necessary only when removing or replacing an optical drive, memory card reader, an HP Pocket Media Drive, diskette drive, or the hard disk drive. 1 Pull the three tabs (B) away from the chassis toward the left to remove it.
B 2 Swing the front panel away from the outside edge of the chassis. Upgrading and Servicing Guide 5 Removing the Front Panel This procedure is necessary only when removing or replacing an optical drive, memory card reader, an HP Pocket Media Drive, diskette drive, or the hard disk drive. 1 Pull the three tabs (B) away from the chassis toward the left to remove it.

Upgrading and Servicing Guide
Page 10
Replacing the Front Panel 1 Align and insert the three hooks on the left side of the front panel with the holes on the left side of the chassis. 2 Swing the front panel around and press the three hooks on the right side of the front panel into the three holes on the right side of the chassis until the panel snaps into place. 6 Upgrading and Servicing Guide
Replacing the Front Panel 1 Align and insert the three hooks on the left side of the front panel with the holes on the left side of the chassis. 2 Swing the front panel around and press the three hooks on the right side of the front panel into the three holes on the right side of the chassis until the panel snaps into place. 6 Upgrading and Servicing Guide
Upgrading and Servicing Guide
Page 11
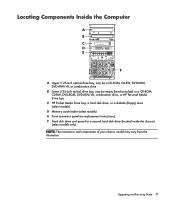
Upgrading and Servicing Guide 7 Locating Components Inside the Computer A B C D E F A Upper 5.25-inch optical drive bay, may be a CD-ROM, CD-RW, DVD-ROM, DVD+RW/+R, or ...
Upgrading and Servicing Guide 7 Locating Components Inside the Computer A B C D E F A Upper 5.25-inch optical drive bay, may be a CD-ROM, CD-RW, DVD-ROM, DVD+RW/+R, or ...

Upgrading and Servicing Guide
Page 12
... and to an external storage device, such as a CD, before removing the hard disk drive. Failure to do so will result in the chassis.) 8 Upgrading and Servicing Guide IMPORTANT: Before adding a new optical drive, make sure you need to run System Recovery using the recovery discs to work with the... files. See the preceding topic, "Locating Components Inside the Computer" on the hard disk drive to remove the front panel. You can replace or upgrade. Removing and Replacing Drives Your PC has several drives that came with your personal files on page 7 for drive type and location.
... and to an external storage device, such as a CD, before removing the hard disk drive. Failure to do so will result in the chassis.) 8 Upgrading and Servicing Guide IMPORTANT: Before adding a new optical drive, make sure you need to run System Recovery using the recovery discs to work with the... files. See the preceding topic, "Locating Components Inside the Computer" on the hard disk drive to remove the front panel. You can replace or upgrade. Removing and Replacing Drives Your PC has several drives that came with your personal files on page 7 for drive type and location.

Upgrading and Servicing Guide
Page 13
... plate out of the front cover. To do so, insert a flat screwdriver into the knockout plate slot (A) and rotate the screwdriver to free the plug. A B Upgrading and Servicing Guide 9 For Serial ATA hard disk drive cables, press the latch (select models only) in the center of each plug, and pull the...
... plate out of the front cover. To do so, insert a flat screwdriver into the knockout plate slot (A) and rotate the screwdriver to free the plug. A B Upgrading and Servicing Guide 9 For Serial ATA hard disk drive cables, press the latch (select models only) in the center of each plug, and pull the...

Upgrading and Servicing Guide
Page 14
... latch drive brackets secure the drives in their respective positions in the CS (Cable Select) position. If the data cable is not connected correctly, the PC is in the chassis.) 6 Connect the power and data cables from the back of the optical drive you want to add. Your drive may be... lost. 10 Upgrading and Servicing Guide Reconnect the sound cable, if present. CS SL MA Cable Select jumper 5 Release the drive bay by pulling the latch out away...
... latch drive brackets secure the drives in their respective positions in the CS (Cable Select) position. If the data cable is not connected correctly, the PC is in the chassis.) 6 Connect the power and data cables from the back of the optical drive you want to add. Your drive may be... lost. 10 Upgrading and Servicing Guide Reconnect the sound cable, if present. CS SL MA Cable Select jumper 5 Release the drive bay by pulling the latch out away...

Upgrading and Servicing Guide
Page 15
... page 1. 2 Release the HP Pocket Media or diskette (floppy), or hard disk drive, by removing the two screws on page 1. Upgrading and Servicing Guide 11 See "Opening and Closing the PC" on the side of the drive, and then slide the drive part way out of the front of the chassis until...
... page 1. 2 Release the HP Pocket Media or diskette (floppy), or hard disk drive, by removing the two screws on page 1. Upgrading and Servicing Guide 11 See "Opening and Closing the PC" on the side of the drive, and then slide the drive part way out of the front of the chassis until...

Upgrading and Servicing Guide
Page 16
3 Disconnect the power and data cables from the back of the chassis. 12 Upgrading and Servicing Guide MASTER SLAVE To CPU 4 Pull the drive out through the front of the drive by squeezing the two latches and pulling the cable.
3 Disconnect the power and data cables from the back of the chassis. 12 Upgrading and Servicing Guide MASTER SLAVE To CPU 4 Pull the drive out through the front of the drive by squeezing the two latches and pulling the cable.

Upgrading and Servicing Guide
Page 17
Upgrading and Servicing Guide 13 For a hard disk drive, make sure to insert the screw into the holes labeled HDD. For the HP Pocket Media and ...
Upgrading and Servicing Guide 13 For a hard disk drive, make sure to insert the screw into the holes labeled HDD. For the HP Pocket Media and ...

Upgrading and Servicing Guide
Page 18
See "Opening and Closing the PC" on page 1. 14 Upgrading and Servicing Guide Connect to the PC motherboard. 5 Complete the procedures to a primary hard disk drive. B - C - Connect to replace the front panel, replace the side panel, and close the PC. Connect to the back of the HP Pocket Media, diskette (floppy), or hard disk drive. 4 Connect the power and data cables to a secondary hard disk drive (select models only). A B MASTER C SLAVE To CPU A -
See "Opening and Closing the PC" on page 1. 14 Upgrading and Servicing Guide Connect to the PC motherboard. 5 Complete the procedures to a primary hard disk drive. B - C - Connect to replace the front panel, replace the side panel, and close the PC. Connect to the back of the HP Pocket Media, diskette (floppy), or hard disk drive. 4 Connect the power and data cables to a secondary hard disk drive (select models only). A B MASTER C SLAVE To CPU A -

Upgrading and Servicing Guide
Page 19
See "Opening and Closing the PC" on page 1. 2 Release the drive by removing the screw on the right side of the chassis. Removing the Memory Card Reader 1 Complete the procedures to prepare the PC to remove the side panel and to loosen it, and then pulling the memory card reader part way out of the front of the chassis. 3 Disconnect the cable from the back of the memory card reader. 4 Pull the memory card reader out of the front of the memory card reader, sliding the reader to the left to remove the front panel. Upgrading and Servicing Guide 15
See "Opening and Closing the PC" on page 1. 2 Release the drive by removing the screw on the right side of the chassis. Removing the Memory Card Reader 1 Complete the procedures to prepare the PC to remove the side panel and to loosen it, and then pulling the memory card reader part way out of the front of the chassis. 3 Disconnect the cable from the back of the memory card reader. 4 Pull the memory card reader out of the front of the memory card reader, sliding the reader to the left to remove the front panel. Upgrading and Servicing Guide 15


