

Hard Drive White Paper
Page 5
... articles for any errors, bad sectors and/or recovery of readable information. HP Recommendations for Notebook Users • Install HP Notebook LidSwitch Policy, or as an alternative, place the notebook into Standby mode before transporting it from one location to another. • Upgrade to the latest system BIOS, as given in the "F10 Setup Hard Drive Self-Test" section. • Whenever possible, adjust power management settings (power schemes) in...
... articles for any errors, bad sectors and/or recovery of readable information. HP Recommendations for Notebook Users • Install HP Notebook LidSwitch Policy, or as an alternative, place the notebook into Standby mode before transporting it from one location to another. • Upgrade to the latest system BIOS, as given in the "F10 Setup Hard Drive Self-Test" section. • Whenever possible, adjust power management settings (power schemes) in...

Limited Warranty and Technical Support
Page 5
... for the fastest time to drivers and product documentation: Find original product drivers, latest updates and software fixes, Limited Warranty information, and product documentation. „ Open an online service event with your local HP Technical Support Center (see Worldwide Phone Numbers booklet). HP pays shipping costs. Applicable error messages - If your portable computer needs a hardware repair that is covered under warranty, then HP will...
... for the fastest time to drivers and product documentation: Find original product drivers, latest updates and software fixes, Limited Warranty information, and product documentation. „ Open an online service event with your local HP Technical Support Center (see Worldwide Phone Numbers booklet). HP pays shipping costs. Applicable error messages - If your portable computer needs a hardware repair that is covered under warranty, then HP will...

WLAN solutions for HP enterprise notebooks and Tablet PCs
Page 4
... IT management by allowing Windows® Domain credentials to make wireless networks as secure as wired LANs. Collectively, these features are addressing business customer needs for better protection against unauthorized PC access, as well as stronger protection for the security and simplified management of user credentials by minimizing technology transitions. WLAN driver and client software that are compatible across multiple notebooks and WLAN adapters...
... IT management by allowing Windows® Domain credentials to make wireless networks as secure as wired LANs. Collectively, these features are addressing business customer needs for better protection against unauthorized PC access, as well as stronger protection for the security and simplified management of user credentials by minimizing technology transitions. WLAN driver and client software that are compatible across multiple notebooks and WLAN adapters...

HP ProtectTools Security Manager
Page 6
... accessing the hard drive if it is physically removed from within the HP ProtectTools Security Manager creates an integrated security solution and enables authorized users to control every aspect of other than the primary hard drive Table 2 - Table 3 - however, by allowing the user to use alternative to the pre-boot BIOS configuration utility known as Smart Cards, Power-on select platforms. Refer to the computer by preventing access to platform specific specifications...
... accessing the hard drive if it is physically removed from within the HP ProtectTools Security Manager creates an integrated security solution and enables authorized users to control every aspect of other than the primary hard drive Table 2 - Table 3 - however, by allowing the user to use alternative to the pre-boot BIOS configuration utility known as Smart Cards, Power-on select platforms. Refer to the computer by preventing access to platform specific specifications...

Wireless Security
Page 8
... using HTTPS. Reverse proxy passes http traffic back and forth across the firewall from the device to be tightly integrated and will be the optimal encryption for notebooks accessing wireless and mobile networks. This is all applications - Microsoft Exchange Server supports access to their corporate networks. This has a huge impact on mobility in terms of reverse proxy to enable synchronization of memory and CPU...
... using HTTPS. Reverse proxy passes http traffic back and forth across the firewall from the device to be tightly integrated and will be the optimal encryption for notebooks accessing wireless and mobile networks. This is all applications - Microsoft Exchange Server supports access to their corporate networks. This has a huge impact on mobility in terms of reverse proxy to enable synchronization of memory and CPU...

Hardware Guide
Page 32
... system hardware components and software version numbers. Using Hotkeys and Shortcut Keys with External Keyboards The following table describes how certain hotkeys and shortcut keys can be used on external keyboards: Notebook keys External keyboard keys fn+esc fn+f8 scroll lock+scroll lock+esc scroll lock+scroll lock+f8 Hardware Guide 2-9 Pointing Devices and Keyboard Displaying System Information (fn+esc) Press fn+esc to remove the system information from the screen. ✎ The system BIOS date is the version number of the system ROM. The BIOS...
... system hardware components and software version numbers. Using Hotkeys and Shortcut Keys with External Keyboards The following table describes how certain hotkeys and shortcut keys can be used on external keyboards: Notebook keys External keyboard keys fn+esc fn+f8 scroll lock+scroll lock+esc scroll lock+scroll lock+f8 Hardware Guide 2-9 Pointing Devices and Keyboard Displaying System Information (fn+esc) Press fn+esc to remove the system information from the screen. ✎ The system BIOS date is the version number of the system ROM. The BIOS...

Hardware Guide
Page 52
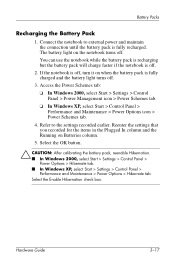
... battery charge displays seem inaccurate. ■ When you must fully charge, fully discharge, then fully recharge the battery pack. How to external power until the battery pack is not necessary to calibrate a battery pack. Leave the notebook connected to Calibrate To calibrate a battery pack, you observe a significant change in use . When to an AC outlet or an optional Automobile Power Adapter/Charger. Charging the Battery Pack Battery packs can charge whether...
... battery charge displays seem inaccurate. ■ When you must fully charge, fully discharge, then fully recharge the battery pack. How to external power until the battery pack is not necessary to calibrate a battery pack. Leave the notebook connected to Calibrate To calibrate a battery pack, you observe a significant change in use . When to an AC outlet or an optional Automobile Power Adapter/Charger. Charging the Battery Pack Battery packs can charge whether...
Hardware Guide
Page 55
... notebook is fully charged and the battery light turns off. 3. Refer to external power and maintain the connection until the battery pack is off, turn it on Batteries column. 5. Select the Enable Hibernation check box. Select the OK button. Ä CAUTION: After calibrating the battery pack, reenable Hibernation. ■ In Windows 2000, select Start > Settings > Control Panel > Power Options > Hibernate tab. ■ In Windows XP, select Start > Settings > Control Panel > Performance and Maintenance > Power Options > Hibernate tab. Hardware Guide 3-17 Access the Power...
... notebook is fully charged and the battery light turns off. 3. Refer to external power and maintain the connection until the battery pack is off, turn it on Batteries column. 5. Select the Enable Hibernation check box. Select the OK button. Ä CAUTION: After calibrating the battery pack, reenable Hibernation. ■ In Windows 2000, select Start > Settings > Control Panel > Power Options > Hibernate tab. ■ In Windows XP, select Start > Settings > Control Panel > Performance and Maintenance > Power Options > Hibernate tab. Hardware Guide 3-17 Access the Power...

Hardware Guide
Page 56
... Power as You Work To conserve power as you use the volume buttons to raise and lower system volume. ■ Turn off a device connected to adjust screen brightness. ■ Use optional powered speakers instead of the internal speakers, or use the notebook: ■ Turn off wireless and local area network (LAN) connections and exit modem applications when you are not using them. ■ Disconnect external devices you are not using that a battery pack can run the notebook from a single charge. Battery Packs Battery...
... Power as You Work To conserve power as you use the volume buttons to raise and lower system volume. ■ Turn off a device connected to adjust screen brightness. ■ Use optional powered speakers instead of the internal speakers, or use the notebook: ■ Turn off wireless and local area network (LAN) connections and exit modem applications when you are not using them. ■ Disconnect external devices you are not using that a battery pack can run the notebook from a single charge. Battery Packs Battery...

Hardware Guide
Page 92
... to a USB connector on the notebook during startup or in the same way as a comparable non-USB device, with the device. Turn on the notebook or to other USB devices. Select Advanced menu > Device Options. 4. Select Enable USB legacy support. 5. Powered hubs must enable USB legacy support to use a USB keyboard, mouse, or hub connected to external power. Enabling USB Legacy Support You must be connected either to a USB connector on or restart the notebook. 2. A USB device functions in a non-Windows application or utility. Hardware Guide 7-3 Some USB devices may...
... to a USB connector on the notebook during startup or in the same way as a comparable non-USB device, with the device. Turn on the notebook or to other USB devices. Select Advanced menu > Device Options. 4. Select Enable USB legacy support. 5. Powered hubs must enable USB legacy support to use a USB keyboard, mouse, or hub connected to external power. Enabling USB Legacy Support You must be connected either to a USB connector on or restart the notebook. 2. A USB device functions in a non-Windows application or utility. Hardware Guide 7-3 Some USB devices may...

Hardware Guide
Page 111
... Card eject 8-3 pointing stick 2-1 power 1-2 Presentation Mode 2-11 Quick Launch 1-2, 2-10 Quick Lock 2-10 TouchPad 1-1, 2-1 volume 1-11, 5-3 Wireless On/Off 2-11 C cable lock, connecting 7-5 cable(s) modem 6-1, 6-2 network 6-4 security 7-5 calibration, battery 3-14 camcorder 5-4 cap, replacing pointing stick 2-3 caps lock light 1-5 CD displaying contents of 4-12 inserting 4-9 removing 4-10, 4-11 CD drive inserting CD into 4-9 inserting into MultiBay 4-17 locations supported 4-3 removing CD 4-10, 4-11 See also drives charge sequence 3-8 compartments, primary memory 1-4 Computer Setup enabling...
... Card eject 8-3 pointing stick 2-1 power 1-2 Presentation Mode 2-11 Quick Launch 1-2, 2-10 Quick Lock 2-10 TouchPad 1-1, 2-1 volume 1-11, 5-3 Wireless On/Off 2-11 C cable lock, connecting 7-5 cable(s) modem 6-1, 6-2 network 6-4 security 7-5 calibration, battery 3-14 camcorder 5-4 cap, replacing pointing stick 2-3 caps lock light 1-5 CD displaying contents of 4-12 inserting 4-9 removing 4-10, 4-11 CD drive inserting CD into 4-9 inserting into MultiBay 4-17 locations supported 4-3 removing CD 4-10, 4-11 See also drives charge sequence 3-8 compartments, primary memory 1-4 Computer Setup enabling...

Software Guide
Page 41
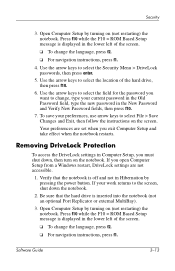
... enter. 5. Select the location of the hard drive, then press f10. 6. Software Guide 3-11 If you open Computer Setup from a Windows restart, DriveLock settings are not accessible. 1. Toggle the Protection field to the screen, shut down , then turn on (not restarting) the notebook. Open Computer Setup by pressing the power button. To continue, press f10. 8. Use the arrow keys to the notebook and the hard drive, shut down the notebook before inserting or removing a primary hard drive...
... enter. 5. Select the location of the hard drive, then press f10. 6. Software Guide 3-11 If you open Computer Setup from a Windows restart, DriveLock settings are not accessible. 1. Toggle the Protection field to the screen, shut down , then turn on (not restarting) the notebook. Open Computer Setup by pressing the power button. To continue, press f10. 8. Use the arrow keys to the notebook and the hard drive, shut down the notebook before inserting or removing a primary hard drive...
Software Guide
Page 43
... work returns to select File > Save Changes and Exit, then follow the instructions on the notebook. Software Guide 3-13 Open Computer Setup by turning on (not restarting) the notebook. Removing DriveLock Protection To access the DriveLock settings in the lower left of the hard drive, then press f10. 6. To save your current password in the Old Password field, type the new password in Hibernation by pressing the power button. Use the arrow keys to change...
... work returns to select File > Save Changes and Exit, then follow the instructions on the notebook. Software Guide 3-13 Open Computer Setup by turning on (not restarting) the notebook. Removing DriveLock Protection To access the DriveLock settings in the lower left of the hard drive, then press f10. 6. To save your current password in the Old Password field, type the new password in Hibernation by pressing the power button. Use the arrow keys to change...

Software Guide
Page 70
... CD-ROM drive becomes drive C, and the hard drive in drives inserted into a Port Replicator, select Enable USB legacy support. ❏ To enable a NIC, select Internal Network adapter boot. 3. In the default boot sequence, the optical drive comes before the diskette drive. To save your preferences and exit Computer Setup, use the arrow keys to boot the diskette drive. Understanding MultiBoot Results Before changing the startup sequence, consider the following: ■ When the notebook restarts after the boot order...
... CD-ROM drive becomes drive C, and the hard drive in drives inserted into a Port Replicator, select Enable USB legacy support. ❏ To enable a NIC, select Internal Network adapter boot. 3. In the default boot sequence, the optical drive comes before the diskette drive. To save your preferences and exit Computer Setup, use the arrow keys to boot the diskette drive. Understanding MultiBoot Results Before changing the startup sequence, consider the following: ■ When the notebook restarts after the boot order...

Startup Guide
Page 9
... the End User License Agreement, you must complete the entire process without interruption. Startup Guide 1-5 The languages you do not choose are deleted from the electrical outlet. ■ Do not shut down the notebook. ■ Do not remove or insert a drive. ■ After you begin the software setup, you are prompted to charge, and the battery light turns on. (The battery light remains on...
... the End User License Agreement, you must complete the entire process without interruption. Startup Guide 1-5 The languages you do not choose are deleted from the electrical outlet. ■ Do not shut down the notebook. ■ Do not remove or insert a drive. ■ After you begin the software setup, you are prompted to charge, and the battery light turns on. (The battery light remains on...

Startup Guide
Page 12
... LAN Select notebooks contain wireless LAN devices. The utility that supports your notebook, for wireless connections. Using Wireless LAN Utilities in your operating system. The WLAN utility provided by HP on the notebook. Refer to see more items on your screen or to the Wireless LAN Utility Installation Instructions, provided with your notebook, for help installing the utility. 1-8 Startup Guide Hardware and Software Setup Selecting Screen Settings If you would like to see the items on your screen displayed larger, change the screen resolution setting in Windows 2000 Windows...
... LAN Select notebooks contain wireless LAN devices. The utility that supports your notebook, for wireless connections. Using Wireless LAN Utilities in your operating system. The WLAN utility provided by HP on the notebook. Refer to see more items on your screen or to the Wireless LAN Utility Installation Instructions, provided with your notebook, for help installing the utility. 1-8 Startup Guide Hardware and Software Setup Selecting Screen Settings If you would like to see the items on your screen displayed larger, change the screen resolution setting in Windows 2000 Windows...

Startup Guide
Page 14
... the onscreen instructions. ■ In Windows XP, select Start > All Programs > Software Setup, select the Bluetooth utility from the list of applications, then follow the onscreen instructions. Select OK. For more information on the notebook. The Windows automatic wireless network configuration utility is disabled until you must install it again. The utility that operates your wireless device. Once the Windows utility has been disabled, refer to the Bluetooth by HP Getting Started Guide and the Bluetooth User's Guide. 1-10 Startup Guide Hardware and Software Setup 3.
... the onscreen instructions. ■ In Windows XP, select Start > All Programs > Software Setup, select the Bluetooth utility from the list of applications, then follow the onscreen instructions. Select OK. For more information on the notebook. The Windows automatic wireless network configuration utility is disabled until you must install it again. The utility that operates your wireless device. Once the Windows utility has been disabled, refer to the Bluetooth by HP Getting Started Guide and the Bluetooth User's Guide. 1-10 Startup Guide Hardware and Software Setup 3.
HP Compaq nc8000 Business PC, HP Compaq nw8000 Mobile Workstation - Maintenance and Service Guide
Page 8
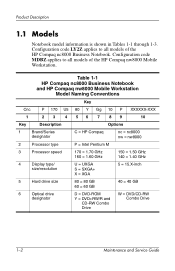
... = 1.40 GHz 4 Display type/ size/resolution U = UXGA S = SXGA+ X = XGA 5 = 15.X-inch 5 Hard drive size 80 = 80 GB 60 = 60 GB 40 = 40 GB 6 Optical drive designator D = DVD-ROM Y = DVD+RW/R and CD-RW Combo Drive W = DVD/CD-RW Combo Drive 1-2 Maintenance and Service Guide Configuration code LY2Z applies to all models of the HP Compaq nw8000 Mobile Workstation. Configuration code MDBZ applies to all models of the HP Compaq nc8000 Business Notebook. Product Description 1.1 Models Notebook model information is...
... = 1.40 GHz 4 Display type/ size/resolution U = UXGA S = SXGA+ X = XGA 5 = 15.X-inch 5 Hard drive size 80 = 80 GB 60 = 60 GB 40 = 40 GB 6 Optical drive designator D = DVD-ROM Y = DVD+RW/R and CD-RW Combo Drive W = DVD/CD-RW Combo Drive 1-2 Maintenance and Service Guide Configuration code LY2Z applies to all models of the HP Compaq nw8000 Mobile Workstation. Configuration code MDBZ applies to all models of the HP Compaq nc8000 Business Notebook. Product Description 1.1 Models Notebook model information is...
HP Compaq nc8000 Business PC, HP Compaq nw8000 Mobile Workstation - Maintenance and Service Guide
Page 19
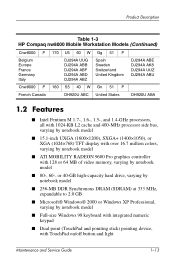
... 40-GB high-capacity hard drive, varying by notebook model ■ 256-MB DDR Synchronous DRAM (SDRAM) at 333 MHz, expandable to 2.0 GB ■ Microsoft® Windows® 2000 or Windows XP Professional, varying by notebook model ■ Full-size Windows 98 keyboard with integrated numeric keypad ■ Dual point (TouchPad and pointing stick) pointing device, with TouchPad on/off button and light Maintenance and Service Guide 1-13
... 40-GB high-capacity hard drive, varying by notebook model ■ 256-MB DDR Synchronous DRAM (SDRAM) at 333 MHz, expandable to 2.0 GB ■ Microsoft® Windows® 2000 or Windows XP Professional, varying by notebook model ■ Full-size Windows 98 keyboard with integrated numeric keypad ■ Dual point (TouchPad and pointing stick) pointing device, with TouchPad on/off button and light Maintenance and Service Guide 1-13

HP Compaq nc8000 Business PC, HP Compaq nw8000 Mobile Workstation - Maintenance and Service Guide
Page 55
Y Port Replicator operating? Power supply 2. Switch box 5. Y Port Replicator operating? Troubleshooting Flowchart 2.8-Nonfunctioning Port Replicator Nonfunctioning Port Replicator. Reseat monitor cable connector at a time. Port Replicator motor mechanism 2-18 Maintenance and Service Guide Check notebook operation after each replacement. 1. Done Reinstall notebook into Port Replicator. Check voltage setting on Port Replicator. Backplane board 4. I/O board 3. Reseat power cord in Port Replicator. N Remove notebook, reseat all internal parts, and replace any damaged...
Y Port Replicator operating? Power supply 2. Switch box 5. Y Port Replicator operating? Troubleshooting Flowchart 2.8-Nonfunctioning Port Replicator Nonfunctioning Port Replicator. Reseat monitor cable connector at a time. Port Replicator motor mechanism 2-18 Maintenance and Service Guide Check notebook operation after each replacement. 1. Done Reinstall notebook into Port Replicator. Check voltage setting on Port Replicator. Backplane board 4. I/O board 3. Reseat power cord in Port Replicator. N Remove notebook, reseat all internal parts, and replace any damaged...


