
Hard Drive White Paper
Page 3
... utility will not invoke Standby on DC power, away from AC power before the display lid is detected in conjunction with his or her notebook. Notebook F10 Setup Hard Drive Self-Test HP has enhanced the Hard Drive Self-Test routine which is operating from the internal battery pack, e.g.,... Web site at any time by selecting Start > Programs > HP Notebook LidSwitch Policy. Refer to DC power. The short and long versions of the tests, the process halts and failure occurs. HP recommends use an external keyboard and monitor, activating Standby upon lid closure in this SoftPaq on AC...
... utility will not invoke Standby on DC power, away from AC power before the display lid is detected in conjunction with his or her notebook. Notebook F10 Setup Hard Drive Self-Test HP has enhanced the Hard Drive Self-Test routine which is operating from the internal battery pack, e.g.,... Web site at any time by selecting Start > Programs > HP Notebook LidSwitch Policy. Refer to DC power. The short and long versions of the tests, the process halts and failure occurs. HP recommends use an external keyboard and monitor, activating Standby upon lid closure in this SoftPaq on AC...

Installing Microsoft Windows XP Service Pack 2 on HP Compaq Business Notebooks
Page 7
...7 Utility for the touchpad device. Enables the integrated video software. System Firmware Enables the Quick Launch Buttons on HP Compaq notebook PCs are listed in silent mode skipping the welcome, license and directory screens. Enables integrated modem devices select models. Descriptions ...hardware-enabling operating system enhancements and fixes. Appendix B: SoftPaqs Unpacking a SoftPaq file Several switches can be used on the internal keyboard. Provides users with a compilation of the software used when unpacking a SoftPaq file. Table 3 SoftPaq descriptions Name Hot Key ...
...7 Utility for the touchpad device. Enables the integrated video software. System Firmware Enables the Quick Launch Buttons on HP Compaq notebook PCs are listed in silent mode skipping the welcome, license and directory screens. Enables integrated modem devices select models. Descriptions ...hardware-enabling operating system enhancements and fixes. Appendix B: SoftPaqs Unpacking a SoftPaq file Several switches can be used on the internal keyboard. Provides users with a compilation of the software used when unpacking a SoftPaq file. Table 3 SoftPaq descriptions Name Hot Key ...

Maintenance and Service Guide
Page 3
... LAN Mini PCI Card 2-7 Removing the Hard Disk Drive...2-9 Recovering the Factory Software...2-11 Replacing Small Parts ...2-12 Removing the Keyboard Cover...2-13 Removing the Speaker Assembly ...2-15 Removing the Keyboard ...2-16 Removing the Switchboard PCA ...2-19 Removing the CD/DVD Drive...2-20 Removing the Display Assembly...2-23 Removing the Top Case...
... LAN Mini PCI Card 2-7 Removing the Hard Disk Drive...2-9 Recovering the Factory Software...2-11 Replacing Small Parts ...2-12 Removing the Keyboard Cover...2-13 Removing the Speaker Assembly ...2-15 Removing the Keyboard ...2-16 Removing the Switchboard PCA ...2-19 Removing the CD/DVD Drive...2-20 Removing the Display Assembly...2-23 Removing the Top Case...

Maintenance and Service Guide
Page 4
Bottom View...1-10 Figure 1-4. Resetting the Notebook ...1-17 Figure 1-8. Removing the Battery ...2-4 Figure 2-3. Removing the Mini PCI Card 2-7 Figure 2-6. Removing the Top Case Screws 2-29 Figure 2-20. Removing the Top Case Screws 2-... Figure 2-21. Removing the Heat Sink (with Fan 2-41 Figure 2-27. AMD CPU Module Release 2-47 Figure 2-30. Replaceable Module Diagram 1-24 Figure 2-1. Removing the Keyboard Cover 2-14 Figure 2-10. Removing the CD/DVD Drive 2-22 Figure 2-17. Removing the Top Case...2-31 Figure 2-22. Intel CPU Module Removal 2-45 Figure...
Bottom View...1-10 Figure 1-4. Resetting the Notebook ...1-17 Figure 1-8. Removing the Battery ...2-4 Figure 2-3. Removing the Mini PCI Card 2-7 Figure 2-6. Removing the Top Case Screws 2-29 Figure 2-20. Removing the Top Case Screws 2-... Figure 2-21. Removing the Heat Sink (with Fan 2-41 Figure 2-27. AMD CPU Module Release 2-47 Figure 2-30. Replaceable Module Diagram 1-24 Figure 2-1. Removing the Keyboard Cover 2-14 Figure 2-10. Removing the CD/DVD Drive 2-22 Figure 2-17. Removing the Top Case...2-31 Figure 2-22. Intel CPU Module Removal 2-45 Figure...

Maintenance and Service Guide
Page 5
...Keys ...1-16 Table 1-6. Functional Structure Description 1-25 Table 2-1. Exploded View ...4-3 Tables Table 1-1. Product Comparisons...1-1 Table 1-2. Keyboard Status Lights...1-15 Table 1-5. Replaceable Parts ...4-4 Table 4-2. Figure 2-36. ASP Support Options...3-2 Table 3-2. Part Number ...Reference...4-12 Table 5-1. Removing the Motherboard 2-56 Figure 2-38. Example of notebook 1-15 Table 1-4. Replacing the Antennas...2-60 Figure 2-37. Removing a PCMCIA Door 2-60 Figure 2-38. Accessories ...1-22...
...Keys ...1-16 Table 1-6. Functional Structure Description 1-25 Table 2-1. Exploded View ...4-3 Tables Table 1-1. Product Comparisons...1-1 Table 1-2. Keyboard Status Lights...1-15 Table 1-5. Replaceable Parts ...4-4 Table 4-2. Figure 2-36. ASP Support Options...3-2 Table 3-2. Part Number ...Reference...4-12 Table 5-1. Removing the Motherboard 2-56 Figure 2-38. Example of notebook 1-15 Table 1-4. Replacing the Antennas...2-60 Figure 2-37. Removing a PCMCIA Door 2-60 Figure 2-38. Accessories ...1-22...

Maintenance and Service Guide
Page 14
.../2 mouse port (supports Y adapter) * on -off button and indicator light* 10. Notebook open/close latch 2. Battery 11. Keyboard status lights 4. Front View HP Pavilion ze4x00, HP Compaq nx9005 and nx9000, Compaq Evo Notebook N1050v and N1010v, and Compaq Presario 2100 and 1100 1. Features The following illustrations show the notebook's main external features. For an exploded view of the...
.../2 mouse port (supports Y adapter) * on -off button and indicator light* 10. Notebook open/close latch 2. Battery 11. Keyboard status lights 4. Front View HP Pavilion ze4x00, HP Compaq nx9005 and nx9000, Compaq Evo Notebook N1050v and N1010v, and Compaq Presario 2100 and 1100 1. Features The following illustrations show the notebook's main external features. For an exploded view of the...

Maintenance and Service Guide
Page 17
...and audio out (headphones) 13. Power button, turns the notebook on -off 5. Audio mute button and audio mute light* 10. Front View HP Pavilion ze5x00, HP Compaq nx9010 and nx9008, and Compaq Presario 2500 1. Touch pad, scroll pad, Select buttons, ...plus on and off button 6. Wireless on certain models Service Manual Product Information 1-11 One-touch buttons 3. Keyboard status lights 4. Universal Serial Bus (USB) port * on -off button and indicator light* 9. Figure 1-4. Notebook...
...and audio out (headphones) 13. Power button, turns the notebook on -off 5. Audio mute button and audio mute light* 10. Front View HP Pavilion ze5x00, HP Compaq nx9010 and nx9008, and Compaq Presario 2500 1. Touch pad, scroll pad, Select buttons, ...plus on and off button 6. Wireless on certain models Service Manual Product Information 1-11 One-touch buttons 3. Keyboard status lights 4. Universal Serial Bus (USB) port * on -off button and indicator light* 9. Figure 1-4. Notebook...

Maintenance and Service Guide
Page 18
Figure 1-5. S-Video port* 22. Kensington lock cable slot (security connector) 23. Modem port* 24. IEEE 1394 port* 25. LAN port* 18. External monitor port 21. PCMCIA card and CardBus slot and button 26. AC adapter jack 16. Two universal Serial Bus (USB) ports 17. Floppy drive* * on certain models 1-12 Product Information Service Manual Back View HP Pavilion 5x00, HP Compaq nx9010, and nx9008 and Compaq Presario 2500 15. Parallel port (LPT1), use this port for a parallel printer or other parallel device 20. External keyboard/mouse port 19.
Figure 1-5. S-Video port* 22. Kensington lock cable slot (security connector) 23. Modem port* 24. IEEE 1394 port* 25. LAN port* 18. External monitor port 21. PCMCIA card and CardBus slot and button 26. AC adapter jack 16. Two universal Serial Bus (USB) ports 17. Floppy drive* * on certain models 1-12 Product Information Service Manual Back View HP Pavilion 5x00, HP Compaq nx9010, and nx9008 and Compaq Presario 2500 15. Parallel port (LPT1), use this port for a parallel printer or other parallel device 20. External keyboard/mouse port 19.

Maintenance and Service Guide
Page 21
... Lights (front of notebook) Meaning Power status On: notebook is in Hibernation mode. Blinking: notebook is on an external keyboard). Hard disk drive activity On: notebook is active. Keyboard Status Lights Meaning Caps Lock Caps Lock is accessing the hard disk drive. The keyboard status lights, located above the keyboard, indicate the states of the notebook report power status...
... Lights (front of notebook) Meaning Power status On: notebook is in Hibernation mode. Blinking: notebook is on an external keyboard). Hard disk drive activity On: notebook is active. Keyboard Status Lights Meaning Caps Lock Caps Lock is accessing the hard disk drive. The keyboard status lights, located above the keyboard, indicate the states of the notebook report power status...

Maintenance and Service Guide
Page 22
... Hot Keys Effect Decreases the display brightness Increases the display brightness Toggles among the built-in keypad on and off . Does not affect an external keyboard. Hot Key Fn+F1 Fn+F2 Fn+F5 Fn+F8 Fn+F12 Fn+NumLock Fn+Page Up Fn+Page Down Fn+Backspace Table 1-5. otherwise, cursor... control is on an external keyboard). Enters Hibernation mode Toggles Scroll Lock on and off Increases the audio volume and cancels the mute setting Decreases the audio volume Audio mute 1-16...
... Hot Keys Effect Decreases the display brightness Increases the display brightness Toggles among the built-in keypad on and off . Does not affect an external keyboard. Hot Key Fn+F1 Fn+F2 Fn+F5 Fn+F8 Fn+F12 Fn+NumLock Fn+Page Up Fn+Page Down Fn+Backspace Table 1-5. otherwise, cursor... control is on an external keyboard). Enters Hibernation mode Toggles Scroll Lock on and off Increases the audio volume and cancels the mute setting Decreases the audio volume Audio mute 1-16...

Maintenance and Service Guide
Page 26
... CD-ROM, 8x DVD, CD-RW, or CD-RW/DVD drive (or higher) At least 128 MB SDRAM preinstalled HP Pavilion ze5x00, ze4x00, HP Compaq nx9010, nx9008, nx9005, Compaq Evo N1050v, Compaq Presario 2500, and Compaq Presario 2100: 2 slots for PC2100 DDR-266 SDRAM modules Up to 1 GB (1024 MB) SDRAM using 512 MB modules... Boot Agent) support for PXE/BINL, NCP/IPX, DHCP 802.11b or 802.11g (54g) 1-20 Product Information Service Manual Mass Storage RAM Audio System Keyboard and Pointing Device LAN (certain models) Wireless LAN (certain models) 20-
... CD-ROM, 8x DVD, CD-RW, or CD-RW/DVD drive (or higher) At least 128 MB SDRAM preinstalled HP Pavilion ze5x00, ze4x00, HP Compaq nx9010, nx9008, nx9005, Compaq Evo N1050v, Compaq Presario 2500, and Compaq Presario 2100: 2 slots for PC2100 DDR-266 SDRAM modules Up to 1 GB (1024 MB) SDRAM using 512 MB modules... Boot Agent) support for PXE/BINL, NCP/IPX, DHCP 802.11b or 802.11g (54g) 1-20 Product Information Service Manual Mass Storage RAM Audio System Keyboard and Pointing Device LAN (certain models) Wireless LAN (certain models) 20-

Maintenance and Service Guide
Page 30
...AC adapter Motherboard SDRAM module Display assembly Motherboard Hard disk drive Motherboard Floppy drive Motherboard Switchboard PCA Keyboard Motherboard Top case Motherboard Speaker assembly Motherboard Switchboard PCA Top case Motherboard Motherboard Motherboard IR PCA ... backlight Hard disk controller Hard disk mechanism I/O controller, floppy connector Floppy drive mechanism Keyboard BIOS, keyboard controller Power switch, one-touch buttons Key switches Keyboard circuitry, keyboard controller, keyboard BIOS Touch pad sensor, Select buttons, controller (PS/2 output) Audio controller, audio...
...AC adapter Motherboard SDRAM module Display assembly Motherboard Hard disk drive Motherboard Floppy drive Motherboard Switchboard PCA Keyboard Motherboard Top case Motherboard Speaker assembly Motherboard Switchboard PCA Top case Motherboard Motherboard Motherboard IR PCA ... backlight Hard disk controller Hard disk mechanism I/O controller, floppy connector Floppy drive mechanism Keyboard BIOS, keyboard controller Power switch, one-touch buttons Key switches Keyboard circuitry, keyboard controller, keyboard BIOS Touch pad sensor, Select buttons, controller (PS/2 output) Audio controller, audio...

Maintenance and Service Guide
Page 31
... symbol at the end of screws before you how to verify the sizes of each section below. Symbols like these to remove and replace the notebook's components and assemblies. Table 2-1. Removal Cross-Reference Assembly, display (page 2-23) • Assembly, speaker (page 2-15) • Battery, ...main (page 2-4) • Card, wireless LAN Mini PCI (page 2-7) Case, bottom (page 2-59) Case, top (page 2-26) CPU module (page 2-44) • Cover, keyboard (page 2-16) • Door, Mini PCI (page 2-7) • Door, SDRAM (page 2-5) Doors, PCMCIA (page 2-60) Drive, CD/DVD (page 2-20) Drive, floppy...
... symbol at the end of screws before you how to verify the sizes of each section below. Symbols like these to remove and replace the notebook's components and assemblies. Table 2-1. Removal Cross-Reference Assembly, display (page 2-23) • Assembly, speaker (page 2-15) • Battery, ...main (page 2-4) • Card, wireless LAN Mini PCI (page 2-7) Case, bottom (page 2-59) Case, top (page 2-26) CPU module (page 2-44) • Cover, keyboard (page 2-16) • Door, Mini PCI (page 2-7) • Door, SDRAM (page 2-5) Doors, PCMCIA (page 2-60) Drive, CD/DVD (page 2-20) Drive, floppy...

Maintenance and Service Guide
Page 43
... the hinge covers if needed, being careful not to the left end, and then gently lift up the center of the notebook. 3. Carefully insert a flat-blade screwdriver blade under the keyboard cover near the right end, then near the center, then near the left and right display assembly hinges. CAUTION: Be ...careful not to damage the antenna PCA that secure the keyboard cover to the rear of the cover. Remove the two M2.5×4.0mm hinge cover screws that is connected to damage the plastics or wireless...
... the hinge covers if needed, being careful not to the left end, and then gently lift up the center of the notebook. 3. Carefully insert a flat-blade screwdriver blade under the keyboard cover near the right end, then near the center, then near the left and right display assembly hinges. CAUTION: Be ...careful not to damage the antenna PCA that secure the keyboard cover to the rear of the cover. Remove the two M2.5×4.0mm hinge cover screws that is connected to damage the plastics or wireless...

Maintenance and Service Guide
Page 44
... center of the cover, carefully insert the flat-blade screwdriver under the right side of the panel into the mating slots under the keyboard, and then press the panel into place. 2-14 Removal and Replacement Service Manual Disconnecting the Speaker Cable Reassembly Note Insert the tabs... on HP Pavilion 5300 and 5200, HP Compaq nx9010, and Compaq Presario 2500 models, disconnect the speaker cable as indicated in Figure 2-10. and right-center of the display assembly hinge, gently ...
... center of the cover, carefully insert the flat-blade screwdriver under the right side of the panel into the mating slots under the keyboard, and then press the panel into place. 2-14 Removal and Replacement Service Manual Disconnecting the Speaker Cable Reassembly Note Insert the tabs... on HP Pavilion 5300 and 5200, HP Compaq nx9010, and Compaq Presario 2500 models, disconnect the speaker cable as indicated in Figure 2-10. and right-center of the display assembly hinge, gently ...

Maintenance and Service Guide
Page 45
... only to HP Pavilion 4x00, HP Compaq nx9005 and nx9000, Compaq Evo Notebook N1050v and N1010v, and Compaq Presario 2100 and 1100 Series notebooks. Required Equipment 1 Phillips screwdriver Removal Procedure 1. The HP Pavilion ze5x00, HP Compaq nx9010 and nx9008, and Compaq Presario 2500 Series notebook speakers are integrated into the top case. Remove the keyboard cover (page 2-13). 3. Disconnect the...
... only to HP Pavilion 4x00, HP Compaq nx9005 and nx9000, Compaq Evo Notebook N1050v and N1010v, and Compaq Presario 2100 and 1100 Series notebooks. Required Equipment 1 Phillips screwdriver Removal Procedure 1. The HP Pavilion ze5x00, HP Compaq nx9010 and nx9008, and Compaq Presario 2500 Series notebook speakers are integrated into the top case. Remove the keyboard cover (page 2-13). 3. Disconnect the...

Maintenance and Service Guide
Page 46
... toward the display assembly to the top case. 4. Remove the keyboard. Excessive flexing can damage the keyboard cable connectors. • Lay the keyboard face down on the top case, forward of the keyboard into their slots in the top case, and then lower the keyboard into place. 2-16 Removal and Replacement Service Manual Unplug the...
... toward the display assembly to the top case. 4. Remove the keyboard. Excessive flexing can damage the keyboard cable connectors. • Lay the keyboard face down on the top case, forward of the keyboard into their slots in the top case, and then lower the keyboard into place. 2-16 Removal and Replacement Service Manual Unplug the...

Maintenance and Service Guide
Page 47
Removing the Keyboard Service Manual Removal and Replacement 2-17 Figure 2-12.
Removing the Keyboard Service Manual Removal and Replacement 2-17 Figure 2-12.
Maintenance and Service Guide
Page 48
... (page 2-13). 3. Disconnect both the 2-wire and 4-wire cables that secures the keyboard, and then switchboard PCA to the top case (page 2-16). 5. Removing the Switchboard PCA HP Pavilion 4x00, HP Compaq nx9005 and nx9000, Compaq Evo Notebook N1050v and N1010v, and Compaq Presario 2100 and 1100 Models 2-18 Removal and Replacement Service Manual Removing the...
... (page 2-13). 3. Disconnect both the 2-wire and 4-wire cables that secures the keyboard, and then switchboard PCA to the top case (page 2-16). 5. Removing the Switchboard PCA HP Pavilion 4x00, HP Compaq nx9005 and nx9000, Compaq Evo Notebook N1050v and N1010v, and Compaq Presario 2100 and 1100 Models 2-18 Removal and Replacement Service Manual Removing the...

Maintenance and Service Guide
Page 49
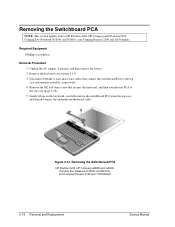
Disconnect the 2-wire cable that secure the switchboard PCA to the display lid switch. 4. Remove the keyboard cover (page 2-13). 3. NOTE: This section applies only to disconnect the PCA from the motherboard. 6. Remove the switchboard PCA. Required Equipment 1 Phillips screwdriver ...screws that connects the switchboard PCA to the top case. 5. Removing the Switchboard PCA HP Pavilion 5x00, HP Compaw nx9010 and nx9008, and Compaq Presario 2500 Models Service Manual Removal and Replacement 2-19 Gently lift up on the rear right edge of the switchboard PCA to HP Pavilion 5x00...
Disconnect the 2-wire cable that secure the switchboard PCA to the display lid switch. 4. Remove the keyboard cover (page 2-13). 3. NOTE: This section applies only to disconnect the PCA from the motherboard. 6. Remove the switchboard PCA. Required Equipment 1 Phillips screwdriver ...screws that connects the switchboard PCA to the top case. 5. Removing the Switchboard PCA HP Pavilion 5x00, HP Compaw nx9010 and nx9008, and Compaq Presario 2500 Models Service Manual Removal and Replacement 2-19 Gently lift up on the rear right edge of the switchboard PCA to HP Pavilion 5x00...


