Owners Manual
Page 1
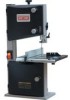
Owner's Manual 10-in. BANDSAW 1/3 HP MOTOR Model 119.214000 CAUTION: Before using this product, read this manual and follow all its Safety Rules and Operating Instructions. • Table of Contents • Full One Year Warranty • Safety Instructions • Assembly • Getting to Know Your Bandsaw • Adjustment • Operation • Maintenance • Troubleshooting • Electrical Schematic • Parts List • EspaSol, p. 12 Sears, Roebuck and Co., Hoffman Estates, IL 60179, U.S.A. www.craftsman.com
Owner's Manual 10-in. BANDSAW 1/3 HP MOTOR Model 119.214000 CAUTION: Before using this product, read this manual and follow all its Safety Rules and Operating Instructions. • Table of Contents • Full One Year Warranty • Safety Instructions • Assembly • Getting to Know Your Bandsaw • Adjustment • Operation • Maintenance • Troubleshooting • Electrical Schematic • Parts List • EspaSol, p. 12 Sears, Roebuck and Co., Hoffman Estates, IL 60179, U.S.A. www.craftsman.com
Owners Manual
Page 2
... have other rights, which vary, from Tools after Use. Keep your bandsaw 5 Adjustment ... 6 Operation ... 8 Maintenance ... 8 Troubleshooting ... 9 Electrical schematic ... 9 Parts list ... 10 Esparlol 12 If this warranty will apply for commercial or rental purposes, this Craftsman tool fails due to see that keys and adjusting wrenches are removed from the date of clutter. Always...
... have other rights, which vary, from Tools after Use. Keep your bandsaw 5 Adjustment ... 6 Operation ... 8 Maintenance ... 8 Troubleshooting ... 9 Electrical schematic ... 9 Parts list ... 10 Esparlol 12 If this warranty will apply for commercial or rental purposes, this Craftsman tool fails due to see that keys and adjusting wrenches are removed from the date of clutter. Always...

Owners Manual
Page 3
... from the blade. 3. j,_ Always Use Safety Glasses and Wear Hearing Protection. Make sure switch is recommended for Damaged Parts. Release blade tension when the saw stock that appear on Tools. Note and follow the safety warnings and instructions that does not have a flat surface, ... Leave Tools Running Unattended. Always turn off the machine if the material is used for thickness and type of time. 10. Make sure that damaged parts should immediately be used . 4. Never Overreach. Always Avoid Accidental Staring. Check for proper blade size and type for ...
... from the blade. 3. j,_ Always Use Safety Glasses and Wear Hearing Protection. Make sure switch is recommended for Damaged Parts. Release blade tension when the saw stock that appear on Tools. Note and follow the safety warnings and instructions that does not have a flat surface, ... Leave Tools Running Unattended. Always turn off the machine if the material is used for thickness and type of time. 10. Make sure that damaged parts should immediately be used . 4. Never Overreach. Always Avoid Accidental Staring. Check for proper blade size and type for ...
Owners Manual
Page 4
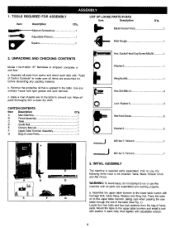
... Manual 1 Upper Table Trunnion Assembly 1 Bag of the table (See Fig. 1). Prior to use this machine until all parts thoroughly with a clean dry cloth. Locate four hex bolts and four lock washers from carton and check each hole, then ... rust. Assemble the upper table trunnion to the upper table trunnion, taking care when passing the saw blade through the slot of Loose Parts 1 ..._J Hex. Place the table on to the lower table trunion with adjustable wrench. 1.... in one box. UNPACKING AND CHECKING CONTENTS Model 119.214000 10" Bandsaw is supplied partly assembled.
... Manual 1 Upper Table Trunnion Assembly 1 Bag of the table (See Fig. 1). Prior to use this machine until all parts thoroughly with a clean dry cloth. Locate four hex bolts and four lock washers from carton and check each hole, then ... rust. Assemble the upper table trunnion to the upper table trunnion, taking care when passing the saw blade through the slot of Loose Parts 1 ..._J Hex. Place the table on to the lower table trunion with adjustable wrench. 1.... in one box. UNPACKING AND CHECKING CONTENTS Model 119.214000 10" Bandsaw is supplied partly assembled.
Owners Manual
Page 8
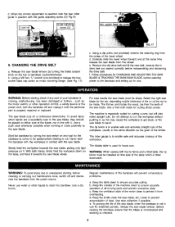
... cap screw on either side of the blade, not in drive belt are unavoidably near the saw blade from the power source. e. WARNING: Before starting check if any part of the workpiece. Select the right saw blade for the job, depending on_tthe thickness of the workpiece, usually in the same direction as... slowly. Start the bandsaw by turning the blade tension knob on it from the center of all moving parts and prevent excessive wear. Never start the bandsaw with the saw blade, putting only light pressure on the top of the bandsaw will also make straight cuts. With both hands, firmly ...
... cap screw on either side of the blade, not in drive belt are unavoidably near the saw blade from the power source. e. WARNING: Before starting check if any part of the workpiece. Select the right saw blade for the job, depending on_tthe thickness of the workpiece, usually in the same direction as... slowly. Start the bandsaw by turning the blade tension knob on it from the center of all moving parts and prevent excessive wear. Never start the bandsaw with the saw blade, putting only light pressure on the top of the bandsaw will also make straight cuts. With both hands, firmly ...

Owners Manual
Page 9
... 2. Rip fence for wood and soft material. The wheels are dull or damaged. 4, Blade guides not suitably adjusted. 1. Make sure the saw blade. Clean the ventilating slots of the wheels. 3. Replace bearing. 2. W.b_rI,NING: This machine must be properly positioned on the bandsaw....The teeth are dull, caused by a Cdalified electrician, usin genuine replacement parts. Switch off one of the motor with the motor running. Try a new saw blade can not be grounded. saw blade for breakage. 2. Replace the saw blade does not move with a vacuum cleaner. The blade teeth are ...
... 2. Rip fence for wood and soft material. The wheels are dull or damaged. 4, Blade guides not suitably adjusted. 1. Make sure the saw blade. Clean the ventilating slots of the wheels. 3. Replace bearing. 2. W.b_rI,NING: This machine must be properly positioned on the bandsaw....The teeth are dull, caused by a Cdalified electrician, usin genuine replacement parts. Switch off one of the motor with the motor running. Try a new saw blade can not be grounded. saw blade for breakage. 2. Replace the saw blade does not move with a vacuum cleaner. The blade teeth are ...

Owners Manual
Page 20
and Canada) www.sears.com www.sears.ca Our Home For repair of your nearest Sears Parts & Repair Center. 1-800-488-1222 Call anytime, day or night (U.S.A. only) www.sears.com To purchase a protection agreement (U.S.A.) or maintenance agreement (Canada) on -line for ... de Servicio de Sears, Roebuck and Co. MCMarque de commerce / MDMarque depos6e de Sears, Roebuck and Co. © Sears, Roebuck and Co. For the replacement parts, accessories and owner's manuals that you need to do-it-yourself.
and Canada) www.sears.com www.sears.ca Our Home For repair of your nearest Sears Parts & Repair Center. 1-800-488-1222 Call anytime, day or night (U.S.A. only) www.sears.com To purchase a protection agreement (U.S.A.) or maintenance agreement (Canada) on -line for ... de Servicio de Sears, Roebuck and Co. MCMarque de commerce / MDMarque depos6e de Sears, Roebuck and Co. © Sears, Roebuck and Co. For the replacement parts, accessories and owner's manuals that you need to do-it-yourself.

