Owners Manual
Page 1
BANDSAW 1/3 HP MOTOR Model 119.214000 CAUTION: Before using this product, read this manual and follow all its Safety Rules and Operating Instructions. • Table of Contents • Full One Year Warranty • Safety Instructions • Assembly • Getting to Know Your Bandsaw • Adjustment • Operation • Maintenance • Troubleshooting • Electrical Schematic • Parts List • EspaSol, p. 12 Sears, Roebuck and Co., Hoffman Estates, IL 60179, U.S.A. www.craftsman.com Owner's Manual 10-in.
BANDSAW 1/3 HP MOTOR Model 119.214000 CAUTION: Before using this product, read this manual and follow all its Safety Rules and Operating Instructions. • Table of Contents • Full One Year Warranty • Safety Instructions • Assembly • Getting to Know Your Bandsaw • Adjustment • Operation • Maintenance • Troubleshooting • Electrical Schematic • Parts List • EspaSol, p. 12 Sears, Roebuck and Co., Hoffman Estates, IL 60179, U.S.A. www.craftsman.com Owner's Manual 10-in.
Owners Manual
Page 2
... one year warranty ... 2 Safety instructions ... 2 Assembly... 4 Getting to know your bandsaw 5 Adjustment ... 6 Operation ... 8 Maintenance ... 8 Troubleshooting ... 9 Electrical schematic ... 9 Parts list ... 10 Esparlol 12 If this Craftsman tool fails due to a defect in material or workmanship within one year from the date of purchase. If this tool is used for only ninety days from the date of purchase, CALL 1-800-4-MY-HOME® TO ARRANGE FOR FREE REPAIR. Cluttered areas and...
... one year warranty ... 2 Safety instructions ... 2 Assembly... 4 Getting to know your bandsaw 5 Adjustment ... 6 Operation ... 8 Maintenance ... 8 Troubleshooting ... 9 Electrical schematic ... 9 Parts list ... 10 Esparlol 12 If this Craftsman tool fails due to a defect in material or workmanship within one year from the date of purchase. If this tool is used for only ninety days from the date of purchase, CALL 1-800-4-MY-HOME® TO ARRANGE FOR FREE REPAIR. Cluttered areas and...

Owners Manual
Page 3
... backed out of material being cut . 6. Release blade tension when the saw stock that the blade tension and blade tracking are properly adjusted. 8, Make "relief" cuts before servicing and when changing accessories such as blades, bits, and cutters. Never wear loose clothing or jewelry that appear on Tools. Check for proper blade size and type for Damaged Parts. Also use a,face or dust mask if the cutting operation is accidentally contacted. _ I_...
... backed out of material being cut . 6. Release blade tension when the saw stock that the blade tension and blade tracking are properly adjusted. 8, Make "relief" cuts before servicing and when changing accessories such as blades, bits, and cutters. Never wear loose clothing or jewelry that appear on Tools. Check for proper blade size and type for Damaged Parts. Also use a,face or dust mask if the cutting operation is accidentally contacted. _ I_...
Owners Manual
Page 4
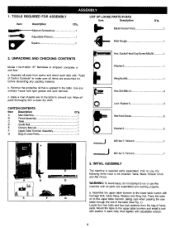
... upper table trunnion and install a bolt with adjustable wrench. Assemble the upper table trunnion to the table. a. Remove the protective oil that is applied to the lower table trunion with a clean dry cloth. Bolt M6x12 4. Place the table on to be installed: Table, Blade Tension Knob and Rip Fence. TOOLS REQUIRED FOR ASSEMBLY Item Description Q'ty. Lock Washer6 4 Star Knob Screw 2 Washer6 2. b. Socket Head Cap Screw M6x30 1 Washer6 1 Wing Nut M6 1 Hex. Prior to use this...
... upper table trunnion and install a bolt with adjustable wrench. Assemble the upper table trunnion to the table. a. Remove the protective oil that is applied to the lower table trunion with a clean dry cloth. Bolt M6x12 4. Place the table on to be installed: Table, Blade Tension Knob and Rip Fence. TOOLS REQUIRED FOR ASSEMBLY Item Description Q'ty. Lock Washer6 4 Star Knob Screw 2 Washer6 2. b. Socket Head Cap Screw M6x30 1 Washer6 1 Wing Nut M6 1 Hex. Prior to use this...

Owners Manual
Page 5
... this purpose 6mm holes are provided in use, the bandsaw is connected to a suitable dust collector. To ensure sufficient upright stability of the machine it should be bolted to the saw blade. Adjust the rip fence parallel to floor, bench or worktable. FIG. 6 tension knob =g knob ]uide T _. _ _Blade rack ng knob 'Guide post adjusting knob , Lower tabl Dust sethehexsockehteadcapscreww, ashearndwing nutforcorrectinthgeworkintgableflatness(S. Placethebladetensioknnobonto thebladetensione(rSee Fig...
... this purpose 6mm holes are provided in use, the bandsaw is connected to a suitable dust collector. To ensure sufficient upright stability of the machine it should be bolted to the saw blade. Adjust the rip fence parallel to floor, bench or worktable. FIG. 6 tension knob =g knob ]uide T _. _ _Blade rack ng knob 'Guide post adjusting knob , Lower tabl Dust sethehexsockehteadcapscreww, ashearndwing nutforcorrectinthgeworkintgableflatness(S. Placethebladetensioknnobonto thebladetensione(rSee Fig...
Owners Manual
Page 6
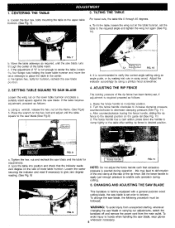
... the table square to the saw blade is factory-equipped with a general-purpose wood cutting blade, the saw blade.(See Fig.8) FIG. 10 b. bolt and adjust until the saw blade or carrying out adjustments, switch the handsaw off and remove the power cord from the main outlet. Loosen the screw securing the indicator and reset if necessary to desired position. Set the fence handle to apply just enough pressure to delivery. CHANGING AND ADJUSTING THE SAW BLADE...
... the table square to the saw blade is factory-equipped with a general-purpose wood cutting blade, the saw blade.(See Fig.8) FIG. 10 b. bolt and adjust until the saw blade or carrying out adjustments, switch the handsaw off and remove the power cord from the main outlet. Loosen the screw securing the indicator and reset if necessary to desired position. Set the fence handle to apply just enough pressure to delivery. CHANGING AND ADJUSTING THE SAW BLADE...

Owners Manual
Page 7
... the saw blade. TRACKING THE BANDSAW BLADE Set the tracking of the saw blade. Set both roller guides are pointing downwards and towards you at the side of the saw blade tracking by turning the upper wheel by turning the door locking knobs before setting the blade guides. b. Setthebladeguidetotherequirehdeighbt yturnintgheguide postadjustinkgnob. Re-tension the new saw blade and check the saw blade b. Replace the rip fence, the guide rail, the wing nut and screw to the blade by releasing the guide adjusting screw...
... the saw blade. TRACKING THE BANDSAW BLADE Set the tracking of the saw blade. Set both roller guides are pointing downwards and towards you at the side of the saw blade tracking by turning the upper wheel by turning the door locking knobs before setting the blade guides. b. Setthebladeguidetotherequirehdeighbt yturnintgheguide postadjustinkgnob. Re-tension the new saw blade and check the saw blade b. Replace the rip fence, the guide rail, the wing nut and screw to the blade by releasing the guide adjusting screw...
Owners Manual
Page 8
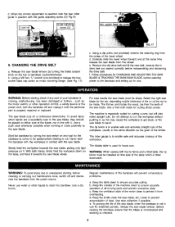
... in use for use water or other operation control, a safety device or the power cord, turn the workpiece without pushing it towards the saw blade cuts on motor mounting flange. (See Fig. 17) c. Regular maintenance of the timber. e. The rip fence is checked. 8 e. The saw blade, putting only light pressure on that the blade is re-tensioned and tracking is to prevent it . WARNING: When sawing with the guide adjusting screw (D) Fig.16 Guide adjusting screw (C) 9. Do...
... in use for use water or other operation control, a safety device or the power cord, turn the workpiece without pushing it towards the saw blade cuts on motor mounting flange. (See Fig. 17) c. Regular maintenance of the timber. e. The rip fence is checked. 8 e. The saw blade, putting only light pressure on that the blade is re-tensioned and tracking is to prevent it . WARNING: When sawing with the guide adjusting screw (D) Fig.16 Guide adjusting screw (C) 9. Do...

Owners Manual
Page 9
... sawdust to the blade. 2. Adjust the table. 2. Adjust the blade tracking knob (See ADJUSTMENT instructions). 3. The saw blade for harder materials. No power supply. 2. The saw blade always cuts slower due to electrical system should be done only by cutting hard material or long use a 6 "EEl. Rip fence for breakage. 2. The wheels are dull or damaged. 4, Blade guides not suitably adjusted. 1. Check the cable for cutting not used. 2. Replace the lock switch. 3. Switch off one of the motor with a vacuum...
... sawdust to the blade. 2. Adjust the table. 2. Adjust the blade tracking knob (See ADJUSTMENT instructions). 3. The saw blade for harder materials. No power supply. 2. The saw blade always cuts slower due to electrical system should be done only by cutting hard material or long use a 6 "EEl. Rip fence for breakage. 2. The wheels are dull or damaged. 4, Blade guides not suitably adjusted. 1. Check the cable for cutting not used. 2. Replace the lock switch. 3. Switch off one of the motor with a vacuum...

Owners Manual
Page 11
... ,Special Screw Washer 10 Fence Handle Roll Pin 3x18 Star knob screw Washer 6 Aluminium Bar Miter Gauge Base Indicator Pan Head Screw M5x6 Knob Bearing Mount Cylinder Hex. Socket Set Screw M6xlO Drive Belt Ball Bearing 12ram Retaining Ring 28 Lower Wheel Tire Retaining Ring 12 Saw Blade Upper Wheel Upper Bearing Bolt Wheel Carrier Bracket Hex. Socket Set Screw M6x25 Ratchet handle Guide Adjust Screw Bail Bearing 6ram Washer 6 Bearing Mount Cylinder Hex. Nut M6 Cable w/Plug Lock Washer 4 Washer 4 Pan Head Screw M4x8 Switch Cover Plate Lock Switch Pan Head Screw M4x12...
... ,Special Screw Washer 10 Fence Handle Roll Pin 3x18 Star knob screw Washer 6 Aluminium Bar Miter Gauge Base Indicator Pan Head Screw M5x6 Knob Bearing Mount Cylinder Hex. Socket Set Screw M6xlO Drive Belt Ball Bearing 12ram Retaining Ring 28 Lower Wheel Tire Retaining Ring 12 Saw Blade Upper Wheel Upper Bearing Bolt Wheel Carrier Bracket Hex. Socket Set Screw M6x25 Ratchet handle Guide Adjust Screw Bail Bearing 6ram Washer 6 Bearing Mount Cylinder Hex. Nut M6 Cable w/Plug Lock Washer 4 Washer 4 Pan Head Screw M4x8 Switch Cover Plate Lock Switch Pan Head Screw M4x12...

Owners Manual
Page 20
For Sears professional installation of your nearest Sears Parts & Repair Center. 1-800-488-1222 Call anytime, day or night (U.S.A. and Canada) www.sears.com www.sears.ca Our Home For repair of carry-in your home or ours! For the replacement parts, accessories and owner's manuals that you need to do-it fixed, at your home-of Sears, Roebuck and Co. ® Marca Registrada / TM Marca de F&bdca...
For Sears professional installation of your nearest Sears Parts & Repair Center. 1-800-488-1222 Call anytime, day or night (U.S.A. and Canada) www.sears.com www.sears.ca Our Home For repair of carry-in your home or ours! For the replacement parts, accessories and owner's manuals that you need to do-it fixed, at your home-of Sears, Roebuck and Co. ® Marca Registrada / TM Marca de F&bdca...


