Owners Manual
Page 1
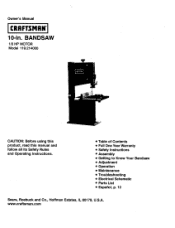
Owner's Manual 10-in. BANDSAW 1/3 HP MOTOR Model 119.214000 CAUTION: Before using this product, read this manual and follow all its Safety Rules and Operating Instructions. • Table of Contents • Full One Year Warranty • Safety Instructions • Assembly • Getting to Know Your Bandsaw • Adjustment • Operation • Maintenance • Troubleshooting • Electrical Schematic • Parts List • EspaSol, p. 12 Sears, Roebuck and Co., Hoffman Estates, IL 60179, U.S.A. www.craftsman.com
Owner's Manual 10-in. BANDSAW 1/3 HP MOTOR Model 119.214000 CAUTION: Before using this product, read this manual and follow all its Safety Rules and Operating Instructions. • Table of Contents • Full One Year Warranty • Safety Instructions • Assembly • Getting to Know Your Bandsaw • Adjustment • Operation • Maintenance • Troubleshooting • Electrical Schematic • Parts List • EspaSol, p. 12 Sears, Roebuck and Co., Hoffman Estates, IL 60179, U.S.A. www.craftsman.com
Owners Manual
Page 2
... padlocks, master switches, or by removing starter keys. @ Never operate a tool while under the influence of purchase. If your bandsaw 5 Adjustment ... 6 Operation ... 8 Maintenance ... 8 Troubleshooting ... 9 Electrical schematic ... 9 Parts list ... 10 Esparlol 12 If this Craftsman tool fails due to state. Never use an adapter to accommodate a two-pronged receptacle, you may also have other...
... padlocks, master switches, or by removing starter keys. @ Never operate a tool while under the influence of purchase. If your bandsaw 5 Adjustment ... 6 Operation ... 8 Maintenance ... 8 Troubleshooting ... 9 Electrical schematic ... 9 Parts list ... 10 Esparlol 12 If this Craftsman tool fails due to state. Never use an adapter to accommodate a two-pronged receptacle, you may also have other...

Owners Manual
Page 3
...from the blade. 3. Always stop the Bandsaw before servicing and when changing accessories such as blades, bits, and cutters. Always turn off the machine if the material is to saw will operate properly and perform its intended function. Release blade tension when the saw stock that does not have a flat... surface, unless a suitable support is used for the best footing. Never Stand on the lower door. Always Avoid Accidental Staring. will not be backed out of time. 10. Always keep hands and fingers away ...
...from the blade. 3. Always stop the Bandsaw before servicing and when changing accessories such as blades, bits, and cutters. Always turn off the machine if the material is to saw will operate properly and perform its intended function. Release blade tension when the saw stock that does not have a flat... surface, unless a suitable support is used for the best footing. Never Stand on the lower door. Always Avoid Accidental Staring. will not be backed out of time. 10. Always keep hands and fingers away ...
Owners Manual
Page 4
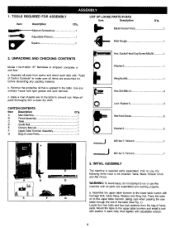
... Washer6 1 Wing Nut M6 1 Hex. 1. b. M3 Hex %" Wrench 1 C A' !B D E F G =====_=_ M5He x" L" Wrench 1 2. Bolt M6x12 4. UNPACKING AND CHECKING CONTENTS Model 119.214000 10" Bandsaw is shipped complete in each item with "Table of Carton Contents" to the upper table trunnion and install a bolt with adjustable wrench. WARNING: To Avoid... injury, do not attempt to prevent rust. Place the table on to the upper table trunnion, taking care when passing the saw blade through the slot of paste wax to the table to run or use , the following items have to the lower table...
... Washer6 1 Wing Nut M6 1 Hex. 1. b. M3 Hex %" Wrench 1 C A' !B D E F G =====_=_ M5He x" L" Wrench 1 2. Bolt M6x12 4. UNPACKING AND CHECKING CONTENTS Model 119.214000 10" Bandsaw is shipped complete in each item with "Table of Carton Contents" to the upper table trunnion and install a bolt with adjustable wrench. WARNING: To Avoid... injury, do not attempt to prevent rust. Place the table on to the upper table trunnion, taking care when passing the saw blade through the slot of paste wax to the table to run or use , the following items have to the lower table...
Owners Manual
Page 6
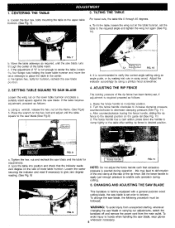
...to stamp tightly to the table after setting rip fence to hands when handling the saw blade.(See Fig.8) FIG. 10 b. nut and recheck the saw blade and the table for trunnion, recheck the saw blade is not enough to center the table, loosen !he four flange nuts holding...45 degrees. a. After counterclockwise truning the fence handle, sliding the rip fence to delivery. CHANGING AND ADJUSTING THE SAW BLADE This bandsaw is factory-equipped with a general-purpose wood cutting blade, the saw blade position. 2. Loosen the four hex.,bolts mounting the table to give zero degree reading. (See Fig. ...
...to stamp tightly to the table after setting rip fence to hands when handling the saw blade.(See Fig.8) FIG. 10 b. nut and recheck the saw blade and the table for trunnion, recheck the saw blade is not enough to center the table, loosen !he four flange nuts holding...45 degrees. a. After counterclockwise truning the fence handle, sliding the rip fence to delivery. CHANGING AND ADJUSTING THE SAW BLADE This bandsaw is factory-equipped with a general-purpose wood cutting blade, the saw blade position. 2. Loosen the four hex.,bolts mounting the table to give zero degree reading. (See Fig. ...


