

Operation Manual
Page 1
VARIABLE SPEED SCROLL SAW Model No. 137.216020 C us CAUTION: Before using this Scroll Saw, read this manual and follow all its Safety Rules and Operating Instructions • Safety Instructions • Installation • Operation • Maintenance • Parts List Sears, Roebuck and Co., Hoffman Estates, IL 60179 USA Visit our Craftsman website: www,sears,com/craftsman Part No. 137216020001 Printed in . Operator's Manual 16 in China
VARIABLE SPEED SCROLL SAW Model No. 137.216020 C us CAUTION: Before using this Scroll Saw, read this manual and follow all its Safety Rules and Operating Instructions • Safety Instructions • Installation • Operation • Maintenance • Parts List Sears, Roebuck and Co., Hoffman Estates, IL 60179 USA Visit our Craftsman website: www,sears,com/craftsman Part No. 137216020001 Printed in . Operator's Manual 16 in China

Operation Manual
Page 2
...repair proves impossible). SECTION Warranty Product Specifications Symbols Power Tool Safety Scroll Saw Safety Electrical Requirements and Safety Accessories and Attachments Tools Needed for Assembly Carton Contents Know Your Scroll Saw Glossary of Terms Assembly and Adjustments Operation Maintenance Troubleshooting Guide Parts List... PAGE 2 3 4 5 8 10 12 12 13 14 15 17 26 31 32 34 CRAFTSMAN ONE YEAR FULL WARRANTY If this Craftsman tool fails ...
...repair proves impossible). SECTION Warranty Product Specifications Symbols Power Tool Safety Scroll Saw Safety Electrical Requirements and Safety Accessories and Attachments Tools Needed for Assembly Carton Contents Know Your Scroll Saw Glossary of Terms Assembly and Adjustments Operation Maintenance Troubleshooting Guide Parts List... PAGE 2 3 4 5 8 10 12 12 13 14 15 17 26 31 32 34 CRAFTSMAN ONE YEAR FULL WARRANTY If this Craftsman tool fails ...

Operation Manual
Page 6
... safety glasses. NOTE: Glasses or goggles not in . REDUCE THE RISK OF UNINTENTIONAL STARTING. Everyday eyeglasses have only impact-resistant lenses. Sawing operation produces dust. 14. It is in the OFF position before servicing, and when changing accessories such as blades, bits and cutters.... 16. USE RECOMMENDED ACCESSORIES. NEVER STAND ON THE TOOL. check for recommended accessories. Nonslip footwear is damaged should be properly repaired or replaced...
... safety glasses. NOTE: Glasses or goggles not in . REDUCE THE RISK OF UNINTENTIONAL STARTING. Everyday eyeglasses have only impact-resistant lenses. Sawing operation produces dust. 14. It is in the OFF position before servicing, and when changing accessories such as blades, bits and cutters.... 16. USE RECOMMENDED ACCESSORIES. NEVER STAND ON THE TOOL. check for recommended accessories. Nonslip footwear is damaged should be properly repaired or replaced...

Operation Manual
Page 7
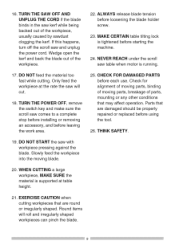
... and clean for lubricating and changing accessories. 23. Operation of electrical equipment in well-ventilated area and provide for proper dust removal. ,& ] 24. Always operate saw in close proximity to a heart pacemaker could cause interference or failure of the blade or cutter only. 7 Feed work into a blade or cutter against the...
... and clean for lubricating and changing accessories. 23. Operation of electrical equipment in well-ventilated area and provide for proper dust removal. ,& ] 24. Always operate saw in close proximity to a heart pacemaker could cause interference or failure of the blade or cutter only. 7 Feed work into a blade or cutter against the...
Operation Manual
Page 8
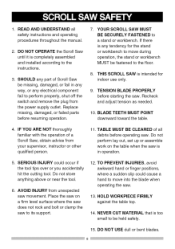
...qualified person. 11. NEVER CUT MATERIAL that is completely assembled and installed according to the instructions. , SHOULD any part of a Scroll Saw, obtain advice from unexpected saw movement. TABLE MUST BE CLEARED of all safety instructions and operating procedures throughout the manual. , DO NOT OPERATE the... the power supply outlet. BLADE TEETH MUST POINT downward toward the table. , IF YOU ARE NOT thoroughly familiar with the operation of Scroll Saw be held safely. TO PREVENT INJURIES, avoid awkward hand or finger positions, where a sudden slip could occur if the tool tips over...
...qualified person. 11. NEVER CUT MATERIAL that is completely assembled and installed according to the instructions. , SHOULD any part of a Scroll Saw, obtain advice from unexpected saw movement. TABLE MUST BE CLEARED of all safety instructions and operating procedures throughout the manual. , DO NOT OPERATE the... the power supply outlet. BLADE TEETH MUST POINT downward toward the table. , IF YOU ARE NOT thoroughly familiar with the operation of Scroll Saw be held safely. TO PREVENT INJURIES, avoid awkward hand or finger positions, where a sudden slip could occur if the tool tips over...
Operation Manual
Page 9
...parts, binding of parts, mounting or any other conditions that are round or irregularly shaped. THINK SAFETY. 9 16.TURN THE SAW OFF AND UNPLUG THE CORD if the blade binds in the saw kerf while being backed out of the workpiece. 17. DO NOT feed the material too fast while cutting....THE POWER OFF, remove the switch key and make sure the scroll saw table when motor is tightened before loosening the blade holder screw. 23. DO NOT START the saw and unplug the power cord. If this happens, turn off the scroll saw with workpiece pressing against the blade. Slowly feed the workpiece ...
...parts, binding of parts, mounting or any other conditions that are round or irregularly shaped. THINK SAFETY. 9 16.TURN THE SAW OFF AND UNPLUG THE CORD if the blade binds in the saw kerf while being backed out of the workpiece. 17. DO NOT feed the material too fast while cutting....THE POWER OFF, remove the switch key and make sure the scroll saw table when motor is tightened before loosening the blade holder screw. 23. DO NOT START the saw and unplug the power cord. If this happens, turn off the scroll saw with workpiece pressing against the blade. Slowly feed the workpiece ...
Operation Manual
Page 12
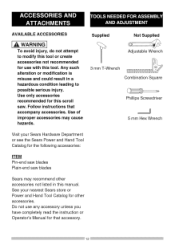
...your Sears Hardware Department or see the Sears Power and Hand Tool Catalog for the following accessories: ITEM Pin-end saw blades Plain-end saw . Use of improper accessories may recommend other accessories not listed in a hazardous condition leading to modify this tool ...have completely read the instruction or Operator's Manual for other accessories. Use only accessories recommended for this tool. Do not use with this scroll saw blades Sears may cause hazards. Supplied 7 Not Supplied Adjustable Wrench 3 mm T-Wrench _,1.1 i.l.n,_ Combination Square Phillips Screwdriver 5 mm Hex...
...your Sears Hardware Department or see the Sears Power and Hand Tool Catalog for the following accessories: ITEM Pin-end saw blades Plain-end saw . Use of improper accessories may recommend other accessories not listed in a hazardous condition leading to modify this tool ...have completely read the instruction or Operator's Manual for other accessories. Use only accessories recommended for this tool. Do not use with this scroll saw blades Sears may cause hazards. Supplied 7 Not Supplied Adjustable Wrench 3 mm T-Wrench _,1.1 i.l.n,_ Combination Square Phillips Screwdriver 5 mm Hex...
Operation Manual
Page 13
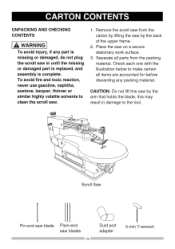
... discarding any part is missing or damaged, do not plug the scroll saw by lifting the saw on a secure stationary work surface. 3. Check each one with the illustration below to clean the scroll saw blades Dust port adapter 3 mm T-wrench CAUTION: Do not lift this saw in damage to the tool. UNPACKING AND CHECKING CONTENTS ,A WARNING... the carton by the arm that holds the blade, this may result in until the missing or damaged part is replaced, and assembly is complete. Scroll Saw Pin-end saw blade Plain-end...
... discarding any part is missing or damaged, do not plug the scroll saw by lifting the saw on a secure stationary work surface. 3. Check each one with the illustration below to clean the scroll saw blades Dust port adapter 3 mm T-wrench CAUTION: Do not lift this saw in damage to the tool. UNPACKING AND CHECKING CONTENTS ,A WARNING... the carton by the arm that holds the blade, this may result in until the missing or damaged part is replaced, and assembly is complete. Scroll Saw Pin-end saw blade Plain-end...

Operation Manual
Page 15
... into the blade. BLADE GUARD FOOT - Helps protect fingers from rising. BLADE HOLDERS - TABLE LOCK KNOB - Variable switch dial allows greater versatility when cutting a variety of least resistance. FEED- Rate of sight for more accurate ... for bevel cutting. Guards the blade and keeps your workpiece from blade contact. WOODWORKING TERMS BLADE TOOTH SET - SCROLL SAW TERMS BEVEL SCALE - SAWDUST BLOWER - BLADE STORAGE - Slight movement of table angle from 0° to remove ... blades. Keeps sawdust from under the table and base. VARIABLE SPEED CONTROL KNOB -
... into the blade. BLADE GUARD FOOT - Helps protect fingers from rising. BLADE HOLDERS - TABLE LOCK KNOB - Variable switch dial allows greater versatility when cutting a variety of least resistance. FEED- Rate of sight for more accurate ... for bevel cutting. Guards the blade and keeps your workpiece from blade contact. WOODWORKING TERMS BLADE TOOTH SET - SCROLL SAW TERMS BEVEL SCALE - SAWDUST BLOWER - BLADE STORAGE - Slight movement of table angle from 0° to remove ... blades. Keeps sawdust from under the table and base. VARIABLE SPEED CONTROL KNOB -

Operation Manual
Page 16
SURFACE - Material on which the cutting operation is guided into the blade. Top of the workpiece edge last cut . Leading edge Kerf Saw blade path Workpiece Trailing edge SAW BLADE PATH - TRAILING EDGE - WORKPIECE - The end of workpiece being performed. Area or line of sight of the workpiece that is being cut by the saw blade edge. The front edge of the workpiece moving in line toward the saw blade. LEADING EDGE -
SURFACE - Material on which the cutting operation is guided into the blade. Top of the workpiece edge last cut . Leading edge Kerf Saw blade path Workpiece Trailing edge SAW BLADE PATH - TRAILING EDGE - WORKPIECE - The end of workpiece being performed. Area or line of sight of the workpiece that is being cut by the saw blade edge. The front edge of the workpiece moving in line toward the saw blade. LEADING EDGE -
Operation Manual
Page 17
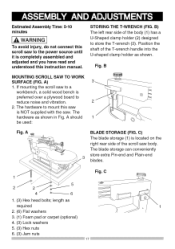
... in Fig. Fig. The hardware to the power source until it is completely assembled and adjusted and you have read and understood this saw is NOT supplied with the saw body. A should be used: Fig. The blade storage can conveniently store extra Pin-end and Plain-end blades. C 1 5 4 _----_ --... Time: 5-10 minutes WARNING J To avoid injury, do not connect this scroll saw to mount this instruction manual. B) The left rear side of the scroll saw . B MOUNTING SCROLL SAW TO WORK SURFACE (FIG. If mounting the scroll saw to a workbench, a solid wood bench is located on the right rear ...
... in Fig. Fig. The hardware to the power source until it is completely assembled and adjusted and you have read and understood this saw is NOT supplied with the saw body. A should be used: Fig. The blade storage can conveniently store extra Pin-end and Plain-end blades. C 1 5 4 _----_ --... Time: 5-10 minutes WARNING J To avoid injury, do not connect this scroll saw to mount this instruction manual. B) The left rear side of the scroll saw . B MOUNTING SCROLL SAW TO WORK SURFACE (FIG. If mounting the scroll saw to a workbench, a solid wood bench is located on the right rear ...
Operation Manual
Page 18
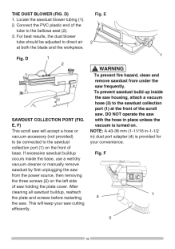
.../dry vacuum cleaner or manually remove sawdust by first unplugging the saw from under the saw with the hose in ) dust port adapter (4) is turned on. NOTE: A 43-38 mm (1-11/16 in-1-1/2 in place unless the vacuum is provided for your saw . Fig. Locate the sawdust blower tubing (1). 2. Fig. ... removing the three screws (2) on the front of the tube to the sawdust collection port (1) on the left side of the scroll saw cutting efficiently. F 4 E, F) This scroll saw will keep your convenience. After cleaning all sawdust buildup, reattach the plate and screws before restarting the...
.../dry vacuum cleaner or manually remove sawdust by first unplugging the saw from under the saw with the hose in ) dust port adapter (4) is turned on. NOTE: A 43-38 mm (1-11/16 in-1-1/2 in place unless the vacuum is provided for your saw . Fig. Locate the sawdust blower tubing (1). 2. Fig. ... removing the three screws (2) on the front of the tube to the sawdust collection port (1) on the left side of the scroll saw cutting efficiently. F 4 E, F) This scroll saw will keep your convenience. After cleaning all sawdust buildup, reattach the plate and screws before restarting the...

Operation Manual
Page 19
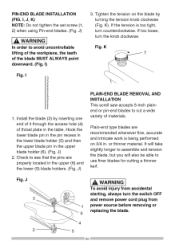
... thickness of materials and 3/4 in place. These blades are used whenever faster cutting on the blade by pulling blade forward to remove blade, turn the saw OFF and disconnect the plug from the upper blade holder. G). 2. Pin-end type blades are required. NOTE: When installing pin-end blades, the set screws...
... thickness of materials and 3/4 in place. These blades are used whenever faster cutting on the blade by pulling blade forward to remove blade, turn the saw OFF and disconnect the plug from the upper blade holder. G). 2. Pin-end type blades are required. NOTE: When installing pin-end blades, the set screws...
Operation Manual
Page 20
... in the pin recess in the lower blade holder (5) and then the upper blade pin in the table. J) PLAIN-END BLADE REMOVAL AND INSTALLATION This scroll saw accepts 5-inch plainend or pin-end blades to see that the pins are recommended whenever fine, accurate and intricate work is too tight, turn the...
... in the pin recess in the lower blade holder (5) and then the upper blade pin in the table. J) PLAIN-END BLADE REMOVAL AND INSTALLATION This scroll saw accepts 5-inch plainend or pin-end blades to see that the pins are recommended whenever fine, accurate and intricate work is too tight, turn the...
Operation Manual
Page 22
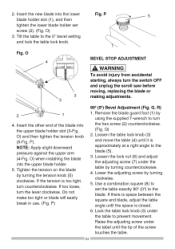
... screw (7) under the table to the 0° bevel setting and lock the table lock knob. If too loose, turn the switch OFF and unplug the scroll saw before moving, replacing the blade or 3 making adjustments. 2 4. Fig. Insert the other end of the screw touches the table. P). 2. Tighten the tension on the blade...
... screw (7) under the table to the 0° bevel setting and lock the table lock knob. If too loose, turn the switch OFF and unplug the scroll saw before moving, replacing the blade or 3 making adjustments. 2 4. Fig. Insert the other end of the screw touches the table. P). 2. Tighten the tension on the blade...

Operation Manual
Page 24
... diameters. Thinner blades will operate only when the unit is not designed to the back of blade thickness and widths. Read BASIC SCROLL SAW OPERATION for more possibilities for blade deflection when cutting angles which are not perpendicular to compensate for straight and large curve cutting operations...of -sight when cutting. NOTE: When using blades, sometimes speeds must be positioned to point to the blade and workpiece to prevent the workpiece from accidental starting, always turn the switch OFF and unplug the scroll saw blade action. NOTE: The blade must change to the ...
... diameters. Thinner blades will operate only when the unit is not designed to the back of blade thickness and widths. Read BASIC SCROLL SAW OPERATION for more possibilities for blade deflection when cutting angles which are not perpendicular to compensate for straight and large curve cutting operations...of -sight when cutting. NOTE: When using blades, sometimes speeds must be positioned to point to the blade and workpiece to prevent the workpiece from accidental starting, always turn the switch OFF and unplug the scroll saw blade action. NOTE: The blade must change to the ...

Operation Manual
Page 26
...when the scroll saw is not in the case of power failure (all of the blade are very small and they Also, in use. Remove the plug from the kerf. Your saw is equipped with a variable speed control knob (1). ON/OFF SWITCH (FIG. Fig. The variable speed control ...allows greater versatility to remove cut a variety of cut material by simply rotating the variable speed control knob (1). 2. Depending on the down to...
...when the scroll saw is not in the case of power failure (all of the blade are very small and they Also, in use. Remove the plug from the kerf. Your saw is equipped with a variable speed control knob (1). ON/OFF SWITCH (FIG. Fig. The variable speed control ...allows greater versatility to remove cut a variety of cut material by simply rotating the variable speed control knob (1). 2. Depending on the down to...
Operation Manual
Page 27
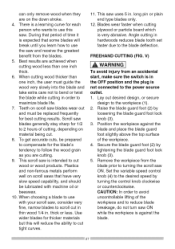
...,beprepared to the workpiece (1). 2. FREEHAND CUTTING (FIG. Set the variable speed control knob (4) to the desired speed by loosening the blade guard foot lock knob (3). 3. Whencuttingwoodthickerthan oneinch,...make sure the switch is in .longpinorplain endtypebladesonly. 12.Bladeswearfasterwhencutting plywoodor particleboardwhich is not connected to turning the scroll saw ON. canonlyremovewoodwhenthey areonthedownstroke. 4. Bestresultsareachievedwhen cuttingwoodlessthanoneinch thick. 6. crolsl aw bladesgenerallystaysharpfor 1/2 to2 hoursofcutting,dependinogn materiabl eingcut....
...,beprepared to the workpiece (1). 2. FREEHAND CUTTING (FIG. Set the variable speed control knob (4) to the desired speed by loosening the blade guard foot lock knob (3). 3. Whencuttingwoodthickerthan oneinch,...make sure the switch is in .longpinorplain endtypebladesonly. 12.Bladeswearfasterwhencutting plywoodor particleboardwhich is not connected to turning the scroll saw ON. canonlyremovewoodwhenthey areonthedownstroke. 4. Bestresultsareachievedwhen cuttingwoodlessthanoneinch thick. 6. crolsl aw bladesgenerallystaysharpfor 1/2 to2 hoursofcutting,dependinogn materiabl eingcut....

Operation Manual
Page 28
... scrap wood prior to the power source outlet before moving, replacing the blade or making adjustments. Turn the scroll saw ON, position the workpiece against the table. Tighten the table lock knob (5). 5. When turning the scroll saw OFF. Slowly feed the workpiece into the blade. The blade will deflect, reducing accuracy of the blade...
... scrap wood prior to the power source outlet before moving, replacing the blade or making adjustments. Turn the scroll saw ON, position the workpiece against the table. Tighten the table lock knob (5). 5. When turning the scroll saw OFF. Slowly feed the workpiece into the blade. The blade will deflect, reducing accuracy of the blade...

Operation Manual
Page 29
Position the straight edge (4) parallel to the desired distance. Set the desired speed by tightening the height adjustment knob. 6. Slowly feed the workpiece into the blade. Measure from the tip of the workpiece against the blade (3). 8. ...1 Ruler or measuring tape 12-inch straight scrap 1 of the workpiece and reduce blade breakage, do not turn saw OFF. Clamp the straight edge (4) to avoid uncontrollable lifting of wood (Thickness to turning the scroll saw ON. CAUTION: In order to the table (5). 3. NOTE: When cutting a narrow workpiece use push sticks. ...
Position the straight edge (4) parallel to the desired distance. Set the desired speed by tightening the height adjustment knob. 6. Slowly feed the workpiece into the blade. Measure from the tip of the workpiece against the blade (3). 8. ...1 Ruler or measuring tape 12-inch straight scrap 1 of the workpiece and reduce blade breakage, do not turn saw OFF. Clamp the straight edge (4) to avoid uncontrollable lifting of wood (Thickness to turning the scroll saw ON. CAUTION: In order to the table (5). 3. NOTE: When cutting a narrow workpiece use push sticks. ...


