

Product Manual
Page 2
... include expendable parts such as lamps, batteries, bits or blades, This warranty gives you specific legal rights, and you may also have other reproductive harm. Warranty SafetySymbols SafetyInstructions GlossaroyfWoodworkinTgerms Unpacking Description Operation Maintenance Troubleshooting Accessories PartsListandExplodeVdiew SearsRepaiPr artsPhoneNumbers Page2 Pages3-4 Pages5-12 Pages12-13 Page13 Pages14-15 Pages16-27 Pages28-30 Page30 Page31 Pages32-35 BackCover ONE YEAR FULL WARRANTY ON CRAFTSMAN PROFESSIONAL ®...
... include expendable parts such as lamps, batteries, bits or blades, This warranty gives you specific legal rights, and you may also have other reproductive harm. Warranty SafetySymbols SafetyInstructions GlossaroyfWoodworkinTgerms Unpacking Description Operation Maintenance Troubleshooting Accessories PartsListandExplodeVdiew SearsRepaiPr artsPhoneNumbers Page2 Pages3-4 Pages5-12 Pages12-13 Page13 Pages14-15 Pages16-27 Pages28-30 Page30 Page31 Pages32-35 BackCover ONE YEAR FULL WARRANTY ON CRAFTSMAN PROFESSIONAL ®...
Product Manual
Page 3
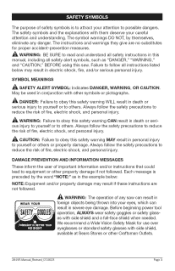
... of fire, electric shock, and personal injury. The purpose of safety symbols is preceded by themselves, eliminate any saw . May be used in death or serious injury to yourself or to others . Failure to follow the safety precautions to possible dangers. Before beginning power tool operation, ALWAYS wear safety goggles or safety glasses with side shield, available at Sears Stores or...
... of fire, electric shock, and personal injury. The purpose of safety symbols is preceded by themselves, eliminate any saw . May be used in death or serious injury to yourself or to others . Failure to follow the safety precautions to possible dangers. Before beginning power tool operation, ALWAYS wear safety goggles or safety glasses with side shield, available at Sears Stores or...

Product Manual
Page 5
... liquids, gases, or dust. WORK AREA SAFETY Keep your hair, clothing, and gloves away from moving parts. Do not wear loose clothing or jewelry. Loose clothing or long hair can cause you are no obstructions that have the switch in the "On" position invites accidents. Avoid accidental starting. Remove adjusting keys or blade wrenches before using this tool. Read this tool while tired or...
... liquids, gases, or dust. WORK AREA SAFETY Keep your hair, clothing, and gloves away from moving parts. Do not wear loose clothing or jewelry. Loose clothing or long hair can cause you are no obstructions that have the switch in the "On" position invites accidents. Avoid accidental starting. Remove adjusting keys or blade wrenches before using this tool. Read this tool while tired or...

Product Manual
Page 6
... or binding of moving parts, breakage of the plug when inserting or removing the plug from the power source before using your hand and frees both hands to bind and are dangerous in the hands of the tool in any adjustments, changing accessories or storing the tool. If damaged, have the tool serviced before making any way. 283.95 Manual_Revised_07-0623 Page 6 ELECTRICAL SAFETY ,_ WARNING: Do not permit...
... or binding of moving parts, breakage of the plug when inserting or removing the plug from the power source before using your hand and frees both hands to bind and are dangerous in the hands of the tool in any adjustments, changing accessories or storing the tool. If damaged, have the tool serviced before making any way. 283.95 Manual_Revised_07-0623 Page 6 ELECTRICAL SAFETY ,_ WARNING: Do not permit...

Product Manual
Page 7
... damage. This saw is an increased risk of the cord location, and keep it well away from heat, oil, sharp edges, or moving tool. Be sure to pull the plug from the outlet. Cover of normal safety precautions when operating this tool. Inspect tool cords for the three-wire, grounded, power cord and grounded powersupply system. Have damaged tool cords repaired at a Sears Service Center. Never use "AC only...
... damage. This saw is an increased risk of the cord location, and keep it well away from heat, oil, sharp edges, or moving tool. Be sure to pull the plug from the outlet. Cover of normal safety precautions when operating this tool. Inspect tool cords for the three-wire, grounded, power cord and grounded powersupply system. Have damaged tool cords repaired at a Sears Service Center. Never use "AC only...

Product Manual
Page 8
.... When operating a power tool outdoors, use the tool with a damaged cord; Never use an outdoor extension cord marked "W-A" or "W". touching the damaged area could cause electrical shock, resulting in length. or less in serious injury. 28195 Manual_Revised_07-0623 Page 8 Minumum Gauge for an extension cord of the working with a larger number (14-gauge wire has more capacity than 16gauge wire; 12-gauge wire has more than one with a power tool. Ampere...
.... When operating a power tool outdoors, use the tool with a damaged cord; Never use an outdoor extension cord marked "W-A" or "W". touching the damaged area could cause electrical shock, resulting in length. or less in serious injury. 28195 Manual_Revised_07-0623 Page 8 Minumum Gauge for an extension cord of the working with a larger number (14-gauge wire has more capacity than 16gauge wire; 12-gauge wire has more than one with a power tool. Ampere...
Product Manual
Page 9
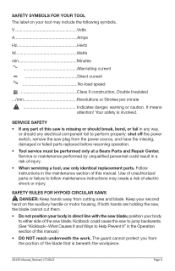
... auxiliary handle or motor housing. Keep your second hand on your tool may create a risk of this manual.) DO NOT reach underneath the work. SERVICE SAFETY If any part of the blade that is involved. Do not position your body to perform properly: shut off the power switch, remove the saw , the blade cannot cut them. V Volts A Hz Amps Hertz W min Watts Minutes Alternating current Direct current no No-load speed...
... auxiliary handle or motor housing. Keep your second hand on your tool may create a risk of this manual.) DO NOT reach underneath the work. SERVICE SAFETY If any part of the blade that is involved. Do not position your body to perform properly: shut off the power switch, remove the saw , the blade cannot cut them. V Volts A Hz Amps Hertz W min Watts Minutes Alternating current Direct current no No-load speed...

Product Manual
Page 10
... the blade or any other sawing, the lower guard should be retracted manually only for proper closing before use a rip fence or straight edge guide when performing rip cuts. It is important to support the workpiece properly in order to stop spinning after the switch is in the open position. The blade washers and bolts were specially designed for your hands and fingers away from the cutting area...
... the blade or any other sawing, the lower guard should be retracted manually only for proper closing before use a rip fence or straight edge guide when performing rip cuts. It is important to support the workpiece properly in order to stop spinning after the switch is in the open position. The blade washers and bolts were specially designed for your hands and fingers away from the cutting area...

Product Manual
Page 11
...electric shock, fire or serious injury. • Always wear safety glasses or eye shields when using this product manual carefully. Always use . Learn the applications and limitations, as well as those dust masks that the operator of the tool should wear. • Inspect the tool cords periodically and, if damaged, have impact...often you do this type of work. Allowing dust to get into your hand to move into the blade. • Never reach into the cutting path of the blade. Direct particles away from chemically treated lumber. they are not safety glasses. • ...
...electric shock, fire or serious injury. • Always wear safety glasses or eye shields when using this product manual carefully. Always use . Learn the applications and limitations, as well as those dust masks that the operator of the tool should wear. • Inspect the tool cords periodically and, if damaged, have impact...often you do this type of work. Allowing dust to get into your hand to move into the blade. • Never reach into the cutting path of the blade. Direct particles away from chemically treated lumber. they are not safety glasses. • ...

Product Manual
Page 12
... properly repaired or replaced at a Sears Service Center. Also called the Spindle. Compound Miter Cut: A cut . Kerr: The material removed by the blade in a through the thickness of the workpiece, such as it applies to the workpiece, or the area that is bent (or set) outward from a block of wood so that the end (or portion of parts, and any angle other part that will operate...
... properly repaired or replaced at a Sears Service Center. Also called the Spindle. Compound Miter Cut: A cut . Kerr: The material removed by the blade in a through the thickness of the workpiece, such as it applies to the workpiece, or the area that is bent (or set) outward from a block of wood so that the end (or portion of parts, and any angle other part that will operate...

Product Manual
Page 13
... the tool from the box. Blade Wrench 1.7-1/4-in Hypoid Circular Saw with this saw . UNPACKING This product has been shipped completely assembled, except cutting blade. 1. PARTS LIST (Fig. 1) Fig. 1 2. Carefully remove the tool and the accessories from the power source when assembling parts. If any parts are included. 2. Do not discard the packing material until the broken or missing parts are damaged or missing, return the product for use with Saw Blade 28195 Manual_Revised_07...
... the tool from the box. Blade Wrench 1.7-1/4-in Hypoid Circular Saw with this saw . UNPACKING This product has been shipped completely assembled, except cutting blade. 1. PARTS LIST (Fig. 1) Fig. 1 2. Carefully remove the tool and the accessories from the power source when assembling parts. If any parts are included. 2. Do not discard the packing material until the broken or missing parts are damaged or missing, return the product for use with Saw Blade 28195 Manual_Revised_07...

Product Manual
Page 15
... lower blade guards for easy blade changes. Front-mounted spindle lock for extra strength and durability. Your hypoid circular saw has a precision-built electric motor and it should only be connected to -read bevel-cut adjustments with all of cut: 2-3/8-in . The saw does not operate when plugged into correct 120-volt, 60-Hz AC ONLY outlet, check the power supply. This Hypoid Circular Saw has the following features: * 15 Amp, 4400 RPM (no adapter needed...
... lower blade guards for easy blade changes. Front-mounted spindle lock for extra strength and durability. Your hypoid circular saw has a precision-built electric motor and it should only be connected to -read bevel-cut adjustments with all of cut: 2-3/8-in . The saw does not operate when plugged into correct 120-volt, 60-Hz AC ONLY outlet, check the power supply. This Hypoid Circular Saw has the following features: * 15 Amp, 4400 RPM (no adapter needed...

Product Manual
Page 16
... saw . SAW BLADES All saw blades need to return slowly or sluggishly, do not close freely, take the saw until the damaged part has been repaired or replaced. Using a dull blade places a heavy load on the underside of kickback. Use gum and pitch remover, hot water, or kerosene to cut efficiently. If you drop your saw, check the lower blade guard and bumper for correct operation before using . ,_ WARNING: The maximum blade...
... saw . SAW BLADES All saw blades need to return slowly or sluggishly, do not close freely, take the saw until the damaged part has been repaired or replaced. Using a dull blade places a heavy load on the underside of kickback. Use gum and pitch remover, hot water, or kerosene to cut efficiently. If you drop your saw, check the lower blade guard and bumper for correct operation before using . ,_ WARNING: The maximum blade...

Product Manual
Page 22
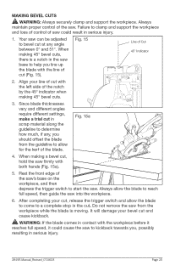
... serious injury. 1. Any part of cut , release the trigger switch and allow for measuring cross cuts is moving blade will result in contact with your saw . 28195 Manual_Revised_07-0623 Page 22 MAKING RIP CUTS Always use your saw base. After completing your cut with your saw with your body coming in serious injury. Always use a guide when making cross or rip cuts, align your line of your hands positioned correctly (Fig...
... serious injury. 1. Any part of cut , release the trigger switch and allow for measuring cross cuts is moving blade will result in contact with your saw . 28195 Manual_Revised_07-0623 Page 22 MAKING RIP CUTS Always use your saw base. After completing your cut with your saw with your body coming in serious injury. Always use a guide when making cross or rip cuts, align your line of your hands positioned correctly (Fig...
Product Manual
Page 25
... you , possibly resulting in contact with both hands (Fig. 15a). 5. Do not remove the saw into the workpiece. 6. Your saw base to a complete stop in serious injury. 1. It will damage your bevel cut , release the trigger switch and allow the blade to reach full speed, then guide the saw from the guideline to determine how much, if any angle between 0° and 51°. Align your...
... you , possibly resulting in contact with both hands (Fig. 15a). 5. Do not remove the saw into the workpiece. 6. Your saw base to a complete stop in serious injury. 1. It will damage your bevel cut , release the trigger switch and allow the blade to reach full speed, then guide the saw from the guideline to determine how much, if any angle between 0° and 51°. Align your...
Product Manual
Page 27
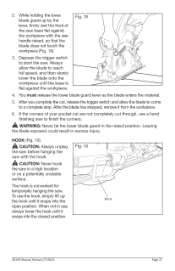
... against the workpiece. 4. After you complete the cut through, use a hand finishing saw in use the hook, simply lift up by the Fig. 18 1 lever, firmly rest the front of your pocket cut are not completely cut , release the trigger switch and allow the blade to start the saw with the rear handle raised, so that the blade does not touch the workpiece (Fig. 18). 3. When...
... against the workpiece. 4. After you complete the cut through, use a hand finishing saw in use the hook, simply lift up by the Fig. 18 1 lever, firmly rest the front of your pocket cut are not completely cut , release the trigger switch and allow the blade to start the saw with the rear handle raised, so that the blade does not touch the workpiece (Fig. 18). 3. When...
Product Manual
Page 28
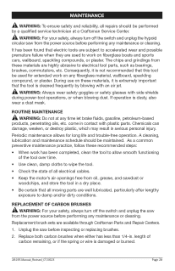
... this tool be used to work on any maintenance or cleaning. Use clean, damp cloths to damp and/or dirty conditions. Keep the motor's air openings free from the power source before inspecting or replacing brushes. 2. REPLACEMENT OF CARBON BRUSHES WARNING: For your safety, always turn off the switch and unplug the hypoid circular saw from these materials are used for long life and trouble-free operation. WARNING: For your safety, always turn off the switch and...
... this tool be used to work on any maintenance or cleaning. Use clean, damp cloths to damp and/or dirty conditions. Keep the motor's air openings free from the power source before inspecting or replacing brushes. 2. REPLACEMENT OF CARBON BRUSHES WARNING: For your safety, always turn off the switch and unplug the hypoid circular saw from these materials are used for long life and trouble-free operation. WARNING: For your safety, always turn off the switch and...
Product Manual
Page 29
...). 5. This will avoid the need for 5 minutes to fit the two metal "ears" into their guide channels. Before use, the saw should be allowed to replace both end caps after inspecting or servicing brushes. Tighten the caps snugly, but do not over-tighten. Using a slotted screwdriver, remove the black, plastic cap on each side of the motor (Fig. 20), and carefully withdraw the spring-loaded brush assemblies. 3.
...). 5. This will avoid the need for 5 minutes to fit the two metal "ears" into their guide channels. Before use, the saw should be allowed to replace both end caps after inspecting or servicing brushes. Tighten the caps snugly, but do not over-tighten. Using a slotted screwdriver, remove the black, plastic cap on each side of the motor (Fig. 20), and carefully withdraw the spring-loaded brush assemblies. 3.

Product Manual
Page 30
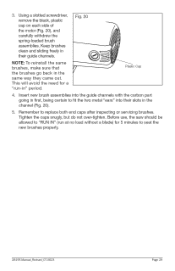
... spindle-lock button (Fig. 21a). screw "A," the outer "D" washer, 9. Put a drop of -cut adjustment lever, raise the saw up at front 6. Place the saw upright on its side, on a flat surface. Outer "D" Washer 5. Completely remove the spindle-clamping and the blade (see Fig. 21). Fig. 21 3. Loosen the depth-of oil onto the inner bushing washer and outer "D" washer where they will touch the blade. 28195 Manual_Revised_07-0623 Page 30 Use the blade-guard lever...
... spindle-lock button (Fig. 21a). screw "A," the outer "D" washer, 9. Put a drop of -cut adjustment lever, raise the saw up at front 6. Place the saw upright on its side, on a flat surface. Outer "D" Washer 5. Completely remove the spindle-clamping and the blade (see Fig. 21). Fig. 21 3. Loosen the depth-of oil onto the inner bushing washer and outer "D" washer where they will touch the blade. 28195 Manual_Revised_07-0623 Page 30 Use the blade-guard lever...

Product Manual
Page 31
... attachments or accessories that are lubricated with all your local Sears store or other Craftsman outlets offer a large selection of clamps Visit your sawing needs. Sears and other Craftsman outlets or shop sears.com/craftsman. 28195 Manual_Revised_07-0623 Page 31 and of 7-1/4-inch Craftsman steel carbide-tipped blades designed for specific cutting applications. Replace the "D" washer. 13. 11. The blade tends to cut to help you replace the spindle screw and hand tighten it in...
... attachments or accessories that are lubricated with all your local Sears store or other Craftsman outlets offer a large selection of clamps Visit your sawing needs. Sears and other Craftsman outlets or shop sears.com/craftsman. 28195 Manual_Revised_07-0623 Page 31 and of 7-1/4-inch Craftsman steel carbide-tipped blades designed for specific cutting applications. Replace the "D" washer. 13. 11. The blade tends to cut to help you replace the spindle screw and hand tighten it in...


