

Operation Manual
Page 1
Sears, Roebuck and Co., Hoffman Estates, IL 60179 U.S.A Visit our Craftsman® website: www.craftsman.com •WARRANTY • SAFETY • ASSEMBLY • OPERATION • MAINTENANCE • PARTS LIST Operator's Manual I £RRFTSM I 15-in. 5.5 Amp Weedwacker_ Electric Tr=mmer Model No. 172.74545 CAUTION: Read, understand and follow all Safety Rules and Operating Instructions in this Manual before using this product.
Sears, Roebuck and Co., Hoffman Estates, IL 60179 U.S.A Visit our Craftsman® website: www.craftsman.com •WARRANTY • SAFETY • ASSEMBLY • OPERATION • MAINTENANCE • PARTS LIST Operator's Manual I £RRFTSM I 15-in. 5.5 Amp Weedwacker_ Electric Tr=mmer Model No. 172.74545 CAUTION: Read, understand and follow all Safety Rules and Operating Instructions in this Manual before using this product.
Operation Manual
Page 2
... by themselves eliminate any trimmer can result in severe eye damage. Warranty Safety Symbols Safety Instructions Unpacking Description Assembly and Adjustments Operation Maintenance Accessories Parts List Page 2 Page 3 Pages 4 - 9 Page 10 Pages 11 - 13 Pages 13 - 17 Pages 17 - 21 Pages 22 Pages 23 Pages 24 - 25 TWO Y EAR FULL WARRANTY ON CRAFTSMAN WEEDWACKER® ELECTRIC TRIMMER If this Craftsman product fails due to...
... by themselves eliminate any trimmer can result in severe eye damage. Warranty Safety Symbols Safety Instructions Unpacking Description Assembly and Adjustments Operation Maintenance Accessories Parts List Page 2 Page 3 Pages 4 - 9 Page 10 Pages 11 - 13 Pages 13 - 17 Pages 17 - 21 Pages 22 Pages 23 Pages 24 - 25 TWO Y EAR FULL WARRANTY ON CRAFTSMAN WEEDWACKER® ELECTRIC TRIMMER If this Craftsman product fails due to...
Operation Manual
Page 3
... repaired. 2. Cover of plug when installing or removing the plug from moving parts. 4 PERSONAL SAFETY cont. 5. if used improperly or without the due precautions it "On" or "Off". DRESS properly. USE SAFETY EQUIPMENT. Tools are doing and use common sense when operating this manual. If damaged, have the tool serviced before using , Many accidents are equipped with care. Cutting line that cannot be suitable for this electric trimmer. Double insulated tools...
... repaired. 2. Cover of plug when installing or removing the plug from moving parts. 4 PERSONAL SAFETY cont. 5. if used improperly or without the due precautions it "On" or "Off". DRESS properly. USE SAFETY EQUIPMENT. Tools are doing and use common sense when operating this manual. If damaged, have the tool serviced before using , Many accidents are equipped with care. Cutting line that cannot be suitable for this electric trimmer. Double insulated tools...

Operation Manual
Page 4
... a Sears Service Center. INSPECT tool cords for electric lawn and garden power tools. When operating a power tool outdoors, use tool with a DC power supply. 4. II EXTENSION CORDS cont. atts rain M. SERVICE SAFETY 1. Tool service should break, bend, or fail in wet or damp locations. Use of electric shock. 7. Following this tool. 3. DO NOT use electric tools in any way; ALWAYS hold the trimmer by or to follow maintenance instructions may include the following symbols. DO NOT carry a plugged in...
... a Sears Service Center. INSPECT tool cords for electric lawn and garden power tools. When operating a power tool outdoors, use tool with a DC power supply. 4. II EXTENSION CORDS cont. atts rain M. SERVICE SAFETY 1. Tool service should break, bend, or fail in wet or damp locations. Use of electric shock. 7. Following this tool. 3. DO NOT use electric tools in any way; ALWAYS hold the trimmer by or to follow maintenance instructions may include the following symbols. DO NOT carry a plugged in...
Operation Manual
Page 5
..., etc. WHEN INSTALLING SAFETY GUARD OR CUTTING LINE OR CHANGING CUTTING LINE SPOOL be taken. KEEP guard in place and in use . KEEP ALL BYSTANDERS AWAY at high speed by the trimmer. 19. However, the following special precautions should be properly repaired or replaced at least 100 feet away. Failure to disconnect it if damaged. 11. DO NOT carry the trimmer by lawn and garden tools contain chemicals...
..., etc. WHEN INSTALLING SAFETY GUARD OR CUTTING LINE OR CHANGING CUTTING LINE SPOOL be taken. KEEP guard in place and in use . KEEP ALL BYSTANDERS AWAY at high speed by the trimmer. 19. However, the following special precautions should be properly repaired or replaced at least 100 feet away. Failure to disconnect it if damaged. 11. DO NOT carry the trimmer by lawn and garden tools contain chemicals...

Operation Manual
Page 6
...-load speed) motor. Four finger Trigger Switch for maximum control and gripping comfort with a GFCI (Ground Fault Circuit interrupter) outlet. Fig. 1 3. The trimmer comes with all II Your trimmer/edger has a precision built electric motor and it should always be used with reduced operator fatigue. 5. Remove the plug guard from the carton and inspect your trimmer. 3. Plug trimmer's power cord into correct 120-volt, 60 Hz AC ONLY outlet, check the power supply...
...-load speed) motor. Four finger Trigger Switch for maximum control and gripping comfort with a GFCI (Ground Fault Circuit interrupter) outlet. Fig. 1 3. The trimmer comes with all II Your trimmer/edger has a precision built electric motor and it should always be used with reduced operator fatigue. 5. Remove the plug guard from the carton and inspect your trimmer. 3. Plug trimmer's power cord into correct 120-volt, 60 Hz AC ONLY outlet, check the power supply...

Operation Manual
Page 7
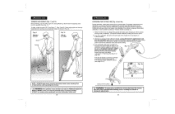
... of the trimmer head and remove the screws (see Fig. 4). 13 I m_akinWgARanNyINaGdju: stmTenotsa.void injury, ALWAYS turn off and disconnect the trimmer 2. Lightweight and Ergonomicatly Designed for Edging Pigtail Power Cord Plug Rotating Top Shaft 180° Trimmer Head N Motor Housing Air Vents Edge Guide position Adjustment Safety Guard Bump-Feed Head Cutting Line 12 _ II:[_Ii[I@#Ii[s][i.I NOTE: THE GUARD MUST BE ATTACHED to advance cutting line. 11. Use Craftsman 71-85967 bump feed replacement spool and line. it's factory...
... of the trimmer head and remove the screws (see Fig. 4). 13 I m_akinWgARanNyINaGdju: stmTenotsa.void injury, ALWAYS turn off and disconnect the trimmer 2. Lightweight and Ergonomicatly Designed for Edging Pigtail Power Cord Plug Rotating Top Shaft 180° Trimmer Head N Motor Housing Air Vents Edge Guide position Adjustment Safety Guard Bump-Feed Head Cutting Line 12 _ II:[_Ii[I@#Ii[s][i.I NOTE: THE GUARD MUST BE ATTACHED to advance cutting line. 11. Use Craftsman 71-85967 bump feed replacement spool and line. it's factory...

Operation Manual
Page 8
... AUXILIARY HANDLE MUST BE ATTACHED to help keep the cutting line away from the power outlet BEFORE installing parts or cleaning the trimmer or making any adjustments. J/ Fig. 6a 2 ADJUSTING THE AUXILIARY HANDLE (Fig. 6a) 1. Each end of the trimmer's head. Unscrew the auxiliary handle's tightening knob (counterclockwise) and remove from the power supply. 2. When the handle is handy for maximum control and balance. insert screws and securely attach the safety guard (see...
... AUXILIARY HANDLE MUST BE ATTACHED to help keep the cutting line away from the power outlet BEFORE installing parts or cleaning the trimmer or making any adjustments. J/ Fig. 6a 2 ADJUSTING THE AUXILIARY HANDLE (Fig. 6a) 1. Each end of the trimmer's head. Unscrew the auxiliary handle's tightening knob (counterclockwise) and remove from the power supply. 2. When the handle is handy for maximum control and balance. insert screws and securely attach the safety guard (see...

Operation Manual
Page 9
... /_/t Use as the trigger switch is repaired or replaced. PIGTAIL POWER CORD (See Figs. 2, 2a and 2b on the trigger switch. Allow at least 5 seconds for the cutting spool (line) to a proper extension cord. Head will stay ON as long as Edger _!' . Turning Trimmer OFF 1. Fig. 8 2. This cord must be attached to stop rotating. 17 Easily readjust the angle to lock top shaft in the trimmer until the damaged part is squeezed. ADJUSTING THE...
... /_/t Use as the trigger switch is repaired or replaced. PIGTAIL POWER CORD (See Figs. 2, 2a and 2b on the trigger switch. Allow at least 5 seconds for the cutting spool (line) to a proper extension cord. Head will stay ON as long as Edger _!' . Turning Trimmer OFF 1. Fig. 8 2. This cord must be attached to stop rotating. 17 Easily readjust the angle to lock top shaft in the trimmer until the damaged part is squeezed. ADJUSTING THE...
Operation Manual
Page 10
... trimming, cut . If no change in "Removing the Spool" on the trimmer head (motor housing) free of any trimmer can result in FOREIGN OBJECTS BEING THROWN, which can result in Fig. 12. Once the lines are pulled out (extended), plug the tdmmer's pigtail power cord into the extension cord and resume cutting. 4_ If the cutting line still does not feed from the power outlet BEFORE installing parts or cleaning the trimmer or m/_akiWngARaNnIyNGad...
... trimming, cut . If no change in "Removing the Spool" on the trimmer head (motor housing) free of any trimmer can result in FOREIGN OBJECTS BEING THROWN, which can result in Fig. 12. Once the lines are pulled out (extended), plug the tdmmer's pigtail power cord into the extension cord and resume cutting. 4_ If the cutting line still does not feed from the power outlet BEFORE installing parts or cleaning the trimmer or m/_akiWngARaNnIyNGad...

Operation Manual
Page 11
... line. Before each use the appropriate type of the arrow on the spool head cover and remove cover, pulling it down and needs to the right improves the unit's cutting efficiency and clippings are trimming. Tighten the guard screws, but DO NOT over 6 inches in height, work from spool rail notch. Before trimming, inspect the area for maximum reliability. 1. When the trimmer is factory wound for string, wire...
... line. Before each use the appropriate type of the arrow on the spool head cover and remove cover, pulling it down and needs to the right improves the unit's cutting efficiency and clippings are trimming. Tighten the guard screws, but DO NOT over 6 inches in height, work from spool rail notch. Before trimming, inspect the area for maximum reliability. 1. When the trimmer is factory wound for string, wire...

Operation Manual
Page 12
... tool immediately and have the problem corrected before using trimmer. Before each use nylon monofilament (Craftsman Cutting Line 71-85822). Have damaged, missing, worn or broken parts replaced before further use. CLEANING /K WARNING: To avoid injury, ALWAYS turn off and disconnect the trimmer from the power outlet BEFORE installing line, cleaning the trimmer or making I from obstruction when operating the trimmer. I Wipe the outside of the air vents ALWAYS keep the air vents free...
... tool immediately and have the problem corrected before using trimmer. Before each use nylon monofilament (Craftsman Cutting Line 71-85822). Have damaged, missing, worn or broken parts replaced before further use. CLEANING /K WARNING: To avoid injury, ALWAYS turn off and disconnect the trimmer from the power outlet BEFORE installing line, cleaning the trimmer or making I from obstruction when operating the trimmer. I Wipe the outside of the air vents ALWAYS keep the air vents free...

Operation Manual
Page 13
... Housing 1 Left Housing husk 1 Right Housing husk 1 Edging Space 1 Guard 1 Cutting Blade 1 Cuting Head&Rivet 1 spring 1X13X29.5 1 B-1 Nut 6 1 Insulation Cap 1 Winding Spool&Cutting Line 1 Bottom Cover 1 Winding Spool decorate Cover 1 Carbon Brush 2 Brush Holder 2 Brush Holder Assmebly 2 Rivet 1 Rear Bracket 1 Stator (120V) 1 Washer(_-) 1 Washer(_) 2 Armature(120V/ 1 Washer(--) 2 Bearing 608Z 1 Front Bracket 1 Stud M4X55 2 Washer byAxis 1 Fixing Block 1 metalSelfTappingScrew(ST3xt0) Weedwacker ® Electric Trimmer ModelNo, 172,74545...
... Housing 1 Left Housing husk 1 Right Housing husk 1 Edging Space 1 Guard 1 Cutting Blade 1 Cuting Head&Rivet 1 spring 1X13X29.5 1 B-1 Nut 6 1 Insulation Cap 1 Winding Spool&Cutting Line 1 Bottom Cover 1 Winding Spool decorate Cover 1 Carbon Brush 2 Brush Holder 2 Brush Holder Assmebly 2 Rivet 1 Rear Bracket 1 Stator (120V) 1 Washer(_-) 1 Washer(_) 2 Armature(120V/ 1 Washer(--) 2 Bearing 608Z 1 Front Bracket 1 Stud M4X55 2 Washer byAxis 1 Fixing Block 1 metalSelfTappingScrew(ST3xt0) Weedwacker ® Electric Trimmer ModelNo, 172,74545...

Operation Manual
Page 14
... replacement parts, accessories and owner's manuals that you need to do-it ! of all major brand appliances, lawn and garden equipment, or heating and cooling systems, no matter who made it, no matter who sold it -yourself, For Sears professional installation of home appliances and items like vacuums, lawn equipment, and electronics, call anytime for the location of the nearest Sears Parts & Repair Service...
... replacement parts, accessories and owner's manuals that you need to do-it ! of all major brand appliances, lawn and garden equipment, or heating and cooling systems, no matter who made it, no matter who sold it -yourself, For Sears professional installation of home appliances and items like vacuums, lawn equipment, and electronics, call anytime for the location of the nearest Sears Parts & Repair Service...


