

Operation Manual
Page 1
Operator's Manual I £RRFTSM I 15-in. 5.5 Amp Weedwacker_ Electric Tr=mmer Model No. 172.74545 CAUTION: Read, understand and follow all Safety Rules and Operating Instructions in this Manual before using this product. Sears, Roebuck and Co., Hoffman Estates, IL 60179 U.S.A Visit our Craftsman® website: www.craftsman.com •WARRANTY • SAFETY • ASSEMBLY • OPERATION • MAINTENANCE • PARTS LIST
Operator's Manual I £RRFTSM I 15-in. 5.5 Amp Weedwacker_ Electric Tr=mmer Model No. 172.74545 CAUTION: Read, understand and follow all Safety Rules and Operating Instructions in this Manual before using this product. Sears, Roebuck and Co., Hoffman Estates, IL 60179 U.S.A Visit our Craftsman® website: www.craftsman.com •WARRANTY • SAFETY • ASSEMBLY • OPERATION • MAINTENANCE • PARTS LIST
Operation Manual
Page 2
...measures. SAVE THESE INSTRUCTIONS? The instructions and warnings they give are not followed. I manual, including all safety alert symbols such as cutting line, lamps batteries, bits, blades, or bonnets. I A CAUTION Failure to obey this safety warning MAY result in death or serious injury...Assembly and Adjustments Operation Maintenance Accessories Parts List Page 2 Page 3 Pages 4 - 9 Page 10 Pages 11 - 13 Pages 13 - 17 Pages 17 - 21 Pages 22 Pages 23 Pages 24 - 25 TWO Y EAR FULL WARRANTY ON CRAFTSMAN WEEDWACKER® ELECTRIC TRIMMER If this Craftsman product fails due to a defect...
...measures. SAVE THESE INSTRUCTIONS? The instructions and warnings they give are not followed. I manual, including all safety alert symbols such as cutting line, lamps batteries, bits, blades, or bonnets. I A CAUTION Failure to obey this safety warning MAY result in death or serious injury...Assembly and Adjustments Operation Maintenance Accessories Parts List Page 2 Page 3 Pages 4 - 9 Page 10 Pages 11 - 13 Pages 13 - 17 Pages 17 - 21 Pages 22 Pages 23 Pages 24 - 25 TWO Y EAR FULL WARRANTY ON CRAFTSMAN WEEDWACKER® ELECTRIC TRIMMER If this Craftsman product fails due to a defect...
Operation Manual
Page 3
...Failure to protect your hair, clothing, and gloves away from the outlet, 1. NEVER allow children near the tool. This trimmer is a double insulated tool. Learn the electric trimmer's applications and limitations, as well as rocks and send them flying at night. Wear long pants and long sleeves to ...follow all instructions listed below may result in FOREIGN OBJECTS I rules that may affect the tool's operation. USE ONLY cutting line that may be suitable for misalignment or binding of moving parts, breakage of untrained users, 4. If the plug does not fit fully in the hands of...
...Failure to protect your hair, clothing, and gloves away from the outlet, 1. NEVER allow children near the tool. This trimmer is a double insulated tool. Learn the electric trimmer's applications and limitations, as well as rocks and send them flying at night. Wear long pants and long sleeves to ...follow all instructions listed below may result in FOREIGN OBJECTS I rules that may affect the tool's operation. USE ONLY cutting line that may be suitable for misalignment or binding of moving parts, breakage of untrained users, 4. If the plug does not fit fully in the hands of...
Operation Manual
Page 4
... and reduce the risk of protection. Use of unauthorized parts or failure to pull the plug from the spinning cutting lines. 8. Use trimmer ONLY when grass and weeds are not recommended. Receptacles are rated for electric lawn and garden power tools. these cords are available ... ONLY use "AC only" rated tools with the trimmer. For this trimmer is recommended for this measure of electric shock. 7. Extension cords 100-ft. When operating a power tool outdoors, use only identical replacement parts. atts rain M. If any part of 50-ft. When servicing a tool, use an...
... and reduce the risk of protection. Use of unauthorized parts or failure to pull the plug from the spinning cutting lines. 8. Use trimmer ONLY when grass and weeds are not recommended. Receptacles are rated for electric lawn and garden power tools. these cords are available ... ONLY use "AC only" rated tools with the trimmer. For this trimmer is recommended for this measure of electric shock. 7. Extension cords 100-ft. When operating a power tool outdoors, use only identical replacement parts. atts rain M. If any part of 50-ft. When servicing a tool, use an...
Operation Manual
Page 5
...line area) until trimmer has completely stopped. ALWAYS wear safety glasses or eye shields when using the trimmer, remove any other part that is damaged should be carefully checked to cause cancer, birth defects or other petroleum products to follow all instructions listed below may create a hazardous situation. 17. tbey are : • Compounds in electric... tool's operation. SAVE THESE INSTRUCTIONS. Keep cord away from cutting line. 15. Do not try to disconnect it is designed for misalignment or binding of parts, and any solid objects such as those dust masks that persons ...
...line area) until trimmer has completely stopped. ALWAYS wear safety glasses or eye shields when using the trimmer, remove any other part that is damaged should be carefully checked to cause cancer, birth defects or other petroleum products to follow all instructions listed below may create a hazardous situation. 17. tbey are : • Compounds in electric... tool's operation. SAVE THESE INSTRUCTIONS. Keep cord away from cutting line. 15. Do not try to disconnect it is designed for misalignment or binding of parts, and any solid objects such as those dust masks that persons ...

Operation Manual
Page 6
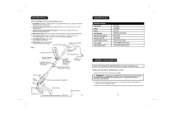
...trimming and edging in the trimmer until all parts are located around collar of power and the motor would overheat. z_ WARNING: If any part of the trimmer is missing or damaged, ...2b). Make a loop in all II Your trimmer/edger has a precision built electric motor and it should be attached to trimmer head are examined. Four finger Trigger Switch for...trimmer, auxiliary handle and safety guard from the pigtail power cord (see page 6). Plug trimmer's power cord into correct 120-volt, 60 Hz AC ONLY outlet, check the power supply. This Trimmer/Edger has the following features: 1. 15...
...trimming and edging in the trimmer until all parts are located around collar of power and the motor would overheat. z_ WARNING: If any part of the trimmer is missing or damaged, ...2b). Make a loop in all II Your trimmer/edger has a precision built electric motor and it should be attached to trimmer head are examined. Four finger Trigger Switch for...trimmer, auxiliary handle and safety guard from the pigtail power cord (see page 6). Plug trimmer's power cord into correct 120-volt, 60 Hz AC ONLY outlet, check the power supply. This Trimmer/Edger has the following features: 1. 15...
Operation Manual
Page 7
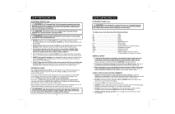
...height. 9. Use Craftsman 71-85967 bump feed replacement spool and line. Edge Guide provides a cutting guide to advance cutting line. 11. Your Trimmer uses 0.065-in the base of the head by trimmer line. 8. Locate the 4 screws in . Disconnect the trimmer from 16 to the trimmer head before use ...Adjustment Safety Guard Bump-Feed Head Cutting Line 12 _ II:[_Ii[I@#Ii[s][i.I Cutting Path Speed Rating Line Diameter Line Feed Mechanism Trimmer Head Tilt Adjust Height of Shaft Cord Length Power Requirement 15 inches 7200 RPM 5.5 Amp 0.065 inch round line Bump feed 4 positions From 16 ...
...height. 9. Use Craftsman 71-85967 bump feed replacement spool and line. Edge Guide provides a cutting guide to advance cutting line. 11. Your Trimmer uses 0.065-in the base of the head by trimmer line. 8. Locate the 4 screws in . Disconnect the trimmer from 16 to the trimmer head before use ...Adjustment Safety Guard Bump-Feed Head Cutting Line 12 _ II:[_Ii[I@#Ii[s][i.I Cutting Path Speed Rating Line Diameter Line Feed Mechanism Trimmer Head Tilt Adjust Height of Shaft Cord Length Power Requirement 15 inches 7200 RPM 5.5 Amp 0.065 inch round line Bump feed 4 positions From 16 ...

Operation Manual
Page 8
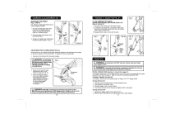
.... (Figs. 4 and 4a ) 4. Disconnect the trimmer from the power outlet BEFORE installing parts or cleaning the trimmer or making any adjustments. J/ Fig. 6a 2 ADJUSTING...cutting guide. I ,/h WARNING: To avoid injury, ALWAYS turn off and disconnect the trimmer I /K CAUTION: Line cutter on each side of the tool in unexpected situations. ALWAYS KEEP proper balance for...and tighten knob (turn knob and tighten securely. 15 Fig. 6 z_ WARNING: To avoid injury, adjust the auxiliary handle for better control of the trimmer's head. Fig. 5 14 ATTACHING THE AUXILIARY...
.... (Figs. 4 and 4a ) 4. Disconnect the trimmer from the power outlet BEFORE installing parts or cleaning the trimmer or making any adjustments. J/ Fig. 6a 2 ADJUSTING...cutting guide. I ,/h WARNING: To avoid injury, ALWAYS turn off and disconnect the trimmer I /K CAUTION: Line cutter on each side of the tool in unexpected situations. ALWAYS KEEP proper balance for...and tighten knob (turn knob and tighten securely. 15 Fig. 6 z_ WARNING: To avoid injury, adjust the auxiliary handle for better control of the trimmer's head. Fig. 5 14 ATTACHING THE AUXILIARY...
Operation Manual
Page 9
.... Refer to a proper extension cord. The trimmer will click into power outlet. 3. Release the trigger switch to turn off and disconnect the trimmer from the power outlet BEFORE installing parts or cleaning the trimmer or making any part of the trimmer is missing or damaged, do so could ...plug in place. 3. Allow at least 5 seconds for the cutting spool (line) to the desired working angle for attaching extension cord. Release bottom collar to lock top shaft in the trimmer until the damaged part is squeezed. Twist top collar (clockwise) to lock shaft in the Collapsed...
.... Refer to a proper extension cord. The trimmer will click into power outlet. 3. Release the trigger switch to turn off and disconnect the trimmer from the power outlet BEFORE installing parts or cleaning the trimmer or making any part of the trimmer is missing or damaged, do so could ...plug in place. 3. Allow at least 5 seconds for the cutting spool (line) to the desired working angle for attaching extension cord. Release bottom collar to lock top shaft in the trimmer until the damaged part is squeezed. Twist top collar (clockwise) to lock shaft in the Collapsed...
Operation Manual
Page 10
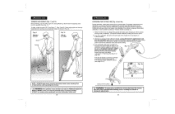
... 13 If the line is operating. from left to normal wear. For greater convenience and efficiency, your trimmer has been equipped with a bump feed head that allows you are being cut from the power outlet BEFORE installing parts or cleaning the trimmer or m/_akiWngARaNnIyNGad: justmTeonatsv....oid injury, ALWAYS turn off and disconnect the trimmer I 19 Z_ WARNING:The operation of obstructions when operating the trimmer. If the spool is done along sidewalks...
... 13 If the line is operating. from left to normal wear. For greater convenience and efficiency, your trimmer has been equipped with a bump feed head that allows you are being cut from the power outlet BEFORE installing parts or cleaning the trimmer or m/_akiWngARaNnIyNGad: justmTeonatsv....oid injury, ALWAYS turn off and disconnect the trimmer I 19 Z_ WARNING:The operation of obstructions when operating the trimmer. If the spool is done along sidewalks...

Operation Manual
Page 11
... wind new line onto the uppermost part of the spool. (Fig. 15). When the wound cutting line reaches the eyeiets (recesses), and cut with constant speed and height. 7. Stand with a new factory pre-wound spool, Craftsman 71-85967, available from the power outlet BEFORE installing parts or cleaning the trimmer or making any remaining cutting line from the...
... wind new line onto the uppermost part of the spool. (Fig. 15). When the wound cutting line reaches the eyeiets (recesses), and cut with constant speed and height. 7. Stand with a new factory pre-wound spool, Craftsman 71-85967, available from the power outlet BEFORE installing parts or cleaning the trimmer or making any remaining cutting line from the...
Operation Manual
Page 12
... at Sears Stores or other Craftsman outlets. Visit your local Sears store or other product manuals online. , Get answers from the power outlet BEFORE installing line, cleaning the trimmer or making any adjustments. for damaged, missing, or worn parts. Check for free! 22 23 I Z_ WARNING: To avoid damage or electric shock, DO NOT use...
... at Sears Stores or other Craftsman outlets. Visit your local Sears store or other product manuals online. , Get answers from the power outlet BEFORE installing line, cleaning the trimmer or making any adjustments. for damaged, missing, or worn parts. Check for free! 22 23 I Z_ WARNING: To avoid damage or electric shock, DO NOT use...

Operation Manual
Page 13
... OV 6OHz o so\ 32\ 10_ 12 60 ]I \ 15-in . Weedwacker ® Electric Trimmer ModelNo, 172,74545 The modelnumberwill be found on the nameplate of the Trimmer. Item No, [ 1 2 3 4 5 6 7 8 9 10 11 12 13 14 15 16 17 18 19 2O 21 22 23 24 25 26 27 28 29 Parts No, GGT4502U-1 GGT4502U-2 GGT4502U-3 GGT4502U-4 GGT4502U-5 GGT4502U-6 GGT4502U...
... OV 6OHz o so\ 32\ 10_ 12 60 ]I \ 15-in . Weedwacker ® Electric Trimmer ModelNo, 172,74545 The modelnumberwill be found on the nameplate of the Trimmer. Item No, [ 1 2 3 4 5 6 7 8 9 10 11 12 13 14 15 16 17 18 19 2O 21 22 23 24 25 26 27 28 29 Parts No, GGT4502U-1 GGT4502U-2 GGT4502U-3 GGT4502U-4 GGT4502U-5 GGT4502U-6 GGT4502U...

Operation Manual
Page 14
For the replacement parts, accessories and owner's manuals that you need to do-it ! and Canada) www.sears.com www.sears.ca Our Home For repair of Sears Brands. ... -yourself, For Sears professional installation of home appliances and items like vacuums, lawn equipment, and electronics, call anytime for the location of the nearest Sears Parts & Repair Service Center 1-800-488-1222 (USA) www.sears.com 1-800-469-4663 (Canada) www.sears.ca To purchase a protection agreement on a product serviced by...
For the replacement parts, accessories and owner's manuals that you need to do-it ! and Canada) www.sears.com www.sears.ca Our Home For repair of Sears Brands. ... -yourself, For Sears professional installation of home appliances and items like vacuums, lawn equipment, and electronics, call anytime for the location of the nearest Sears Parts & Repair Service Center 1-800-488-1222 (USA) www.sears.com 1-800-469-4663 (Canada) www.sears.ca To purchase a protection agreement on a product serviced by...


