Getting Started Guide
Page 1
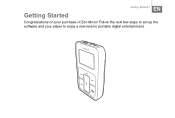
Follow the next few steps to set up the software and your purchase of Zen Micro! Getting Started EN Getting Started 1 Congratulations on your player to enjoy a new level in portable digital entertainment.
Follow the next few steps to set up the software and your purchase of Zen Micro! Getting Started EN Getting Started 1 Congratulations on your player to enjoy a new level in portable digital entertainment.

Getting Started Guide
Page 3
flashes on the power outlet. When the battery is charging, the battery charging icon charge should take approximately three hours. Charge the battery 3 2 Connect your player's battery, you are in. If necessary, turn on the LCD. NOTE The power outlet shown may differ, depending on the country you can still use your player. A full TIP While charging your player to the power adapter, then connect the power adapter to a power outlet.
flashes on the power outlet. When the battery is charging, the battery charging icon charge should take approximately three hours. Charge the battery 3 2 Connect your player's battery, you are in. If necessary, turn on the LCD. NOTE The power outlet shown may differ, depending on the country you can still use your player. A full TIP While charging your player to the power adapter, then connect the power adapter to a power outlet.

Getting Started Guide
Page 4
... the instructions on the screen. 4 If prompted, restart your CD-ROM/DVD-ROM drive. 4 Set up the software Step 2: Set up the software WARNING DO NOT connect your player to your computer before setting up the software. 1 Turn on your computer. Your CD should start automatically. If you have Microsoft® Windows® XP or Windows 2000, remember to your operating system's online Help. 2 Insert the Installation and Applications...
... the instructions on the screen. 4 If prompted, restart your CD-ROM/DVD-ROM drive. 4 Set up the software Step 2: Set up the software WARNING DO NOT connect your player to your computer before setting up the software. 1 Turn on your computer. Your CD should start automatically. If you have Microsoft® Windows® XP or Windows 2000, remember to your operating system's online Help. 2 Insert the Installation and Applications...
Getting Started Guide
Page 5
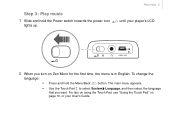
For tips on using the Touch Pad, see "Using the Touch Pad" on Zen Micro for the first time, the menu is in English. The main menu appears. • Use the Touch Pad to select System Language, and then select the language that you turn on page 10, or your player's LCD USB 2 When you want. Step 3: Play music 1 Slide and hold the Menu/Back button. Play music 5 until your User's Guide. To change the language: • Press and hold the Power switch towards the power icon lights up.
For tips on using the Touch Pad, see "Using the Touch Pad" on Zen Micro for the first time, the menu is in English. The main menu appears. • Use the Touch Pad to select System Language, and then select the language that you turn on page 10, or your player's LCD USB 2 When you want. Step 3: Play music 1 Slide and hold the Menu/Back button. Play music 5 until your User's Guide. To change the language: • Press and hold the Power switch towards the power icon lights up.
Getting Started Guide
Page 6
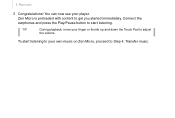
To start listening. Zen Micro is preloaded with content to start listening to your player. Connect the earphones and press the Play/Pause button to get you started immediately. You can now use your own music on Zen Micro, proceed to adjust the volume. 6 Play music 3 Congratulations! TIP During playback, move your finger or thumb up and down the Touch Pad to Step 4: Transfer music.
To start listening. Zen Micro is preloaded with content to start listening to your player. Connect the earphones and press the Play/Pause button to get you started immediately. You can now use your own music on Zen Micro, proceed to adjust the volume. 6 Play music 3 Congratulations! TIP During playback, move your finger or thumb up and down the Touch Pad to Step 4: Transfer music.

Getting Started Guide
Page 7
TIP Your computer's USB port may be located on your player's LCD 2 Connect your player to your player from the power adapter. The battery is fully charged when you see on the front, rear or side panels. Transfer music 7 Step 4: Transfer music 1 After charging the battery, disconnect your computer's USB port with the supplied USB cable.
TIP Your computer's USB port may be located on your player's LCD 2 Connect your player to your player from the power adapter. The battery is fully charged when you see on the front, rear or side panels. Transfer music 7 Step 4: Transfer music 1 After charging the battery, disconnect your computer's USB port with the supplied USB cable.
Getting Started Guide
Page 8
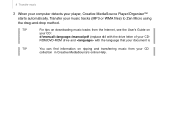
ROM/DVD-ROM drive and with the drive letter of your music tracks (MP3 or WMA files) to Zen Micro using the drag-and-drop method. 8 Transfer music 3 When your computer detects your CD collection in Creative MediaSource's online Help. TIP For tips on downloading music tracks from the Internet, see the User's Guide on your CD: d:\manual\\manual.pdf (replace d:\ with the language that your document is TIP You can find information on ripping and transferring music from your player, Creative MediaSource Player/Organizer™ starts automatically. Transfer your CD-
ROM/DVD-ROM drive and with the drive letter of your music tracks (MP3 or WMA files) to Zen Micro using the drag-and-drop method. 8 Transfer music 3 When your computer detects your CD collection in Creative MediaSource's online Help. TIP For tips on downloading music tracks from the Internet, see the User's Guide on your CD: d:\manual\\manual.pdf (replace d:\ with the language that your document is TIP You can find information on ripping and transferring music from your player, Creative MediaSource Player/Organizer™ starts automatically. Transfer your CD-
Getting Started Guide
Page 9
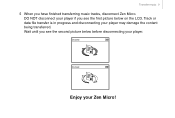
Track or data file transfer is in progress and disconnecting your Zen Micro! Wait until you see the first picture below before disconnecting your player if you have finished transferring music tracks, disconnect Zen Micro. Docked Docked Enjoy your player may damage the content being transferred. DO NOT disconnect your player. Transfer music 9 4 When you see the second picture below on the LCD.
Track or data file transfer is in progress and disconnecting your Zen Micro! Wait until you see the first picture below before disconnecting your player if you have finished transferring music tracks, disconnect Zen Micro. Docked Docked Enjoy your player may damage the content being transferred. DO NOT disconnect your player. Transfer music 9 4 When you see the second picture below on the LCD.

Getting Started Guide
Page 10
10 Using the Touch Pad Using the Touch Pad 1 Move your finger or thumb up and down the Touch Pad to scroll through menu items. To rapidly scroll though menu items, hold down the top or bottom portion of the Touch Pad with your finger or thumb. 2 To select a menu item, lightly tap the Touch Pad.
10 Using the Touch Pad Using the Touch Pad 1 Move your finger or thumb up and down the Touch Pad to scroll through menu items. To rapidly scroll though menu items, hold down the top or bottom portion of the Touch Pad with your finger or thumb. 2 To select a menu item, lightly tap the Touch Pad.
Getting Started Guide
Page 11
Register your region. Enjoy a host of benefits by registering your warranty rights are not dependent on promotions and events. Benefits include: • Service and product support from Creative • Exclusive updates on product registration. Go to www.creative.com and select your product! Please note that your product during installation, or at Creative's 24-hour self-help Knowledge Base. Safety Advice Safety Advice 11 More Information Creative Knowledge Base Resolve and troubleshoot technical queries at www.creative.com.
Register your region. Enjoy a host of benefits by registering your warranty rights are not dependent on promotions and events. Benefits include: • Service and product support from Creative • Exclusive updates on product registration. Go to www.creative.com and select your product! Please note that your product during installation, or at Creative's 24-hour self-help Knowledge Base. Safety Advice Safety Advice 11 More Information Creative Knowledge Base Resolve and troubleshoot technical queries at www.creative.com.

Getting Started Guide
Page 12
... owners and are in the Installation CD. All specifications are registered trademarks of Creative Technology Ltd. All other products are trademarks or registered trademarks of the warranty period. d:\manual\\manual.pdf (replace d:\ with the drive letter of your CD-ROM/DVD-ROM drive, with the language that you are hereby recognized as such. 12 Safety Advice Customer Support Services and Warranty You can find Customer Support Services...
... owners and are in the Installation CD. All specifications are registered trademarks of Creative Technology Ltd. All other products are trademarks or registered trademarks of the warranty period. d:\manual\\manual.pdf (replace d:\ with the drive letter of your CD-ROM/DVD-ROM drive, with the language that you are hereby recognized as such. 12 Safety Advice Customer Support Services and Warranty You can find Customer Support Services...

