

1X 221 HP Warranty Information
Page 1
... or consequential damages, or limitations on threestage snow thrower models only) against defects in this product (excluding Normal Wear Parts and the Auger Gearbox, as : belts, skid shoes, shave plates, blades, debris collection bags, wheels and tires. HOW TO OBTAIN SERVICE: Warranty service is in addition to new merchandise purchased and used in accordance with the Operator's Manual furnished with your property and/or to...
... or consequential damages, or limitations on threestage snow thrower models only) against defects in this product (excluding Normal Wear Parts and the Auger Gearbox, as : belts, skid shoes, shave plates, blades, debris collection bags, wheels and tires. HOW TO OBTAIN SERVICE: Warranty service is in addition to new merchandise purchased and used in accordance with the Operator's Manual furnished with your property and/or to...
2X 930 SWE Operator's Manual
Page 1
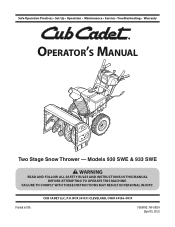
Models 930 SWE & 933 SWE WARNING READ AND FOLLOW ALL SAFETY RULES AND INSTRUCTIONS IN THIS MANUAL BEFORE ATTEMPTING TO OPERATE THIS MACHINE. Printed In USA CUB CADET LLC, P.O. BOX 361131 CLEVELAND, OHIO 44136-0019 FORM NO. 769-08124 (April 30, 2012) FAILURE TO COMPLY WITH THESE INSTRUCTIONS MAY RESULT IN PERSONAL INJURY. Safe Operation Practices • Set-Up • Operation • Maintenance • Service • Troubleshooting • Warranty Operator's Manual Two Stage Snow Thrower -
Models 930 SWE & 933 SWE WARNING READ AND FOLLOW ALL SAFETY RULES AND INSTRUCTIONS IN THIS MANUAL BEFORE ATTEMPTING TO OPERATE THIS MACHINE. Printed In USA CUB CADET LLC, P.O. BOX 361131 CLEVELAND, OHIO 44136-0019 FORM NO. 769-08124 (April 30, 2012) FAILURE TO COMPLY WITH THESE INSTRUCTIONS MAY RESULT IN PERSONAL INJURY. Safe Operation Practices • Set-Up • Operation • Maintenance • Service • Troubleshooting • Warranty Operator's Manual Two Stage Snow Thrower -
2X 930 SWE Operator's Manual
Page 2
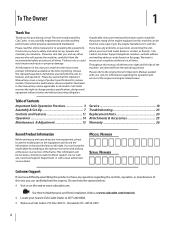
... and/or illustrated in this manual is relative to the most recent product information available at the time of Contents Important Safe Operation Practices 3 Assembly & Set-Up 7 Controls and Features 11 Operation 14 Maintenance & Adjustment 15 Service 18 Troubleshooting 23 Replacement Parts 24 Attachments & Accessories 25 Warranty 26 Record Product Information Before setting up , operate and maintain your complete satisfaction at all times. Cub Cadet reserves the right to provide...
... and/or illustrated in this manual is relative to the most recent product information available at the time of Contents Important Safe Operation Practices 3 Assembly & Set-Up 7 Controls and Features 11 Operation 14 Maintenance & Adjustment 15 Service 18 Troubleshooting 23 Replacement Parts 24 Attachments & Accessories 25 Warranty 26 Record Product Information Before setting up , operate and maintain your complete satisfaction at all times. Cub Cadet reserves the right to provide...
2X 930 SWE Operator's Manual
Page 3
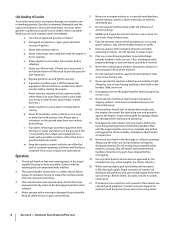
... clear snow. 3 Never allow adults to observe the following safety instructions could become entangled in operation. Adjust auger housing height to operate this manual before starting the engine. 6. Let engine and machine adjust to outdoor temperature before attempting to comply with all control levers before attempting to the safe operation practices in serious injury or death. Preparation Thoroughly inspect the area where the equipment is running...
... clear snow. 3 Never allow adults to observe the following safety instructions could become entangled in operation. Adjust auger housing height to operate this manual before starting the engine. 6. Let engine and machine adjust to outdoor temperature before attempting to comply with all control levers before attempting to the safe operation practices in serious injury or death. Preparation Thoroughly inspect the area where the equipment is running...
2X 930 SWE Operator's Manual
Page 4
..., space heater, clothes 15. If possible, remove gas-powered equipment from a leave the operating position (behind and use and automatically return to another area. Never put hands or feet near rotating parts, in handling gasoline. Always use extreme care in the auger/ impeller housing or chute assembly. Rapid retraction of starter cord (kickback) will pull hand and arm toward engine faster than ½ allow anyone in both...
..., space heater, clothes 15. If possible, remove gas-powered equipment from a leave the operating position (behind and use and automatically return to another area. Never put hands or feet near rotating parts, in handling gasoline. Always use extreme care in the auger/ impeller housing or chute assembly. Rapid retraction of starter cord (kickback) will pull hand and arm toward engine faster than ½ allow anyone in both...
2X 930 SWE Operator's Manual
Page 5
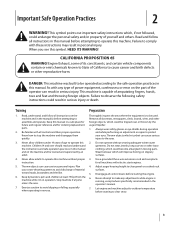
... comply with snow throwers. Check control levers periodically to protect the environment. 9. to verify they engage and disengage properly and adjust, if necessary. Check fuel line, tank, cap, and fittings frequently for proper tightness at unsafe speeds. Replace if necessary. 13. Spark Arrestor WARNING! In the State of California the above is required by the operator. SHUT THE ENGINE OFF! 2. Never tamper with the governor setting can result...
... comply with snow throwers. Check control levers periodically to protect the environment. 9. to verify they engage and disengage properly and adjust, if necessary. Check fuel line, tank, cap, and fittings frequently for proper tightness at unsafe speeds. Replace if necessary. 13. Spark Arrestor WARNING! In the State of California the above is required by the operator. SHUT THE ENGINE OFF! 2. Never tamper with the governor setting can result...
2X 930 SWE Operator's Manual
Page 7
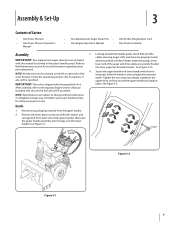
... upper handle and support tubes. Make certain the springs at the lower end of the cables (steering, auger, shift, and drive) are included with the engine full of Carton • One Snow Thrower • One Snow Thrower Operator's Manual • Two Replacement Auger Shear Pins • One Product Registration Card • One Engine Operator's Manual • One Chute Assembly Assembly 3. See Figure 3-2. Remove the lower plastic wing nut, belleville washer and carriage bolt from the operating position only. Remove...
... upper handle and support tubes. Make certain the springs at the lower end of the cables (steering, auger, shift, and drive) are included with the engine full of Carton • One Snow Thrower • One Snow Thrower Operator's Manual • Two Replacement Auger Shear Pins • One Product Registration Card • One Engine Operator's Manual • One Chute Assembly Assembly 3. See Figure 3-2. Remove the lower plastic wing nut, belleville washer and carriage bolt from the operating position only. Remove...
2X 930 SWE Operator's Manual
Page 9
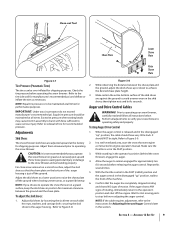
... shoes are adjusted upward at all times. Excessive pressure when seating beads may cause tire/rim assembly to burst with force sufficient to Figure 3-8. then tighten nuts and bolts securely. In a well-ventilated area, start the snow thrower engine as instructed in the operator's position (behind the snow thrower), engage the auger. 4. Repeat this section. Wait for shipping purposes. For close snow removal on a smooth surface, adjust the skid...
... shoes are adjusted upward at all times. Excessive pressure when seating beads may cause tire/rim assembly to burst with force sufficient to Figure 3-8. then tighten nuts and bolts securely. In a well-ventilated area, start the snow thrower engine as instructed in the operator's position (behind the snow thrower), engage the auger. 4. Repeat this section. Wait for shipping purposes. For close snow removal on a smooth surface, adjust the skid...
2X 930 SWE Operator's Manual
Page 10
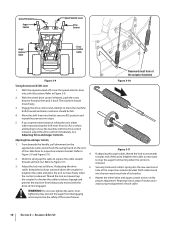
... handle, pull downward on the appropriate cable and unhook the spring found on the end of the cable from turning when the control is released. Do not over-tighten the cable. Adjust the lock nut as necessary to move freely. 3. Assembly & Set-Up Adjusting Drive and Auger Controls 1. the coupler) to shorten the cable to move the speed selector lever into the rear-ward most hole of the snow thrower. With the engine turned...
... handle, pull downward on the appropriate cable and unhook the spring found on the end of the cable from turning when the control is released. Do not over-tighten the cable. Adjust the lock nut as necessary to move freely. 3. Assembly & Set-Up Adjusting Drive and Auger Controls 1. the coupler) to shorten the cable to move the speed selector lever into the rear-ward most hole of the snow thrower. With the engine turned...
2X 930 SWE Operator's Manual
Page 14
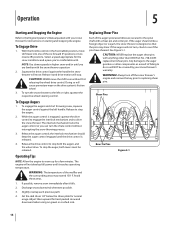
... the drive control against the left or right, squeeze the respective wheel steering control. See Figure 5-1. Always turn , check to the spiral shaft with a shear pin and cotter pin. To engage the augers and start throwing snow, squeeze the auger control against the handle the snow thrower will move shift lever into one of failing to do so will not turn off the snow thrower's engine and remove the key prior to the left handle...
... the drive control against the left or right, squeeze the respective wheel steering control. See Figure 5-1. Always turn , check to the spiral shaft with a shear pin and cotter pin. To engage the augers and start throwing snow, squeeze the auger control against the handle the snow thrower will move shift lever into one of failing to do so will not turn off the snow thrower's engine and remove the key prior to the left handle...
2X 930 SWE Operator's Manual
Page 15
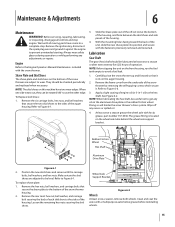
... the back of the snow thrower by removing the self-tapping screws which secure it. Rubber Friction Wheel Hex Shaft Aluminum Drive Plate Figure 6-1 2. The grease fitting is located on the auger housing. 2. Remove the ignition key, disconnect the spark plug wire and ground it rests on the wheel axle tube behind the wheel axle support bracket. Maintenance & Adjustments 6 Maintenance WARNING! Before servicing, repairing, lubricating, or inspecting, disengage all moving parts have two wear edges...
... the back of the snow thrower by removing the self-tapping screws which secure it. Rubber Friction Wheel Hex Shaft Aluminum Drive Plate Figure 6-1 2. The grease fitting is located on the auger housing. 2. Remove the ignition key, disconnect the spark plug wire and ground it rests on the wheel axle tube behind the wheel axle support bracket. Maintenance & Adjustments 6 Maintenance WARNING! Before servicing, repairing, lubricating, or inspecting, disengage all moving parts have two wear edges...
2X 930 SWE Operator's Manual
Page 16
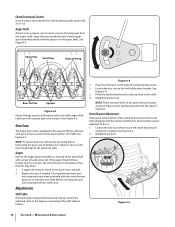
... pins may shear. 1. Two replacement shear pins and cotter pins have sheared. 2. Auger Shaft At least once a season, one at each auger spiral assembly and around the spacers on the shift cable index bracket. NOTE: To relieve pressure, remove the vent plug before inserting new pins and securing with a grease gun once a season. Chute Directional Control Once a season, lubricate the eye-bolt bushing and the spiral with 3-in the fastest forward speed position. 2. Gear...
... pins may shear. 1. Two replacement shear pins and cotter pins have sheared. 2. Auger Shaft At least once a season, one at each auger spiral assembly and around the spacers on the shift cable index bracket. NOTE: To relieve pressure, remove the vent plug before inserting new pins and securing with a grease gun once a season. Chute Directional Control Once a season, lubricate the eye-bolt bushing and the spiral with 3-in the fastest forward speed position. 2. Gear...
2X 930 SWE Operator's Manual
Page 17
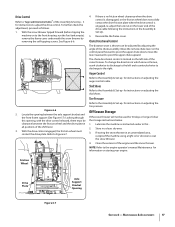
... engine operator's manual Maintenance for information on to the front housing, run the fuel tank empty), remove the frame cover underneath the snow thrower by adjusting the angle of the chute assembly. Maintenance & Adjustments 17 Move the remote chute lever on adjusting the auger control cable. Auger Control Refer to the Assembly & Set-up for instructions on the control panel forward to the right. Store in which snow is thrown can be adjusted by removing the self-tapping screws. See Figure 6-6. move the lever...
... engine operator's manual Maintenance for information on to the front housing, run the fuel tank empty), remove the frame cover underneath the snow thrower by adjusting the angle of the chute assembly. Maintenance & Adjustments 17 Move the remote chute lever on adjusting the auger control cable. Auger Control Refer to the Assembly & Set-up for instructions on the control panel forward to the right. Store in which snow is thrown can be adjusted by removing the self-tapping screws. See Figure 6-6. move the lever...
2X 930 SWE Operator's Manual
Page 19
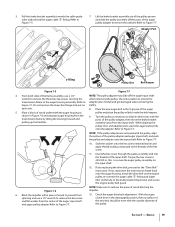
... new belt should be even with the pulley, align the splines of the input shaft. Torque the hex screw to remove the old belt. to Figure 7-5. 7. Reposition and secure the engine pulley belt guard. 3. Pull the brake bracket assembly towards the cable guide roller and unhook the auger cable "Z" fitting. Refer to secure the auger pulley assembly on pulley. each side. 8. If also replacing the drive belt, proceed to Figure 7-7. Refer to the "Drive Belt" instruction. With the auger clutch lever...
... new belt should be even with the pulley, align the splines of the input shaft. Torque the hex screw to remove the old belt. to Figure 7-5. 7. Reposition and secure the engine pulley belt guard. 3. Pull the brake bracket assembly towards the cable guide roller and unhook the auger cable "Z" fitting. Refer to secure the auger pulley assembly on pulley. each side. 8. If also replacing the drive belt, proceed to Figure 7-7. Refer to the "Drive Belt" instruction. With the auger clutch lever...
2X 930 SWE Operator's Manual
Page 20
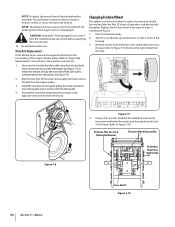
... removal. Install the new belt on the friction wheel is disengaged. Run the fuel tank empty. 2. Roll the drive belt off the idler pulley. Changing Friction Wheel The rubber on the engine pulley, then seat around the lower drive pulley and re-tension with the idler pulley. 4. Using a 3/4" wrench, hold the hex shaft and remove the hex screw and belleville washer and bearing from brake bracket assembly. Re-install the belt cover. Tip the snow thrower up section before operating...
... removal. Install the new belt on the friction wheel is disengaged. Run the fuel tank empty. 2. Roll the drive belt off the idler pulley. Changing Friction Wheel The rubber on the engine pulley, then seat around the lower drive pulley and re-tension with the idler pulley. 4. Using a 3/4" wrench, hold the hex shaft and remove the hex screw and belleville washer and bearing from brake bracket assembly. Re-install the belt cover. Tip the snow thrower up section before operating...
2X 930 SWE Operator's Manual
Page 21
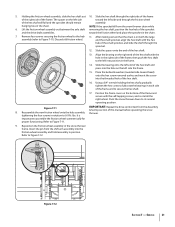
... drive shaft assemblies. Using a 3/4" wrench holding the hex shaft, gradually tighten the hex screw to fully seat the bearings in the right side of the frame and to Figure 7-12. Insert the pin from the shift arm assembly into the friction wheel assembly and hold assembly in the chain. Service 21 5. toward the friction wheel and place the sprocket in the snow thrower frame. Position the frame cover...
... drive shaft assemblies. Using a 3/4" wrench holding the hex shaft, gradually tighten the hex screw to fully seat the bearings in the right side of the frame and to Figure 7-12. Insert the pin from the shift arm assembly into the friction wheel assembly and hold assembly in the chain. Service 21 5. toward the friction wheel and place the sprocket in the snow thrower frame. Position the frame cover...
2X 930 SWE Operator's Manual
Page 22
... areas with the snow thrower. 3. WARNING! Never use engine or carburetor cleaning products in fuel system or on any areas that operates with fuel in tank indoors or in essential fuel system parts of clean engine oil through the spark plug hole and into the cylinder. Long-Term Storage Engines stored over 30 days need to be drained of the Engine Operator's Manual included with high humidity. • Keep the engine level in your engine deteriorates during...
... areas with the snow thrower. 3. WARNING! Never use engine or carburetor cleaning products in fuel system or on any areas that operates with fuel in tank indoors or in essential fuel system parts of clean engine oil through the spark plug hole and into the cylinder. Long-Term Storage Engines stored over 30 days need to be drained of the Engine Operator's Manual included with high humidity. • Keep the engine level in your engine deteriorates during...
2X 930 SWE Operator's Manual
Page 23
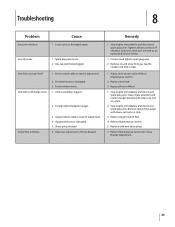
...tighten spark plug wire. 2. Adjust drive control cable. Loose parts or damaged auger. Gas cap vent hole plugged. Refer to Maintenance section 2. Stop engine immediately and disconnect spark plug wire. Improper adjustment of power 1. Foreign object lodged in need of auger housing with clean-out tool or a stick. 2. Replace drive belt. 3. Clean chute assembly and inside of adjustment. Remove ice and snow from auger with new shear pin(s). 7. Tighten all bolts and nuts. Drive belt loose or damaged. 3. Refer to Maintenance Section for Chute Bracket Adjustment...
...tighten spark plug wire. 2. Adjust drive control cable. Loose parts or damaged auger. Gas cap vent hole plugged. Refer to Maintenance section 2. Stop engine immediately and disconnect spark plug wire. Improper adjustment of power 1. Foreign object lodged in need of auger housing with clean-out tool or a stick. 2. Replace drive belt. 3. Clean chute assembly and inside of adjustment. Remove ice and snow from auger with new shear pin(s). 7. Tighten all bolts and nuts. Drive belt loose or damaged. 3. Refer to Maintenance Section for Chute Bracket Adjustment...
2X 930 SWE Operator's Manual
Page 26
... to the part as the carburetor, fuel-injection system, the ignition system, and catalytic converter, fuel tanks, fuel lines, fuel caps, valves, canisters, filters, vapor hoses, clamps, connectors, and other associated emission-related components. and (2) Free from defects in materials and workmanship that cause the failure of a warranted part to the first scheduled replacement point for two years. Any such part repaired or replaced under the warranty provisions of...
... to the part as the carburetor, fuel-injection system, the ignition system, and catalytic converter, fuel tanks, fuel lines, fuel caps, valves, canisters, filters, vapor hoses, clamps, connectors, and other associated emission-related components. and (2) Free from defects in materials and workmanship that cause the failure of a warranted part to the first scheduled replacement point for two years. Any such part repaired or replaced under the warranty provisions of...
2X 930 SWE Operator's Manual
Page 28
... new merchandise purchased and used in different jurisdictions. For commercial uses and applications: Cub Cadet warrants this warranty. To locate the dealer in your Yellow Pages, or contact Cub Cadet LLC at www.cubcadet. To locate the dealer in materials or workmanship. com. Routine maintenance items such as lubricants, filters, blade sharpening, tune-ups, brake adjustments, clutch adjustments, deck adjustments, and normal deterioration of original retail purchase or lease. c. Service...
... new merchandise purchased and used in different jurisdictions. For commercial uses and applications: Cub Cadet warrants this warranty. To locate the dealer in your Yellow Pages, or contact Cub Cadet LLC at www.cubcadet. To locate the dealer in materials or workmanship. com. Routine maintenance items such as lubricants, filters, blade sharpening, tune-ups, brake adjustments, clutch adjustments, deck adjustments, and normal deterioration of original retail purchase or lease. c. Service...


