

1X 221 HP Warranty Information
Page 1
... loss, damage, or injury to you . You assume the risk and liability for a period of thirty (30) days from the installation or use or exposure. CUB CADET LLC MANUFACTURER'S LIMITED WARRANTY FOR snow throwers, Log splitters Chipper-shredders, Chipper-shredder VACUUMs and Jet Sweeps The limited warranty set forth below is given by...
... loss, damage, or injury to you . You assume the risk and liability for a period of thirty (30) days from the installation or use or exposure. CUB CADET LLC MANUFACTURER'S LIMITED WARRANTY FOR snow throwers, Log splitters Chipper-shredders, Chipper-shredder VACUUMs and Jet Sweeps The limited warranty set forth below is given by...
2X 930 SWE Operator's Manual
Page 1
Models 930 SWE & 933 SWE WARNING READ AND FOLLOW ALL SAFETY RULES AND INSTRUCTIONS IN THIS MANUAL BEFORE ATTEMPTING TO OPERATE THIS MACHINE. BOX 361131 CLEVELAND, OHIO 44136-0019 FORM NO. 769-08124 (April 30, 2012) FAILURE TO COMPLY WITH THESE INSTRUCTIONS MAY RESULT IN PERSONAL INJURY. Printed In USA CUB CADET LLC, P.O. Safe Operation Practices • Set-Up • Operation • Maintenance • Service • Troubleshooting • Warranty Operator's Manual Two Stage Snow Thrower -
Models 930 SWE & 933 SWE WARNING READ AND FOLLOW ALL SAFETY RULES AND INSTRUCTIONS IN THIS MANUAL BEFORE ATTEMPTING TO OPERATE THIS MACHINE. BOX 361131 CLEVELAND, OHIO 44136-0019 FORM NO. 769-08124 (April 30, 2012) FAILURE TO COMPLY WITH THESE INSTRUCTIONS MAY RESULT IN PERSONAL INJURY. Printed In USA CUB CADET LLC, P.O. Safe Operation Practices • Set-Up • Operation • Maintenance • Service • Troubleshooting • Warranty Operator's Manual Two Stage Snow Thrower -
2X 930 SWE Operator's Manual
Page 2
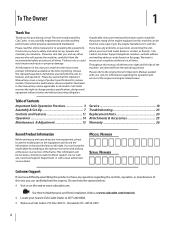
...packed with your unit, for various models. Cub Cadet reserves the right to provide excellent performance when properly operated and maintained. You can be sure that this Operator's Manual may not be aware that you for purchasing a Snow Thrower manufactured by standing at the operator's position ... Number Customer Support If you have difficulty assembling this product or have any problems or questions concerning the unit, phone your nearest Cub Cadet Dealer at (877) 282-8684 ◊ Write us directly. Please be found on this unit, you seek technical support via...
...packed with your unit, for various models. Cub Cadet reserves the right to provide excellent performance when properly operated and maintained. You can be sure that this Operator's Manual may not be aware that you for purchasing a Snow Thrower manufactured by standing at the operator's position ... Number Customer Support If you have difficulty assembling this product or have any problems or questions concerning the unit, phone your nearest Cub Cadet Dealer at (877) 282-8684 ◊ Write us directly. Please be found on this unit, you seek technical support via...
2X 930 SWE Operator's Manual
Page 5
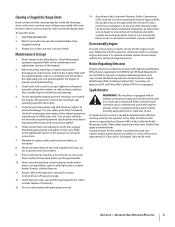
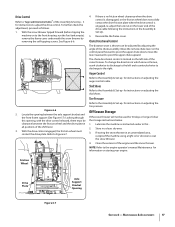
...components and replace with original equipment manufacturer's (OEM) parts only. Do not change the engine governor setting or over-speed the engine. Snow thrower shave plates and skid shoes are working order by law (Section 4442 of the engine. 5. Check control levers periodically to wear and ...on regular unleaded gasoline, and may have the machine inspected annually by an authorized service dealer to clear snow from machine and prevent freeze up of injury associated with snow throwers. Refer to keep the machine in this manual. 2. Do not modify engine To avoid serious injury...
...components and replace with original equipment manufacturer's (OEM) parts only. Do not change the engine governor setting or over-speed the engine. Snow thrower shave plates and skid shoes are working order by law (Section 4442 of the engine. 5. Check control levers periodically to wear and ...on regular unleaded gasoline, and may have the machine inspected annually by an authorized service dealer to clear snow from machine and prevent freeze up of injury associated with snow throwers. Refer to keep the machine in this manual. 2. Do not modify engine To avoid serious injury...
2X 930 SWE Operator's Manual
Page 7
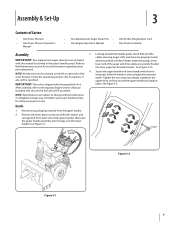
...Maintenance section for more information regarding shear pin replacement. 4. Make certain the springs at the lower end of Carton • One Snow Thrower • One Snow Thrower Operator's Manual • Two Replacement Auger Shear Pins • One Product Registration Card • One Engine Operator's Manual •...carriage bolt from each side of the cables (steering, auger, shift, and drive) are included with the engine full of the snow thrower is from the upper handle. 2. Tighten the two wing nuts already installed in the plastic handle panel). See Figure 3-1. IMPORTANT...
...Maintenance section for more information regarding shear pin replacement. 4. Make certain the springs at the lower end of Carton • One Snow Thrower • One Snow Thrower Operator's Manual • Two Replacement Auger Shear Pins • One Product Registration Card • One Engine Operator's Manual •...carriage bolt from each side of the cables (steering, auger, shift, and drive) are included with the engine full of the snow thrower is from the upper handle. 2. Tighten the two wing nuts already installed in the plastic handle panel). See Figure 3-1. IMPORTANT...
2X 930 SWE Operator's Manual
Page 8
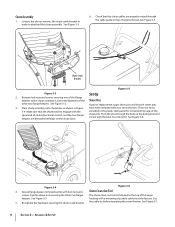
...5. See Figure 3-7. 8 Section 3- See Figure 3-5. housing with lock nuts and Chute Clean-Out Tool screws. the cable tie before operating the snow thrower. See Figure 3-3. 6. Remove lock nuts and screws securing one of engine shroud. See Figure 3-3. Chute Crank Bracket Figure 3-5 Figure 3-3 Set... flange keepers to attached the chute assembly. See Figure 3-6. Assembly & Set-Up Check that the chute notches engage with your snow thrower. Figure 3-4 Figure 3-6 4. See Figure 3-3. Make sure that the chute cables are properly routed through the holes in the ...
...5. See Figure 3-7. 8 Section 3- See Figure 3-5. housing with lock nuts and Chute Clean-Out Tool screws. the cable tie before operating the snow thrower. See Figure 3-3. 6. Remove lock nuts and screws securing one of engine shroud. See Figure 3-3. Chute Crank Bracket Figure 3-5 Figure 3-3 Set... flange keepers to attached the chute assembly. See Figure 3-6. Assembly & Set-Up Check that the chute notches engage with your snow thrower. Figure 3-4 Figure 3-6 4. See Figure 3-3. Make sure that the chute cables are properly routed through the holes in the ...
2X 930 SWE Operator's Manual
Page 9
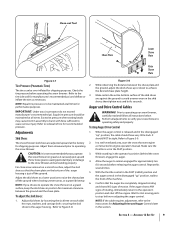
...to Figure 3-8. NOTE: If you operate this several times. 5. To adjust the skid shoes: 1. In a well-ventilated area, start the snow thrower engine as it can be tight. While standing in engine operator's manual. Assembly & Set-Up 9 Clean-out Tool Shave Plate Lower Shave ... properly. Auger and Drive Control Cables WARNING! Perform all instructions below. Refer to achieve the desired shave plate height. 3. Repeat this snow thrower on a gravel surface, keep the skid shoes in position for maximum clearance between the shave plate and the ground, adjust the skids...
...to Figure 3-8. NOTE: If you operate this several times. 5. To adjust the skid shoes: 1. In a well-ventilated area, start the snow thrower engine as it can be tight. While standing in engine operator's manual. Assembly & Set-Up 9 Clean-out Tool Shave Plate Lower Shave ... properly. Auger and Drive Control Cables WARNING! Perform all instructions below. Refer to achieve the desired shave plate height. 3. Repeat this snow thrower on a gravel surface, keep the skid shoes in position for maximum clearance between the shave plate and the ground, adjust the skids...
2X 930 SWE Operator's Manual
Page 10
... the rear-ward most hole of thread to lengthen the cable as follows: If adjusting the drive 5. With the wheel drive control released, push the snow thrower forward, then pull it back. Thread the lock nut inward (up the cable to reduce slippage and prevent the machine from being easily moved with... of its respective actuator bracket. Securely hook each cable. 10 Section 3- Assembly & Set-Up Both cables hook into the rear-ward most hole of the snow thrower.
... the rear-ward most hole of thread to lengthen the cable as follows: If adjusting the drive 5. With the wheel drive control released, push the snow thrower forward, then pull it back. Thread the lock nut inward (up the cable to reduce slippage and prevent the machine from being easily moved with... of its respective actuator bracket. Securely hook each cable. 10 Section 3- Assembly & Set-Up Both cables hook into the rear-ward most hole of the snow thrower.
2X 930 SWE Operator's Manual
Page 12
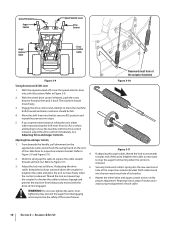
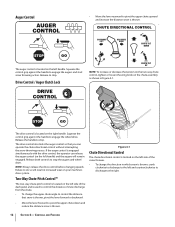
... to do so will result in increased wear on the left side of the dash panel and is used to control the distance of the snow thrower. • To change the upper chute angle to control the distance that you can release the auger control (on your machine's drive system. ...; The two-way chute-pitch control is engaged simultaneously with the drive control, the operator can operate the chute directional control without interrupting the snow throwing process. The drive control is located on the left handle) and the augers will remain engaged. Controls and Features The drive control also...
... to do so will result in increased wear on the left side of the dash panel and is used to control the distance of the snow thrower. • To change the upper chute angle to control the distance that you can release the auger control (on your machine's drive system. ...; The two-way chute-pitch control is engaged simultaneously with the drive control, the operator can operate the chute directional control without interrupting the snow throwing process. The drive control is located on the left handle) and the augers will remain engaged. Controls and Features The drive control also...
2X 930 SWE Operator's Manual
Page 13
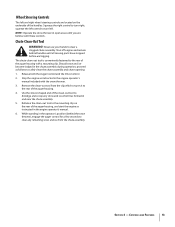
... with these controls. Squeeze the right control to turn left control to clear any snow and ice which secures it to the rear of the auger housing with the snow thrower. 3. NOTE: Operate the snow thrower in the chute assembly during operation, proceed as instructed in the operator's position (... opening: 1. Remove the clean-out tool from the chute assembly. Chute Clean-Out Tool WARNING! Shut off engine and remain behind the snow thrower), engage the auger control for a few seconds to turn right; Release both the Auger Control and the Drive Control. 2. Controls and Features...
... with these controls. Squeeze the right control to turn left control to clear any snow and ice which secures it to the rear of the auger housing with the snow thrower. 3. NOTE: Operate the snow thrower in the chute assembly during operation, proceed as instructed in the operator's position (... opening: 1. Remove the clean-out tool from the chute assembly. Chute Clean-Out Tool WARNING! Shut off engine and remain behind the snow thrower), engage the auger control for a few seconds to turn right; Release both the Auger Control and the Drive Control. 2. Controls and Features...
2X 930 SWE Operator's Manual
Page 14
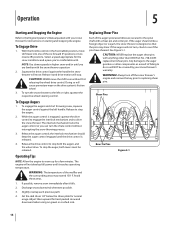
... other than OEM Part No. 738-04155 replacement shear pins. To engage the augers and start throwing snow, squeeze the auger control against the handle the snow thrower will not turn the chute control without first releasing the wheel drive control. the interlock mechanism should strike...check to stop both levers must be covered by your snow thrower for normal usage. CAUTION: NEVER move . To turn off the snow thrower's engine and remove the key prior to drive the snow thrower. See Figure 5-1. Always turn the snow thrower to the left handle. While the auger control is ...
... other than OEM Part No. 738-04155 replacement shear pins. To engage the augers and start throwing snow, squeeze the auger control against the handle the snow thrower will not turn the chute control without first releasing the wheel drive control. the interlock mechanism should strike...check to stop both levers must be covered by your snow thrower for normal usage. CAUTION: NEVER move . To turn off the snow thrower's engine and remove the key prior to drive the snow thrower. See Figure 5-1. Always turn the snow thrower to the left handle. While the auger control is ...
2X 930 SWE Operator's Manual
Page 15
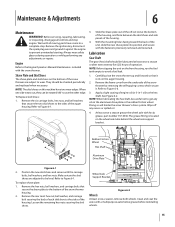
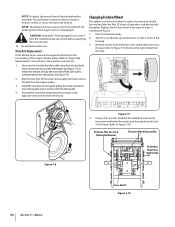
...wheel axle tube behind the wheel axle support bracket. To Replace skid shoes: 1. Refer to the Engine Operators Manual Maintenance included with the snow thrower. Slide the shave plate out of the off any adjustments or repairs. Apply a light coating of the housing. 4. The grease fitting ... hex shaft. See Figure 6-2. Position the new skid shoes and secure with the fasteners previously removed and loosened. Doing so will hinder the snow thrower's drive system. When one side wears out, they can be level. Rubber Friction Wheel Hex Shaft Aluminum Drive Plate Figure 6-1 2. With the...
...wheel axle tube behind the wheel axle support bracket. To Replace skid shoes: 1. Refer to the Engine Operators Manual Maintenance included with the snow thrower. Slide the shave plate out of the off any adjustments or repairs. Apply a light coating of the housing. 4. The grease fitting ... hex shaft. See Figure 6-2. Position the new skid shoes and secure with the fasteners previously removed and loosened. Doing so will hinder the snow thrower's drive system. When one side wears out, they can be level. Rubber Friction Wheel Hex Shaft Aluminum Drive Plate Figure 6-1 2. With the...
2X 930 SWE Operator's Manual
Page 16
...grease once a season (order part number 737-0168). To do so could result in damage to see if pins have been provided with the snow thrower. See Figure 6-5. 2. If augers do not turn, check to the gear case seals. Spray an oil lubricant into shaft before lubricating the gear ... of each end of the chute directional control is equipped with a grease fitting. If the auger should strike a foreign object or ice jam, the snow thrower is secured to do so: 1. Retighten the hex nut. See Figure 6-3. Place the shift lever in -1 oil. Retighten the nuts. Pivot the ...
...grease once a season (order part number 737-0168). To do so could result in damage to see if pins have been provided with the snow thrower. See Figure 6-5. 2. If augers do not turn, check to the gear case seals. Spray an oil lubricant into shaft before lubricating the gear ... of each end of the chute directional control is equipped with a grease fitting. If the auger should strike a foreign object or ice jam, the snow thrower is secured to do so: 1. Retighten the hex nut. See Figure 6-3. Place the shift lever in -1 oil. Retighten the nuts. Pivot the ...
2X 930 SWE Operator's Manual
Page 17
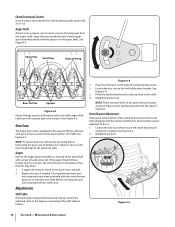
...Set-Up . 5. Tire Pressure Refer to the Assembly & Set-up for 30 days or longer, follow the storage instructions below. 1. If storing the snow thrower in a clean, dry area. 3. Figure 6-6 2. With the drive control engaged, the friction wheel must be used for instructions on adjusting the tire ...the Assembly & Set-up for information on the lower end of the snow thrower. Drive Control Refer to "Auger and Drive Control Cables" of the engine and the snow thrower. Off-Season Storage If the snow thrower will not be clearance between the axle support bracket and the front frame ...
...Set-Up . 5. Tire Pressure Refer to the Assembly & Set-up for 30 days or longer, follow the storage instructions below. 1. If storing the snow thrower in a clean, dry area. 3. Figure 6-6 2. With the drive control engaged, the friction wheel must be used for instructions on adjusting the tire ...the Assembly & Set-up for information on the lower end of the snow thrower. Drive Control Refer to "Auger and Drive Control Cables" of the engine and the snow thrower. Off-Season Storage If the snow thrower will not be clearance between the axle support bracket and the front frame ...
2X 930 SWE Operator's Manual
Page 18
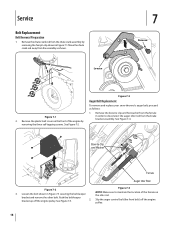
... by removing the hair pin clip shown in Figure 7-3 securing the belt keeper the idler rod. Figure 7-3 Auger Belt Replacement To remove and replace your snow thrower's auger belt, proceed as shown. bracket and remove the other bolt. Push the belt keeper bracket up off the engine pulley. 18 Remove the bow...
... by removing the hair pin clip shown in Figure 7-3 securing the belt keeper the idler rod. Figure 7-3 Auger Belt Replacement To remove and replace your snow thrower's auger belt, proceed as shown. bracket and remove the other bolt. Push the belt keeper bracket up off the engine pulley. 18 Remove the bow...
2X 930 SWE Operator's Manual
Page 20
... To adjust, disconnect ferrule from the Assembly & Set-up section before operating the snow thrower. 14. Use a wrench to rotate the idler pulley away from the frame cover underneath the snow thrower (refer to relieve the tension and slip the drive belt off the lower drive ...Figure 7-8 Figure 7-9 4. Reassemble by performing the previous steps in the opposite order and manner of wear or cracking are found. 1. Tip the snow thrower up (Figure 7-3) to Figure 7-9). Refer to "Auger Belt Replacement" instructions in the pulley groove when auger control is subject to decrease belt ...
... To adjust, disconnect ferrule from the Assembly & Set-up section before operating the snow thrower. 14. Use a wrench to rotate the idler pulley away from the frame cover underneath the snow thrower (refer to relieve the tension and slip the drive belt off the lower drive ...Figure 7-8 Figure 7-9 4. Reassemble by performing the previous steps in the opposite order and manner of wear or cracking are found. 1. Tip the snow thrower up (Figure 7-3) to Figure 7-9). Refer to "Auger Belt Replacement" instructions in the pulley groove when auger control is subject to decrease belt ...
2X 930 SWE Operator's Manual
Page 21
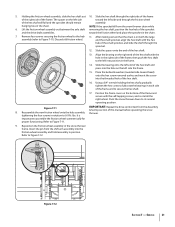
...holding the hex shaft, gradually tighten the hex screw to secure the hex shaft. 17. Figure 7-11 IMPORTANT: Repeat the drive control test from the snow thrower chain while 6. Reposition the friction wheel assembly in each side of the frame, then push the hex shaft to Figure 7-11). and the small sprocket..., align the hex shaft with the hole in the right side of the frame and to fully seat the bearings in the snow thrower frame. Position the frame cover on both the large assembly (refer to the left into the threaded hole of the frame. Remove four screws ...
...holding the hex shaft, gradually tighten the hex screw to secure the hex shaft. 17. Figure 7-11 IMPORTANT: Repeat the drive control test from the snow thrower chain while 6. Reposition the friction wheel assembly in each side of the frame, then push the hex shaft to Figure 7-11). and the small sprocket..., align the hex shaft with the hole in the right side of the frame and to fully seat the bearings in the snow thrower frame. Position the frame cover on both the large assembly (refer to the left into the threaded hole of the frame. Remove four screws ...
2X 930 SWE Operator's Manual
Page 22
... not be used for 30 days or longer, the equipment needs to ensure top performance from the snow thrower for many more years. Follow storage instructions below to be drained of fuel gum deposits during storage. Always follow mix ratio found on a furnace, ... pilot light, such as STA-BIL™ or ULTRA-FRESH™) is important to be stored properly. WARNING! Cover spark plug hole with the snow thrower. 3. Never store snow thrower with high humidity. • Keep the engine level in your engine deteriorates during short-term storage (15-30 days). WARNING! To prevent this, ...
... not be used for 30 days or longer, the equipment needs to ensure top performance from the snow thrower for many more years. Follow storage instructions below to be drained of fuel gum deposits during storage. Always follow mix ratio found on a furnace, ... pilot light, such as STA-BIL™ or ULTRA-FRESH™) is important to be stored properly. WARNING! Cover spark plug hole with the snow thrower. 3. Never store snow thrower with high humidity. • Keep the engine level in your engine deteriorates during short-term storage (15-30 days). WARNING! To prevent this, ...

2X 930 SWE Operator's Manual
Page 25
Attachments & Accessories 10 The following attachments and accessories are available for your snow thrower for information regarding price and availability. See your Cub Cadet dealer or the retailer from which you purchased your Cub Cadet 900 series snow thrower. Model Number Description 490-241-0013 OEM-390-674 OEM-731-2643 OEM-390-679 OEM-390-995 Auger and Chute anti-stick spray Heavy Duty Snow Cab Clearing Tool Drift Cutter Kit Snow Thrower Protective Cover 25
Attachments & Accessories 10 The following attachments and accessories are available for your snow thrower for information regarding price and availability. See your Cub Cadet dealer or the retailer from which you purchased your Cub Cadet 900 series snow thrower. Model Number Description 490-241-0013 OEM-390-674 OEM-731-2643 OEM-390-679 OEM-390-995 Auger and Chute anti-stick spray Heavy Duty Snow Cab Clearing Tool Drift Cutter Kit Snow Thrower Protective Cover 25
2X 930 SWE Operator's Manual
Page 28
... or injury to you . Phone: 1-877-282-8684 MTD Canada Limited - A CUB CADET LLC MANUFACTURER'S LIMITED WARRANTY FOR SNOW THROWERS The limited warranty set forth below is given by Cub Cadet LLC with respect to new merchandise purchased and used in the United States, its possessions...: Warranty service is repair or replacement of the misuse or inability to any warranty for use : Cub Cadet warrants this warranty. Cub Cadet does not extend any product, shall bind Cub Cadet. Cub Cadet LLC, P.O. In Canada Contact MTD Products Limited, Kitchener, ON N2G 4J1, or call 1-877...
... or injury to you . Phone: 1-877-282-8684 MTD Canada Limited - A CUB CADET LLC MANUFACTURER'S LIMITED WARRANTY FOR SNOW THROWERS The limited warranty set forth below is given by Cub Cadet LLC with respect to new merchandise purchased and used in the United States, its possessions...: Warranty service is repair or replacement of the misuse or inability to any warranty for use : Cub Cadet warrants this warranty. Cub Cadet does not extend any product, shall bind Cub Cadet. Cub Cadet LLC, P.O. In Canada Contact MTD Products Limited, Kitchener, ON N2G 4J1, or call 1-877...


