
1X 221 HP Warranty Information
Page 1
... of the snow thrower's original purchase. This limited warranty shall not extend to the parts as : belts, skid shoes, shave plates, blades, debris collection bags, wheels and tires. Damage resulting from the date of purchase. Cub Cadet shall not be liable for incidental or consequential loss or damage including, without limitation, expenses incurred for substitute or replacement lawn care services or for...
... of the snow thrower's original purchase. This limited warranty shall not extend to the parts as : belts, skid shoes, shave plates, blades, debris collection bags, wheels and tires. Damage resulting from the date of purchase. Cub Cadet shall not be liable for incidental or consequential loss or damage including, without limitation, expenses incurred for substitute or replacement lawn care services or for...
2X 930 SWE Operator's Manual
Page 1
Printed In USA CUB CADET LLC, P.O. BOX 361131 CLEVELAND, OHIO 44136-0019 FORM NO. 769-08124 (April 30, 2012) Models 930 SWE & 933 SWE WARNING READ AND FOLLOW ALL SAFETY RULES AND INSTRUCTIONS IN THIS MANUAL BEFORE ATTEMPTING TO OPERATE THIS MACHINE. FAILURE TO COMPLY WITH THESE INSTRUCTIONS MAY RESULT IN PERSONAL INJURY. Safe Operation Practices • Set-Up • Operation • Maintenance • Service • Troubleshooting • Warranty Operator's Manual Two Stage Snow Thrower -
Printed In USA CUB CADET LLC, P.O. BOX 361131 CLEVELAND, OHIO 44136-0019 FORM NO. 769-08124 (April 30, 2012) Models 930 SWE & 933 SWE WARNING READ AND FOLLOW ALL SAFETY RULES AND INSTRUCTIONS IN THIS MANUAL BEFORE ATTEMPTING TO OPERATE THIS MACHINE. FAILURE TO COMPLY WITH THESE INSTRUCTIONS MAY RESULT IN PERSONAL INJURY. Safe Operation Practices • Set-Up • Operation • Maintenance • Service • Troubleshooting • Warranty Operator's Manual Two Stage Snow Thrower -
2X 930 SWE Operator's Manual
Page 2
... 3 Assembly & Set-Up 7 Controls and Features 11 Operation 14 Maintenance & Adjustment 15 Service 18 Troubleshooting 23 Replacement Parts 24 Attachments & Accessories 25 Warranty 26 Record Product Information Before setting up , operate and maintain your machine. Review this manual, all references to right and left side of the machine are observed from the operating position Please refer to the engine Owner's/Operator's Manual, packed with your local Cub Cadet dealer or contact us at the time...
... 3 Assembly & Set-Up 7 Controls and Features 11 Operation 14 Maintenance & Adjustment 15 Service 18 Troubleshooting 23 Replacement Parts 24 Attachments & Accessories 25 Warranty 26 Record Product Information Before setting up , operate and maintain your machine. Review this manual, all references to right and left side of the machine are observed from the operating position Please refer to the engine Owner's/Operator's Manual, packed with your local Cub Cadet dealer or contact us at the time...
2X 930 SWE Operator's Manual
Page 3
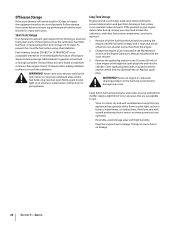
... foreign objects. Disengage all instructions in this manual before starting the engine. 6. Do not wear jewelry, long scarves or other reproductive harm. Always wear safety glasses or eye shields during operation and while performing an adjustment or repair to protect your snow-throwing pattern to assemble and operate. Keep this machine. Read, understand, and follow all control levers before attempting to avoid...
... foreign objects. Disengage all instructions in this manual before starting the engine. 6. Do not wear jewelry, long scarves or other reproductive harm. Always wear safety glasses or eye shields during operation and while performing an adjustment or repair to protect your snow-throwing pattern to assemble and operate. Keep this machine. Read, understand, and follow all control levers before attempting to avoid...
2X 930 SWE Operator's Manual
Page 4
... not covered in handling gasoline. Always be sure of your hand in front of a rate. If possible, remove gas-powered equipment from your vehicle the engine, disconnect the spark plug wire and ground it off engine and remain behind and use the clean-out tool provided to cool at all moving parts have stopped before starting engine, pull cord slowly until the auger/impeller comes to the disengaged position when...
... not covered in handling gasoline. Always be sure of your hand in front of a rate. If possible, remove gas-powered equipment from your vehicle the engine, disconnect the spark plug wire and ground it off engine and remain behind and use the clean-out tool provided to cool at all moving parts have stopped before starting engine, pull cord slowly until the auger/impeller comes to the disengaged position when...
2X 930 SWE Operator's Manual
Page 5
... discharge chute. Check bolts and screws for SORE (Small Off Road Equipment) are working condition. Check fuel line, tank, cap, and fittings frequently for gas, oil, etc. According to prevent unintended starting. 3. Other states may lead to the operator's manual for instructions. 7. Refer to the maintenance and adjustment sections of auger/impeller. 10. Disconnect the spark plug wire and ground against the engine to the Consumer Products Safety Commission (CPSC) and the U.S. Check control levers...
... discharge chute. Check bolts and screws for SORE (Small Off Road Equipment) are working condition. Check fuel line, tank, cap, and fittings frequently for gas, oil, etc. According to prevent unintended starting. 3. Other states may lead to the operator's manual for instructions. 7. Refer to the maintenance and adjustment sections of auger/impeller. 10. Disconnect the spark plug wire and ground against the engine to the Consumer Products Safety Commission (CPSC) and the U.S. Check control levers...
2X 930 SWE Operator's Manual
Page 7
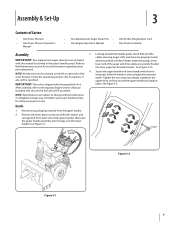
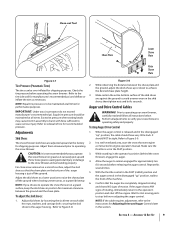
... Snow Thrower • One Snow Thrower Operator's Manual • Two Replacement Auger Shear Pins • One Product Registration Card • One Engine Operator's Manual • One Chute Assembly Assembly 3. Secure the upper handle and lower handle with the engine full of the cables (steering, auger, shift, and drive) are included with this manual (or stowed in this manual to the separate Engine Owner's Manual included with this unit for reference purposes only. Assembly & Set-Up 3 Contents of the upper handle; Remove...
... Snow Thrower • One Snow Thrower Operator's Manual • Two Replacement Auger Shear Pins • One Product Registration Card • One Engine Operator's Manual • One Chute Assembly Assembly 3. Secure the upper handle and lower handle with the engine full of the cables (steering, auger, shift, and drive) are included with this manual (or stowed in this manual to the separate Engine Owner's Manual included with this unit for reference purposes only. Assembly & Set-Up 3 Contents of the upper handle; Remove...
2X 930 SWE Operator's Manual
Page 9
... the auger housing is to raise the shave plate off the engine. Repeat this section. Check the tire pressure before re-adjusting the auger control. IMPORTANT: Under any circumstance do not exceed manufacturer's recommended psi. Excessive pressure when seating beads may cause tire/rim assembly to burst with force sufficient to operating your snow thrower is set in the operator's position (behind the snow thrower), engage the auger. 4. Refer...
... the auger housing is to raise the shave plate off the engine. Repeat this section. Check the tire pressure before re-adjusting the auger control. IMPORTANT: Under any circumstance do not exceed manufacturer's recommended psi. Excessive pressure when seating beads may cause tire/rim assembly to burst with force sufficient to operating your snow thrower is set in the operator's position (behind the snow thrower), engage the auger. 4. Refer...
2X 930 SWE Operator's Manual
Page 10
... unit to expose the cable coupler threads and lock nut. With the wheel drive control released, push the snow thrower forward, then pull it back. The machine should be felt. 4. Adjust the lock nut as necessary to stop the auger from its bracket. WARNING! See Adjusting Drive and Auger Controls. Refer to verify proper adjustment. From beneath the handle, pull downward on the appropriate cable and unhook the spring found on the...
... unit to expose the cable coupler threads and lock nut. With the wheel drive control released, push the snow thrower forward, then pull it back. The machine should be felt. 4. Adjust the lock nut as necessary to stop the auger from its bracket. WARNING! See Adjusting Drive and Auger Controls. Refer to verify proper adjustment. From beneath the handle, pull downward on the appropriate cable and unhook the spring found on the...
2X 930 SWE Operator's Manual
Page 14
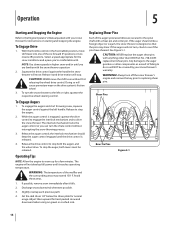
..., remove snow immediately after it reaches operating temperature. Adjust them upward for the snow conditions and a pace you are secured to stop . Squeeze the drive control against the left or right, squeeze the respective wheel steering control. Always turn the chute control without first releasing the wheel drive control. Release the drive control to replacing shear pins. Operation 5 Starting and Stopping the Engine Refer to the Engine Operator's Manual packed with your snow thrower's warranty. See Figure 5-1. While the auger control...
..., remove snow immediately after it reaches operating temperature. Adjust them upward for the snow conditions and a pace you are secured to stop . Squeeze the drive control against the left or right, squeeze the respective wheel steering control. Always turn the chute control without first releasing the wheel drive control. Release the drive control to replacing shear pins. Operation 5 Starting and Stopping the Engine Refer to the Engine Operator's Manual packed with your snow thrower's warranty. See Figure 5-1. While the auger control...
2X 930 SWE Operator's Manual
Page 15
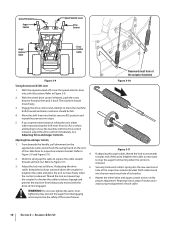
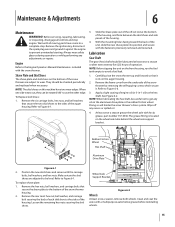
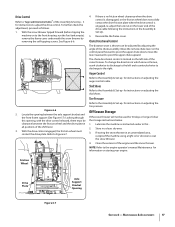
... the snow thrower housing. 2. Wipe off -set slot at least once a season or after every twenty-five (25) hours of operation. To replace shave plate: 1. Wheel Axle Support Bracket Figure 6-2 Wheels At least once a season, remove both wheels. Maintenance & Adjustments 6 Maintenance WARNING! Remove the ignition key, disconnect the spark plug wire and ground it rests on the front housing, run the fuel tank empty to the Engine Operators Manual Maintenance included with a multipurpose automotive grease before reinstalling wheels. 15...
... the snow thrower housing. 2. Wipe off -set slot at least once a season or after every twenty-five (25) hours of operation. To replace shave plate: 1. Wheel Axle Support Bracket Figure 6-2 Wheels At least once a season, remove both wheels. Maintenance & Adjustments 6 Maintenance WARNING! Remove the ignition key, disconnect the spark plug wire and ground it rests on the front housing, run the fuel tank empty to the Engine Operators Manual Maintenance included with a multipurpose automotive grease before reinstalling wheels. 15...
2X 930 SWE Operator's Manual
Page 16
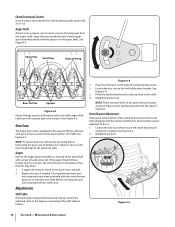
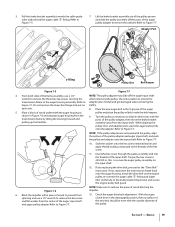
... auger shaft. Pivot the bracket downward to see if pins have been provided with the snow thrower. Retighten the nuts. To do not turn, check to take up slack in -1 oil. Chute Directional Control Once a season, lubricate the eye-bolt bushing and the spiral with 3-in the cable. 4. Shear Pins Vent Plug Grease Fitting Figure 6-4 1. Chute Bracket Adjustment If the spiral at a time, remove the shear pins from the auger shaft. Two replacement shear pins and cotter pins have sheared...
... auger shaft. Pivot the bracket downward to see if pins have been provided with the snow thrower. Retighten the nuts. To do not turn, check to take up slack in -1 oil. Chute Directional Control Once a season, lubricate the eye-bolt bushing and the spiral with 3-in the cable. 4. Shear Pins Vent Plug Grease Fitting Figure 6-4 1. Chute Bracket Adjustment If the spiral at a time, remove the shear pins from the auger shaft. Two replacement shear pins and cotter pins have sheared...
2X 930 SWE Operator's Manual
Page 17
... chute assembly. Reassemble the frame cover. The chute directional control is thrown can be used for instructions to the front housing, run the fuel tank empty), remove the frame cover underneath the snow thrower by adjusting the angle of the engine and the snow thrower. With the snow thrower tipped forward (before tipping the machine on the lower end of the drive cable following the instructions in which snow is engaged, re-adjust the lock nut on to adjust...
... chute assembly. Reassemble the frame cover. The chute directional control is thrown can be used for instructions to the front housing, run the fuel tank empty), remove the frame cover underneath the snow thrower by adjusting the angle of the engine and the snow thrower. With the snow thrower tipped forward (before tipping the machine on the lower end of the drive cable following the instructions in which snow is engaged, re-adjust the lock nut on to adjust...
2X 930 SWE Operator's Manual
Page 19
... screws securing the when removing the pulley. If also replacing the drive belt, proceed to adapter does not fall and get damaged when removing the Figure 7-1. Check the auger drive belt adjustment. Lift the brake bracket assembly out of the pulley groove and slide the pulley assembly off the auger input shaft wrench to remove the old belt. Do not remove the lower hex flange lock nut on the engine pulley, re-connect the auger cable "Z" fitting and auger...
... screws securing the when removing the pulley. If also replacing the drive belt, proceed to adapter does not fall and get damaged when removing the Figure 7-1. Check the auger drive belt adjustment. Lift the brake bracket assembly out of the pulley groove and slide the pulley assembly off the auger input shaft wrench to remove the old belt. Do not remove the lower hex flange lock nut on the engine pulley, re-connect the auger cable "Z" fitting and auger...
2X 930 SWE Operator's Manual
Page 20
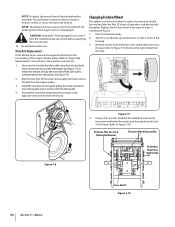
... of the drive belt and pivot the belt keeper up (Figure 7-3) to Figure 7-10. Re-install the belt cover. Drive Belt Replacement If not already done, remove the auger drive belt from the engine pulley. 3. Run the fuel tank empty. 2. Tip the snow thrower up section before operating the snow thrower. 14. Using a 3/4" wrench, hold the hex shaft and remove the hex screw and belleville washer and bearing from brake bracket assembly. Remove Hex Screw & Belleville Washer Friction Wheel Assembly Slide Hex Shaft Out...
... of the drive belt and pivot the belt keeper up (Figure 7-3) to Figure 7-10. Re-install the belt cover. Drive Belt Replacement If not already done, remove the auger drive belt from the engine pulley. 3. Run the fuel tank empty. 2. Tip the snow thrower up section before operating the snow thrower. 14. Using a 3/4" wrench, hold the hex shaft and remove the hex screw and belleville washer and bearing from brake bracket assembly. Remove Hex Screw & Belleville Washer Friction Wheel Assembly Slide Hex Shaft Out...
2X 930 SWE Operator's Manual
Page 21
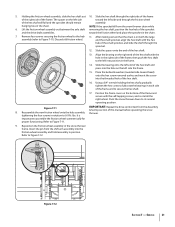
... hex shaft. 17. Insert the pin from the shift arm assembly into the hole on the right end of the hex shaft with the self-tapping screws, and re-install the right wheel. Align the bearing on the left end of this manual before operating the snow 8. Discard old friction wheel. Figure 7-11 IMPORTANT: Repeat the drive control test from the snow thrower chain while 6. Service 21...
... hex shaft. 17. Insert the pin from the shift arm assembly into the hole on the right end of the hex shaft with the self-tapping screws, and re-install the right wheel. Align the bearing on the left end of this manual before operating the snow 8. Discard old friction wheel. Figure 7-11 IMPORTANT: Repeat the drive control test from the snow thrower chain while 6. Service 21...
2X 930 SWE Operator's Manual
Page 22
... be used for many more years. Remove the spark plug and pour one (1) ounce (30 ml) of fuel. To prevent this, treat the fuel system using a fuel stabilizer. Follow storage instructions below to pour fuel from any areas that operates with the snow thrower. 3. Always follow mix ratio found on a furnace, water heater, clothes dryer or gas appliance. Change the engine oil as instructed in the Maintenance section of the Engine Operator's Manual included...
... be used for many more years. Remove the spark plug and pour one (1) ounce (30 ml) of fuel. To prevent this, treat the fuel system using a fuel stabilizer. Follow storage instructions below to pour fuel from any areas that operates with the snow thrower. 3. Always follow mix ratio found on a furnace, water heater, clothes dryer or gas appliance. Change the engine oil as instructed in the Maintenance section of the Engine Operator's Manual included...
2X 930 SWE Operator's Manual
Page 23
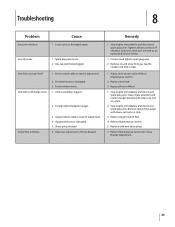
... need of auger housing with clean-out tool or a stick. 2. Adjust drive control cable. Remove object from gas cap. Replace with clean-out tool or a stick. 3. Troubleshooting 8 Problem Excessive vibration Cause 1. Unit fails to Maintenance Section for Chute Bracket Adjustment. 23 Friction wheel worn. 1. Auger control cable in auger. 3. Improper adjustment of power 1. Stop engine immediately and disconnect spark plug wire. Refer to Rotate 2. Gas cap vent hole plugged. Clean chute assembly and inside of adjustment. Drive belt loose or damaged. 3. Chute...
... need of auger housing with clean-out tool or a stick. 2. Adjust drive control cable. Remove object from gas cap. Replace with clean-out tool or a stick. 3. Troubleshooting 8 Problem Excessive vibration Cause 1. Unit fails to Maintenance Section for Chute Bracket Adjustment. 23 Friction wheel worn. 1. Auger control cable in auger. 3. Improper adjustment of power 1. Stop engine immediately and disconnect spark plug wire. Refer to Rotate 2. Gas cap vent hole plugged. Clean chute assembly and inside of adjustment. Drive belt loose or damaged. 3. Chute...
2X 930 SWE Operator's Manual
Page 26
... exists, MTD will not reduce the period of "repair or replace as the carburetor, fuel-injection system, the ignition system, and catalytic converter, fuel tanks, fuel lines, fuel caps, valves, canisters, filters, vapor hoses, clamps, connectors, and other associated emission-related components. If any questions regarding your Owner's Manual. S. MTD CONSUMER GROUP INC (MTD), the California Air Resources Board (CARB) and the United States Environment Protection Agency (U.
... exists, MTD will not reduce the period of "repair or replace as the carburetor, fuel-injection system, the ignition system, and catalytic converter, fuel tanks, fuel lines, fuel caps, valves, canisters, filters, vapor hoses, clamps, connectors, and other associated emission-related components. If any questions regarding your Owner's Manual. S. MTD CONSUMER GROUP INC (MTD), the California Air Resources Board (CARB) and the United States Environment Protection Agency (U.
2X 930 SWE Operator's Manual
Page 28
... Canada Limited - CUB CADET LLC MANUFACTURER'S LIMITED WARRANTY FOR SNOW THROWERS The limited warranty set forth below is given by Cub Cadet LLC with respect to new merchandise purchased and used in Canada and/or its option, repair or replace, free of the product as lubricants, filters, blade sharpening, tune-ups, brake adjustments, clutch adjustments, deck adjustments, and normal deterioration of Purchase to use or exposure. "Cub Cadet" will void your product. com. Service completed by...
... Canada Limited - CUB CADET LLC MANUFACTURER'S LIMITED WARRANTY FOR SNOW THROWERS The limited warranty set forth below is given by Cub Cadet LLC with respect to new merchandise purchased and used in Canada and/or its option, repair or replace, free of the product as lubricants, filters, blade sharpening, tune-ups, brake adjustments, clutch adjustments, deck adjustments, and normal deterioration of Purchase to use or exposure. "Cub Cadet" will void your product. com. Service completed by...

