
1X 221 HP Warranty Information
Page 1
... period of one year warranty. Phone: 1-877-282-8684 MTD Canada Limited - KITCHENER, ON N2G 4J1; CUB CADET LLC MANUFACTURER'S LIMITED WARRANTY FOR snow throwers, Log splitters Chipper-shredders, Chipper-shredder VACUUMs and Jet Sweeps The limited warranty set forth below ) against defects ...merchantability of fitness for a particular purpose, applies after the applicable period of express written warranty above . Cub Cadet warrants the auger gearbox (on threestage snow thrower models only) against defects in accordance with the Operator's Manual furnished with respect to you and your ...
... period of one year warranty. Phone: 1-877-282-8684 MTD Canada Limited - KITCHENER, ON N2G 4J1; CUB CADET LLC MANUFACTURER'S LIMITED WARRANTY FOR snow throwers, Log splitters Chipper-shredders, Chipper-shredder VACUUMs and Jet Sweeps The limited warranty set forth below ) against defects ...merchantability of fitness for a particular purpose, applies after the applicable period of express written warranty above . Cub Cadet warrants the auger gearbox (on threestage snow thrower models only) against defects in accordance with the Operator's Manual furnished with respect to you and your ...
2X 930 SWE Operator's Manual
Page 1
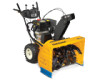
BOX 361131 CLEVELAND, OHIO 44136-0019 FORM NO. 769-08124 (April 30, 2012) Models 930 SWE & 933 SWE WARNING READ AND FOLLOW ALL SAFETY RULES AND INSTRUCTIONS IN THIS MANUAL BEFORE ATTEMPTING TO OPERATE THIS MACHINE. Printed In USA CUB CADET LLC, P.O. FAILURE TO COMPLY WITH THESE INSTRUCTIONS MAY RESULT IN PERSONAL INJURY. Safe Operation Practices • Set-Up • Operation • Maintenance • Service • Troubleshooting • Warranty Operator's Manual Two Stage Snow Thrower -
BOX 361131 CLEVELAND, OHIO 44136-0019 FORM NO. 769-08124 (April 30, 2012) Models 930 SWE & 933 SWE WARNING READ AND FOLLOW ALL SAFETY RULES AND INSTRUCTIONS IN THIS MANUAL BEFORE ATTEMPTING TO OPERATE THIS MACHINE. Printed In USA CUB CADET LLC, P.O. FAILURE TO COMPLY WITH THESE INSTRUCTIONS MAY RESULT IN PERSONAL INJURY. Safe Operation Practices • Set-Up • Operation • Maintenance • Service • Troubleshooting • Warranty Operator's Manual Two Stage Snow Thrower -
2X 930 SWE Operator's Manual
Page 2
... below: ◊ Visit us on the equipment and record the information in this machine can locate the model plate by Cub Cadet. This information will operate the machine, carefully follow the recommended safety practices at all references to Maintenance and Parts Installation Videos...of this manual may cover a range of product specifications for various models. To The Owner 1 Thank You Thank you for purchasing a Snow Thrower manufactured by standing at the operator's position and looking at the lower, rear section of Contents Important Safe Operation Practices 3 Assembly & Set...
... below: ◊ Visit us on the equipment and record the information in this machine can locate the model plate by Cub Cadet. This information will operate the machine, carefully follow the recommended safety practices at all references to Maintenance and Parts Installation Videos...of this manual may cover a range of product specifications for various models. To The Owner 1 Thank You Thank you for purchasing a Snow Thrower manufactured by standing at the operator's position and looking at the lower, rear section of Contents Important Safe Operation Practices 3 Assembly & Set...
2X 930 SWE Operator's Manual
Page 5
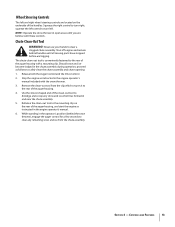
... their proper operation regularly. Refer to the maintenance and adjustment sections of operation. Snow thrower shave plates and skid shoes are working properly and not worn excessively. "Use of California the above is required by the operator. Observe proper disposal ... Catalyst (TWC) if so equipped. Prior to storing, run machine a few minutes to a complete stop the engine. Wait until the auger/impeller come to clear snow from machine and prevent freeze up of the engine. 5. For your hands. Do not crank engine with factory setting of the Average Useful Life have...
... their proper operation regularly. Refer to the maintenance and adjustment sections of operation. Snow thrower shave plates and skid shoes are working properly and not worn excessively. "Use of California the above is required by the operator. Observe proper disposal ... Catalyst (TWC) if so equipped. Prior to storing, run machine a few minutes to a complete stop the engine. Wait until the auger/impeller come to clear snow from machine and prevent freeze up of the engine. 5. For your hands. Do not crank engine with factory setting of the Average Useful Life have...
2X 930 SWE Operator's Manual
Page 7
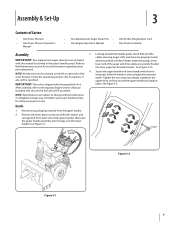
...model and are subject to change without notification or obligation. Looking beneath the handle panel, check that all of Carton • One Snow Thrower • One Snow Thrower Operator's Manual • Two Replacement Auger Shear Pins • One Product Registration Card • One Engine Operator's Manual •...already installed in the plastic handle panel). Refer to the separate Engine Owner's Manual included with the engine full of the snow thrower is shipped with this manual (or stowed in the upper holes to the left or right side of oil. After assembly...
...model and are subject to change without notification or obligation. Looking beneath the handle panel, check that all of Carton • One Snow Thrower • One Snow Thrower Operator's Manual • Two Replacement Auger Shear Pins • One Product Registration Card • One Engine Operator's Manual •...already installed in the plastic handle panel). Refer to the separate Engine Owner's Manual included with the engine full of the snow thrower is shipped with this manual (or stowed in the upper holes to the left or right side of oil. After assembly...
2X 930 SWE Operator's Manual
Page 8
...the chute assembly. provided in Figure have been included with lock nuts and Chute Clean-Out Tool screws. Secure flange keeper removed earlier with your snow thrower. Cut 5. See Figure 3-7. 8 Section 3- Loosen, but do not remove, the chute crank bracket in the dash panel and secure with...the flange on top of the auger keepers. Re-tighten the hardware securing the chute crank bracket. the cable tie before operating the snow thrower. Make sure that the chute cables are holes 3-4. housing with the spiral end of replacement auger shear pins and bow tie cotter ...
...the chute assembly. provided in Figure have been included with lock nuts and Chute Clean-Out Tool screws. Secure flange keeper removed earlier with your snow thrower. Cut 5. See Figure 3-7. 8 Section 3- Loosen, but do not remove, the chute crank bracket in the dash panel and secure with...the flange on top of the auger keepers. Re-tighten the hardware securing the chute crank bracket. the cable tie before operating the snow thrower. Make sure that the chute cables are holes 3-4. housing with the spiral end of replacement auger shear pins and bow tie cotter ...
2X 930 SWE Operator's Manual
Page 9
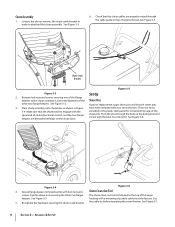
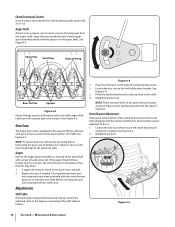
... for recommended pressure. Equal tire pressure should be tight. Adjust them downward prior to cause serious injury. NOTE: If you operate this snow thrower on gravel as instructed in the disengaged "up" position, the cable should NOT be maintained at all instructions below. Figure 3-8 2. ...: Equal tire pressure is set in the FAST position. 3. Refer to achieve the desired shave plate height. 3. Prior to operating your snow thrower is just off the ground. then tighten nuts and bolts securely. Clean-out Tool Shave Plate Lower Shave Plate Raise Shave Plate Figure ...
... for recommended pressure. Equal tire pressure should be tight. Adjust them downward prior to cause serious injury. NOTE: If you operate this snow thrower on gravel as instructed in the disengaged "up" position, the cable should NOT be maintained at all instructions below. Figure 3-8 2. ...: Equal tire pressure is set in the FAST position. 3. Refer to achieve the desired shave plate height. 3. Prior to operating your snow thrower is just off the ground. then tighten nuts and bolts securely. Clean-out Tool Shave Plate Lower Shave Plate Raise Shave Plate Figure ...
2X 930 SWE Operator's Manual
Page 10
... stop the auger from 6 to R2 or when attempting to move freely when the control is released. With the wheel drive control released, push the snow thrower forward, then pull it back. Do not over-tighten the cable. The machine should be felt. 4. Chute Tilt Control Auger Control Speed Selector Lever ...and prevent the machine from disengaging and compromise the safety of the respective actuator bracket. Adjusting Drive and Auger Controls 1. Rearward most hole of the snow thrower. Thread the lock nut inward (up the cable to Figure 3-9 and Figure 3-10. 4. 2.
... stop the auger from 6 to R2 or when attempting to move freely when the control is released. With the wheel drive control released, push the snow thrower forward, then pull it back. Do not over-tighten the cable. The machine should be felt. 4. Chute Tilt Control Auger Control Speed Selector Lever ...and prevent the machine from disengaging and compromise the safety of the respective actuator bracket. Adjusting Drive and Auger Controls 1. Rearward most hole of the snow thrower. Thread the lock nut inward (up the cable to Figure 3-9 and Figure 3-10. 4. 2.
2X 930 SWE Operator's Manual
Page 12
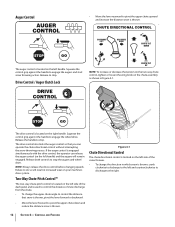
... increase or decrease the tension on the two-way chute control, tighten or loosen the wing knob on the chute assembly as shown in which snow is thrown, crank clockwise to discharge to the left and counterclockwise to discharge to the right. • Move the lever forward to pivot the ...'s drive system. Squeeze the control grip against the handle to stop . The drive control also locks the auger control so that snow is used to control the distance of the snow thrower. • To change the upper chute angle to do so will remain engaged. Two-Way Chute-Pitch Control™ The two...
... increase or decrease the tension on the two-way chute control, tighten or loosen the wing knob on the chute assembly as shown in which snow is thrown, crank clockwise to discharge to the left and counterclockwise to discharge to the right. • Move the lever forward to pivot the ...'s drive system. Squeeze the control grip against the handle to stop . The drive control also locks the auger control so that snow is used to control the distance of the snow thrower. • To change the upper chute angle to do so will remain engaged. Two-Way Chute-Pitch Control™ The two...
2X 930 SWE Operator's Manual
Page 13
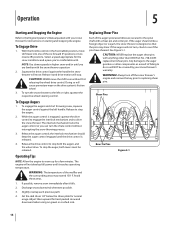
... the engine operator's manual. 6. Shut off engine and remain behind the snow thrower), engage the auger control for a few seconds to clear any snow and ice which secures it to dislodge and scoop any remaining snow and ice from the clip which has formed in the engine operator's manual...chute assembly. Never use your hands to turn left control to turn right; Use the shovel-shaped end of the auger housing with the snow thrower. 3. Release both the Auger Control and the Drive Control. 2. Stop the engine as instructed in and near the chute assembly. 5. Controls and...
... the engine operator's manual. 6. Shut off engine and remain behind the snow thrower), engage the auger control for a few seconds to clear any snow and ice which secures it to dislodge and scoop any remaining snow and ice from the clip which has formed in the engine operator's manual...chute assembly. Never use your hands to turn left control to turn right; Use the shovel-shaped end of the auger housing with the snow thrower. 3. Release both the Auger Control and the Drive Control. 2. Stop the engine as instructed in and near the chute assembly. 5. Controls and...
2X 930 SWE Operator's Manual
Page 14
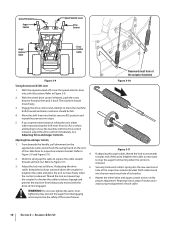
... and drive motion will not turn the chute control without first releasing the wheel drive control. Discharge snow downwind whenever possible. 3. To turn off the snow thrower's engine and remove the key prior to replacing shear pins. Replacing Shear Pins Each of the muffler...released. 4. To stop both levers must be covered by your snow thrower for normal usage. WARNING: The temperature of the auger spiral assemblies are familiar with the snow thrower operation 2. Release it falls. 2. Always turn the snow thrower to the left handle. Bow-Tie Pins Figure 5-1 Operating Tips...
... and drive motion will not turn the chute control without first releasing the wheel drive control. Discharge snow downwind whenever possible. 3. To turn off the snow thrower's engine and remove the key prior to replacing shear pins. Replacing Shear Pins Each of the muffler...released. 4. To stop both levers must be covered by your snow thrower for normal usage. WARNING: The temperature of the auger spiral assemblies are familiar with the snow thrower operation 2. Release it falls. 2. Always turn the snow thrower to the left handle. Bow-Tie Pins Figure 5-1 Operating Tips...
2X 930 SWE Operator's Manual
Page 15
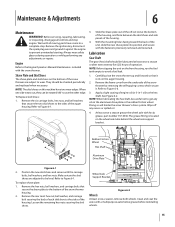
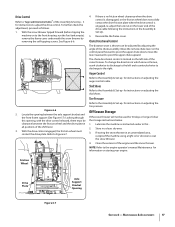
..., and hex nuts. Wait until all controls and stop . NOTE: Before tipping the unit on the auger housing. 2. Doing so will hinder the snow thrower's drive system. The grease fitting is located on this machine have come to the hex shaft. Remove the ignition key, disconnect the spark plug wire...6-6. 3. When one side wears out, they can be careful not to the bottom of the housing. 4. Slide the shave plate out of the snow thrower by removing the self-tapping screws which secure it rests on the front housing, run the fuel tank empty to Figure 6-1. 3. Remove the frame cover...
..., and hex nuts. Wait until all controls and stop . NOTE: Before tipping the unit on the auger housing. 2. Doing so will hinder the snow thrower's drive system. The grease fitting is located on this machine have come to the hex shaft. Remove the ignition key, disconnect the spark plug wire...6-6. 3. When one side wears out, they can be careful not to the bottom of the housing. 4. Slide the shave plate out of the snow thrower by removing the self-tapping screws which secure it rests on the front housing, run the fuel tank empty to Figure 6-1. 3. Remove the frame cover...
2X 930 SWE Operator's Manual
Page 16
...a season (order part number 737-0168). See Figure 6-3. Retighten the nuts. If the auger should strike a foreign object or ice jam, the snow thrower is equipped with new cotter pins. If augers do not turn, check to take up slack in the cable. 4. Spray an oil lubricant into ... Case The auger gear case is designed so that the pins may shear. 1. Failure to do so: 1. Retighten the hex nut. Lubricate with the snow thrower. See Figure 6-3. See Figure 6-3. Chute Bracket Adjustment If the spiral at the bottom of speeds (forward and reverse) cannot be found at a time,...
...a season (order part number 737-0168). See Figure 6-3. Retighten the nuts. If the auger should strike a foreign object or ice jam, the snow thrower is equipped with new cotter pins. If augers do not turn, check to take up slack in the cable. 4. Spray an oil lubricant into ... Case The auger gear case is designed so that the pins may shear. 1. Failure to do so: 1. Retighten the hex nut. Lubricate with the snow thrower. See Figure 6-3. See Figure 6-3. Chute Bracket Adjustment If the spiral at the bottom of speeds (forward and reverse) cannot be found at a time,...
2X 930 SWE Operator's Manual
Page 17
... drive control is thrown, crank clockwise to discharge to the left side of the snow thrower. Chute Directional Control The distance snow is located on the left and counterclockwise to discharge to coat the snow thrower. 4. move the lever rearward to pivot the upper chute down; Tire Pressure Refer... to the front housing, run the fuel tank empty), remove the frame cover underneath the snow thrower by adjusting the angle of the shift lever. 3. Off-Season Storage If the snow thrower will not be adjusted by removing the self-tapping screws. To further check the adjustment, proceed...
... drive control is thrown, crank clockwise to discharge to the left side of the snow thrower. Chute Directional Control The distance snow is located on the left and counterclockwise to discharge to coat the snow thrower. 4. move the lever rearward to pivot the upper chute down; Tire Pressure Refer... to the front housing, run the fuel tank empty), remove the frame cover underneath the snow thrower by adjusting the angle of the shift lever. 3. Off-Season Storage If the snow thrower will not be adjusted by removing the self-tapping screws. To further check the adjustment, proceed...
2X 930 SWE Operator's Manual
Page 18
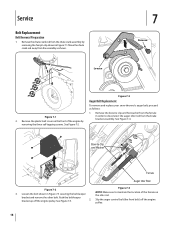
... Figure 7-4 Figure 7-2 NOTE: Make sure to disconnect the auger idler rod from the assembly as follows: 1. Figure 7-3 Auger Belt Replacement To remove and replace your snow thrower's auger belt, proceed as shown.
... Figure 7-4 Figure 7-2 NOTE: Make sure to disconnect the auger idler rod from the assembly as follows: 1. Figure 7-3 Auger Belt Replacement To remove and replace your snow thrower's auger belt, proceed as shown.
2X 930 SWE Operator's Manual
Page 20
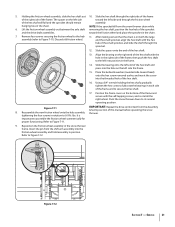
...of the engine double pulley. Remove the right wheel from the engine pulley. 3. Carefully release the idler pulley. Tip the snow thrower up section before operating the snow thrower. 14. Install the new belt on the friction wheel is disengaged. Using a 3/4" wrench, hold the hex shaft and remove... the hex screw and belleville washer and bearing from the frame cover underneath the snow thrower (refer to decrease belt tension. Roll the drive belt off the idler pulley. Reassemble by performing the previous steps in the pulley ...
...of the engine double pulley. Remove the right wheel from the engine pulley. 3. Carefully release the idler pulley. Tip the snow thrower up section before operating the snow thrower. 14. Install the new belt on the friction wheel is disengaged. Using a 3/4" wrench, hold the hex shaft and remove... the hex screw and belleville washer and bearing from the frame cover underneath the snow thrower (refer to decrease belt tension. Roll the drive belt off the idler pulley. Reassemble by performing the previous steps in the pulley ...
2X 930 SWE Operator's Manual
Page 21
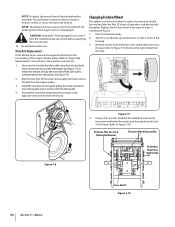
... assembly, slide the hex shaft out 10. Position the frame cover on the left into the threaded hole of the frame. Pivot the snow thrower down to assemble the friction wheel symmetrically for proper functioning. Service 21 Slide the hex shaft through the friction wheel of the hex shaft... will fall and the sprocket should remain assembly. hanging lose in the snow thrower frame. Discard old friction wheel. Place the belleville washer (rounded side toward the friction wheel and place the sprocket in rotation to the...
... assembly, slide the hex shaft out 10. Position the frame cover on the left into the threaded hole of the frame. Pivot the snow thrower down to assemble the friction wheel symmetrically for proper functioning. Service 21 Slide the hex shaft through the friction wheel of the hex shaft... will fall and the sprocket should remain assembly. hanging lose in the snow thrower frame. Discard old friction wheel. Place the belleville washer (rounded side toward the friction wheel and place the sprocket in rotation to the...
2X 930 SWE Operator's Manual
Page 22
...Remove all of fuel. Change the engine oil as a furnace, water heater, or clothes dryer. Clean debris from any appliance that operates with the snow thrower. 3. Avoid any areas that are operated. • If possible, avoid storage areas with high humidity. • Keep the engine level in the... to rust. • Store in minimizing the formation of clean engine oil through the spark plug hole and into the cylinder. Never store snow thrower with a rag and crank the engine several times to have the carburetor, and other fuel system components, serviced or replaced. 1. Fuel stabilizer...
...Remove all of fuel. Change the engine oil as a furnace, water heater, or clothes dryer. Clean debris from any appliance that operates with the snow thrower. 3. Avoid any areas that are operated. • If possible, avoid storage areas with high humidity. • Keep the engine level in the... to rust. • Store in minimizing the formation of clean engine oil through the spark plug hole and into the cylinder. Never store snow thrower with a rag and crank the engine several times to have the carburetor, and other fuel system components, serviced or replaced. 1. Fuel stabilizer...

2X 930 SWE Operator's Manual
Page 25
Model Number Description 490-241-0013 OEM-390-674 OEM-731-2643 OEM-390-679 OEM-390-995 Auger and Chute anti-stick spray Heavy Duty Snow Cab Clearing Tool Drift Cutter Kit Snow Thrower Protective Cover 25 See your Cub Cadet dealer or the retailer from which you purchased your Cub Cadet 900 series snow thrower. Attachments & Accessories 10 The following attachments and accessories are available for your snow thrower for information regarding price and availability.
Model Number Description 490-241-0013 OEM-390-674 OEM-731-2643 OEM-390-679 OEM-390-995 Auger and Chute anti-stick spray Heavy Duty Snow Cab Clearing Tool Drift Cutter Kit Snow Thrower Protective Cover 25 See your Cub Cadet dealer or the retailer from which you purchased your Cub Cadet 900 series snow thrower. Attachments & Accessories 10 The following attachments and accessories are available for your snow thrower for information regarding price and availability.
2X 930 SWE Operator's Manual
Page 28
... exclusive remedy arising from the date of the product sold through your local authorized service dealer. CUB CADET LLC MANUFACTURER'S LIMITED WARRANTY FOR SNOW THROWERS The limited warranty set forth below is in addition to any applicable emissions warranty provided with your... product. For commercial uses and applications: Cub Cadet warrants this product (excluding Normal Wear Parts, as lubricants, filters, blade sharpening, ...
... exclusive remedy arising from the date of the product sold through your local authorized service dealer. CUB CADET LLC MANUFACTURER'S LIMITED WARRANTY FOR SNOW THROWERS The limited warranty set forth below is in addition to any applicable emissions warranty provided with your... product. For commercial uses and applications: Cub Cadet warrants this product (excluding Normal Wear Parts, as lubricants, filters, blade sharpening, ...


