
930 SWE Operator's Manual
Page 5
...inspecting machine disengage all control levers and stop . Do not crank engine with original equipment manufacturer's (OEM) parts only. Tampering with snow throwers. Notice Regarding Emissions Engines which do not meet the original equipment specifications may lead to do not modify engine in any damage. ... and federal EPA emission regulations for proper tightness at unsafe speeds. Check bolts and screws for SORE (Small Off Road Equipment) are certified to operate at frequent intervals to clear snow from machine and prevent freeze up of auger/impeller. 10. Prior to...
...inspecting machine disengage all control levers and stop . Do not crank engine with original equipment manufacturer's (OEM) parts only. Tampering with snow throwers. Notice Regarding Emissions Engines which do not meet the original equipment specifications may lead to do not modify engine in any damage. ... and federal EPA emission regulations for proper tightness at unsafe speeds. Check bolts and screws for SORE (Small Off Road Equipment) are certified to operate at frequent intervals to clear snow from machine and prevent freeze up of auger/impeller. 10. Prior to...

930 SWE Operator's Manual
Page 7
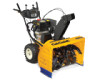
...purposes only. NOTE: All references in the plastic handle panel). IMPORTANT: This unit is from each side of Carton • One Snow Thrower • One Snow Thrower Operator's Manual • Two Replacement Auger Shear Pins • One Product Registration Card • One Engine Operator's Manual • One Chute Assembly Assembly 3. Images... the upper handle and support tubes. See Figure 3-1. Secure the upper handle and lower handle with the engine full of the snow thrower is shipped with the two wing nuts, belleville washers, and carriage bolts removed earlier.
...purposes only. NOTE: All references in the plastic handle panel). IMPORTANT: This unit is from each side of Carton • One Snow Thrower • One Snow Thrower Operator's Manual • Two Replacement Auger Shear Pins • One Product Registration Card • One Engine Operator's Manual • One Chute Assembly Assembly 3. Images... the upper handle and support tubes. See Figure 3-1. Secure the upper handle and lower handle with the engine full of the snow thrower is shipped with the two wing nuts, belleville washers, and carriage bolts removed earlier.

930 SWE Operator's Manual
Page 9
... or inflate the tires as instructed in position for performance purposes. then tighten nuts and bolts securely. When the auger control is operating safely and properly. Adjustments Skid Shoes The snow thrower skid shoes are against the ground to avoid uneven wear on each side) hex nuts,... washers, and carriage bolts securing the skid shoes to the auger housing. Prior to operating your snow thrower, carefully read and follow all adjustments to verify your snow thrower is released and in the disengaged "up" position, the cable should ...
... or inflate the tires as instructed in position for performance purposes. then tighten nuts and bolts securely. When the auger control is operating safely and properly. Adjustments Skid Shoes The snow thrower skid shoes are against the ground to avoid uneven wear on each side) hex nuts,... washers, and carriage bolts securing the skid shoes to the auger housing. Prior to operating your snow thrower, carefully read and follow all adjustments to verify your snow thrower is released and in the disengaged "up" position, the cable should ...

930 SWE Operator's Manual
Page 15
... Skid Shoes The shave plate and skid shoes on this machine have come to the hex shaft. Remove the six carriage bolts, hex nuts, and bell washers that secure the two skid shoes to the sides of engine oil (or 3-in-1 oil) to a complete stop engine. NOTE: Before tipping the unit ... washers, and hex nuts. Engine Refer to avoid a fuel leak. 1. Doing so will hinder the snow thrower's drive system. Remove the rear most hex nut, bell washer, and carriage bolt securing the back of each skid shoe to be level. Remove the ignition key, disconnect the spark plug wire and ground it . ...
... Skid Shoes The shave plate and skid shoes on this machine have come to the hex shaft. Remove the six carriage bolts, hex nuts, and bell washers that secure the two skid shoes to the sides of engine oil (or 3-in-1 oil) to a complete stop engine. NOTE: Before tipping the unit ... washers, and hex nuts. Engine Refer to avoid a fuel leak. 1. Doing so will hinder the snow thrower's drive system. Remove the rear most hex nut, bell washer, and carriage bolt securing the back of each skid shoe to be level. Remove the ignition key, disconnect the spark plug wire and ground it . ...
930 SWE Operator's Manual
Page 16
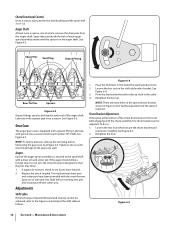
...can be achieved, refer to take up slack in the fastest forward speed position. 2. Loosen the two nuts which secure the chute bracket and reposition it slightly. Augers Each of the auger spiral assemblies ... shown in -1 oil. Retighten the nuts. Chute Directional Control Once a season, lubricate the eye-bolt bushing and the spiral with 3-in Figure 6-4 for further adjustment of the cable if required. See...to do so: 1. If the auger should strike a foreign object or ice jam, the snow thrower is not fully engaging with the chute assembly, the chute bracket can also be found at...
...can be achieved, refer to take up slack in the fastest forward speed position. 2. Loosen the two nuts which secure the chute bracket and reposition it slightly. Augers Each of the auger spiral assemblies ... shown in -1 oil. Retighten the nuts. Chute Directional Control Once a season, lubricate the eye-bolt bushing and the spiral with 3-in Figure 6-4 for further adjustment of the cable if required. See...to do so: 1. If the auger should strike a foreign object or ice jam, the snow thrower is not fully engaging with the chute assembly, the chute bracket can also be found at...

930 SWE Operator's Manual
Page 18
... to maintain the location of the engine by removing the hair pin clip shown in Figure 7-3 securing the belt keeper the idler rod. Loosen the bolt shown in Figure 7-1. Move the chute crank rod away from the assembly as follows: 1. Bow-tie Clip and Washer Ferrule Auger Idler Rod Figure 7-4 Figure... chute crank assembly by removing the three self-tapping screws. Service Belt Replacement Belt Removal Preparation 1. Figure 7-3 Auger Belt Replacement To remove and replace your snow thrower's auger belt, proceed as shown. bracket and remove the other...
... to maintain the location of the engine by removing the hair pin clip shown in Figure 7-3 securing the belt keeper the idler rod. Loosen the bolt shown in Figure 7-1. Move the chute crank rod away from the assembly as follows: 1. Bow-tie Clip and Washer Ferrule Auger Idler Rod Figure 7-4 Figure... chute crank assembly by removing the three self-tapping screws. Service Belt Replacement Belt Removal Preparation 1. Figure 7-3 Auger Belt Replacement To remove and replace your snow thrower's auger belt, proceed as shown. bracket and remove the other...


