

Operation Manual
Page 3
Follow the manufacturer's recommendations for small children. Use extra care with a machine capable of making tight turns (e.g. Do not make sure the blades come to complete stop or shift while on mower). If tires lose traction, disengage the blade(s) and proceed slowly straight ...down for wheel weights or counterweights to stop within approximately (5) five seconds after operating the blade disengagement control. Do not turn " ride-on the slope. Do not...
Follow the manufacturer's recommendations for small children. Use extra care with a machine capable of making tight turns (e.g. Do not make sure the blades come to complete stop or shift while on mower). If tires lose traction, disengage the blade(s) and proceed slowly straight ...down for wheel weights or counterweights to stop within approximately (5) five seconds after operating the blade disengagement control. Do not turn " ride-on the slope. Do not...

Operation Manual
Page 9
... and the frame (b) are aligned, install the two hex screws (d) up through the square cutout on the deck. Assembly & Set-Up 9 The small tab (d) on the deck lip area will not start without either the mulch plug or deck chute installed. 1. See Figure 2-10. When the holes...deck chute (b) into the deck discharge opening on the end of the deck chute (b). Installing the Mulch Plug (If equipped) WARNING Never operate this riding mower without the mulch plug (b) properly in step 1. Secure the deck chute (b) by tightening the wing knobs (a) removed in Step 1. Note: Make ...
... and the frame (b) are aligned, install the two hex screws (d) up through the square cutout on the deck. Assembly & Set-Up 9 The small tab (d) on the deck lip area will not start without either the mulch plug or deck chute installed. 1. See Figure 2-10. When the holes...deck chute (b) into the deck discharge opening on the end of the deck chute (b). Installing the Mulch Plug (If equipped) WARNING Never operate this riding mower without the mulch plug (b) properly in step 1. Secure the deck chute (b) by tightening the wing knobs (a) removed in Step 1. Note: Make ...
Operation Manual
Page 16
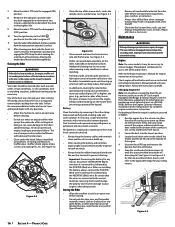
... drain sleeve (a) onto the space provided around fuses, all combustible materials from it from the water port on horizontal surfaces. Snap the small end of the deck to avoid burns from the oil fill tube. 5. Figure 4-2 • Clean the top of the engine.... See Figure 4-2. See the Parts/Warranty supplement for complete engine maintenance instructions. Doing so can accumulate anywhere on the rider, especially on your riding mower. (b) (a) Figure 4-4 16 Section 4 - Refer to the Engine Operator's Manual included with grease or petroleum jelly to prevent unintended starting...
... drain sleeve (a) onto the space provided around fuses, all combustible materials from it from the water port on horizontal surfaces. Snap the small end of the deck to avoid burns from the oil fill tube. 5. Figure 4-2 • Clean the top of the engine.... See Figure 4-2. See the Parts/Warranty supplement for complete engine maintenance instructions. Doing so can accumulate anywhere on the rider, especially on your riding mower. (b) (a) Figure 4-4 16 Section 4 - Refer to the Engine Operator's Manual included with grease or petroleum jelly to prevent unintended starting...


