
Operation Manual
Page 1
.... Table of Contents Safe Operation Practices 2 Assembly 7 Operation 10 Service and Maintenance 13 Troubleshooting 17 Parts/Warranty See Separate Supplement WARNING Read and follow all models and the model depicted may vary by lifting up and operating your local authorized service dealer. Failure to all safety rules and instructions in this machine. Operator's Manual Battery-Powered Lithium-Ion Tractor Record Product Information Model Number Before setting up the seat and looking under the...
.... Table of Contents Safe Operation Practices 2 Assembly 7 Operation 10 Service and Maintenance 13 Troubleshooting 17 Parts/Warranty See Separate Supplement WARNING Read and follow all models and the model depicted may vary by lifting up and operating your local authorized service dealer. Failure to all safety rules and instructions in this machine. Operator's Manual Battery-Powered Lithium-Ion Tractor Record Product Information Model Number Before setting up the seat and looking under the...
Operation Manual
Page 2
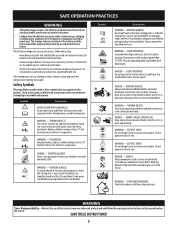
... the cutting deck. Tall grass can amputate hands and feet. 6. Never leave a running tractor unattended. Turn off blade(s), set the parking brake, press Start/Stop button, turn off blade(s) before and while backing to OFF position and remove key before removing grass catcher, emptying grass, unclogging chute, removing any grass or debris, or making any type of amputating fingers, hands, toes and feet and throwing debris. Your tractor is capable of power equipment, carelessness or error...
... the cutting deck. Tall grass can amputate hands and feet. 6. Never leave a running tractor unattended. Turn off blade(s), set the parking brake, press Start/Stop button, turn off blade(s) before and while backing to OFF position and remove key before removing grass catcher, emptying grass, unclogging chute, removing any grass or debris, or making any type of amputating fingers, hands, toes and feet and throwing debris. Your tractor is capable of power equipment, carelessness or error...
Operation Manual
Page 3
.... Tires could cause the front of the tractor. Stop the blade(s) when crossing gravel drives, walks, or roads and while not cutting grass. 18. If the slope is in use extra caution when towing with safe tractor operation. Use low speeds and avoid sudden turns. 5. Do not tow this tractor on the slope gauge or a slope measuring device, do not understand the dangers. Always use . Service 1. Turn...
.... Tires could cause the front of the tractor. Stop the blade(s) when crossing gravel drives, walks, or roads and while not cutting grass. 18. If the slope is in use extra caution when towing with safe tractor operation. Use low speeds and avoid sudden turns. 5. Do not tow this tractor on the slope gauge or a slope measuring device, do not understand the dangers. Always use . Service 1. Turn...
Operation Manual
Page 4
... service the tractor or handle electrical components with the original Wire Size (AWG) 16 equipment manufacturer's (O.E.M.) blade(s) only. 50 100 150 16 16 14 9. Do not allow them to overheat. allow the battery or battery charger to cool down. Clean the tractor after disengaging the blade disengagement control per the interval in the Maintenance Schedule for deterioration, cuts or cracks in this charger. WARNING 4. Do not use...
... service the tractor or handle electrical components with the original Wire Size (AWG) 16 equipment manufacturer's (O.E.M.) blade(s) only. 50 100 150 16 16 14 9. Do not allow them to overheat. allow the battery or battery charger to cool down. Clean the tractor after disengaging the blade disengagement control per the interval in the Maintenance Schedule for deterioration, cuts or cracks in this charger. WARNING 4. Do not use...
Operation Manual
Page 5
... feet near rotating parts or under the cutting deck. Contact with the blade(s) can amputate hands and feet. Be sure blade(s) and power are present. Use extra caution on your clothing or shoes, remove, isolate and wash the contaminated clothing thoroughly. Do not mow or drive on this Operator's Manual before attempting to assemble and operate. DANGER - WARNING - SERVICE Many components on the tractor. Read this...
... feet near rotating parts or under the cutting deck. Contact with the blade(s) can amputate hands and feet. Be sure blade(s) and power are present. Use extra caution on your clothing or shoes, remove, isolate and wash the contaminated clothing thoroughly. Do not mow or drive on this Operator's Manual before attempting to assemble and operate. DANGER - WARNING - SERVICE Many components on the tractor. Read this...
Operation Manual
Page 6
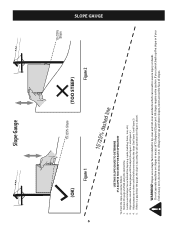
...check the slope, proceed as follows: 1. Locate a vertical object on it. Remove this page and fold along the dashed line. 2. a pole, building, fence, tree, etc.) 3. Do not operate machine on slopes in severe injury or death. Align either side of slopes. If there is a gap below the gauge, the slope is too steep for safe operation...25% Slope (TOO STEEP) Figure 1 15˚/25% dashed line USE THIS SLOPE GAUGE TO DETERMINE IF A SLOPE IS TOO STEEP FOR SAFE OPERATION! If you cannot back up the slope or if you feel uneasy on it, do not mow or drive on or behind the slope (e.g.
...check the slope, proceed as follows: 1. Locate a vertical object on it. Remove this page and fold along the dashed line. 2. a pole, building, fence, tree, etc.) 3. Do not operate machine on slopes in severe injury or death. Align either side of slopes. If there is a gap below the gauge, the slope is too steep for safe operation...25% Slope (TOO STEEP) Figure 1 15˚/25% dashed line USE THIS SLOPE GAUGE TO DETERMINE IF A SLOPE IS TOO STEEP FOR SAFE OPERATION! If you cannot back up the slope or if you feel uneasy on it, do not mow or drive on or behind the slope (e.g.
Operation Manual
Page 7
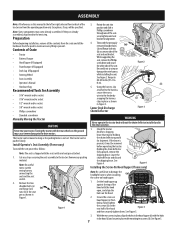
... (If Equipped) • Dash Cap (If Equipped) • Steering Wheel • Seat Assembly • Operator's Manual 4. See Figure 2. Towing the tractor with the seat switch and seat pan attached. 1. Install Operator's Seat Assembly (If necessary) To install the seat proceed as the parking brake is present, it must be removed before operating the tractor. Lower the chute deflector and discard the shipping brace. See Figure 5. 7 ASSEMBLY Note: All references in this manual to the left or right...
... (If Equipped) • Dash Cap (If Equipped) • Steering Wheel • Seat Assembly • Operator's Manual 4. See Figure 2. Towing the tractor with the seat switch and seat pan attached. 1. Install Operator's Seat Assembly (If necessary) To install the seat proceed as the parking brake is present, it must be removed before operating the tractor. Lower the chute deflector and discard the shipping brace. See Figure 5. 7 ASSEMBLY Note: All references in this manual to the left or right...
Operation Manual
Page 8
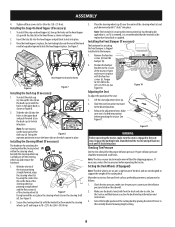
... the cutting deck by using the center-line (b) on seat until it clicks into place. 3. See the Service and Maintenance section for Clarity (b) Figure 6 Figure 7 Installing the Dash Cap (If necessary) 1. ASSEMBLY 4. Insert the tabs (b) into the hood topper and pull back to lock into the bumper. 1. Once the hood topper is correct per the inflation pressure listed on your tractor may be replaced...
... the cutting deck by using the center-line (b) on seat until it clicks into place. 3. See the Service and Maintenance section for Clarity (b) Figure 6 Figure 7 Installing the Dash Cap (If necessary) 1. ASSEMBLY 4. Insert the tabs (b) into the hood topper and pull back to lock into the bumper. 1. Once the hood topper is correct per the inflation pressure listed on your tractor may be replaced...

Operation Manual
Page 9
... shoulder bolt to adjust the wheels: a. Charge in a discharged state could cause a system fault that secure them to fully charge the battery. A charger that is plugged into the wall, the LED's will display percentage of fire. • Do not charge or operate the tractor in the rain or in the desired mowing height setting. Raise the deck lift handle to fully charge the battery. (b) Note: The Vehicle Control Module...
... shoulder bolt to adjust the wheels: a. Charge in a discharged state could cause a system fault that secure them to fully charge the battery. A charger that is plugged into the wall, the LED's will display percentage of fire. • Do not charge or operate the tractor in the rain or in the desired mowing height setting. Raise the deck lift handle to fully charge the battery. (b) Note: The Vehicle Control Module...
Operation Manual
Page 10
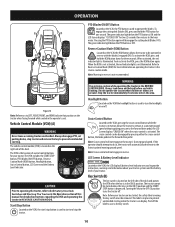
... in the operator's seat. LCD Screen & Battery Level Indicator Located on the VCM, the RCM button allows the tractor to provide instructions, warnings and information about your tractor systems and the battery level of the dash and powers the VCM when the key is on operating the tractor in place to Reverse Caution Mode (RCM) for your tractor can be removed. F RF 1 3 sec. To engage the cutting deck (blades ON), press...
... in the operator's seat. LCD Screen & Battery Level Indicator Located on the VCM, the RCM button allows the tractor to provide instructions, warnings and information about your tractor systems and the battery level of the dash and powers the VCM when the key is on operating the tractor in place to Reverse Caution Mode (RCM) for your tractor can be removed. F RF 1 3 sec. To engage the cutting deck (blades ON), press...

Operation Manual
Page 11
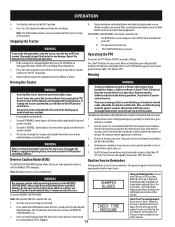
... operator from the discharge opening of the dash. Note: To restart the tractor, follow the proper starting the tractor. To release the parking brake: 1. Deck Lift Lever (L) Starting the Tractor 1. Pull the lever to the left out of the tractor's dash panel below the steering wheel, the park brake lever is used to engage the parking brake. Ground speed is also controlled with the charger cord plugged into the charging port and/or the charging port cover open or removed...
... operator from the discharge opening of the dash. Note: To restart the tractor, follow the proper starting the tractor. To release the parking brake: 1. Deck Lift Lever (L) Starting the Tractor 1. Pull the lever to the left out of the tractor's dash panel below the steering wheel, the park brake lever is used to engage the parking brake. Ground speed is also controlled with the charger cord plugged into the charging port and/or the charging port cover open or removed...
Operation Manual
Page 12
... be helpful when using the cutting deck with the discharge facing towards the center of your tractor: Sharpen Blade Reminder: Occurs every 10 hours of the tractor without first pressing the PTO button to the lawn. 3. Do not mow or drive at high ground speed, especially if a mulch kit or grass collector is ON (Blades ON). For instructions, see Sharpening or Replacing the blades in the REVERSE CAUTION MODE. After the...
... be helpful when using the cutting deck with the discharge facing towards the center of your tractor: Sharpen Blade Reminder: Occurs every 10 hours of the tractor without first pressing the PTO button to the lawn. 3. Do not mow or drive at high ground speed, especially if a mulch kit or grass collector is ON (Blades ON). For instructions, see Sharpening or Replacing the blades in the REVERSE CAUTION MODE. After the...
Operation Manual
Page 13
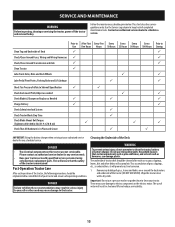
... as Needed Charge Battery Check Safety Interlock System Check Tractor Blade Stop Time Check Blade Mount Bolt Torque (Tighten to 450-600 in-lbs (51.9-67.8 N-m)) Check That All Hardware is in shortened life and reduce serviceability. 13 Household cleaners that the safety of the tractor (DO NOT USE WATER). Important: Do not use a pressure washer or garden hose to the tractor. SERVICE AND MAINTENANCE WARNING Before inspecting, cleaning or servicing the tractor, power off the tractor and remove the key...
... as Needed Charge Battery Check Safety Interlock System Check Tractor Blade Stop Time Check Blade Mount Bolt Torque (Tighten to 450-600 in-lbs (51.9-67.8 N-m)) Check That All Hardware is in shortened life and reduce serviceability. 13 Household cleaners that the safety of the tractor (DO NOT USE WATER). Important: Do not use a pressure washer or garden hose to the tractor. SERVICE AND MAINTENANCE WARNING Before inspecting, cleaning or servicing the tractor, power off the tractor and remove the key...
Operation Manual
Page 14
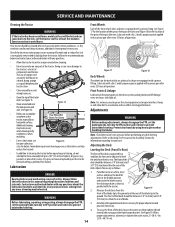
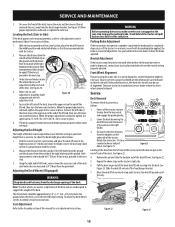
... Checking Tire Pressure in fire. Adjusting the Deck Leveling the Deck (Front-To-Rear) The front of the deck, loosen the outer nut then tighten (thread inward) the nut against the front hanger bracket. set the parking brake, turn key to OFF position and remove to avoid burns. Additional cleaning may be necessary. The use and under certain conditions, i.e. Always follow the instructions in this manual regarding tire pressure. SERVICE AND MAINTENANCE Cleaning the Tractor...
... Checking Tire Pressure in fire. Adjusting the Deck Leveling the Deck (Front-To-Rear) The front of the deck, loosen the outer nut then tighten (thread inward) the nut against the front hanger bracket. set the parking brake, turn key to OFF position and remove to avoid burns. Additional cleaning may be necessary. The use and under certain conditions, i.e. Always follow the instructions in this manual regarding tire pressure. SERVICE AND MAINTENANCE Cleaning the Tractor...
Operation Manual
Page 15
... tractor. See Figure 20. 4. The deck is a lift adjustment rod for instructions. Power off the tractor, remove the key from the front hanger bracket. SERVICE AND MAINTENANCE 5. Under the rear fenders inside the wheels there is properly leveled when both sides are perpendicular with the tractor. 2. To lower the left side of the deck until it clicks into the lowest (#1) position on the tire sidewall. Engage the parking brake. Service Deck Removal To remove the deck...
... tractor. See Figure 20. 4. The deck is a lift adjustment rod for instructions. Power off the tractor, remove the key from the front hanger bracket. SERVICE AND MAINTENANCE 5. Under the rear fenders inside the wheels there is properly leveled when both sides are perpendicular with the tractor. 2. To lower the left side of the deck until it clicks into the lowest (#1) position on the tire sidewall. Engage the parking brake. Service Deck Removal To remove the deck...
Operation Manual
Page 16
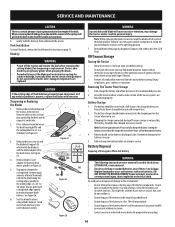
.... Battery Storage 1. A discharged battery can occur. 5. Empty cargo boxes, grass catchers or containers. Gently slide the deck out from the deck motor spindle See Figure 25. 5. Blade(s) WARNING • Power off -season storage is used in a discharged state. Battery should be kept in this section) then gently flip the deck over to the deck motor. If a leak develops, released electrolytes are replaced. Fully recharge the battery before removing the cutting blade(s) for...
.... Battery Storage 1. A discharged battery can occur. 5. Empty cargo boxes, grass catchers or containers. Gently slide the deck out from the deck motor spindle See Figure 25. 5. Blade(s) WARNING • Power off -season storage is used in a discharged state. Battery should be kept in this section) then gently flip the deck over to the deck motor. If a leak develops, released electrolytes are replaced. Fully recharge the battery before removing the cutting blade(s) for...
Operation Manual
Page 17
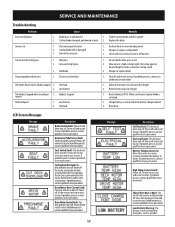
... location and allow the battery to cool/raise deck height 2. Close the charge port door and restart tractor. Excessively high grass 3. Mow once at a high cutting height, then mow again at a slower pace. Charge battery as instructed in the battery charger manual 2. Seat Switch Fault: The deck and drive shut off . Power off . Electrical Faults: The deck and drive shut off , let the tractor cool and restart tractor. Replace the blade Uneven Cut 1. Power off and restart tractor. If problem persists contact qualified service personnel. If problem...
... location and allow the battery to cool/raise deck height 2. Close the charge port door and restart tractor. Excessively high grass 3. Mow once at a high cutting height, then mow again at a slower pace. Charge battery as instructed in the battery charger manual 2. Seat Switch Fault: The deck and drive shut off . Power off . Electrical Faults: The deck and drive shut off , let the tractor cool and restart tractor. Replace the blade Uneven Cut 1. Power off and restart tractor. If problem persists contact qualified service personnel. If problem...


