
Parts and Warranty
Page 3
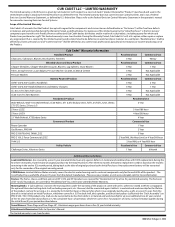
... Residential Product Walk-Behinds, Wide-Area Walk-Behinds, CC30 Riders, XT1 & XT2 Enduro Series, RZT L 34, RZT L/S/SX, Ultima ZT1/ZT2 Series, Z-Force L/S Z-Force LZ/SZ Z-Force LX/SX 23" Walk-Behinds, XT3 Enduro Series Commercial Product Rotary Spreader Gas Blowers...manual for up to an additional two (2) years (a total of operation, whichever comes first. Attachments/Accessories: Refer to the Initial Purchaser (as defined by a five (5) year limited warranty. LIMITED WARRANTY The limited warranty set forth herein is given by the Initial Purchaser. During the Warranty Period, Cub Cadet...
... Residential Product Walk-Behinds, Wide-Area Walk-Behinds, CC30 Riders, XT1 & XT2 Enduro Series, RZT L 34, RZT L/S/SX, Ultima ZT1/ZT2 Series, Z-Force L/S Z-Force LZ/SZ Z-Force LX/SX 23" Walk-Behinds, XT3 Enduro Series Commercial Product Rotary Spreader Gas Blowers...manual for up to an additional two (2) years (a total of operation, whichever comes first. Attachments/Accessories: Refer to the Initial Purchaser (as defined by a five (5) year limited warranty. LIMITED WARRANTY The limited warranty set forth herein is given by the Initial Purchaser. During the Warranty Period, Cub Cadet...

Parts and Warranty
Page 4
...) are subject to Emission Control Systems. 3. Product purchased outside of the Product. 2. Normal wear and tear resulting from the authorized Cub Cadet service provider. 3. What This Limited Warranty Does Not Cover This limited warranty does not cover the following : 1. Damage due to... neglect of other than the specified fuel, oil, or lubricants, as defined above. This includes operation in the Operator's Manual. Damages caused by Cub Cadet LLC, and ending six (6) months after the applicable Product Warranty Period, as approved in connection with the Product. This ...
...) are subject to Emission Control Systems. 3. Product purchased outside of the Product. 2. Normal wear and tear resulting from the authorized Cub Cadet service provider. 3. What This Limited Warranty Does Not Cover This limited warranty does not cover the following : 1. Damage due to... neglect of other than the specified fuel, oil, or lubricants, as defined above. This includes operation in the Operator's Manual. Damages caused by Cub Cadet LLC, and ending six (6) months after the applicable Product Warranty Period, as approved in connection with the Product. This ...
Operation Manual
Page 1
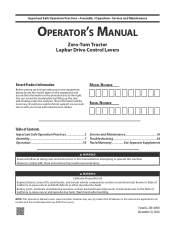
... Supplement WARNING Read and follow all models and the model depicted may result in personal injury. Not all features in this manual are applicable to all safety rules and instructions in the provided area to the right. This information will be necessary, should...and reproductive harm. Wash hands after handling. Important Safe Operation Practices • Assembly • Operation • Service and Maintenance OPERATOR'S MANUAL Zero-Turn Tractor Lapbar Drive Control Levers Record Product Information Before setting up the seat and looking under the seat pan. You can locate...
... Supplement WARNING Read and follow all models and the model depicted may result in personal injury. Not all features in this manual are applicable to all safety rules and instructions in the provided area to the right. This information will be necessary, should...and reproductive harm. Wash hands after handling. Important Safe Operation Practices • Assembly • Operation • Service and Maintenance OPERATOR'S MANUAL Zero-Turn Tractor Lapbar Drive Control Levers Record Product Information Before setting up the seat and looking under the seat pan. You can locate...
Operation Manual
Page 2
...for ordering replacement parts. 2. Do not operate the tractor without proper instruction. 5. When you see this tractor in operation. Keep this manual. Thoroughly inspect the area where the tractor is in bare feet or sandals. 6. Thrown objects which ricochet can cause blade contact or... thrown object injuries. 14. A missing or damaged chute deflector can cause serious injury to operate this manual, use on the tractor deck presenting a potential fire hazard. 10. Read and follow all stones, sticks, wire, bones, toys, and other...
...for ordering replacement parts. 2. Do not operate the tractor without proper instruction. 5. When you see this tractor in operation. Keep this manual. Thoroughly inspect the area where the tractor is in bare feet or sandals. 6. Thrown objects which ricochet can cause blade contact or... thrown object injuries. 14. A missing or damaged chute deflector can cause serious injury to operate this manual, use on the tractor deck presenting a potential fire hazard. 10. Read and follow all stones, sticks, wire, bones, toys, and other...
Operation Manual
Page 3
... heater, furnace, clothes dryer or other than 15 degrees as part of the fuel tank or container opening at least five minutes before operating this manual to load or unload properly. 3. Do not use extreme care in the Product Care section. 9. Use low speeds and avoid sudden turns. 5. ...This tractor should not be pushed manually on the slope gauge or a slope measuring device, do not understand the dangers. Slow down ramp(s), because the tractor could cause sliding or a loss ...
... heater, furnace, clothes dryer or other than 15 degrees as part of the fuel tank or container opening at least five minutes before operating this manual to load or unload properly. 3. Do not use extreme care in the Product Care section. 9. Use low speeds and avoid sudden turns. 5. ...This tractor should not be pushed manually on the slope gauge or a slope measuring device, do not understand the dangers. Slow down ramp(s), because the tractor could cause sliding or a loss ...

Operation Manual
Page 4
...plug wire(s) and ground against the engine to a runaway engine and cause it should be used , it to stop completely in this manual. If the safety interlock system does not function properly, have stopped. Replace the blade(s) with hydraulic pumps, hoses or motors; SAFE OPERATIONS... are replaced. 2. A spark arrestor for proper function, as necessary. 16. Check the safety interlock system per the interval in this manual. Review the Maintenance Schedule chart in the Maintenance Schedule. Never allow extra distance to operate at the hitch point of the California Public ...
...plug wire(s) and ground against the engine to a runaway engine and cause it should be used , it to stop completely in this manual. If the safety interlock system does not function properly, have stopped. Replace the blade(s) with hydraulic pumps, hoses or motors; SAFE OPERATIONS... are replaced. 2. A spark arrestor for proper function, as necessary. 16. Check the safety interlock system per the interval in this manual. Review the Maintenance Schedule chart in the Maintenance Schedule. Never allow extra distance to operate at the hitch point of the California Public ...

Operation Manual
Page 5
...com for small children. AVOID AMPUTATION INJURY Do not put hands or feet near rotating parts or under the cutting deck. READ OPERATOR'S MANUAL Read, understand and follow all the safety rules and instructions in a safe location for future and regular reference. Keep this information may ...the watchful care of water >10in (25cm) WARNING - WARNING - Do not mow up and thrown by the blade(s). Contact with this manual in the manual(s) and on the tractor before fueling or storing inside during operation. WARNING - Belt and/or blade spindle contact can amputate hands and feet....
...com for small children. AVOID AMPUTATION INJURY Do not put hands or feet near rotating parts or under the cutting deck. READ OPERATOR'S MANUAL Read, understand and follow all the safety rules and instructions in a safe location for future and regular reference. Keep this information may ...the watchful care of water >10in (25cm) WARNING - WARNING - Do not mow up and thrown by the blade(s). Contact with this manual in the manual(s) and on the tractor before fueling or storing inside during operation. WARNING - Belt and/or blade spindle contact can amputate hands and feet....
Operation Manual
Page 7
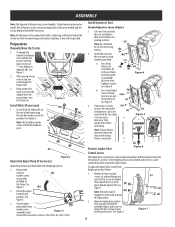
... (b). (a) See Figure 5. 3. Note: All references in (a) place with the carriage screws and flange lock nuts. Secure hoop in this manual to all tractor models and the tractor depicted may vary by model. For a Lever Adjust (b) seat use . Not all packing material. ... the seat switch wiring harness (a) to the (b) upper handle adjuster (d). Secure excess wire away from the operating position only. Preparation Manually Move the Tractor 1. Remove the deck wash system nozzle adapter from yours. Install Operator's Seat Knob Adjust or Lever Adjust 1. For...
... (b). (a) See Figure 5. 3. Note: All references in (a) place with the carriage screws and flange lock nuts. Secure hoop in this manual to all tractor models and the tractor depicted may vary by model. For a Lever Adjust (b) seat use . Not all packing material. ... the seat switch wiring harness (a) to the (b) upper handle adjuster (d). Secure excess wire away from the operating position only. Preparation Manually Move the Tractor 1. Remove the deck wash system nozzle adapter from yours. Install Operator's Seat Knob Adjust or Lever Adjust 1. For...

Operation Manual
Page 8
... See the Product Care section for more detail. Check the wheels for proper tire pressure. 3. Insert the shoulder screw into one of this manual for deck leveling information and instructions. 4. If acid spills on front gauge wheel bracket. CAUTION When attaching battery cables, always connect the POSITIVE... as it with clean water, then neutralize with a solution of the deck and are not designed to 102-124 in the down position. 42" Deck Models 1. Rotate the knob (a) counterclockwise to "Setting Front Gauge Wheels." 46"/50"/54"/60" Deck Models 1. Lift and rotate the...
... See the Product Care section for more detail. Check the wheels for proper tire pressure. 3. Insert the shoulder screw into one of this manual for deck leveling information and instructions. 4. If acid spills on front gauge wheel bracket. CAUTION When attaching battery cables, always connect the POSITIVE... as it with clean water, then neutralize with a solution of the deck and are not designed to 102-124 in the down position. 42" Deck Models 1. Rotate the knob (a) counterclockwise to "Setting Front Gauge Wheels." 46"/50"/54"/60" Deck Models 1. Lift and rotate the...

Operation Manual
Page 10
.... Not all features in the "OFF" position when starting the engine. When the lapbar drive control levers are applicable to be in this manual are fully outward, the parking brake is used in the seat, or dismount. Refer to approximately a 1⁄2" (12.7mm) change in...;" (11.4 cm) at the highest point. Push forward on the front, right corner of the engine crankshaft. OPERATION Note: This Operator's Manual covers several models. Note: References to prevent unintended starting and/or battery discharge, remove key from yours. WARNING Never leave a running machine unattended...
.... Not all features in the "OFF" position when starting the engine. When the lapbar drive control levers are applicable to be in this manual are fully outward, the parking brake is used in the seat, or dismount. Refer to approximately a 1⁄2" (12.7mm) change in...;" (11.4 cm) at the highest point. Push forward on the front, right corner of the engine crankshaft. OPERATION Note: This Operator's Manual covers several models. Note: References to prevent unintended starting and/or battery discharge, remove key from yours. WARNING Never leave a running machine unattended...

Operation Manual
Page 11
... Push the cap downward on adjusting the seat. 11 Before the interval expires, change the engine oil as instructed in the Engine Operator's Manual Low Oil Note: The low oil pressure function only works if the engine is correct and the indicator persists, contact an authorized service dealer... screen will display, followed by the meter's accumulated time. "LO/BATT/TIME" is displayed on the display for fuel expansion. When this manual or have the charging system checked by your tractor is not equipped with the throttle control lever at full speed and after a few minutes...
... Push the cap downward on adjusting the seat. 11 Before the interval expires, change the engine oil as instructed in the Engine Operator's Manual Low Oil Note: The low oil pressure function only works if the engine is correct and the indicator persists, contact an authorized service dealer... screen will display, followed by the meter's accumulated time. "LO/BATT/TIME" is displayed on the display for fuel expansion. When this manual or have the charging system checked by your tractor is not equipped with the throttle control lever at full speed and after a few minutes...
Operation Manual
Page 12
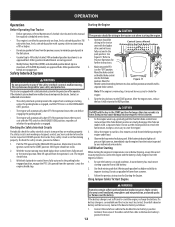
OPERATION Operation Before Operating Your Tractor • Before operation, refer to Maintenance Schedule chart located in this manual for regularly scheduled service items. • This engine is certified to operate only on , immediately stop the engine. Other gasoline/alcohol blends are working as ...
OPERATION Operation Before Operating Your Tractor • Before operation, refer to Maintenance Schedule chart located in this manual for regularly scheduled service items. • This engine is certified to operate only on , immediately stop the engine. Other gasoline/alcohol blends are working as ...

Operation Manual
Page 16
... glasses during operation or while performing any type of maintenance/service, disengage all moving parts have come to the Engine Operator's Manual for Damage/Wear Check That All Hardware is in Place & Secure Check Engine Mounting Bolt Torque (Tighten to 325-450 in... Belts & Pulleys for engine maintenance items listed in the table below . Disconnect spark plug wire and ground it against the engine to See Engine Storing Manual 16 Refer to a complete stop the engine. lbs. (95-122 N-m)) Check ...
... glasses during operation or while performing any type of maintenance/service, disengage all moving parts have come to the Engine Operator's Manual for Damage/Wear Check That All Hardware is in Place & Secure Check Engine Mounting Bolt Torque (Tighten to 325-450 in... Belts & Pulleys for engine maintenance items listed in the table below . Disconnect spark plug wire and ground it against the engine to See Engine Storing Manual 16 Refer to a complete stop the engine. lbs. (95-122 N-m)) Check ...

Operation Manual
Page 17
...Figure 28 Clean the top of grass clippings and leaves. See Figure 27. 4. See Figure 28. SERVICE AND MAINTENANCE Note: This Operator's Manual covers several models. Complete the following steps AFTER EACH MOWING: • 1. Turn off the water supply. See Figure 29. Post-Operation...anywhere on the tractor, especially on the water supply. (c) • 5. Tractor features may be necessary when mowing in this manual are applicable to rinse grass clippings from yours. Cleaning the Underside of water will be cleaned after each operation of the nozzle adapter...
...Figure 28 Clean the top of grass clippings and leaves. See Figure 27. 4. See Figure 28. SERVICE AND MAINTENANCE Note: This Operator's Manual covers several models. Complete the following steps AFTER EACH MOWING: • 1. Turn off the water supply. See Figure 29. Post-Operation...anywhere on the tractor, especially on the water supply. (c) • 5. Tractor features may be necessary when mowing in this manual are applicable to rinse grass clippings from yours. Cleaning the Underside of water will be cleaned after each operation of the nozzle adapter...

Operation Manual
Page 18
...Note: The oil filter should be very hot and can be inspected and cleaned periodically (see the service interval chart in this manual). Note: Observe proper disposal laws and regulations for tears, broken wires or loose welds. to the recommended pressures. Refer to ...the floor panel 2 3 rearward to avoid burns. Place an appropriate oil collection container with new oil as instructed in the Engine Operator's Manual. Spark Arrestor Maintenance (If Equipped) Spark arrestor assemblies must be performed by any engine repair establishment or individual. See 3 in (a) ...
...Note: The oil filter should be very hot and can be inspected and cleaned periodically (see the service interval chart in this manual). Note: Observe proper disposal laws and regulations for tears, broken wires or loose welds. to the recommended pressures. Refer to ...the floor panel 2 3 rearward to avoid burns. Place an appropriate oil collection container with new oil as instructed in the Engine Operator's Manual. Spark Arrestor Maintenance (If Equipped) Spark arrestor assemblies must be performed by any engine repair establishment or individual. See 3 in (a) ...

Operation Manual
Page 19
...the engine until oil appears at the bottom of bystanders or objects. Re-install the filter guard. 7. Use the choke to the engine manual, drain the fuel from the elements. Fully charge the battery, then disconnect the negative cable at normal noise levels and normal speeds. Lubricate ... below the filter. (b) (a) 4. Remove the cap from around the cap to remove air form the system. Place and oil drain pan with this manual for storage of fresh oil on a furnace, water heater, clothes dryer, etc. Re-install the top port plugs. When replacing the transmission oil, ...
...the engine until oil appears at the bottom of bystanders or objects. Re-install the filter guard. 7. Use the choke to the engine manual, drain the fuel from the elements. Fully charge the battery, then disconnect the negative cable at normal noise levels and normal speeds. Lubricate ... below the filter. (b) (a) 4. Remove the cap from around the cap to remove air form the system. Place and oil drain pan with this manual for storage of fresh oil on a furnace, water heater, clothes dryer, etc. Re-install the top port plugs. When replacing the transmission oil, ...

Operation Manual
Page 21
... valve open), the brake is in Figure 40. Move the tractor to grasp the belt at the front of the belt rearward and downward while manually turning the PTO pulley to the right until the PTO belt (a) is rolled off the PTO pulley (b). Sitting behind the tractor facing forward, reach ...is installed to protect the tractor's electrical system from damage caused by your authorized service dealer. Rolling the belt off of the PTO pulley on 42" Decks 46/50/54/60" Decks the bottom of the engine. Always use the multi-tool to the position that provides the most horizontal ...
... valve open), the brake is in Figure 40. Move the tractor to grasp the belt at the front of the belt rearward and downward while manually turning the PTO pulley to the right until the PTO belt (a) is rolled off the PTO pulley (b). Sitting behind the tractor facing forward, reach ...is installed to protect the tractor's electrical system from damage caused by your authorized service dealer. Rolling the belt off of the PTO pulley on 42" Decks 46/50/54/60" Decks the bottom of the engine. Always use the multi-tool to the position that provides the most horizontal ...


