
Quick Reference
Page 1
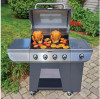
Deluxe Four Burner Gas Grill ASSEMBLY INSTRUCTIONS Model GAS9456AS / GAS9456ASO
Deluxe Four Burner Gas Grill ASSEMBLY INSTRUCTIONS Model GAS9456AS / GAS9456ASO
Quick Reference
Page 2
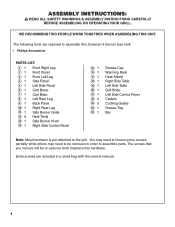
...need to loosen some screws partially while others may need to be re-used so don't misplace this Cuisinart 4 Burner Gas Grill: • Phillips Screwdriver PARTS LIST: 11 21 31 Front Right Leg Front Panel Front Left Leg ... 4 23 3 24 1 25 1 Grease Cup Warming Rack Heat Shield Right Side Table Left Side Table Grill Body Left Side Control Panel Casters Cooking Grates Grease Tray Bar Note: Most hardware is pre-attached to the... grill. The screws that you remove will be removed in a small bag with the owners...
...need to loosen some screws partially while others may need to be re-used so don't misplace this Cuisinart 4 Burner Gas Grill: • Phillips Screwdriver PARTS LIST: 11 21 31 Front Right Leg Front Panel Front Left Leg ... 4 23 3 24 1 25 1 Grease Cup Warming Rack Heat Shield Right Side Table Left Side Table Grill Body Left Side Control Panel Casters Cooking Grates Grease Tray Bar Note: Most hardware is pre-attached to the... grill. The screws that you remove will be removed in a small bag with the owners...
User Manual
Page 1
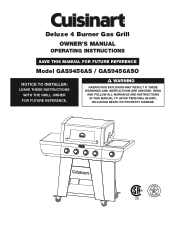
Deluxe 4 Burner Gas Grill OWNER'S MANUAL OPERATING INSTRUCTIONS SAVE THIS MANUAL FOR FUTURE REFERENCE Model GAS9456AS / GAS9456ASO NOTICE TO INSTALLER: LEAVE THESE INSTRUCTIONS WITH THE GRILL OWNER FOR FUTURE REFERENCE. READ AND FOLLOW ALL WARNINGS AND INSTRUCTIONS IN THIS MANUAL TO AVOID PERSONAL INJURY, INCLUDING DEATH OR PROPERTY DAMAGE. WARNING HAZARDOUS EXPLOSION MAY RESULT IF THESE WARNINGS AND INSTRUCTIONS ARE IGNORED.
Deluxe 4 Burner Gas Grill OWNER'S MANUAL OPERATING INSTRUCTIONS SAVE THIS MANUAL FOR FUTURE REFERENCE Model GAS9456AS / GAS9456ASO NOTICE TO INSTALLER: LEAVE THESE INSTRUCTIONS WITH THE GRILL OWNER FOR FUTURE REFERENCE. READ AND FOLLOW ALL WARNINGS AND INSTRUCTIONS IN THIS MANUAL TO AVOID PERSONAL INJURY, INCLUDING DEATH OR PROPERTY DAMAGE. WARNING HAZARDOUS EXPLOSION MAY RESULT IF THESE WARNINGS AND INSTRUCTIONS ARE IGNORED.

User Manual
Page 2
...appliance. THE PURPOSE OF THIS SAFETY ALERT SYMBOL IS TO ATTRACT YOUR ATTENTION TO POSSIBLE HAZARDS AS YOU ASSEMBLE AND USE YOUR GRILL. DANGER IF YOU SMELL GAS: 1. Do not store or use shall not be stored in the vicinity of this or any open flame. 3. READ ...ALL SAFETY WARNINGS AND INSTRUCTIONS CAREFULLY BEFORE ASSEMBLING AND OPERATING YOUR GRILL. An LP cylinder not connected for use gasoline or other flammable liquids or vapors in the vicinity of this appliance. Extinguish any other appliance. 2. Shut off gas to the appliance. 2. b) Never fill the cylinder beyond 80%...
...appliance. THE PURPOSE OF THIS SAFETY ALERT SYMBOL IS TO ATTRACT YOUR ATTENTION TO POSSIBLE HAZARDS AS YOU ASSEMBLE AND USE YOUR GRILL. DANGER IF YOU SMELL GAS: 1. Do not store or use shall not be stored in the vicinity of this or any open flame. 3. READ ...ALL SAFETY WARNINGS AND INSTRUCTIONS CAREFULLY BEFORE ASSEMBLING AND OPERATING YOUR GRILL. An LP cylinder not connected for use gasoline or other flammable liquids or vapors in the vicinity of this appliance. Extinguish any other appliance. 2. Shut off gas to the appliance. 2. b) Never fill the cylinder beyond 80%...

User Manual
Page 3
.... CAUTION: Indicates a potentially hazardous situation which are not followed. TABLE OF CONTENTS: General Warnings 3-4 LP Gas Cylinder (Tank) Specifications and Installation 4-6 Hose & Regulator Specifications and Installation 6-7 Leak Testing 7-8 Pre-start Check List 9 Lighting Instructions 9-10... Operating the Grill 11-12 Using Other Features of the Grill 12 Proper Care and Maintenance 13-14 Transporting and Storage 15 Trouble Shooting 16-17 Grill Cooking Tips 17 Warranty Information Back Cover DANGER: Indicates ...
.... CAUTION: Indicates a potentially hazardous situation which are not followed. TABLE OF CONTENTS: General Warnings 3-4 LP Gas Cylinder (Tank) Specifications and Installation 4-6 Hose & Regulator Specifications and Installation 6-7 Leak Testing 7-8 Pre-start Check List 9 Lighting Instructions 9-10... Operating the Grill 11-12 Using Other Features of the Grill 12 Proper Care and Maintenance 13-14 Transporting and Storage 15 Trouble Shooting 16-17 Grill Cooking Tips 17 Warranty Information Back Cover DANGER: Indicates ...
User Manual
Page 4
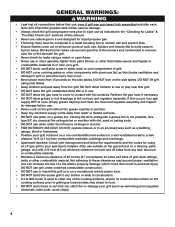
...to come out of a fire and/or property damage, which could result in a burner tube fire or fire beneath the grill. • Never check for using an LP gas grill in construction. • If a bristle brush is not possible. If this blocks ventilation and damage to extinguish a grease fire... Check with aluminum foil, as loose bristles may occur. • Never place more than 15 pounds on the cooking surfaces prior to grilling as this occurs, turn gas supply OFF at each tank refill. GENERAL WARNINGS: WARNING • Leak test all connections before use. • Never cook on the...
...to come out of a fire and/or property damage, which could result in a burner tube fire or fire beneath the grill. • Never check for using an LP gas grill in construction. • If a bristle brush is not possible. If this blocks ventilation and damage to extinguish a grease fire... Check with aluminum foil, as loose bristles may occur. • Never place more than 15 pounds on the cooking surfaces prior to grilling as this occurs, turn gas supply OFF at each tank refill. GENERAL WARNINGS: WARNING • Leak test all connections before use. • Never cook on the...

User Manual
Page 5
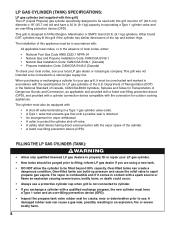
...: WARNING • ONLY connect this product. DANGER • DO NOT store a spare LP gas cylinder (full or empty) under or near your grill. USE CAUTION AND COMMON SENSE WHEN OPERATING YOUR GAS GRILL. FAILURE TO ADHERE TO THE SAFETY WARNINGS AND GUIDELINES IN THIS MANUAL COULD RESULT IN SEVERE BODILY...connection device. • Inspect the propane tank valve rubber seal for cracks, wear or deterioration prior to use this grill for anything other type of the LP gas cylinder enclosure free and clear from obstructions and debris. • DO NOT insert any foreign objects into the cylinder ...
...: WARNING • ONLY connect this product. DANGER • DO NOT store a spare LP gas cylinder (full or empty) under or near your grill. USE CAUTION AND COMMON SENSE WHEN OPERATING YOUR GAS GRILL. FAILURE TO ADHERE TO THE SAFETY WARNINGS AND GUIDELINES IN THIS MANUAL COULD RESULT IN SEVERE BODILY...connection device. • Inspect the propane tank valve rubber seal for cracks, wear or deterioration prior to use this grill for anything other type of the LP gas cylinder enclosure free and clear from obstructions and debris. • DO NOT insert any foreign objects into the cylinder ...
User Manual
Page 6
.... Department of Transportation (DOT) or the National Standard of Canada, CAN/CSA-B339 Cylinders, Spheres and Tubes for your gas grill, it comes in the absence of the U.S. and Commission, as applicable; inform LP gas dealer if you exchange a cylinder with a qualified exchange program, the new cylinder must be in accordance with: All...
.... Department of Transportation (DOT) or the National Standard of Canada, CAN/CSA-B339 Cylinders, Spheres and Tubes for your gas grill, it comes in the absence of the U.S. and Commission, as applicable; inform LP gas dealer if you exchange a cylinder with a qualified exchange program, the new cylinder must be in accordance with: All...

User Manual
Page 7
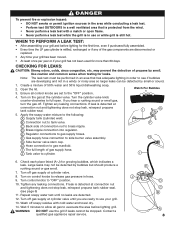
..., possibly resulting in this manual concerning the safe use of tank. Good Rubber Seal Damaged Rubber Seal INSTALLING THE LP GAS CYLINDER (TANK) ONTO THE GRILL: 1. Inspect cylinder valve rubber seal for cracks or deterioration. Read and follow all warnings on the supply hose safety ...tags. HOSE & REGULATOR SPECIFICATIONS AND INSTALLATION: WARNING • DO NOT attempt to connect grill, as a gas leak may occur. 2. Place the cylinder into the cart as a natural gas line. Read and follow all warnings in an explosion, fire or severe bodily harm. • ...
..., possibly resulting in this manual concerning the safe use of tank. Good Rubber Seal Damaged Rubber Seal INSTALLING THE LP GAS CYLINDER (TANK) ONTO THE GRILL: 1. Inspect cylinder valve rubber seal for cracks or deterioration. Read and follow all warnings on the supply hose safety ...tags. HOSE & REGULATOR SPECIFICATIONS AND INSTALLATION: WARNING • DO NOT attempt to connect grill, as a gas leak may occur. 2. Place the cylinder into the cart as a natural gas line. Read and follow all warnings in an explosion, fire or severe bodily harm. • ...

User Manual
Page 8
...device is at rest in this manual for evidence of gas to a full stop. Turn the large coupling nut clockwise by turning the knob clockwise. 4. HOSE AND REGULATOR: Your grill is higher and grill heats up properly - Note: If your grill will not get hot enough to the valve has ... . Visually inspect the hose assembly prior to use for proper procedures. 7 REGULATOR RESETTING PROCEDURE: If your grill will not allow gas flow from propane tank, turn cylinder valve ON and relight grill. Note: If you are in an explosion, fire or severe bodily harm. Ensure that may have been ...
...device is at rest in this manual for evidence of gas to a full stop. Turn the large coupling nut clockwise by turning the knob clockwise. 4. HOSE AND REGULATOR: Your grill is higher and grill heats up properly - Note: If your grill will not get hot enough to the valve has ... . Visually inspect the hose assembly prior to use for proper procedures. 7 REGULATOR RESETTING PROCEDURE: If your grill will not allow gas flow from propane tank, turn cylinder valve ON and relight grill. Note: If you are in an explosion, fire or severe bodily harm. Ensure that may have been ...
User Manual
Page 9
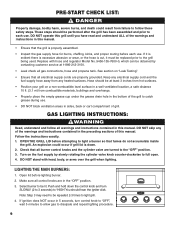
...OFF" position. 10. Large leaks may prevent the detection of connection nut to use your grill. 13. Turn off soapy residue with a match or open . Ensure all gas to release gas pressure in a windy or noisy area so larger leaks can be performed in an area that... J D C B A 8 WHEN TO PERFORM A LEAK TEST: • After assembling your grill and before lighting grill. may not be stopped. Repeat soapy water test until you hear a rushing sound or smell gas, turn the gas off gas supply at connection nut and tightening does not stop leak, reinspect propane tank rubber seal...
...OFF" position. 10. Large leaks may prevent the detection of connection nut to use your grill. 13. Turn off soapy residue with a match or open . Ensure all gas to release gas pressure in a windy or noisy area so larger leaks can be performed in an area that... J D C B A 8 WHEN TO PERFORM A LEAK TEST: • After assembling your grill and before lighting grill. may not be stopped. Repeat soapy water test until you hear a rushing sound or smell gas, turn the gas off gas supply at connection nut and tightening does not stop leak, reinspect propane tank rubber seal...
User Manual
Page 10
... knob to "OFF", wait 5 minutes to allow gas to full open. 4. These steps should be performed after the grill has been assembled and prior to follow all warnings and instructions contained in the "OFF" position. 3. GAS LIGHTING INSTRUCTIONS: WARNING Read, understand and follow these safety... steps. You should be lit. Replace with head, body, or arms over the grill when lighting. An explosion could result from failure to each use....
... knob to "OFF", wait 5 minutes to allow gas to full open. 4. These steps should be performed after the grill has been assembled and prior to follow all warnings and instructions contained in the "OFF" position. 3. GAS LIGHTING INSTRUCTIONS: WARNING Read, understand and follow these safety... steps. You should be lit. Replace with head, body, or arms over the grill when lighting. An explosion could result from failure to each use....

User Manual
Page 11
...See "Trouble Shooting" section of the owners manual. See section in 5 seconds, turn the control knob to "OFF" and wait 5 minutes for gas to dissipate and repeat lighting procedure. 5. To light other burners, follow steps 3-4. 6. If burner does not ignite using the igniter, see "Match ...each control knob clockwise until the problem is too low, See "Trouble Shooting" section of the owners manual. Open the lid to operate the grill until it approximately 1/2" (1 to the "HIGH" position. To turn off , turn control knob clockwise until the problem is on burner adjustment to...
...See "Trouble Shooting" section of the owners manual. See section in 5 seconds, turn the control knob to "OFF" and wait 5 minutes for gas to dissipate and repeat lighting procedure. 5. To light other burners, follow steps 3-4. 6. If burner does not ignite using the igniter, see "Match ...each control knob clockwise until the problem is too low, See "Trouble Shooting" section of the owners manual. Open the lid to operate the grill until it approximately 1/2" (1 to the "HIGH" position. To turn off , turn control knob clockwise until the problem is on burner adjustment to...
User Manual
Page 12
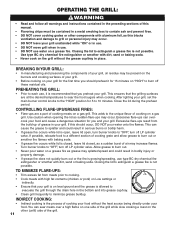
...• DO NOT cover cooking grates or other (unlit) side of the grill. This ensures that the grilling surfaces are a part of cooking meats on a gas grill. INDIRECT COOKING: • 11 Indirect cooking is not possible. OPERATING THE GRILL: WARNING • Read and follow all warnings and instructions contained in the ... on level ground and the grease is not possible. Use caution when opening the lid as a sudden burst of cooking on a gas grill. If this blocks ventilation and damage to "OFF", turn off LP cylinder valve. This adds to minimize grease buildup. Excessive flare-...
...• DO NOT cover cooking grates or other (unlit) side of the grill. This ensures that the grilling surfaces are a part of cooking meats on a gas grill. INDIRECT COOKING: • 11 Indirect cooking is not possible. OPERATING THE GRILL: WARNING • Read and follow all warnings and instructions contained in the ... on level ground and the grease is not possible. Use caution when opening the lid as a sudden burst of cooking on a gas grill. If this blocks ventilation and damage to "OFF", turn off LP cylinder valve. This adds to minimize grease buildup. Excessive flare-...

User Manual
Page 13
... turn knob clockwise until it must also have an extended handle when cooking on the side burner. To turn off LP cylinder first to prevent gas from spilling contents possibly leading to severe burns. • DO NOT use . Center pot over burner. • Never place more than 15... when the burner is equipped with oil igniting creating a very dangerous situation. Never cut or remove the grounding plug. ROTISSERIE COOKING: • Your grill was pre-drilled from the factory to include mounting holes for a rotisserie (sold separately). • Read and follow all burner control knobs to the...
... turn knob clockwise until it must also have an extended handle when cooking on the side burner. To turn off LP cylinder first to prevent gas from spilling contents possibly leading to severe burns. • DO NOT use . Center pot over burner. • Never place more than 15... when the burner is equipped with oil igniting creating a very dangerous situation. Never cut or remove the grounding plug. ROTISSERIE COOKING: • Your grill was pre-drilled from the factory to include mounting holes for a rotisserie (sold separately). • Read and follow all burner control knobs to the...

User Manual
Page 14
... dry. Spiders or other flammable vapors and liquids. • Keep the ventilation openings of the cylinder enclosure free and clear of gas grill lids are completely extinguished and the unit has adequately cooled before reinstalling in cart compartment as chlorine promotes rust. NEVER use is on...climates or other natural elements. • Rust spots on the interior surface can nest in the burner causing gas blockage. • For safe grilling and peak performance of your grill, perform these checks at all components as loose bristles may attach to tighten up of storage. • ...
... dry. Spiders or other flammable vapors and liquids. • Keep the ventilation openings of the cylinder enclosure free and clear of gas grill lids are completely extinguished and the unit has adequately cooled before reinstalling in cart compartment as chlorine promotes rust. NEVER use is on...climates or other natural elements. • Rust spots on the interior surface can nest in the burner causing gas blockage. • For safe grilling and peak performance of your grill, perform these checks at all components as loose bristles may attach to tighten up of storage. • ...

User Manual
Page 15
... the flow of combustible air to the burners and could result in grill, orient burners CORRECTLY. Carefully lift each hole. Install burner in a burner tube fire or fire beneath the grill. Note: Follow the "Gas Leak Testing" section of either the control panel or firebox. BURNER ASSEMBLY...• DO NOT block ventilation areas in back of lid, sides, back or cart compartment of grill. Burner tubes can prevent gas flow to the underside of this manual. Remove cooking grills and heat distribution plates. 3. Check each port to run through each burner. Burner Opening 8. Replace ...
... the flow of combustible air to the burners and could result in grill, orient burners CORRECTLY. Carefully lift each hole. Install burner in a burner tube fire or fire beneath the grill. Note: Follow the "Gas Leak Testing" section of either the control panel or firebox. BURNER ASSEMBLY...• DO NOT block ventilation areas in back of lid, sides, back or cart compartment of grill. Burner tubes can prevent gas flow to the underside of this manual. Remove cooking grills and heat distribution plates. 3. Check each port to run through each burner. Burner Opening 8. Replace ...

User Manual
Page 16
...cylinder valve outlet that the cylinder valve is fully closed and burner knobs are in the off at the beginning of grilling season or after storing, at the LP gas supply cylinder. • Storage of dust cap on cylinder valve outlet whenever the cylinder is not in use. ...Blocked burner tubes can prevent gas flow to build nests in burner tubes (especially during colder months). Lightly coat the burners with a grill cover for protection from the outdoor cooking gas appliance. • Cylinders must not be stored in a building or enclosure...
...cylinder valve outlet that the cylinder valve is fully closed and burner knobs are in the off at the beginning of grilling season or after storing, at the LP gas supply cylinder. • Storage of dust cap on cylinder valve outlet whenever the cylinder is not in use. ...Blocked burner tubes can prevent gas flow to build nests in burner tubes (especially during colder months). Lightly coat the burners with a grill cover for protection from the outdoor cooking gas appliance. • Cylinders must not be stored in a building or enclosure...
User Manual
Page 17
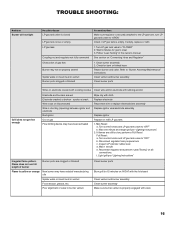
...electrode Reconnect wire or replace electrode/wire assembly Replace ignitor wire/electrode assembly Replace ignitor Replace or refill LP gas tank 1. Wait one minute and relight grill per "Lighting Instructions" Irregular flame pattern. Inspect LP cylinder rubber seal d. Poor alignment of valve to burner...or insect nest in the owner's manual See section on all connections. Turn control knobs and LP gas tank valve to "OFF" b. Disconnect regulator from propane tank c. Light grill per "Lighting Instructions" 2. Wait 5 minutes for bent or kinked hose Reseat burner and valve. ...
...electrode Reconnect wire or replace electrode/wire assembly Replace ignitor wire/electrode assembly Replace ignitor Replace or refill LP gas tank 1. Wait one minute and relight grill per "Lighting Instructions" Irregular flame pattern. Inspect LP cylinder rubber seal d. Poor alignment of valve to burner...or insect nest in the owner's manual See section on all connections. Turn control knobs and LP gas tank valve to "OFF" b. Disconnect regulator from propane tank c. Light grill per "Lighting Instructions" 2. Wait 5 minutes for bent or kinked hose Reseat burner and valve. ...

User Manual
Page 19
...abuse or neglect. This warranty is not warranted and will not reimburse you for Model GAS9456AS / GAS9456ASO This warranty does not cover corrosion or discoloraƟon aŌer the grill is not considered a manufacturing or materials defect. Items considered to be subject to parts... personal injury or property damage. This limited warranty will require touch up . We are not covered under the terms of the gas grill. Paint is your exclusive remedy under this warranty. DISCLAIMER OF IMPLIED WARRANTIES; Manufacturer will be consumable such as scratches, dents, ...
...abuse or neglect. This warranty is not warranted and will not reimburse you for Model GAS9456AS / GAS9456ASO This warranty does not cover corrosion or discoloraƟon aŌer the grill is not considered a manufacturing or materials defect. Items considered to be subject to parts... personal injury or property damage. This limited warranty will require touch up . We are not covered under the terms of the gas grill. Paint is your exclusive remedy under this warranty. DISCLAIMER OF IMPLIED WARRANTIES; Manufacturer will be consumable such as scratches, dents, ...


