Product Manual
Page 2
Table of Contents D-Link DES-3010PA User Guide Overview 6 Using the Installation Guide ...6 Using the Embedded Web Interface User Guide 6 Intended Audience...7 D-Link DES-3010PA Installation Guide 8 Device Description ...9 Viewing the Device ...10 Device Front Panel ...10 Ports Description ...11 10/... the Device ...22 Desktop or Shelf Installation ...22 Rack Installation ...22 Wall Installation...25 Connecting the Device ...26 Connecting the Switch to a Terminal ...26 AC Power Connection ...27 Starting and Configuring the Device 28 Configuring the Terminal ...29 Installation Procedure ......
Table of Contents D-Link DES-3010PA User Guide Overview 6 Using the Installation Guide ...6 Using the Embedded Web Interface User Guide 6 Intended Audience...7 D-Link DES-3010PA Installation Guide 8 Device Description ...9 Viewing the Device ...10 Device Front Panel ...10 Ports Description ...11 10/... the Device ...22 Desktop or Shelf Installation ...22 Rack Installation ...22 Wall Installation...25 Connecting the Device ...26 Connecting the Switch to a Terminal ...26 AC Power Connection ...27 Starting and Configuring the Device 28 Configuring the Terminal ...29 Installation Procedure ......
Product Manual
Page 3
... Configuration 37 Startup Procedures ...41 Startup Menu Procedures ...41 Software Download and Reboot ...42 D-Link DES-3010PA EWS User Guide 46 Getting Started...47 Starting the D-Link Embedded Web Interface 48 Understanding the D-Link Embedded Web Interface 50 Device Representation...51 Using the D-Link Embedded Web Interface Management Buttons 51 Using Screen and Table Options 53 Adding Configuration...
... Configuration 37 Startup Procedures ...41 Startup Menu Procedures ...41 Software Download and Reboot ...42 D-Link DES-3010PA EWS User Guide 46 Getting Started...47 Starting the D-Link Embedded Web Interface 48 Understanding the D-Link Embedded Web Interface 50 Device Representation...51 Using the D-Link Embedded Web Interface Management Buttons 51 Using Screen and Table Options 53 Adding Configuration...
Product Manual
Page 5
D-Link DES-3010FA/GA User Guide Configuring Quality of Service 187 VPT Classification Information ...187 CoS Services ...188 Configuring Quality of Service General Settings 189 Defining QoS Settings...189 Defining Bandwidth ...
D-Link DES-3010FA/GA User Guide Configuring Quality of Service 187 VPT Classification Information ...187 CoS Services ...188 Configuring Quality of Service General Settings 189 Defining QoS Settings...189 Defining Bandwidth ...

Product Manual
Page 7
... information about configuring ports. • Section 9. D-Link DES-3010PA User Guide Preface This preface provides an overview to the D-Link DES-3010PA User Guide, and includes the following sections: • D-Link DES-3010PA User Guide Overview • Intended Audience D-Link DES-3010PA User Guide Overview This user guide is divided into the following sections to the D-Link Web System Interface User Guide. Device Description - The D-Link Web System Interface User Guide provides the following sections: • Section 4. Provides...
... information about configuring ports. • Section 9. D-Link DES-3010PA User Guide Preface This preface provides an overview to the D-Link DES-3010PA User Guide, and includes the following sections: • D-Link DES-3010PA User Guide Overview • Intended Audience D-Link DES-3010PA User Guide Overview This user guide is divided into the following sections to the D-Link Web System Interface User Guide. Device Description - The D-Link Web System Interface User Guide provides the following sections: • Section 4. Provides...

Product Manual
Page 11
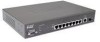
... - The Power LED and the Port activity LEDs on the device as follows: • 8 Fast Ethernet ports - D-Link DES-3010PA User Guide Viewing the Device The D-Link DES-3010PA Fast Ethernet Switch is performed via a DB-9 RS-232 interface. Device Front Panel The following figure illustrates the front panel. The port is...(SFP) port to provide an uplink to the console managing the device. • 1000Base-T Copper port - Figure 1: D-Link DES-3010PA Front Panel The device front panel is performed using an Embedded Web Server (EWS) or through a Command Line Interface (CLI).
... - The Power LED and the Port activity LEDs on the device as follows: • 8 Fast Ethernet ports - D-Link DES-3010PA User Guide Viewing the Device The D-Link DES-3010PA Fast Ethernet Switch is performed via a DB-9 RS-232 interface. Device Front Panel The following figure illustrates the front panel. The port is...(SFP) port to provide an uplink to the console managing the device. • 1000Base-T Copper port - Figure 1: D-Link DES-3010PA Front Panel The device front panel is performed using an Embedded Web Server (EWS) or through a Command Line Interface (CLI).
Product Manual
Page 13
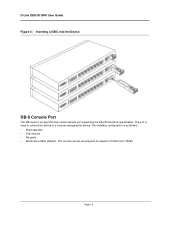
Page 12 This interface configuration is as follows: • Eight data bits. • One stop bit. • No parity. • Baud rate is used to connect the device to a console managing the device. The console can be reconfigured for speeds of 57600 and 115200. The port is 9600 (default). D-Link DES-3010PA User Guide Figure 3: Inserting a GBIC into the Device DB-9 Console Port The DB-9 port is an asynchronous serial console port supporting the RS-232 electrical specification.
Page 12 This interface configuration is as follows: • Eight data bits. • One stop bit. • No parity. • Baud rate is used to connect the device to a console managing the device. The console can be reconfigured for speeds of 57600 and 115200. The port is 9600 (default). D-Link DES-3010PA User Guide Figure 3: Inserting a GBIC into the Device DB-9 Console Port The DB-9 port is an asynchronous serial console port supporting the RS-232 electrical specification.
Product Manual
Page 15
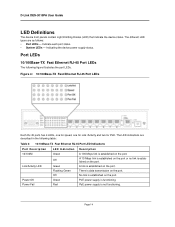
... LED Power OK Power Fail LED Indication Green Off Green Flashing Green Off Green Red Description A 100 Mbps link is data transmission on the port. A link is functioning. PoE power supply is established on the port. Indicate each port status. • System LEDs - PoE power... 4 LEDs, one for speed, one for Link /Activity and two for PoE. No link is not functioning. Indicating the device power supply status. A 10 Mbps link is established on the port or no link is established on the port. D-Link DES-3010PA User Guide LED Definitions The device front panels contain Light ...
... LED Power OK Power Fail LED Indication Green Off Green Flashing Green Off Green Red Description A 100 Mbps link is data transmission on the port. A link is functioning. PoE power supply is established on the port. Indicate each port status. • System LEDs - PoE power... 4 LEDs, one for speed, one for Link /Activity and two for PoE. No link is not functioning. Indicating the device power supply status. A 10 Mbps link is established on the port or no link is established on the port. D-Link DES-3010PA User Guide LED Definitions The device front panels contain Light ...
Product Manual
Page 17
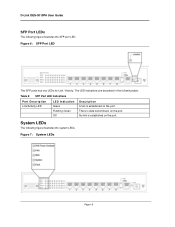
Figure 6: SFP Port LED The SFP ports has one LEDs for Link / Activity. System LEDs The following figure illustrates the SFP port LED. D-Link DES-3010PA User Guide SFP Port LEDs The following figure illustrates the system LEDs. No link is established on the port. The LED indications are described in the following table: Table 5: SFP Port LED Indications Port Description Link/Activity LED LED Indication Green Flashing Green Off Description A link is data transmission on the port. Figure 7: System LEDs Page 16 There is established on the port.
Figure 6: SFP Port LED The SFP ports has one LEDs for Link / Activity. System LEDs The following figure illustrates the SFP port LED. D-Link DES-3010PA User Guide SFP Port LEDs The following figure illustrates the system LEDs. No link is established on the port. The LED indications are described in the following table: Table 5: SFP Port LED Indications Port Description Link/Activity LED LED Indication Green Flashing Green Off Description A link is data transmission on the port. Figure 7: System LEDs Page 16 There is established on the port.

Product Manual
Page 19
Physical Dimensions The device has the following physical dimensions: • Width: 280 mm (11 inch) • Depth: 180 mm (7.1 inch) • Height: 45 mm (1.75 inch) Page 18 D-Link DES-3010PA User Guide Table 7: RJ-45 Pin Connections for 10/100/1000 Base-T Pin Use 4 TxRx 2- 5 TxRx 3+ 6 TxRx 3- 7 TxRx 4+ 8 TxRx 4-
Physical Dimensions The device has the following physical dimensions: • Width: 280 mm (11 inch) • Depth: 180 mm (7.1 inch) • Height: 45 mm (1.75 inch) Page 18 D-Link DES-3010PA User Guide Table 7: RJ-45 Pin Connections for 10/100/1000 Base-T Pin Use 4 TxRx 2- 5 TxRx 3+ 6 TxRx 3- 7 TxRx 4+ 8 TxRx 4-

Product Manual
Page 21
... within 1.5 m (5 feet) of a grounded, easily accessible outlet 100-250V AC, 50- 60Hz. • Clearance - Page 20 DLINK DES-3010PA User Guide Preparing for Installation This section provides an explanation for cabling, power connections, and ventilation. • Cabling - Opening or removing covers marked with ...: • Installation Precautions • Site Requirements • Unpacking Installation Precautions Warnings • The surface on which the switch is placed should be serviced by trained service technicians only. • Ensure the power cable, extension cable, and/or plug...
... within 1.5 m (5 feet) of a grounded, easily accessible outlet 100-250V AC, 50- 60Hz. • Clearance - Page 20 DLINK DES-3010PA User Guide Preparing for Installation This section provides an explanation for cabling, power connections, and ventilation. • Cabling - Opening or removing covers marked with ...: • Installation Precautions • Site Requirements • Unpacking Installation Precautions Warnings • The surface on which the switch is placed should be serviced by trained service technicians only. • Ensure the power cable, extension cable, and/or plug...
Product Manual
Page 23
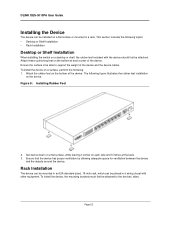
... install the device, the mounting brackets must first be attached to support the weight of the device and the device cables. DLINK DES-3010PA User Guide Installing the Device The device can be placed in a rack. To install the device on a desktop or shelf, the rubber feet.... 3. This section includes the following topics: • Desktop or Shelf Installation • Rack Installation Desktop or Shelf Installation When installing the switch on a surface, perform the following figure illustrates the rubber feet installation on the device. Set device down on a flat surface, while leaving...
... install the device, the mounting brackets must first be attached to support the weight of the device and the device cables. DLINK DES-3010PA User Guide Installing the Device The device can be placed in a rack. To install the device on a desktop or shelf, the rubber feet.... 3. This section includes the following topics: • Desktop or Shelf Installation • Rack Installation Desktop or Shelf Installation When installing the switch on a surface, perform the following figure illustrates the rubber feet installation on the device. Set device down on a flat surface, while leaving...

Product Manual
Page 25
Page 24 Fasten the lower pair of screws before the upper pair of the unit is evenly distributed during installation. This ensures that the ventilation holes are not obstructed. Secure the unit to the rack with the rack screws (not provided). Ensure that the weight of screws. DLINK DES-3010PA User Guide Figure 11: Mounting Device in a Rack 5.
Page 24 Fasten the lower pair of screws before the upper pair of the unit is evenly distributed during installation. This ensures that the ventilation holes are not obstructed. Secure the unit to the rack with the rack screws (not provided). Ensure that the weight of screws. DLINK DES-3010PA User Guide Figure 11: Mounting Device in a Rack 5.

Product Manual
Page 27
...; AC Power Connection Connecting the Switch to a Terminal The device is set as follows: a) Select the appropriate port to connect to 8 data bits, 1 stop bit, and no parity. To connect a terminal to 9600 baud. Connect a cable to a terminal desktop system running VT100 terminal emulation software. DLINK DES-3010PA User Guide Figure 13: Mounting the device...
...; AC Power Connection Connecting the Switch to a Terminal The device is set as follows: a) Select the appropriate port to connect to 8 data bits, 1 stop bit, and no parity. To connect a terminal to 9600 baud. Connect a cable to a terminal desktop system running VT100 terminal emulation software. DLINK DES-3010PA User Guide Figure 13: Mounting the device...

Product Manual
Page 29
D-Link DES-3010PA User Guide Section 3. Starting and Configuring the Device This section describes initial device configuration and includes the following topics: • Configuring the Terminal • Installation Procedure • Booting the Device • Configuration Overview • Advanced Configuration • Startup Procedures Page 28
D-Link DES-3010PA User Guide Section 3. Starting and Configuring the Device This section describes initial device configuration and includes the following topics: • Configuring the Terminal • Installation Procedure • Booting the Device • Configuration Overview • Advanced Configuration • Startup Procedures Page 28

Product Manual
Page 31
D-Link DES-3010PA User Guide Booting the Device The assumed bootup information is as follows: • The device is delivered with a default configuration. • The default user name is admin • The default password is connected to a VT100 terminal device or VT100 terminal emulator. 2. To login, perform... 60 seconds. To enter the Startup menu, press or within the first two seconds after the auto-boot message is blank. Enter the user name, "admin". To boot the device, perform the following steps: 1. If POST passes successfully, a valid executable image is detected, the...
D-Link DES-3010PA User Guide Booting the Device The assumed bootup information is as follows: • The device is delivered with a default configuration. • The default user name is admin • The default password is connected to a VT100 terminal device or VT100 terminal emulator. 2. To login, perform... 60 seconds. To enter the Startup menu, press or within the first two seconds after the auto-boot message is blank. Enter the user name, "admin". To boot the device, perform the following steps: 1. If POST passes successfully, a valid executable image is detected, the...
Product Manual
Page 33
Static IP Address and Subnet Mask IP interfaces can be assigned to the same subnet as 100.1.1.10. To manage the switch from a remote network, a static route must belong to the VLAN interface is 100.1.1.110 • The IP subnet mask for the ...username admin password dlink level 15 console(config)# interface VLAN 1 console (config-if) # ip address 100.1.1.110 console (config-if) # exit Page 32 D-Link DES-3010PA User Guide • The default gateway IP address. • The SNMP community. Note The commands to configure the device are found in the following assumptions: • ...
Static IP Address and Subnet Mask IP interfaces can be assigned to the same subnet as 100.1.1.10. To manage the switch from a remote network, a static route must belong to the VLAN interface is 100.1.1.110 • The IP subnet mask for the ...username admin password dlink level 15 console(config)# interface VLAN 1 console (config-if) # ip address 100.1.1.110 console (config-if) # exit Page 32 D-Link DES-3010PA User Guide • The default gateway IP address. • The SNMP community. Note The commands to configure the device are found in the following assumptions: • ...

Product Manual
Page 35
...-Address System Trap-Rec-Community Version Page 34 If an IP address is delivered with no community strings configured. Enter the command configure and press . 3. D-Link DES-3010PA User Guide Note The device is not configured, all community members having the same community name are enabled. If an IP address is recommended to configure the...
...-Address System Trap-Rec-Community Version Page 34 If an IP address is delivered with no community strings configured. Enter the command configure and press . 3. D-Link DES-3010PA User Guide Note The device is not configured, all community members having the same community name are enabled. If an IP address is recommended to configure the...
Product Manual
Page 37
...prompt, enter the delete startup configuration command to retrieve the IP address. 2. D-Link DES-3010PA User Guide Advanced Configuration This section provides information about dynamic allocation of the copying configuration, the switch retrieves the new configuration file and boots from a DHCP server, perform the ... or to automatically download its IP host configuration from a BOOTP Server The standard BOOTP protocol is supported and enables the switch to one with an identical configuration. console# configure console(config)# interface ethernet 1 console(config-if)# ip address dhcp...
...prompt, enter the delete startup configuration command to retrieve the IP address. 2. D-Link DES-3010PA User Guide Advanced Configuration This section provides information about dynamic allocation of the copying configuration, the switch retrieves the new configuration file and boots from a DHCP server, perform the ... or to automatically download its IP host configuration from a BOOTP Server The standard BOOTP protocol is supported and enables the switch to one with an identical configuration. console# configure console(config)# interface ethernet 1 console(config-if)# ip address dhcp...
Product Manual
Page 39
If there is no specified password, privileged users can be assigned privilege level 15 without a password, it is recommended to always assign a password. Page 38 D-Link DES-3010PA User Guide can access the web interface with any password.
If there is no specified password, privileged users can be assigned privilege level 15 without a password, it is recommended to always assign a password. Page 38 D-Link DES-3010PA User Guide can access the web interface with any password.

Product Manual
Page 41
... browser, enable SSL 2.0 or greater for password. Note HTTP and HTTPS services require level 15 access and connect directly to use an HTTPS session. D-Link DES-3010PA User Guide console(config)# ip http authentication local console(config)# username admin password user1 level 15 Configuring an initial HTTPS Password To configure an initial HTTPS password... level access. console(config)# crypto certificate generate key_generate console(config)# ip https server When initially enabling an http or https session, enter admin for user name and user1 for the content of the page to appear.
... browser, enable SSL 2.0 or greater for password. Note HTTP and HTTPS services require level 15 access and connect directly to use an HTTPS session. D-Link DES-3010PA User Guide console(config)# ip http authentication local console(config)# username admin password user1 level 15 Configuring an initial HTTPS Password To configure an initial HTTPS password... level access. console(config)# crypto certificate generate key_generate console(config)# ip https server When initially enabling an http or https session, enter admin for user name and user1 for the content of the page to appear.

