
Quick Installation Guide
Page 1
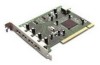
... PCI Slot • CD-ROM Drive Check Your Package Contents These are the items included with your purchase: If any of the below items are missing, please contact your reseller. • DU-520 Hi-Speed USB 2.0 PCI Adapter • CD-ROM (containing Drivers, Installation Guide and Warranty) Windows Users Run the Driver CD before you install the DU-520...
... PCI Slot • CD-ROM Drive Check Your Package Contents These are the items included with your purchase: If any of the below items are missing, please contact your reseller. • DU-520 Hi-Speed USB 2.0 PCI Adapter • CD-ROM (containing Drivers, Installation Guide and Warranty) Windows Users Run the Driver CD before you install the DU-520...
Quick Installation Guide
Page 2
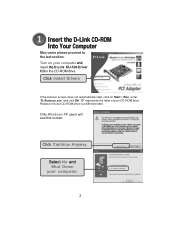
Replace it if your computer. 2 Only Windows XP users will see this screen. Click Install Drivers If the Autorun screen does not automatically start, click on your CD-ROM drive. Click Continue Anyway Select No and Shut Down your CD-ROM drive is a different letter. Turn on Start > Run, enter "D:\Autorun.exe" and click OK. "D" represents the letter of your computer and insert the D-Link DU-520 Driver CD in the CD-ROM drive. Insert the D-Link CD-ROM Into Your Computer Mac users please proceed to the last section.
Replace it if your computer. 2 Only Windows XP users will see this screen. Click Install Drivers If the Autorun screen does not automatically start, click on your CD-ROM drive. Click Continue Anyway Select No and Shut Down your CD-ROM drive is a different letter. Turn on Start > Run, enter "D:\Autorun.exe" and click OK. "D" represents the letter of your computer and insert the D-Link DU-520 Driver CD in the CD-ROM drive. Insert the D-Link CD-ROM Into Your Computer Mac users please proceed to the last section.
Quick Installation Guide
Page 5
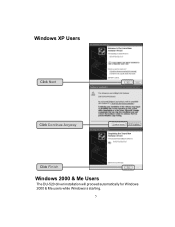
Windows XP Users Click Next Click Continue Anyway Click Finish Windows 2000 & Me Users The DU-520 driver installation will proceed automatically for Windows 2000 & Me users while Windows is starting. 5
Windows XP Users Click Next Click Continue Anyway Click Finish Windows 2000 & Me Users The DU-520 driver installation will proceed automatically for Windows 2000 & Me users while Windows is starting. 5
Quick Installation Guide
Page 8
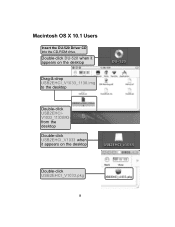
Macintosh OS X 10.1 Users Insert the DU-520 Driver CD into the CD-ROM drive. Double-click DU-520 when it appears on the desktop Drag-&-drop USB2EHCI_V1033_1130.img to the desktop Double-click USB2EHCIV1033_1130.IMG from the desktop Double-click USB2EHCI_V1033 when it appears on the desktop Double-click USB2EHCI_V1033.pkg 8
Macintosh OS X 10.1 Users Insert the DU-520 Driver CD into the CD-ROM drive. Double-click DU-520 when it appears on the desktop Drag-&-drop USB2EHCI_V1033_1130.img to the desktop Double-click USB2EHCIV1033_1130.IMG from the desktop Double-click USB2EHCI_V1033 when it appears on the desktop Double-click USB2EHCI_V1033.pkg 8

Quick Installation Guide
Page 12
... to shut -down the computer. Because of the high speed of the nice things about USB is extended to 480Mbps in drivers for connecting external devices to your computer. USB also allows the device to be connected and removed from the PC without the need more ...reliable data transfers. This means that when connecting USB 1.0 or USB 1.1 products into a USB 2.0 adapter, the USB 1x product will not work faster. • To ensure optimal performance when using USB 2.0 devices, use a USB 2.0 certified cable such as the DUB-C5AB. • The DU-520 will have to use an external power source...
... to shut -down the computer. Because of the high speed of the nice things about USB is extended to 480Mbps in drivers for connecting external devices to your computer. USB also allows the device to be connected and removed from the PC without the need more ...reliable data transfers. This means that when connecting USB 1.0 or USB 1.1 products into a USB 2.0 adapter, the USB 1x product will not work faster. • To ensure optimal performance when using USB 2.0 devices, use a USB 2.0 certified cable such as the DUB-C5AB. • The DU-520 will have to use an external power source...
