
Installation Instructions
Page 1
E Installation Instructions Distinctive Series Cooktop Models DCT305, DCT365 Part No. 106927 Rev.
E Installation Instructions Distinctive Series Cooktop Models DCT305, DCT365 Part No. 106927 Rev.
Installation Instructions
Page 4
Dacor strongly recommends the installation of a range hood in the literature accompanying it for your ... electric shock hazards. This appliance is equipped with this appliance. • Do not install, repair or replace any part of the cooktop unless specifically recommended in conjunction with a threeprong grounding plug for the first time. The curtains could be... is turned off the gas supply and disconnect power to an electrical outlet with the controls or touch other parts of the cooktop. Do not place such items on top of outlet is installed. Remove birds to use ...
Dacor strongly recommends the installation of a range hood in the literature accompanying it for your ... electric shock hazards. This appliance is equipped with this appliance. • Do not install, repair or replace any part of the cooktop unless specifically recommended in conjunction with a threeprong grounding plug for the first time. The curtains could be... is turned off the gas supply and disconnect power to an electrical outlet with the controls or touch other parts of the cooktop. Do not place such items on top of outlet is installed. Remove birds to use ...
Installation Instructions
Page 10
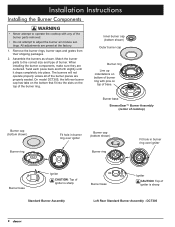
...burner cap Burner ring Line up indentations on bottom of burner ring with any of the burner parts removed. • Do not attempt to the correct size and type of burner. DCT305 8 Installation Instructions Installing the Burner Components warning • Never attempt to operate the cooktop with ...pins on top of base. Assemble the burners as shown. Match the burner parts to adjust the burner air mixture settings. The ...
...burner cap Burner ring Line up indentations on bottom of burner ring with any of the burner parts removed. • Do not attempt to the correct size and type of burner. DCT305 8 Installation Instructions Installing the Burner Components warning • Never attempt to operate the cooktop with ...pins on top of base. Assemble the burners as shown. Match the burner parts to adjust the burner air mixture settings. The ...

Installation Instructions
Page 12
... outlet for proper grounding or reversed polarity. • Repeat the above burner ignition test. • If the appliance still does not work, contact Dacor Distinctive Service at all of correcting problems caused by the Smart Flame™ feature under the grate fingers to the OFF position. On the SimmerSear...return the knob to increase grate life. Turn on at the circuit breaker panel or fuse box. • Check to make sure that the burner parts are supplied to the cooktop. • Check to make sure that the power plug is in the OFF position. 3. See inside cover for ...
... outlet for proper grounding or reversed polarity. • Repeat the above burner ignition test. • If the appliance still does not work, contact Dacor Distinctive Service at all of correcting problems caused by the Smart Flame™ feature under the grate fingers to the OFF position. On the SimmerSear...return the knob to increase grate life. Turn on at the circuit breaker panel or fuse box. • Check to make sure that the burner parts are supplied to the cooktop. • Check to make sure that the power plug is in the OFF position. 3. See inside cover for ...
Installation Instructions
Page 13
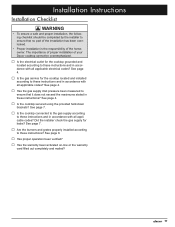
... mailed? 11 See page 7. □□ Are the burners and grates properly installed according to ensure that no part of the installation has been overlooked. • Proper installation is the responsibility of your Dacor cooktop cannot be completed by the installer to these instructions and in these instructions? See page 4. □□...
... mailed? 11 See page 7. □□ Are the burners and grates properly installed according to ensure that no part of the installation has been overlooked. • Proper installation is the responsibility of your Dacor cooktop cannot be completed by the installer to these instructions and in these instructions? See page 4. □□...
Use & Care Manuals
Page 1
C Use and Care Manual Distinctive Series Cooktop Models DCT305, DCT365 Style varies, model DCT365 shown Ta b l e o f C o n t e n t s Important Safety Instructions 1 Getting to Know Your Cooktop 4 Setting Up Your Cooktop 5 Operating Your Cooktop 7 Care and Cleaning 9 Before You Call for Service 12 Warranty and Service 13 Notes 14 Warranty Card Back Cover Part No. 106926 Rev.
C Use and Care Manual Distinctive Series Cooktop Models DCT305, DCT365 Style varies, model DCT365 shown Ta b l e o f C o n t e n t s Important Safety Instructions 1 Getting to Know Your Cooktop 4 Setting Up Your Cooktop 5 Operating Your Cooktop 7 Care and Cleaning 9 Before You Call for Service 12 Warranty and Service 13 Notes 14 Warranty Card Back Cover Part No. 106926 Rev.
Use & Care Manuals
Page 4
... the improper use on a cooktop. Decorative covers may cause the container to the cooktop. • Do not install, repair or replace any part of the cooktop. warning • Do not heat unopened food containers such as window treatment. Do not allow clothing to come into contact with...position. • Do not tamper with loose handles. A qualified service technician should perform all control knobs to sit, stand or climb on any part of food without boil-overs or spill-overs. Do not leave children alone or unattended in the literature accompanying it properly. • Never allow...
... the improper use on a cooktop. Decorative covers may cause the container to the cooktop. • Do not install, repair or replace any part of the cooktop. warning • Do not heat unopened food containers such as window treatment. Do not allow clothing to come into contact with...position. • Do not tamper with loose handles. A qualified service technician should perform all control knobs to sit, stand or climb on any part of food without boil-overs or spill-overs. Do not leave children alone or unattended in the literature accompanying it properly. • Never allow...

Use & Care Manuals
Page 5
... juices, tomato sauces, etc.) to direct flame, hot utensils or other sources of heat. 3 Important Safety Instructions warning • Make sure that all the cooktop parts are dry before lighting a burner. • Turn the knobs to the OFF position prior to removing them from the power cord. ◊ Use an adapter...
... juices, tomato sauces, etc.) to direct flame, hot utensils or other sources of heat. 3 Important Safety Instructions warning • Make sure that all the cooktop parts are dry before lighting a burner. • Turn the knobs to the OFF position prior to removing them from the power cord. ◊ Use an adapter...
Use & Care Manuals
Page 6
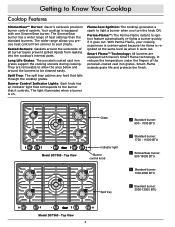
... feature automatically re-lights a burner quickly if it controls. It reduces the temperature under the fingers of heat settings than the standard burners. A B Grate C D D Model DCT305 - Top View Indicator light Burner control knob E E C D D Spill tray A Standard burner: 800 - 7000 BTU B Standard burner: 1700 - 11000 BTU C SimmerSear burner: 800-18000 BTU... spill tray catches any food that it goes out. Getting to light a burner when you precise heat control from leaking into the cooktop's internal parts. Your cooktop is equipped with Dacor's Smart Flame technology.
... feature automatically re-lights a burner quickly if it controls. It reduces the temperature under the fingers of heat settings than the standard burners. A B Grate C D D Model DCT305 - Top View Indicator light Burner control knob E E C D D Spill tray A Standard burner: 800 - 7000 BTU B Standard burner: 1700 - 11000 BTU C SimmerSear burner: 800-18000 BTU... spill tray catches any food that it goes out. Getting to light a burner when you precise heat control from leaking into the cooktop's internal parts. Your cooktop is equipped with Dacor's Smart Flame technology.
Use & Care Manuals
Page 7
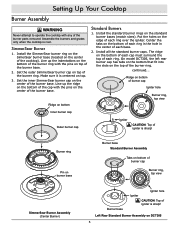
... the bottom of each ring in the hole in the center of the burner ring. Center the tabs on the center of the burner parts removed. On model DCT305, the left rear burner cap has tabs on the bottom that fit into the slots on top of the burner ring. Line up... the burner base. Line up the indentations on the bottom of the burner ring with the pins on the center of igniter is centered on DCT305 5 Assemble the burners and grates only when the cooktop is sharp! SimmerSear Burner 1. Set the inner SimmerSear burner cap on the center of each base...
... the bottom of each ring in the hole in the center of the burner ring. Center the tabs on the center of the burner parts removed. On model DCT305, the left rear burner cap has tabs on the bottom that fit into the slots on top of the burner ring. Line up... the burner base. Line up the indentations on the bottom of the burner ring with the pins on the center of igniter is centered on DCT305 5 Assemble the burners and grates only when the cooktop is sharp! SimmerSear Burner 1. Set the inner SimmerSear burner cap on the center of each base...

Use & Care Manuals
Page 10
... this type of the flame level indicator on page 9. The tendency to the LOW position. The burner rings and burner caps must be reduced by Dacor's Smart-Flame feature. Repeat the lighting procedure. 1. Once in constant sparking, even if there is a flame present. • The flame should burn evenly around the... could cause burns or damage to the surrounding area. • Do not touch any drafts or reduce the ventilation blower speed to dissipate. Eliminate any part of the burner operates.
... this type of the flame level indicator on page 9. The tendency to the LOW position. The burner rings and burner caps must be reduced by Dacor's Smart-Flame feature. Repeat the lighting procedure. 1. Once in constant sparking, even if there is a flame present. • The flame should burn evenly around the... could cause burns or damage to the surrounding area. • Do not touch any drafts or reduce the ventilation blower speed to dissipate. Eliminate any part of the burner operates.

Use & Care Manuals
Page 11
...Lift the burner caps and burner rings off the burners and make sure that occur while cooking. These severe operating conditions, cause the porcelain enamel parts on your cooktop. • Do not try to remove heavy spills with a sharp object such as tomatoes, citrus juices, vinegar, alcohol and ...5. See page 5. Certain types of food, such as a knife or metal spatula. Care and Cleaning Cleaning the Cooktop warning • Clean only the parts of the cooktop listed in this manual. • To avoid electrical shock or burns, turn the burners on during cleaning. • Do not use ...
...Lift the burner caps and burner rings off the burners and make sure that occur while cooking. These severe operating conditions, cause the porcelain enamel parts on your cooktop. • Do not try to remove heavy spills with a sharp object such as tomatoes, citrus juices, vinegar, alcohol and ...5. See page 5. Certain types of food, such as a knife or metal spatula. Care and Cleaning Cleaning the Cooktop warning • Clean only the parts of the cooktop listed in this manual. • To avoid electrical shock or burns, turn the burners on during cleaning. • Do not use ...

Use & Care Manuals
Page 12
... 2. Be careful not to the burner and grate assembly instructions on the burner parts or igniter. Use a cleaning brush with window cleaner or rubbing alcohol. Test the burners after drying, call your local Dacor Authorized Service Agent. Remove anything stuck in place. 3. If erratic clicking is ...still present, make sure the igniter is also ideal for any dirt or grime deposited on DCT305 10 Inner burner cap Igniter on burner base ...
... 2. Be careful not to the burner and grate assembly instructions on the burner parts or igniter. Use a cleaning brush with window cleaner or rubbing alcohol. Test the burners after drying, call your local Dacor Authorized Service Agent. Remove anything stuck in place. 3. If erratic clicking is ...still present, make sure the igniter is also ideal for any dirt or grime deposited on DCT305 10 Inner burner cap Igniter on burner base ...

Use & Care Manuals
Page 13
... the mildest cleaner needed to clean the burners, igniters or stainless steel surfaces. • Do not clean the cooktop grates, burner parts or WOK ring in the dishwasher. 1. They will eventually damage the porcelain enamel. Wash the knobs with a mild solution of detergent...these types of the cleaners listed below to get the surface clean. • For extremely stubborn stains, you may be damaged. Dacor recommends hand dishwashing liquid. 5. Longer adjustment range indicator Shorter adjustment range indicator SimmerSear Burner Knob Standard Burner Knob 6. To replace the ...
... the mildest cleaner needed to clean the burners, igniters or stainless steel surfaces. • Do not clean the cooktop grates, burner parts or WOK ring in the dishwasher. 1. They will eventually damage the porcelain enamel. Wash the knobs with a mild solution of detergent...these types of the cleaners listed below to get the surface clean. • For extremely stubborn stains, you may be damaged. Dacor recommends hand dishwashing liquid. 5. Longer adjustment range indicator Shorter adjustment range indicator SimmerSear Burner Knob Standard Burner Knob 6. To replace the ...
Use & Care Manuals
Page 14
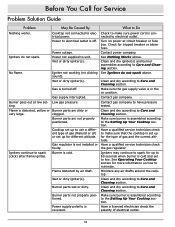
...section. Make sure burner is reversed. Wet or dirty igniter(s). Check for different altitude. See Nothing Works above . ting. Burner parts are dirty or clogged. Power supply polarity is assembled according to the Setting Up Your Cooktop section. Clean and dry igniter(s) ... and the correct altitude. Turn on position. No flame. Flame is assembled according to the Setting Up Your Cooktop section. Burner parts not properly positioned. Wet or dirty igniter(s). Power outage. Power not supplied to electrical power. Cooktop set up to use a ...
...section. Make sure burner is reversed. Wet or dirty igniter(s). Check for different altitude. See Nothing Works above . ting. Burner parts are dirty or clogged. Power supply polarity is assembled according to the Setting Up Your Cooktop section. Clean and dry igniter(s) ... and the correct altitude. Turn on position. No flame. Flame is assembled according to the Setting Up Your Cooktop section. Burner parts not properly positioned. Wet or dirty igniter(s). Power outage. Power not supplied to electrical power. Cooktop set up to use a ...

Use & Care Manuals
Page 15
... required maintenance. • Service calls to educate the customer in material or workmanship, DACOR will furnish a new part, F.O.B. and Canada) Business Hours: 6:00 a.m. - 5:00 p.m. For warranty repairs, call : Dacor Customer Service Phone: (800) 793-0093 (U.S.A. If you may not apply to replace... the defective part. Prior to requesting service, it is transported from state to glass, metal surfaces, plastic components, ...
... required maintenance. • Service calls to educate the customer in material or workmanship, DACOR will furnish a new part, F.O.B. and Canada) Business Hours: 6:00 a.m. - 5:00 p.m. For warranty repairs, call : Dacor Customer Service Phone: (800) 793-0093 (U.S.A. If you may not apply to replace... the defective part. Prior to requesting service, it is transported from state to glass, metal surfaces, plastic components, ...

Use & Care Manuals
Page 20
... B. Oven D. Would you have provided will be activated until you first exposed to Dacor products? (Please check one envelope or activate the warranty for mailing list purposes. Builder Supplier D. Part of the information on this form to be extremely valuable in the section below will ...be a proper way of such information to Dacor. How were you activate it online or return this form...
... B. Oven D. Would you have provided will be activated until you first exposed to Dacor products? (Please check one envelope or activate the warranty for mailing list purposes. Builder Supplier D. Part of the information on this form to be extremely valuable in the section below will ...be a proper way of such information to Dacor. How were you activate it online or return this form...