
Planning Guides
Page 1
....dacor.com Phone: (800) 7943-.010893 Revised 08/19/11 Page 1/4 PLANNING GUIDE Product tolerances ±1/16" (±1.6 mm) unless otherwise noted. Contact your local building department for further information. • This appliance must be installed in Gas Cooktops warning... • Observe all governing codes and ordinances during planning and installation. A 2" (5.1 cm) countertop to cooking surface Model DCT305 DCT365 (A) 30" (76.2 cm) 36" (91.4 cm) 4" (10.2 cm...
....dacor.com Phone: (800) 7943-.010893 Revised 08/19/11 Page 1/4 PLANNING GUIDE Product tolerances ±1/16" (±1.6 mm) unless otherwise noted. Contact your local building department for further information. • This appliance must be installed in Gas Cooktops warning... • Observe all governing codes and ordinances during planning and installation. A 2" (5.1 cm) countertop to cooking surface Model DCT305 DCT365 (A) 30" (76.2 cm) 36" (91.4 cm) 4" (10.2 cm...
Planning Guides
Page 2
...Pressure** 6" water column 11" water column Max. If the above data does not agree with a, three-prong, grounding electrical plug. www.dacor.com Phone: (800) 7943-.010993 It is located on this standard may be easily disconnected if the unit needs service. See the Gas...pressure for LP operation have an "H" at an altitude above the specified manifold pressure. Document # PG04-006 DCT305, DCT365 30" and 36" Wide, Distinctive Series Drop-in Gas Cooktops Revised 08/19/11 Page 2/4 PLANNING GUIDE Electrical Requirements WARNING To prevent an electric shock hazard, the power...
...Pressure** 6" water column 11" water column Max. If the above data does not agree with a, three-prong, grounding electrical plug. www.dacor.com Phone: (800) 7943-.010993 It is located on this standard may be easily disconnected if the unit needs service. See the Gas...pressure for LP operation have an "H" at an altitude above the specified manifold pressure. Document # PG04-006 DCT305, DCT365 30" and 36" Wide, Distinctive Series Drop-in Gas Cooktops Revised 08/19/11 Page 2/4 PLANNING GUIDE Electrical Requirements WARNING To prevent an electric shock hazard, the power...
Planning Guides
Page 3
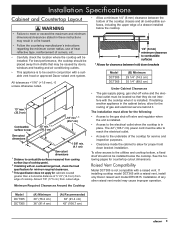
... corner radius, use of heat reflective tape, reinforcement of corners, etc. ◊ Carefully check the location where the cooktop will be installed. Minimum Required Clearances Around the Cooktop Model DCT305 DCT365 (A) Minimum 30" (76.2 cm) 36" (91.4 cm) (A) Recommended 36" (91.4 cm) 42"... to the underside of the cooktop for service and inspection purposes ◊ Clearance inside the cabinet to allow for proper hold down bracket installation. Raised Vent Compatibility Model DCT305 is not compatible with a raised vent, install only Dacor raised vent model ERV3615. Installation...
... corner radius, use of heat reflective tape, reinforcement of corners, etc. ◊ Carefully check the location where the cooktop will be installed. Minimum Required Clearances Around the Cooktop Model DCT305 DCT365 (A) Minimum 30" (76.2 cm) 36" (91.4 cm) (A) Recommended 36" (91.4 cm) 42"... to the underside of the cooktop for service and inspection purposes ◊ Clearance inside the cabinet to allow for proper hold down bracket installation. Raised Vent Compatibility Model DCT305 is not compatible with a raised vent, install only Dacor raised vent model ERV3615. Installation...

Planning Guides
Page 4
...) 3/8" (1.0 cm) * Model DCT305 is not compatible with ERV3615 Raised Vent Specifications subject to clear stiffener ERV3615 raised vent. Installation other any other model raised vent may cause improper operation. Check raised vent dimensions/specifications to combustibles below cooktop chassis Raised Vent Compatibility If installing cooktop DCT365 with a raised vent, install only Dacor raised vent...
...) 3/8" (1.0 cm) * Model DCT305 is not compatible with ERV3615 Raised Vent Specifications subject to clear stiffener ERV3615 raised vent. Installation other any other model raised vent may cause improper operation. Check raised vent dimensions/specifications to combustibles below cooktop chassis Raised Vent Compatibility If installing cooktop DCT365 with a raised vent, install only Dacor raised vent...

Installation Instructions
Page 1
E Installation Instructions Distinctive Series Cooktop Models DCT305, DCT365 Part No. 106927 Rev.
E Installation Instructions Distinctive Series Cooktop Models DCT305, DCT365 Part No. 106927 Rev.
Installation Instructions
Page 2
...Product Dimensions 3 Electrical Requirements 4 Gas Supply Requirements 4 Cabinet and Countertop Layout 5 Installation Instructions 7 Verify Package Contents 7 Installing the Cooktop 7 Connecting the Gas Line 7 Installing the Burner Components 8 Verifying Proper Operation 9 Installation Checklist 10 Wiring Diagram 11 Before You Begin......serial number information and the electrical and gas supply requirements. • It is not responsible for service required to Dacor appliances under warranty only) Phone: (877) 337-3226 (U.S.A. and Canada) Monday - Front of the unit. ...
...Product Dimensions 3 Electrical Requirements 4 Gas Supply Requirements 4 Cabinet and Countertop Layout 5 Installation Instructions 7 Verify Package Contents 7 Installing the Cooktop 7 Connecting the Gas Line 7 Installing the Burner Components 8 Verifying Proper Operation 9 Installation Checklist 10 Wiring Diagram 11 Before You Begin......serial number information and the electrical and gas supply requirements. • It is not responsible for service required to Dacor appliances under warranty only) Phone: (877) 337-3226 (U.S.A. and Canada) Monday - Front of the unit. ...
Installation Instructions
Page 3
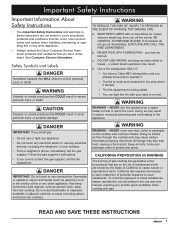
warning Hazards or unsafe practices that COULD result in carbon monoxide poisoning and overheating of the appliance. Also keep items that are on the cooktop and cooktop chassis. warning TO REDUCE THE RISK OF INJURY TO PERSONS IN THE EVENT OF A RANGE TOP GREASE FIRE: a. NEVER PICK UP...reproductive harm. Use common sense and caution when installing, maintaining or operating this or any other appliance. • Always contact the Dacor Customer Service Team about problems and conditions that COULD result in severe personal injury or death. Safety Symbols and Labels DANGER Immediate ...
warning Hazards or unsafe practices that COULD result in carbon monoxide poisoning and overheating of the appliance. Also keep items that are on the cooktop and cooktop chassis. warning TO REDUCE THE RISK OF INJURY TO PERSONS IN THE EVENT OF A RANGE TOP GREASE FIRE: a. NEVER PICK UP...reproductive harm. Use common sense and caution when installing, maintaining or operating this or any other appliance. • Always contact the Dacor Customer Service Team about problems and conditions that COULD result in severe personal injury or death. Safety Symbols and Labels DANGER Immediate ...
Installation Instructions
Page 4
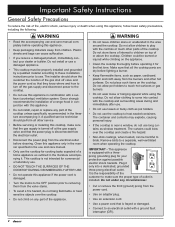
... controls or touch other parts of outlet is installed. This appliance is near a window, do not hang flammable or heat sensitive objects over the cooktop and create a fire hazard. • Non-stick coatings, when heated, can cause suffocation. • If you receive a damaged product, immediately...with a threeprong grounding plug for commercial or laboratory use . Dacor strongly recommends the installation of a range hood in the use and care manual. • Only use the cooktop for the first time. Do not allow children to the cooktop. • Do not use towels or bulky cloth as ...
... controls or touch other parts of outlet is installed. This appliance is near a window, do not hang flammable or heat sensitive objects over the cooktop and create a fire hazard. • Non-stick coatings, when heated, can cause suffocation. • If you receive a damaged product, immediately...with a threeprong grounding plug for commercial or laboratory use . Dacor strongly recommends the installation of a range hood in the use and care manual. • Only use the cooktop for the first time. Do not allow children to the cooktop. • Do not use towels or bulky cloth as ...

Installation Instructions
Page 5
A 2" (5.1 cm) countertop to cooking surface 4" (10.2 cm) chassis height Model DCT305 DCT365 (A) 30" (76.2 cm) 36" (91.4 cm) (B) 27 5/16" (69.4 cm) 33 5/16" (57.8 cm) Rear overhang 1 3/16" (3.0 cm) 19 9/32" (49.0 cm) Side View ... overhang 17/32" (1.3 cm) 1 11/32" (3.4 cm) Product Dimensions B Front View 21" (53.3 cm) 1 11/32" (3.4 cm) Front of unit Power cord in Front of cooktop 1/2" male NPT gas inlet* 1/2" male NPT gas inlet Power cord 42" (106.7 cm) long Utility Locations 1 3/4" (4.4 cm) Chassis 1 3/4" (4.4 cm) 2" (5.1 cm) Top panel overhang *Gas inlet...
A 2" (5.1 cm) countertop to cooking surface 4" (10.2 cm) chassis height Model DCT305 DCT365 (A) 30" (76.2 cm) 36" (91.4 cm) (B) 27 5/16" (69.4 cm) 33 5/16" (57.8 cm) Rear overhang 1 3/16" (3.0 cm) 19 9/32" (49.0 cm) Side View ... overhang 17/32" (1.3 cm) 1 11/32" (3.4 cm) Product Dimensions B Front View 21" (53.3 cm) 1 11/32" (3.4 cm) Front of unit Power cord in Front of cooktop 1/2" male NPT gas inlet* 1/2" male NPT gas inlet Power cord 42" (106.7 cm) long Utility Locations 1 3/4" (4.4 cm) Chassis 1 3/4" (4.4 cm) 2" (5.1 cm) Top panel overhang *Gas inlet...

Installation Instructions
Page 6
... for testing the regulator setting shall be connected to a dedicated, grounded three-prong electrical outlet installed by a licensed electrician. • The cooktop is supplied with a factory installed, 42 inch long, power cord with National Electric Code ANSI/NFPA 70 and local codes and ordinances. A...electrician. • The electrical installation, including minimum supply wire size and grounding, must be installed between the gas inlet and the cooktop for the gas service being installed is correct for the purpose of turning on or shutting off valve must be installed in accordance ...
... for testing the regulator setting shall be connected to a dedicated, grounded three-prong electrical outlet installed by a licensed electrician. • The cooktop is supplied with a factory installed, 42 inch long, power cord with National Electric Code ANSI/NFPA 70 and local codes and ordinances. A...electrician. • The electrical installation, including minimum supply wire size and grounding, must be installed between the gas inlet and the cooktop for the gas service being installed is correct for the purpose of turning on or shutting off valve must be installed in accordance ...
Installation Instructions
Page 7
... to be installed below the cooktop. 1/4" (6 mm) mimimum clearance B to combustible surfaces * Allows for proper hold down bracket installation. Raised Vent Compatibility Model DCT305 is installed. To allow for clearance between hold down brackets Model DCT305 DCT365 (B) Minimum 29 1/4" ...the cooktop. Minimum Required Clearances Around the Cooktop • Allow a minimum 1/4" (6 mm) clearance between the bottom of the cooktop chassis and all combustible surfaces, including the upper edge of cooktop grate). 2 If installing with a raised vent, install only Dacor raised...
... to be installed below the cooktop. 1/4" (6 mm) mimimum clearance B to combustible surfaces * Allows for proper hold down bracket installation. Raised Vent Compatibility Model DCT305 is installed. To allow for clearance between hold down brackets Model DCT305 DCT365 (B) Minimum 29 1/4" ...the cooktop. Minimum Required Clearances Around the Cooktop • Allow a minimum 1/4" (6 mm) clearance between the bottom of the cooktop chassis and all combustible surfaces, including the upper edge of cooktop grate). 2 If installing with a raised vent, install only Dacor raised...

Installation Instructions
Page 8
... 7/8" (17.5 cm) 6 7/8" (17.5 cm) 3/8" min. (1.0 cm) flat countertop overhang required behind cutout Countertop Stiffener DCT365 cooktop Cabinet face 3/8" min. (1.0 cm) space behind raised vent chassis to determine proper fit Floor Side View - Installation Specifications Cutout Dimensions All...cm) min. from mounting surface to F combustibles below cooktop chassis C E D 1 5/8" min. (4.1 cm) F Minimum distance to combustible side wall above countertop (both sides) Countertop Cutout Dimensions Installation Type DCT305* DCT365 with no raised vent DCT365 with ERV3615 raised ...
... 7/8" (17.5 cm) 6 7/8" (17.5 cm) 3/8" min. (1.0 cm) flat countertop overhang required behind cutout Countertop Stiffener DCT365 cooktop Cabinet face 3/8" min. (1.0 cm) space behind raised vent chassis to determine proper fit Floor Side View - Installation Specifications Cutout Dimensions All...cm) min. from mounting surface to F combustibles below cooktop chassis C E D 1 5/8" min. (4.1 cm) F Minimum distance to combustible side wall above countertop (both sides) Countertop Cutout Dimensions Installation Type DCT305* DCT365 with no raised vent DCT365 with ERV3615 raised ...

Installation Instructions
Page 9
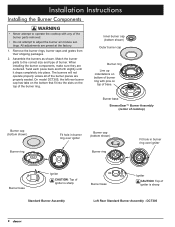
...brackets (2) • Grates (3) • Burner sets (5) • Gas pressure regulator with 3/4" to 1/2" reducer • Stainless steel cleaner Installing the Cooktop warning • Verify that the power supply meets the specifications on the seat of flared gas line connections. • Test the gas lines for leaks...that the gas supply meets specifications before proceeding. • To prevent damage to side. 3. Check for gas leaks: ◊ Turn all cooktop control valves to the OFF position. ◊ Turn on the gas supply valve and check all lines and connections for leaks using the two ...
...brackets (2) • Grates (3) • Burner sets (5) • Gas pressure regulator with 3/4" to 1/2" reducer • Stainless steel cleaner Installing the Cooktop warning • Verify that the power supply meets the specifications on the seat of flared gas line connections. • Test the gas lines for leaks...that the gas supply meets specifications before proceeding. • To prevent damage to side. 3. Check for gas leaks: ◊ Turn all cooktop control valves to the OFF position. ◊ Turn on the gas supply valve and check all lines and connections for leaks using the two ...
Installation Instructions
Page 10
... of burner ring with any of the burner parts removed. • Do not attempt to the correct size and type of base. DCT305 8 On model DCT305, the left rear burner cap has tabs on top of burner. Match the burner parts to adjust the burner air mixture settings. The... burners will not operate properly unless all of igniter is sharp Left Rear Standard Burner Assembly - Burner base SimmerSear™ Burner Assembly (center of cooktop)...
... of burner ring with any of the burner parts removed. • Do not attempt to the correct size and type of base. DCT305 8 On model DCT305, the left rear burner cap has tabs on top of burner. Match the burner parts to adjust the burner air mixture settings. The... burners will not operate properly unless all of igniter is sharp Left Rear Standard Burner Assembly - Burner base SimmerSear™ Burner Assembly (center of cooktop)...

Installation Instructions
Page 11
... on the bottom of each grate. 4. Notch on bottom toward back Notch on bottom toward the outside. 5. Use the notch on the bottom of the cooktop. The notch on the bottom of each grate goes towards the back of each grate to determine location and orientation. Installation Instructions IMPORTANT: Install the...
... on the bottom of each grate. 4. Notch on bottom toward back Notch on bottom toward the outside. 5. Use the notch on the bottom of the cooktop. The notch on the bottom of each grate goes towards the back of each grate to determine location and orientation. Installation Instructions IMPORTANT: Install the...

Installation Instructions
Page 12
... ignition test. • If the appliance still does not work, contact Dacor Distinctive Service at (877) 337-3226. See inside cover for all the cooktop burner controls are not already in the OFF position. 3. Dacor is turned on . Perform the following ignition test for the burner to ...SimmerSear knob (see knob diagrams, bottom right) on power to the electrical outlet at the gas supply valve before proceeding. • The cooktop must be sure to have a sharp, blue inner cone proportional to adjust the flame height progressively. tion. The flame will also have the...
... ignition test. • If the appliance still does not work, contact Dacor Distinctive Service at (877) 337-3226. See inside cover for all the cooktop burner controls are not already in the OFF position. 3. Dacor is turned on . Perform the following ignition test for the burner to ...SimmerSear knob (see knob diagrams, bottom right) on power to the electrical outlet at the gas supply valve before proceeding. • The cooktop must be sure to have a sharp, blue inner cone proportional to adjust the flame height progressively. tion. The flame will also have the...
Installation Instructions
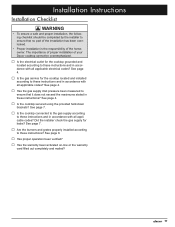
Page 13
... properly installed according to ensure that no part of the installation has been overlooked. • Proper installation is the responsibility of your Dacor cooktop cannot be completed by the installer to these instructions and in accordance with all applicable codes? See page 4. □□ Has ...the gas supply inlet pressure been measured to these instructions? See page 7. □□ Is the cooktop connected to the gas supply according to ensure that it does not exceed the maximums stated in these instructions? See page 4. □□ ...
... properly installed according to ensure that no part of the installation has been overlooked. • Proper installation is the responsibility of your Dacor cooktop cannot be completed by the installer to these instructions and in accordance with all applicable codes? See page 4. □□ Has ...the gas supply inlet pressure been measured to these instructions? See page 7. □□ Is the cooktop connected to the gas supply according to ensure that it does not exceed the maximums stated in these instructions? See page 4. □□ ...
Use & Care Manuals
Page 1
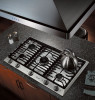
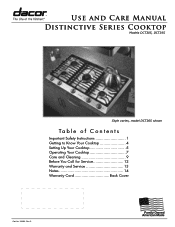
C Use and Care Manual Distinctive Series Cooktop Models DCT305, DCT365 Style varies, model DCT365 shown Ta b l e o f C o n t e n t s Important Safety Instructions 1 Getting to Know Your Cooktop 4 Setting Up Your Cooktop 5 Operating Your Cooktop 7 Care and Cleaning 9 Before You Call for Service 12 Warranty and Service 13 Notes 14 Warranty Card Back Cover Part No. 106926 Rev.
C Use and Care Manual Distinctive Series Cooktop Models DCT305, DCT365 Style varies, model DCT365 shown Ta b l e o f C o n t e n t s Important Safety Instructions 1 Getting to Know Your Cooktop 4 Setting Up Your Cooktop 5 Operating Your Cooktop 7 Care and Cleaning 9 Before You Call for Service 12 Warranty and Service 13 Notes 14 Warranty Card Back Cover Part No. 106926 Rev.

Use & Care Manuals
Page 3
...appliance as a space heater to the use combustible, flammable or explosive vapors and liquids (such as aerosol cans away from the cooktop. caution Hazards or unsafe practices that COULD result in severe personal injury or death. warning NEVER use this manual are not meant ...exposure to these substances, always operate this appliance. Safety Symbols and Labels DANGER Immediate hazards that you cannot contact the gas supplier, call : Dacor Customer Service (800) 793-0093 (U.S.A. Date of purchase Since we may result in your building. • From a neighbor's phone, immediately ...
...appliance as a space heater to the use combustible, flammable or explosive vapors and liquids (such as aerosol cans away from the cooktop. caution Hazards or unsafe practices that COULD result in severe personal injury or death. warning NEVER use this manual are not meant ...exposure to these substances, always operate this appliance. Safety Symbols and Labels DANGER Immediate hazards that you cannot contact the gas supplier, call : Dacor Customer Service (800) 793-0093 (U.S.A. Date of purchase Since we may result in your building. • From a neighbor's phone, immediately ...
Use & Care Manuals
Page 4
... the desired quantity of food without boil-overs or spill-overs. Have the installer show you receive a damaged product, immediately contact your cooktop, follow basic safety precautions, including the following: warning • If you the location of the gas shut off and the power cord...The steam can cause steam burns. 2 Use utensils of the proper size, material and construction for use . • Clean and maintain the cooktop regularly as window treatment. Choose pans with anything except properly selected utensils. Do not allow pots or pans to boil dry. • Use...
... the desired quantity of food without boil-overs or spill-overs. Have the installer show you receive a damaged product, immediately contact your cooktop, follow basic safety precautions, including the following: warning • If you the location of the gas shut off and the power cord...The steam can cause steam burns. 2 Use utensils of the proper size, material and construction for use . • Clean and maintain the cooktop regularly as window treatment. Choose pans with anything except properly selected utensils. Do not allow pots or pans to boil dry. • Use...


