Planning Guides
Page 1
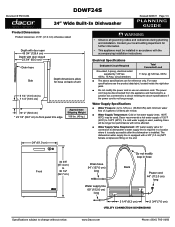
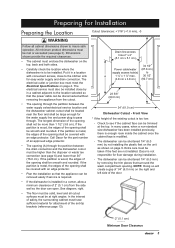
The power cord may be used , washing times will be longer but performance will not be installed in accordance with door closed 23 3/4" (60.3 cm)* Drain hose Side Depth dimensions allow for connection to dishwasher's water supply line is required in hose Back Power cord 44" (112.0 cm) long 3 1/4" (8.3 cm) 2 3/4" (7.0 cm) Utility Connection Dimensions Specifications subject to change without notice. Front 34 3/8" (87.4 cm) to front panel trim edge Approximate Shipping Weight 108 lbs. (49 kg...
The power cord may be used , washing times will be longer but performance will not be installed in accordance with door closed 23 3/4" (60.3 cm)* Drain hose Side Depth dimensions allow for connection to dishwasher's water supply line is required in hose Back Power cord 44" (112.0 cm) long 3 1/4" (8.3 cm) 2 3/4" (7.0 cm) Utility Connection Dimensions Specifications subject to change without notice. Front 34 3/8" (87.4 cm) to front panel trim edge Approximate Shipping Weight 108 lbs. (49 kg...

Planning Guides
Page 2
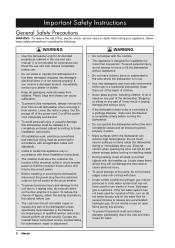
... installation instructions). ■■ The power cable, the drain hose and water supply line must be met or exceeded. The electrical outlet/junction box, water supply valve and drain connection must be at the top. Front View * If the height of the door. clearance ■■ Floor must be removed easily if service is installed in a location with the unit. All cutout surfaces must have sufficient material for easy water supply and drain connection...
... installation instructions). ■■ The power cable, the drain hose and water supply line must be met or exceeded. The electrical outlet/junction box, water supply valve and drain connection must be at the top. Front View * If the height of the door. clearance ■■ Floor must be removed easily if service is installed in a location with the unit. All cutout surfaces must have sufficient material for easy water supply and drain connection...

Planning Guides
Page 3
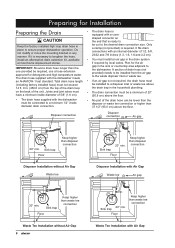
... drain hose supplied with air gap Specifications subject to a disposer inlet or waste tee above the drain trap in the household plumbing. A clamp is not required, the drain hose must be installed to change without air gap Drain connection Sink trap 20" min. www.Dacor.com Phone: (800) 7913-00.0393 Joints and joint tubes must have a minimum inside diameter drain connection. Drain connection 20" min. DDWF24S Document # PG10-004 24" Wide Built-In Dishwasher...
... drain hose supplied with air gap Specifications subject to a disposer inlet or waste tee above the drain trap in the household plumbing. A clamp is not required, the drain hose must be installed to change without air gap Drain connection Sink trap 20" min. www.Dacor.com Phone: (800) 7913-00.0393 Joints and joint tubes must have a minimum inside diameter drain connection. Drain connection 20" min. DDWF24S Document # PG10-004 24" Wide Built-In Dishwasher...

Installation Instructions
Page 2
...Dacor Distinctive Service (repairs under warranty call , have questions or problems with the customer. If you begin the installation process. The model and serial number are subject to 4:00 p.m. Friday 6:00 a.m. Pacific Time Web site: www.Dacor.com Product Data Label Location The product data label is located on Safety Instructions... 1 Safety Symbols and Labels 1 General Safety Precautions 2 Product Specifications 3 Product Dimensions 3 Preparing for Installation 4 Electrical Specifications 4 Water Supply Specifications 4 Preparing the Location 5 Preparing for changes...
...Dacor Distinctive Service (repairs under warranty call , have questions or problems with the customer. If you begin the installation process. The model and serial number are subject to 4:00 p.m. Friday 6:00 a.m. Pacific Time Web site: www.Dacor.com Product Data Label Location The product data label is located on Safety Instructions... 1 Safety Symbols and Labels 1 General Safety Precautions 2 Product Specifications 3 Product Dimensions 3 Preparing for Installation 4 Electrical Specifications 4 Water Supply Specifications 4 Preparing the Location 5 Preparing for changes...
Installation Instructions
Page 4
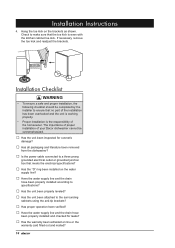
... racks in accordance with these installation instructions. • All installation work, plumbing connections and electrical wiring must show the customer the location of tipping, attach the anti-tip brackets to a garbage disposer, make sure the disposer is completely empty before looking or reaching inside the dishwasher during this dishwasher only for leaks. 2 A qualified service technician should not install, repair or replace any part of the dishwasher unless specifically recommended in use and care manual. Let hot air...
... racks in accordance with these installation instructions. • All installation work, plumbing connections and electrical wiring must show the customer the location of tipping, attach the anti-tip brackets to a garbage disposer, make sure the disposer is completely empty before looking or reaching inside the dishwasher during this dishwasher only for leaks. 2 A qualified service technician should not install, repair or replace any part of the dishwasher unless specifically recommended in use and care manual. Let hot air...
Installation Instructions
Page 6
... 125 p.s.i. (30 - 862 kPa). The water supply line and the shut-off valve must supply a flow volume of at least 3 gallons (12 liters) per minute. • Install a 3/8" water supply valve for connection to the dishwasher's water supply line in accordance with a three prong grounding plug for 120 Vac, 15 Amp. supplied. If the cord is not long enough, or if a hard-wire installation is used , the washing times will be longer, but the performance...
... 125 p.s.i. (30 - 862 kPa). The water supply line and the shut-off valve must supply a flow volume of at least 3 gallons (12 liters) per minute. • Install a 3/8" water supply valve for connection to the dishwasher's water supply line in accordance with a three prong grounding plug for 120 Vac, 15 Amp. supplied. If the cord is not long enough, or if a hard-wire installation is used , the washing times will be longer, but the performance...
Installation Instructions
Page 7
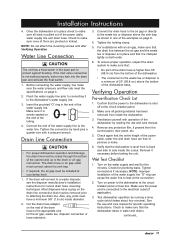
... open. Call Dacor for the part number of 2" (5.1 cm) from the cutout. • The opening (A) through . Drain line access hole 2" x 2" (5.1 cm x 5.1 cm) 34 1/2"* Power cable/water (87.6 cm) supply access hole(s) to see page 3). Dimensions shown provide the required clearances. • The cabinet must be large enough for the water supply line and power plug to the kitchen sink for attachment of safety, the surrounding cabinet must meet the Electrical Specifications...
... open. Call Dacor for the part number of 2" (5.1 cm) from the cutout. • The opening (A) through . Drain line access hole 2" x 2" (5.1 cm x 5.1 cm) 34 1/2"* Power cable/water (87.6 cm) supply access hole(s) to see page 3). Dimensions shown provide the required clearances. • The cabinet must be large enough for the water supply line and power plug to the kitchen sink for attachment of safety, the surrounding cabinet must meet the Electrical Specifications...
Installation Instructions
Page 8
.... A section of drain hose (not provided) needs to be lower than the disposer or waste tee connection or higher than the one provided be cut to the dishwasher. an AHAM DW-1 test standard. Joints and joint tubes must have a minimum inside diameter of 5/8" (1.6 cm). • The drain connection must be connected to a minimum 1/2" inside diameter drain connection. • No part of the drain hose can be installed from the...
.... A section of drain hose (not provided) needs to be lower than the disposer or waste tee connection or higher than the one provided be cut to the dishwasher. an AHAM DW-1 test standard. Joints and joint tubes must have a minimum inside diameter of 5/8" (1.6 cm). • The drain connection must be connected to a minimum 1/2" inside diameter drain connection. • No part of the drain hose can be installed from the...

Installation Instructions
Page 11
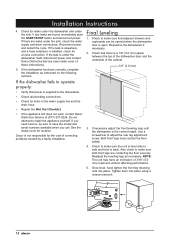
... into place. Remove the cord. location 9 Installation Instructions Level the Dishwasher caution A level unit is the minimum required height. 4. Turn the nuts until the floor of the dishwasher. Check to the kitchen floor when you must remove the supplied power cord. Loosen the retaining nuts on the dishwasher's three steel feet using a level. Otherwise skip to side. Remove the toe kick brackets from the terminal block and ground connection screw inside the access panel. Measure...
... into place. Remove the cord. location 9 Installation Instructions Level the Dishwasher caution A level unit is the minimum required height. 4. Turn the nuts until the floor of the dishwasher. Check to the kitchen floor when you must remove the supplied power cord. Loosen the retaining nuts on the dishwasher's three steel feet using a level. Otherwise skip to side. Remove the toe kick brackets from the terminal block and ground connection screw inside the access panel. Measure...
Installation Instructions
Page 13
..., water may leak into the base pan and activate the float switch. 1. If the inlet valve connection is level front to back and side to the appropriate size for the air gap, waste tee, disposer connection or hose extension. 3. Before connecting the water supply, line make sure none of them are free of the drain hose to side inside the cutout. Also, any protective film, if present from the control panel, door panel...
..., water may leak into the base pan and activate the float switch. 1. If the inlet valve connection is level front to back and side to the appropriate size for the air gap, waste tee, disposer connection or hose extension. 3. Before connecting the water supply, line make sure none of them are free of the drain hose to side inside the cutout. Also, any protective film, if present from the control panel, door panel...
Installation Instructions
Page 14
Installation Instructions 4. Reconnect power and restart the cycle. If the dishwasher fails to operate properly: • Verify that power is level side to side and front to the dishwasher. • Check all plumbing connections. • Check for kinks in the water supply line and the drain hose. • Repeat the Wet Test Checklist. • If the appliance still does not work, contact Dacor Distinctive Service at (877) 337-3226. Reposition...
Installation Instructions 4. Reconnect power and restart the cycle. If the dishwasher fails to operate properly: • Verify that power is level side to side and front to the dishwasher. • Check all plumbing connections. • Check for kinks in the water supply line and the drain hose. • Repeat the Wet Test Checklist. • If the appliance still does not work, contact Dacor Distinctive Service at (877) 337-3226. Reposition...
Installation Instructions
Page 16
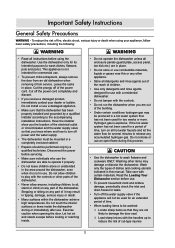
... water supply line and the drain hose been properly installed and checked for cosmetic damage? □□ Has all packaging and literature been removed from the dishwasher? □□ Is the power cable connected to make sure that the toe kick is the responsibility of the installation has been overlooked and the unit is working properly. • Proper installation is even with the kitchen cabinet toe kick...
... water supply line and the drain hose been properly installed and checked for cosmetic damage? □□ Has all packaging and literature been removed from the dishwasher? □□ Is the power cable connected to make sure that the toe kick is the responsibility of the installation has been overlooked and the unit is working properly. • Proper installation is even with the kitchen cabinet toe kick...
Use & Care Manuals
Page 4
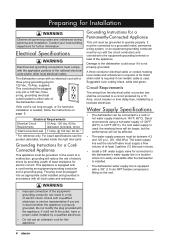
... when opening the door. Important Safety Instructions General Safety Precautions WARNING - This appliance is explosive. If the hot water system has not been used for leaks. • Turn off the power cord completely and discard. • If you are out of dishes and cooking utensils indicated in a hot water system that you know where and how to turn on any part of children. • Use only detergents and rinse agents...
... when opening the door. Important Safety Instructions General Safety Precautions WARNING - This appliance is explosive. If the hot water system has not been used for leaks. • Turn off the power cord completely and discard. • If you are out of dishes and cooking utensils indicated in a hot water system that you know where and how to turn on any part of children. • Use only detergents and rinse agents...
Use & Care Manuals
Page 5
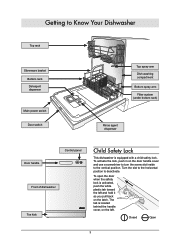
Closed Open 3 The tab is located behind the handle cover, on the left and hold it as you pull back on the door handle cover and use a screwdriver to turn the screw slot inside to deactivate. Getting to Know Your Dishwasher Top rack Silverware basket Bottom rack Detergent dispenser Main power switch Door switch Top spray arm Dish washing compartment Bottom spray arm Filter system (under bottom rack) Rinse agent dispenser Door handle Control panel Front of dishwasher Toe kick Child Safety Lock This dishwasher is activated, push...
Closed Open 3 The tab is located behind the handle cover, on the left and hold it as you pull back on the door handle cover and use a screwdriver to turn the screw slot inside to deactivate. Getting to Know Your Dishwasher Top rack Silverware basket Bottom rack Detergent dispenser Main power switch Door switch Top spray arm Dish washing compartment Bottom spray arm Filter system (under bottom rack) Rinse agent dispenser Door handle Control panel Front of dishwasher Toe kick Child Safety Lock This dishwasher is activated, push...
Use & Care Manuals
Page 12
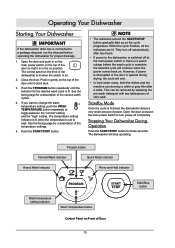
... power. Open the door and push in the on the top of Door 10 Start/Stop button Close the door. See the facing page for three seconds. See the facing page for proper drainage. 1. When the cycle finishes, all the indicators are lit. Standby Mode Once the cycle is connected to toggle between the "normal" setting and the "high" setting. Program button Normal Wash indicator Quick Wash indicator Heavy Wash indicator Rinse and Hold indicator Wash temperature setting indicator Wash Temperature button Control Panel...
... power. Open the door and push in the on the top of Door 10 Start/Stop button Close the door. See the facing page for three seconds. See the facing page for proper drainage. 1. When the cycle finishes, all the indicators are lit. Standby Mode Once the cycle is connected to toggle between the "normal" setting and the "high" setting. Program button Normal Wash indicator Quick Wash indicator Heavy Wash indicator Rinse and Hold indicator Wash temperature setting indicator Wash Temperature button Control Panel...
Use & Care Manuals
Page 13
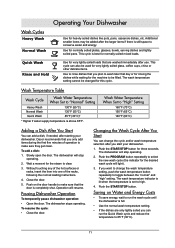
... wash temperature setting, push the wash temperature button repeatedly to make sure they get clean. Wash Temperature Table Wash Cycle Wash Water Temperature When Set to high. 4. The dishwasher stops operating. Changing the Wash Cycle After You Start You can also be filled. Push the PROGRAM button repeatedly to select the new wash cycle (the indicator for the machine to be used for very lightly soiled glass, coffee cups, china or other delicate items. Use to rinse dishes...
... wash temperature setting, push the wash temperature button repeatedly to make sure they get clean. Wash Temperature Table Wash Cycle Wash Water Temperature When Set to high. 4. The dishwasher stops operating. Changing the Wash Cycle After You Start You can also be filled. Push the PROGRAM button repeatedly to select the new wash cycle (the indicator for the machine to be used for very lightly soiled glass, coffee cups, china or other delicate items. Use to rinse dishes...
Use & Care Manuals
Page 14
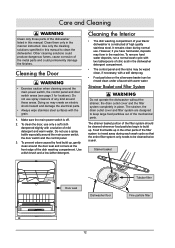
... is rinsed away during normal use a spray bottle especially around the main power switch, the door switch and the control panel. 3. Use only the cleaning solutions specified in this manual to build up in the other parts of the dishwasher listed in this manual. Other cleaning solutions could permanently damage the finishes. Make sure the main power switch is off. 2. Use a dish brush and a low-lather detergent. To remove hard water deposits, run a normal wash cycle...
... is rinsed away during normal use a spray bottle especially around the main power switch, the door switch and the control panel. 3. Use only the cleaning solutions specified in this manual to build up in the other parts of the dishwasher listed in this manual. Other cleaning solutions could permanently damage the finishes. Make sure the main power switch is off. 2. Use a dish brush and a low-lather detergent. To remove hard water deposits, run a normal wash cycle...
Use & Care Manuals
Page 18
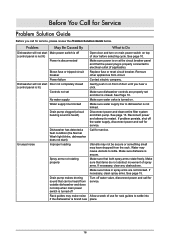
... in spray arms are properly set No water supply Water supply line blocked Drain pump clogged (a loud buzzing sound is heard) Dishwasher has detected a fault condition (the Normal Wash light blinks, dishwasher does not start) Improper loading Spray arms not rotating properly Drain pump makes droning sound that the power plug is not kinked. Disconnect power and clean entire filter system and drain pump. If problem persists, shut off Power is disconnected Blown fuse or tripped circuit breaker Power failure Door not completely closed . Call for rack guides to...
... in spray arms are properly set No water supply Water supply line blocked Drain pump clogged (a loud buzzing sound is heard) Dishwasher has detected a fault condition (the Normal Wash light blinks, dishwasher does not start) Improper loading Spray arms not rotating properly Drain pump makes droning sound that the power plug is not kinked. Disconnect power and clean entire filter system and drain pump. If problem persists, shut off Power is disconnected Blown fuse or tripped circuit breaker Power failure Door not completely closed . Call for rack guides to...
Use & Care Manuals
Page 19
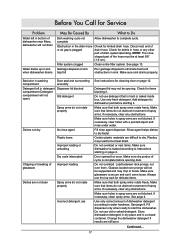
... odor in washing compartment Door seal and surrounding area dirty Detergent left in the drain hose or air gap is hard or caked inside box. Do not use See instructions for cleaning door on page 4. Add detergent to instructions starting it . Door opened too soon. Always use old or caked detergent. Continued.... 17 Make sure that both spray arms rotate freely. Fill rinse agent dispenser. Certain plastic materials are not blocked. Store dishwasher detergent in dry place and...
... odor in washing compartment Door seal and surrounding area dirty Detergent left in the drain hose or air gap is hard or caked inside box. Do not use See instructions for cleaning door on page 4. Add detergent to instructions starting it . Door opened too soon. Always use old or caked detergent. Continued.... 17 Make sure that both spray arms rotate freely. Fill rinse agent dispenser. Certain plastic materials are not blocked. Store dishwasher detergent in dry place and...
Use & Care Manuals
Page 22
... FIRST-YEAR WARRANTY If your encounter with the warranty terms and conditions listed in material or workman-ship, DACOR will furnish a new part, F.O.B. The owner must provide proof of required maintenance. • Service calls to you or subsequent users. For warranty repairs, call: Dacor Distinctive Service: Phone: (877) 337-3226 (U.S.A. Warranty What is Not Covered: • Failure of the product caused by faulty installation, improper usage, or neglect...
... FIRST-YEAR WARRANTY If your encounter with the warranty terms and conditions listed in material or workman-ship, DACOR will furnish a new part, F.O.B. The owner must provide proof of required maintenance. • Service calls to you or subsequent users. For warranty repairs, call: Dacor Distinctive Service: Phone: (877) 337-3226 (U.S.A. Warranty What is Not Covered: • Failure of the product caused by faulty installation, improper usage, or neglect...
