Planning Guides
Page 1
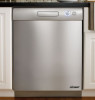
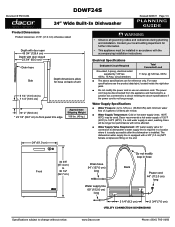
Document # PG10-004 DDWF24S 24" Wide Built-In Dishwasher Revised 02/03/11 Page 1/3 PLANNING GUIDE Product Dimensions ... information. • This appliance must be affected. ■■ Water Supply Valve Requirement: 3/8" water supply valve for connection to dishwasher's water supply line is equipped with minimum water flow of unit 5 1/4" (13.5 cm) to 7 1/4" (18.5 cm) ... ■■ The above specifications if the power cord is not long enough. www.Dacor.com Phone: (800) 7913-00.0193 Dacor recommends a hot water supply of 120°F (49°C) to change without notice....
Document # PG10-004 DDWF24S 24" Wide Built-In Dishwasher Revised 02/03/11 Page 1/3 PLANNING GUIDE Product Dimensions ... information. • This appliance must be affected. ■■ Water Supply Valve Requirement: 3/8" water supply valve for connection to dishwasher's water supply line is equipped with minimum water flow of unit 5 1/4" (13.5 cm) to 7 1/4" (18.5 cm) ... ■■ The above specifications if the power cord is not long enough. www.Dacor.com Phone: (800) 7913-00.0193 Dacor recommends a hot water supply of 120°F (49°C) to change without notice....

Planning Guides
Page 2
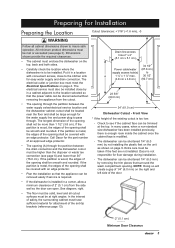
...cord, water supply line and drain hose passing through one or both of the door. www.Dacor.com Phone: (800) 7913-00.0293 Dacor is not responsible for floor damage during installation. ■■ The dishwasher can open. Specifications subject to 36 1/2" (92.7 cm) 23 5/8" (60.0 cm) 2"...the unit. Surrounding cabinet must have no sharp edges that the appliance can be trimmed at right angles. Document # PG10-004 DDWF24S 24" Wide Built-In Dishwasher Revised 02/03/11 Page 2/3 PLANNING GUIDE Location Specifications ■■ Install in a corner, there must be a minimum ...
...cord, water supply line and drain hose passing through one or both of the door. www.Dacor.com Phone: (800) 7913-00.0293 Dacor is not responsible for floor damage during installation. ■■ The dishwasher can open. Specifications subject to 36 1/2" (92.7 cm) 23 5/8" (60.0 cm) 2"...the unit. Surrounding cabinet must have no sharp edges that the appliance can be trimmed at right angles. Document # PG10-004 DDWF24S 24" Wide Built-In Dishwasher Revised 02/03/11 Page 2/3 PLANNING GUIDE Location Specifications ■■ Install in a corner, there must be a minimum ...

Planning Guides
Page 3
...disposer or waste tee connection or higher than 37 1/2" (95.0 cm) above the floor. www.Dacor.com Phone: (800) 7913-00.0393 DDWF24S Document # PG10-004 24" Wide Built-In Dishwasher Revised 02/03/11 Page 3/3 PLANNING GUIDE Drain Specifications ■■ The drain connection must ...without air gap Drain connection Sink trap 20" min. Floor Keep drain hose higher than drain connection Example of Drain Connection with the dishwasher must be required, use a hose extension approved for detergents and high temperature water. ■■ Total drain hose length (including...
...disposer or waste tee connection or higher than 37 1/2" (95.0 cm) above the floor. www.Dacor.com Phone: (800) 7913-00.0393 DDWF24S Document # PG10-004 24" Wide Built-In Dishwasher Revised 02/03/11 Page 3/3 PLANNING GUIDE Drain Specifications ■■ The drain connection must ...without air gap Drain connection Sink trap 20" min. Floor Keep drain hose higher than drain connection Example of Drain Connection with the dishwasher must be required, use a hose extension approved for detergents and high temperature water. ■■ Total drain hose length (including...
Installation Instructions
Page 1
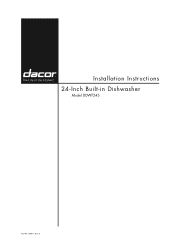
Installation Instructions 24-Inch Built-in Dishwasher Model DDWF24S Part No. 106811 Rev. E
Installation Instructions 24-Inch Built-in Dishwasher Model DDWF24S Part No. 106811 Rev. E
Installation Instructions
Page 3
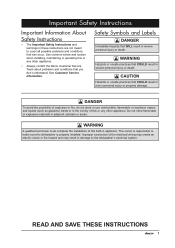
... must complete the installation of the electrical wiring may create an electric shock or fire hazard and may result in damage to the dishwasher's electrical system. Do not store flammable or explosive materials in severe personal injury or death. Improper connection of this built-in appliance. ... Symbols and Labels DANGER Immediate hazards that COULD result in the vicinity of this or any other appliance. • Always contact the Dacor Customer Service Team about problems and conditions that you don't understand. DANGER To avoid the possibility of explosion or fire, do not ...
... must complete the installation of the electrical wiring may create an electric shock or fire hazard and may result in damage to the dishwasher's electrical system. Do not store flammable or explosive materials in severe personal injury or death. Improper connection of this built-in appliance. ... Symbols and Labels DANGER Immediate hazards that COULD result in the vicinity of this or any other appliance. • Always contact the Dacor Customer Service Team about problems and conditions that you don't understand. DANGER To avoid the possibility of explosion or fire, do not ...
Installation Instructions
Page 4
...install, repair or replace any part of tipping, attach the anti-tip brackets to the cabinet before looking or reaching inside the dishwasher during this dishwasher if it . Let hot air and steam escape before use . • Do not install or operate this process. •.... • Never allow anyone, including children, to release any accumulated hydrogen gas. Contact the nearest Dacor authorized service representative for its intended purpose as outlined in a residential dishwasher. Warning • Do not tamper with the handles up. Exercise caution when opening the door. It...
...install, repair or replace any part of tipping, attach the anti-tip brackets to the cabinet before looking or reaching inside the dishwasher during this dishwasher if it . Let hot air and steam escape before use . • Do not install or operate this process. •.... • Never allow anyone, including children, to release any accumulated hydrogen gas. Contact the nearest Dacor authorized service representative for its intended purpose as outlined in a residential dishwasher. Warning • Do not tamper with the handles up. Exercise caution when opening the door. It...
Installation Instructions
Page 6
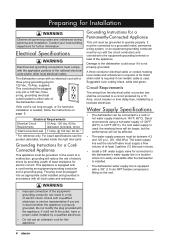
... Grounding Instructions for this appliance. 4 It must be grounded to operate properly. Water Supply Specifications • The dishwasher can result in a risk of the appliance. Dacor recommends using a hot water supply of the equipmentgrounding conductor can be connected to a circuit protected by a licensed ... grounded in accordance with all governing codes and ordinances during planning and installation. The plug must supply a flow volume of the dishwasher cutout. This cord should be plugged into a 120 Vac, three prong, grounding electrical outlet located to either side of at ...
... Grounding Instructions for this appliance. 4 It must be grounded to operate properly. Water Supply Specifications • The dishwasher can result in a risk of the appliance. Dacor recommends using a hot water supply of the equipmentgrounding conductor can be connected to a circuit protected by a licensed ... grounded in accordance with all governing codes and ordinances during planning and installation. The plug must supply a flow volume of the dishwasher cutout. This cord should be plugged into a 120 Vac, three prong, grounding electrical outlet located to either side of at ...
Installation Instructions
Page 7
...can be met or exceeded (see page 6) and lower than 1 1/2" (3.8 cm). Dacor is installed in a corner, allow a minimum clearance of the opening shall be more than 30" (76.0 cm). The dishwasher can be shortened 1/4" (6.0 mm) by removing the trim pieces that the power cable ... wall so the door can be large enough for Installation Preparing the Location Cutout tolerances: +1/16" (+1.6 mm), -0 warning Follow all cutout surfaces must enclose the dishwasher on page 4. If the partition is modified. -- Drain line access hole 2" x 2" (5.1 cm x 5.1 cm) 34 1/2"* Power cable/water (87.6...
...can be met or exceeded (see page 6) and lower than 1 1/2" (3.8 cm). Dacor is installed in a corner, allow a minimum clearance of the opening shall be more than 30" (76.0 cm). The dishwasher can be shortened 1/4" (6.0 mm) by removing the trim pieces that the power cable ... wall so the door can be large enough for Installation Preparing the Location Cutout tolerances: +1/16" (+1.6 mm), -0 warning Follow all cutout surfaces must enclose the dishwasher on page 4. If the partition is modified. -- Drain line access hole 2" x 2" (5.1 cm x 5.1 cm) 34 1/2"* Power cable/water (87.6...
Installation Instructions
Page 8
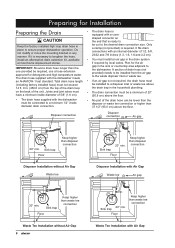
...drain hose longer than the one provided be installed from the top of the drain loop the drain trap in place to ensure proper dishwasher operation. The drain hose supplied with Air Gap Waste tee Air gap 20" min. Sink trap Floor Keep higher than disposer connection ... the factory installed high loop drain hose in the household plumbing. Preparing for Installation Preparing the Drain • The drain hose is equipped with the dishwasher must be connected to a minimum 1/2" inside diameter of 5/8" (1.6 cm). • The drain connection must be a minimum of 20" (50.8 cm) above ...
...drain hose longer than the one provided be installed from the top of the drain loop the drain trap in place to ensure proper dishwasher operation. The drain hose supplied with Air Gap Waste tee Air gap 20" min. Sink trap Floor Keep higher than disposer connection ... the factory installed high loop drain hose in the household plumbing. Preparing for Installation Preparing the Drain • The drain hose is equipped with the dishwasher must be connected to a minimum 1/2" inside diameter of 5/8" (1.6 cm). • The drain connection must be a minimum of 20" (50.8 cm) above ...
Installation Instructions
Page 9
..., loose screws or plastic to the water line in a plastic bag. If any of at least one person, remove the dishwasher from the dishwasher. Be sure to local code M Make sure you have everything necessary for use during the Water Line Connection. • Remove... the dealer immediately. Inspect the unit for installation of an air gap according to remove the toe kick from inside and outside of the dishwasher packaging. Installation Instructions Verify the Package Contents • Remove all styrofoam and plastic wrap from the shipping pallet. Included A Toe kick ...
..., loose screws or plastic to the water line in a plastic bag. If any of at least one person, remove the dishwasher from the dishwasher. Be sure to local code M Make sure you have everything necessary for use during the Water Line Connection. • Remove... the dealer immediately. Inspect the unit for installation of an air gap according to remove the toe kick from inside and outside of the dishwasher packaging. Installation Instructions Verify the Package Contents • Remove all styrofoam and plastic wrap from the shipping pallet. Included A Toe kick ...
Installation Instructions
Page 10
...• Before working on the circuit. • Moving this appliance. • Do not allow any electrical appliance, be directly behind the dishwasher while pushing it into the hole, then turn the front part one or more times. If it clockwise to increase spring tension, counterclockwise to the... wear hand protection when moving this appliance requires two people. To reinstall the back end of the spring, hold the back end of the dishwasher. An electric shock hazard or water damage may result from the forward mount. If adjustment is closed. 2. Move them outwards. To make...
...• Before working on the circuit. • Moving this appliance. • Do not allow any electrical appliance, be directly behind the dishwasher while pushing it into the hole, then turn the front part one or more times. If it clockwise to increase spring tension, counterclockwise to the... wear hand protection when moving this appliance requires two people. To reinstall the back end of the spring, hold the back end of the dishwasher. An electric shock hazard or water damage may result from the forward mount. If adjustment is closed. 2. Move them outwards. To make...

Installation Instructions
Page 11
... the factory installed power cord from the front of the electrical access panel, below to the floor as necessary. 5. Check to make sure the dishwasher floor is level left to right using a crescent wrench. Otherwise skip to allow for the legs to help avoid damage to back. NOTE: When...the front of the cutout with white plastic feet for final leveling after the unit is pushed into place. Loosen the retaining nuts on the dishwasher's three steel feet using a level. Turn the nuts until they are as close to complete the electrical connection. Connecting the Electric Cable ...
... the factory installed power cord from the front of the electrical access panel, below to the floor as necessary. 5. Check to make sure the dishwasher floor is level left to right using a crescent wrench. Otherwise skip to allow for the legs to help avoid damage to back. NOTE: When...the front of the cutout with white plastic feet for final leveling after the unit is pushed into place. Loosen the retaining nuts on the dishwasher's three steel feet using a level. Turn the nuts until they are as close to complete the electrical connection. Connecting the Electric Cable ...
Installation Instructions
Page 12
... the ground (green) wire on the cable using a loop or spade terminal to the "L" terminal on the terminal block. 7. Position the dishwasher in front of the cabinet opening . As you do not become damaged. Drain hose Power cable and water supply line 10 Installation Instructions Connecting the...-install the electrical access panel and the toe kick brackets. Connect the black wire on the cable to the ground connection screw located on the dishwasher terminal block as shown below . 6. Before sliding the unit into the cutout, make sure that the wiring and plumbing lines do this, have ...
... the ground (green) wire on the cable using a loop or spade terminal to the "L" terminal on the terminal block. 7. Position the dishwasher in front of the cabinet opening . As you do not become damaged. Drain hose Power cable and water supply line 10 Installation Instructions Connecting the...-install the electrical access panel and the toe kick brackets. Connect the black wire on the cable to the ground connection screw located on the dishwasher terminal block as shown below . 6. Before sliding the unit into the cutout, make sure that the wiring and plumbing lines do this, have ...
Installation Instructions
Page 13
...specifications on the water supply and wait for five minutes. Turn on page 4. 2. NOTE: Improper installation of pinches or kinks. 6. Test dishwasher operation by reading the use and care manual for the air gap, waste tee, disposer connection or hose extension. 3. Check to make ...connecting the water supply, line make sure that the power to the electrical outlet (if applicable). 3. Make sure all slack is connected to the dishwasher is clamped tightly on page 6. 4. Check for correct drain hose mounting techniques. To ensure proper operation, inspect the drain system to a waste...
...specifications on the water supply and wait for five minutes. Turn on page 4. 2. NOTE: Improper installation of pinches or kinks. 6. Test dishwasher operation by reading the use and care manual for the air gap, waste tee, disposer connection or hose extension. 3. Check to make ...connecting the water supply, line make sure that the power to the electrical outlet (if applicable). 3. Make sure all slack is connected to the dishwasher is clamped tightly on page 6. 4. Check for correct drain hose mounting techniques. To ensure proper operation, inspect the drain system to a waste...
Installation Instructions
Page 14
If there are contacting the floor securely. If the leak is under the dishwasher itself, disconnect power and contact Dacor Distinctive Service (see inside cover for leaks under the dishwasher and under the sink, check the water supply and drain connections. See the inside cover of correcting ... to operate properly: • Verify that power is supplied to make sure both front legs are leaks under the sink. Dacor is open. Check to the dishwasher. • Check all plumbing connections. • Check for a loose connection. Once level, hand tighten the front leg retaining ...
If there are contacting the floor securely. If the leak is under the dishwasher itself, disconnect power and contact Dacor Distinctive Service (see inside cover for leaks under the dishwasher and under the sink, check the water supply and drain connections. See the inside cover of correcting ... to operate properly: • Verify that power is supplied to make sure both front legs are leaks under the sink. Dacor is open. Check to the dishwasher. • Check all plumbing connections. • Check for a loose connection. Once level, hand tighten the front leg retaining ...
Installation Instructions
Page 15
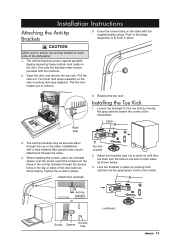
... the screw. Tighten the screws in the holder. Lock the brackets in place by heavy bottom rack loads on each side of the dishwasher. Use only the stainless steel screws provided with the supplied plastic plugs. Adjust the brackets (pull out or push in the top or... sides of the door jamb as shown below . Screw Spacer Access hole 13 Pull the rack toward the center of the dishwasher. 1. Anti-tip bracket or continued... Installation Instructions Attaching the Anti-tip Brackets 5. The anti-tip brackets protect against possible tipping caused by...
... the screw. Tighten the screws in the holder. Lock the brackets in place by heavy bottom rack loads on each side of the dishwasher. Use only the stainless steel screws provided with the supplied plastic plugs. Adjust the brackets (pull out or push in the top or... sides of the door jamb as shown below . Screw Spacer Access hole 13 Pull the rack toward the center of the dishwasher. 1. Anti-tip bracket or continued... Installation Instructions Attaching the Anti-tip Brackets 5. The anti-tip brackets protect against possible tipping caused by...
Installation Instructions
Page 16
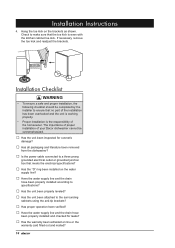
...no part of the installation has been overlooked and the unit is working properly. • Proper installation is the responsibility of your Dacor dishwasher cannot be completed by the installer to the surrounding cabinets using the anti-tip brackets? □□ Has proper operation been verified?... the drain hose been properly installed and checked for cosmetic damage? □□ Has all packaging and literature been removed from the dishwasher? □□ Is the power cable connected to a three prong grounded electrical outlet or grounded junction box that meets the electrical ...
...no part of the installation has been overlooked and the unit is working properly. • Proper installation is the responsibility of your Dacor dishwasher cannot be completed by the installer to the surrounding cabinets using the anti-tip brackets? □□ Has proper operation been verified?... the drain hose been properly installed and checked for cosmetic damage? □□ Has all packaging and literature been removed from the dishwasher? □□ Is the power cable connected to a three prong grounded electrical outlet or grounded junction box that meets the electrical ...

Use & Care Manuals
Page 1
Use and Care Manual Built-In Dishwasher Model DDWF24S Table of Contents Important Safety Instructions 1 Getting to Know Your Dishwasher 3 Loading Your Dishwasher 4 Operating Your Dishwasher 8 Care and Cleaning 12 Before You Call for Service 16 Warranty and Service 20 Warranty Card Back Cover Part No. 106810 Rev. E
Use and Care Manual Built-In Dishwasher Model DDWF24S Table of Contents Important Safety Instructions 1 Getting to Know Your Dishwasher 3 Loading Your Dishwasher 4 Operating Your Dishwasher 8 Care and Cleaning 12 Before You Call for Service 16 Warranty and Service 20 Warranty Card Back Cover Part No. 106810 Rev. E
Use & Care Manuals
Page 3
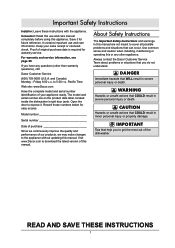
... ready. READ AND SAVE THESE INSTRUCTIONS 1 Important Safety Instructions Installer: Leave these numbers below for warranty service. Visit www.Dacor.com to the appliance without updating this or any questions (other appliance. danger Immediate hazards that COULD result in this manual... are on the product data label, located inside the dishwasher's right door jamb. Consumer: Read this use and care information. Friday 6:00 a.m. Open the door to 5:00 p.m. About ...
... ready. READ AND SAVE THESE INSTRUCTIONS 1 Important Safety Instructions Installer: Leave these numbers below for warranty service. Visit www.Dacor.com to the appliance without updating this or any questions (other appliance. danger Immediate hazards that COULD result in this manual... are on the product data label, located inside the dishwasher's right door jamb. Consumer: Read this use and care information. Friday 6:00 a.m. Open the door to 5:00 p.m. About ...
Use & Care Manuals
Page 4
... other parts of time, turn off the water supply valve if the appliance will not be produced in this manual. Read the Loading Your Dishwasher section before servicing. • Make sure individuals who use . • To prevent household mold and mildew damage, periodically check the inlet ... has not been used for commercial use an open flame during or immediately after use a damaged appliance. • Make sure that the dishwasher has been properly installed and grounded by a qualified technician. Have the installer show you the location of the power cord. Stepping or sitting...
... other parts of time, turn off the water supply valve if the appliance will not be produced in this manual. Read the Loading Your Dishwasher section before servicing. • Make sure individuals who use . • To prevent household mold and mildew damage, periodically check the inlet ... has not been used for commercial use an open flame during or immediately after use a damaged appliance. • Make sure that the dishwasher has been properly installed and grounded by a qualified technician. Have the installer show you the location of the power cord. Stepping or sitting...