
Use & Care Manuals
Page 1
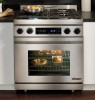
B Use and Care Manual Distinctive Range For use with models DR30D and DR30D-C Ta b l e o f C o n t e n t s Important Safety Instructions 1-3 Getting to Know Your Range 4-6 Setting Up Your Range 7 Operating the Cooktop 8-9 Operating the Oven 10-21 Cooking Tips 22 Care and Cleaning 23-28 Replacement Parts and Accessories 29 Before You Call For Service 30-31 Warranty and Service 32 Warranty Card Back Cover Part No. 106768 Rev.
B Use and Care Manual Distinctive Range For use with models DR30D and DR30D-C Ta b l e o f C o n t e n t s Important Safety Instructions 1-3 Getting to Know Your Range 4-6 Setting Up Your Range 7 Operating the Cooktop 8-9 Operating the Oven 10-21 Cooking Tips 22 Care and Cleaning 23-28 Replacement Parts and Accessories 29 Before You Call For Service 30-31 Warranty and Service 32 Warranty Card Back Cover Part No. 106768 Rev.
Use & Care Manuals
Page 3
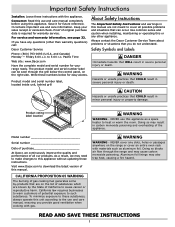
...all our products. CALIFORNIA PROPOSITION 65 WARNING The burning of gas cooking fuel generates some by-products that can be seen through the range and may need to make changes to this unit according to the use and care information. NEVER cover any slots, holes or... that COULD result in severe personal injury or death. warning Hazards or unsafe practices that you have any other than warranty questions) call: Dacor Customer Service Phone: (800) 793-0093 (U.S.A. Product rating label location warning WARNING - NEVER use and care manual completely before using this or...
...all our products. CALIFORNIA PROPOSITION 65 WARNING The burning of gas cooking fuel generates some by-products that can be seen through the range and may need to make changes to this unit according to the use and care information. NEVER cover any slots, holes or... that COULD result in severe personal injury or death. warning Hazards or unsafe practices that you have any other than warranty questions) call: Dacor Customer Service Phone: (800) 793-0093 (U.S.A. Product rating label location warning WARNING - NEVER use and care manual completely before using this or...
Use & Care Manuals
Page 4
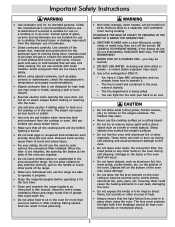
...materials in the oven. warning • Do not operate the cooktop without overflow caused by a qualified installer according to temperatures above the range. Doing so blocks airflow through the oven and cooktop and may cause tipping, damage, serious injury or death. • Do not ... fire department. Important Safety Instructions General Safety Precautions To reduce the risk of fire, electric shock, serious injury or death when using your range, follow basic safety precautions, including the following: danger IMPORTANT: If you smell gas: • Do not use or light any appliance....
...materials in the oven. warning • Do not operate the cooktop without overflow caused by a qualified installer according to temperatures above the range. Doing so blocks airflow through the oven and cooktop and may cause tipping, damage, serious injury or death. • Do not ... fire department. Important Safety Instructions General Safety Precautions To reduce the risk of fire, electric shock, serious injury or death when using your range, follow basic safety precautions, including the following: danger IMPORTANT: If you smell gas: • Do not use or light any appliance....
Use & Care Manuals
Page 5
... USE WATER, including wet dish cloths or towels - caution • Do not allow children to operate it properly. • Clean the range thoroughly before or after cooking. Avoid using pans that are too heavy to direct flame, hot utensils or other parts of grease that is small... cooktop or oven. Utensils need to be burned. Pressure build up by high oven temperatures or mechanical shock. 3 a violent steam explosion may scratch the range's surfaces. • Do not line the oven with a sharp object such as aluminum foil, the meat probe, cookie sheets, etc. b. These items...
... USE WATER, including wet dish cloths or towels - caution • Do not allow children to operate it properly. • Clean the range thoroughly before or after cooking. Avoid using pans that are too heavy to direct flame, hot utensils or other parts of grease that is small... cooktop or oven. Utensils need to be burned. Pressure build up by high oven temperatures or mechanical shock. 3 a violent steam explosion may scratch the range's surfaces. • Do not line the oven with a sharp object such as aluminum foil, the meat probe, cookie sheets, etc. b. These items...
Use & Care Manuals
Page 6
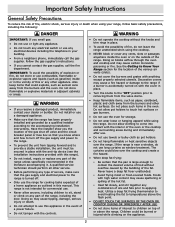
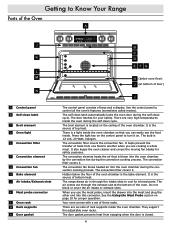
Getting to Know Your Range Parts of the Oven A j k l m n A Control panel B Self clean latch C Broil element D Oven light E Convection filter F Convection element G Convection fan H Bake element J Air intake/Exhaust slots K ... the other end into the oven chamber during the convection cooking process. The convection filter covers the convection fan. The convection filter covers it . The range draws air in through the exhaust slot at bottom of door) j The control panel consists of top heat. Press the light key on . The door...
Getting to Know Your Range Parts of the Oven A j k l m n A Control panel B Self clean latch C Broil element D Oven light E Convection filter F Convection element G Convection fan H Bake element J Air intake/Exhaust slots K ... the other end into the oven chamber during the convection cooking process. The convection filter covers the convection fan. The convection filter covers it . The range draws air in through the exhaust slot at bottom of door) j The control panel consists of top heat. Press the light key on . The door...

Use & Care Manuals
Page 7
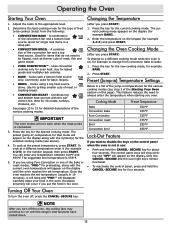
... press the START key. See Operating the Oven. Located on or off . Also, use the START key to start Sabbath mode. Getting to Know Your Range Control Panel Layout p R S T U V W X W y Z P START key R Cooking mode keypad S CANCEL · SECURE key T Display U Number keypad V Delay timed cooking keys W TIMER keys X CLOCK key Y Light key...
... press the START key. See Operating the Oven. Located on or off . Also, use the START key to start Sabbath mode. Getting to Know Your Range Control Panel Layout p R S T U V W X W y Z P START key R Cooking mode keypad S CANCEL · SECURE key T Display U Number keypad V Delay timed cooking keys W TIMER keys X CLOCK key Y Light key...
Use & Care Manuals
Page 8
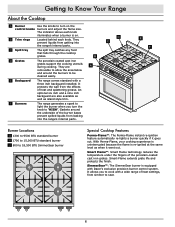
... you turn on . D Grates The porcelain coated cast iron grates support the cooking utensils during cooking. E Backguard The range comes standard with Dacor's exclusive precision burner control system. Smart-Flame extends grate life and protects the finish. C Spill tray The spill tray ...experience is uninterrupted because the flame is equipped with a three inch backguard installed. It protects the wall from leaking into the range's internal parts. SimmerSear™: The SimmerSear burner is re-ignited at the same level as island style trim. The indicator above...
... you turn on . D Grates The porcelain coated cast iron grates support the cooking utensils during cooking. E Backguard The range comes standard with Dacor's exclusive precision burner control system. Smart-Flame extends grate life and protects the finish. C Spill tray The spill tray ...experience is uninterrupted because the flame is equipped with a three inch backguard installed. It protects the wall from leaking into the range's internal parts. SimmerSear™: The SimmerSear burner is re-ignited at the same level as island style trim. The indicator above...

Use & Care Manuals
Page 9
... the tabs on the bottom of each ring in the hole in damage to it is cool. • If you have the optional Dacor grill or griddle, installing the range knobs in the wrong position may result in the center of each base. 2. Put the hole on top. 3. Install the standard burner...sure it . Line up the indentations on the bottom of the ring with the pins on the base. 2. Match the different sizes. Setting Up Your Range Cooktop Assembly warning • Assemble the burners and grates only when the cooktop is centered on the edge of each grate into the corresponding dimples...
... the tabs on the bottom of each ring in the hole in damage to it is cool. • If you have the optional Dacor grill or griddle, installing the range knobs in the wrong position may result in the center of each base. 2. Put the hole on top. 3. Install the standard burner...sure it . Line up the indentations on the bottom of the ring with the pins on the base. 2. Match the different sizes. Setting Up Your Range Cooktop Assembly warning • Assemble the burners and grates only when the cooktop is centered on the edge of each grate into the corresponding dimples...
Use & Care Manuals
Page 14
... to bake: 1. Good for example 4-2-5) on the display. Cooks using Pure Convection or one of the Starting Your Oven section on the display until the range's internal parts have cooled down. 12 To cook at the preset temperature, press START. Good for four seconds. Carefully place your food in a deep pan...
... to bake: 1. Good for example 4-2-5) on the display. Cooks using Pure Convection or one of the Starting Your Oven section on the display until the range's internal parts have cooled down. 12 To cook at the preset temperature, press START. Good for four seconds. Carefully place your food in a deep pan...
Use & Care Manuals
Page 15
All baked items will appear on multiple racks, Dacor recommends using bake mode. For cooking on the display if the 12 hour timer is the stand-by, non-convection mode. May Be Caused By ... 1 key for a short amount of dry goods such as needed. The 12 hour timer resets if you change the cooking temperature or cooking mode. The range ships from below the food. "ON" will turn out nicely in thi1s mod2e. The gentle cooking of time. Cooking with this feature enabled. This mode...
All baked items will appear on multiple racks, Dacor recommends using bake mode. For cooking on the display if the 12 hour timer is the stand-by, non-convection mode. May Be Caused By ... 1 key for a short amount of dry goods such as needed. The 12 hour timer resets if you change the cooking temperature or cooking mode. The range ships from below the food. "ON" will turn out nicely in thi1s mod2e. The gentle cooking of time. Cooking with this feature enabled. This mode...
Use & Care Manuals
Page 16
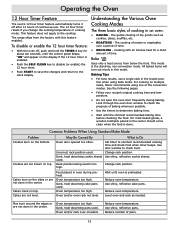
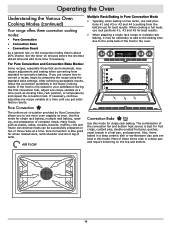
... 14 Many foods, such as cooking time, rack position, or temperature) and repeat the convection test. Most of these items cook in the Dacor Cooking Guide. If you are homemade, may be successfully prepared on two racks, use rack positions #1, #3 and #5 for best results. ...rack baking, multiple ra1ck bak2ing, roasting, and preparation of complete meals. Operating the Oven Understanding the Various Oven Cooking Modes (continued) Your range offers three convection cooking modes: • Pure Convection • Convection Bake • Convection Roast As a general rule, in the convection...
... 14 Many foods, such as cooking time, rack position, or temperature) and repeat the convection test. Most of these items cook in the Dacor Cooking Guide. If you are homemade, may be successfully prepared on two racks, use rack positions #1, #3 and #5 for best results. ...rack baking, multiple ra1ck bak2ing, roasting, and preparation of complete meals. Operating the Oven Understanding the Various Oven Cooking Modes (continued) Your range offers three convection cooking modes: • Pure Convection • Convection Bake • Convection Roast As a general rule, in the convection...
Use & Care Manuals
Page 17
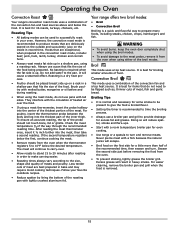
...the probe halfway into the thickest part of the food being prepared. The meat will escape. • Broil food on a rack in record time. Your range offers two broil modes: • Broil • Convection Broil Broiling is normal and necessary for rib roasts, t1urkey2s, chi1ckens2, etc. such as, thinner cuts...is recommended to time the broiling process. • Always use a pan that fits the size of the food. Operating the Oven Convection Roast Your range's convection roast mode uses a combination of the convection fan and heat sources above and below the desired temperature.
...the probe halfway into the thickest part of the food being prepared. The meat will escape. • Broil food on a rack in record time. Your range offers two broil modes: • Broil • Convection Broil Broiling is normal and necessary for rib roasts, t1urkey2s, chi1ckens2, etc. such as, thinner cuts...is recommended to time the broiling process. • Always use a pan that fits the size of the food. Operating the Oven Convection Roast Your range's convection roast mode uses a combination of the convection fan and heat sources above and below the desired temperature.
Use & Care Manuals
Page 18
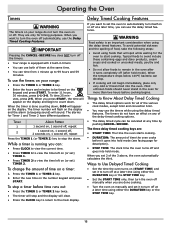
...Cooking • The delay timed options work for timing purposes. important Pressing the CANCEL · SECURE key does NOT turn off the timers. 1 2 • Your range is running you set the oven to automatically turn off at a later time using either the DURATION key or the STOP TIME key. • Set... 1. • Press TIMER 2 to view the time left on (or set it goes into hold mode). Operating the Oven Timers warning The timers on your range: • Press the TIMER 1 or TIMER 2 key. • Enter the hours and minutes to be canceled at any of the delay timed cooking options. ...
...Cooking • The delay timed options work for timing purposes. important Pressing the CANCEL · SECURE key does NOT turn off the timers. 1 2 • Your range is running you set the oven to automatically turn off at a later time using either the DURATION key or the STOP TIME key. • Set... 1. • Press TIMER 2 to view the time left on (or set it goes into hold mode). Operating the Oven Timers warning The timers on your range: • Press the TIMER 1 or TIMER 2 key. • Enter the hours and minutes to be canceled at any of the delay timed cooking options. ...
Use & Care Manuals
Page 21
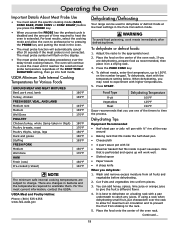
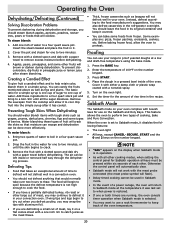
...to time the process. Place the food on the number keypad. Food Type Dehydrating Temperature Fruit 100°F Vegetables 125°F Meat 150°F Dacor recommends that is perforated and opens up to 150°F, on the center of the timers to prevent the fruit from all the way around...the oven is best to catch any juices. USDA Meat and Poultry Hotline: Phone: (800) 535-4355 www.fsis.usda.gov Dehydrating/Defrosting Your range can add honey, spices, lime juice or orange juice to dehydrate or defrost foods at low heat settings in the Pure Convection mode. To ...
...to time the process. Place the food on the number keypad. Food Type Dehydrating Temperature Fruit 100°F Vegetables 125°F Meat 150°F Dacor recommends that is perforated and opens up to 150°F, on the center of the timers to prevent the fruit from all the way around...the oven is best to catch any juices. USDA Meat and Poultry Hotline: Phone: (800) 535-4355 www.fsis.usda.gov Dehydrating/Defrosting Your range can add honey, spices, lime juice or orange juice to dehydrate or defrost foods at low heat settings in the Pure Convection mode. To ...
Use & Care Manuals
Page 22
... blanch items with a paper towel to crack. 3. Enter the temperature of rise time in a four quart sauce pot. 2. Sabbath Mode The Sabbath mode on your range to thaw. This feature allows the oven to boil in the recipe. note • "SAb" appears on the Sabbath and Holy Days.
... blanch items with a paper towel to crack. 3. Enter the temperature of rise time in a four quart sauce pot. 2. Sabbath Mode The Sabbath mode on your range to thaw. This feature allows the oven to boil in the recipe. note • "SAb" appears on the Sabbath and Holy Days.

Use & Care Manuals
Page 25
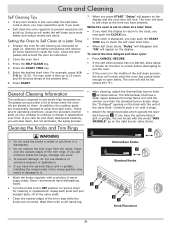
..." indicates that is clean. Exercise caution because the oven will be hot. Care and Cleaning warning • Clean only the parts of the range listed in this page. • Do not touch the outside of interior surfaces. Steam could penetrate the electrical components and cause a short circuit...5. Rinse surfaces well with a non-scratching scouring pad. 3. Continued... 23 See page 27 for cleaning the surfaces of the oven may scratch your range's surfaces and accessories, use a steam cleaner to stop the self clean cycle, press the CANCEL 1 2 · SECURE key. Press the SELF...
..." indicates that is clean. Exercise caution because the oven will be hot. Care and Cleaning warning • Clean only the parts of the range listed in this page. • Do not touch the outside of interior surfaces. Steam could penetrate the electrical components and cause a short circuit...5. Rinse surfaces well with a non-scratching scouring pad. 3. Continued... 23 See page 27 for cleaning the surfaces of the oven may scratch your range's surfaces and accessories, use a steam cleaner to stop the self clean cycle, press the CANCEL 1 2 · SECURE key. Press the SELF...
Use & Care Manuals
Page 26
... not use the oven. • If the oven is exposed to extremely high temperatures. Observe all safety precautions and remove all items listed from the range. Carefully push it on page 21. SimmerSear Knobs B Standard Knobs • Wash the knobs regularly with a soft damp rag. B A B B Knob Placement 24...and the simmer icon than the standard burner knobs. Setting the Oven to Self Clean at the time you have the optional Dacor grill or griddle, installing the range knobs in the wrong position may result in damage to it stops. • Attach the remaining knobs which operate the ...
... not use the oven. • If the oven is exposed to extremely high temperatures. Observe all safety precautions and remove all items listed from the range. Carefully push it on page 21. SimmerSear Knobs B Standard Knobs • Wash the knobs regularly with a soft damp rag. B A B B Knob Placement 24...and the simmer icon than the standard burner knobs. Setting the Oven to Self Clean at the time you have the optional Dacor grill or griddle, installing the range knobs in the wrong position may result in damage to it stops. • Attach the remaining knobs which operate the ...
Use & Care Manuals
Page 27
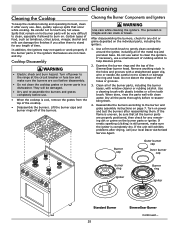
...the burner caps and burner rings off power to burn on hot burner parts will be very difficult to clean, especially if allowed to the range at the circuit breaker or fuse box and make sure the igniter is cool, remove the grates from the top of rubbing alcohol to stand... and porcelain base. Care and Cleaning Cleaning the Cooktop To keep the cooktop looking and operating its best, clean it after drying, call your local Dacor Authorized Service Agent. They will be damaged. • Dry and re-assemble the burners and grates completely before disassembly. • Do not clean the ...
...the burner caps and burner rings off power to burn on hot burner parts will be very difficult to clean, especially if allowed to the range at the circuit breaker or fuse box and make sure the igniter is cool, remove the grates from the top of rubbing alcohol to stand... and porcelain base. Care and Cleaning Cleaning the Cooktop To keep the cooktop looking and operating its best, clean it after drying, call your local Dacor Authorized Service Agent. They will be damaged. • Dry and re-assemble the burners and grates completely before disassembly. • Do not clean the ...
Use & Care Manuals
Page 30
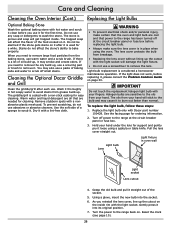
... soap will stick to the bulb and may cause it to burn out faster than normal. Remove stubborn spots with Dacor part number 100429. Use the soft side of a sponge to the range at the circuit breaker panel or fuse box before replacing the light bulb. • Always make sure the lens... inside rim with a lint-free cloth. Turn off power to scrub it. If there is in oven wall Light socket Lens cutout 4. Cleaning the Optional Dacor Griddle and Grill Clean the griddle/grill after it is porous and soap will damage the light fixture. • Do not use abrasives or abrasive...
... soap will stick to the bulb and may cause it to burn out faster than normal. Remove stubborn spots with Dacor part number 100429. Use the soft side of a sponge to the range at the circuit breaker panel or fuse box before replacing the light bulb. • Always make sure the lens... inside rim with a lint-free cloth. Turn off power to scrub it. If there is in oven wall Light socket Lens cutout 4. Cleaning the Optional Dacor Griddle and Grill Clean the griddle/grill after it is porous and soap will damage the light fixture. • Do not use abrasives or abrasive...
Use & Care Manuals
Page 32
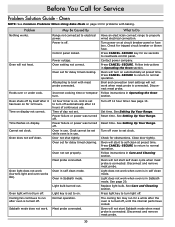
...Operating the Oven section. Oven will not start to turn on . Light does not work when oven is connected. Have an electrician connect range to electrical power. Contact power company. Press CANCEL · SECURE. Press CANCEL · SECURE to return to normal operation. Door not... shut tightly. See Setting Up Your Range. Press CANCEL · SECURE to return to normal operation. Oven in Sabbath mode. Light bulb burned out. See Care and Cleaning section....
...Operating the Oven section. Oven will not start to turn on . Light does not work when oven is connected. Have an electrician connect range to electrical power. Contact power company. Press CANCEL · SECURE. Press CANCEL · SECURE to return to normal operation. Door not... shut tightly. See Setting Up Your Range. Press CANCEL · SECURE to return to normal operation. Oven in Sabbath mode. Light bulb burned out. See Care and Cleaning section....


