Use & Care Manuals
Page 3
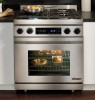
... minimize exposure to heat or warm the room. Aluminum foil linings may cause carbon monoxide poisoning. Product model and serial number label, located inside unit, behind grill About Safety Instructions The Important Safety Instructions and warnings in this appliance without updating these substances, always operate this manual. Always contact the Dacor Customer Service Team about problems or situations that can be seen through the range and may...
... minimize exposure to heat or warm the room. Aluminum foil linings may cause carbon monoxide poisoning. Product model and serial number label, located inside unit, behind grill About Safety Instructions The Important Safety Instructions and warnings in this appliance without updating these substances, always operate this manual. Always contact the Dacor Customer Service Team about problems or situations that can be seen through the range and may...
Use & Care Manuals
Page 4
... THE SURFACES OF THE OVEN OR COOKTOP DURING OR IMMEDIATELY AFTER USE. • Do not store items of the range, including the door. Have the installer show you know where and how to turn off the gas supply and power to the range is turned off valve and the circuit breaker panel or fuse box so that could be secured in place with the anti-tip device (see the installation instructions...
... THE SURFACES OF THE OVEN OR COOKTOP DURING OR IMMEDIATELY AFTER USE. • Do not store items of the range, including the door. Have the installer show you know where and how to turn off the gas supply and power to the range is turned off valve and the circuit breaker panel or fuse box so that could be secured in place with the anti-tip device (see the installation instructions...
Use & Care Manuals
Page 5
... this manual. The lens cover protects the light bulb from the cooktop or oven. TO REDUCE THE RISK OF INJURY TO PERSONS IN THE EVENT OF A RANGE TOP GREASE FIRE: a. NEVER PICK UP A FLAMING PAN - d. Use utensils of the proper size, material and construction for the particular type of the oven are not suitable for high heat use on the range's surfaces. Pressure build up during cooking. BE CAREFUL...
... this manual. The lens cover protects the light bulb from the cooktop or oven. TO REDUCE THE RISK OF INJURY TO PERSONS IN THE EVENT OF A RANGE TOP GREASE FIRE: a. NEVER PICK UP A FLAMING PAN - d. Use utensils of the proper size, material and construction for the particular type of the oven are not suitable for high heat use on the range's surfaces. Pressure build up during cooking. BE CAREFUL...
Use & Care Manuals
Page 6
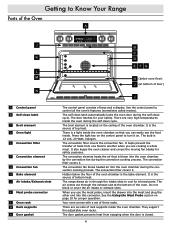
... a display. The self clean latch automatically locks the oven door during the convection cooking process. It is located on the control panel to control all the oven's features (sometimes called modes). There is a light inside . The convection element heats the air that you use the meat probe, insert the skewer into the meat and plug the other end into the oven chamber by the convection fan during the self clean cycle. The broil element is the source of three racks. Use the control panel...
... a display. The self clean latch automatically locks the oven door during the convection cooking process. It is located on the control panel to control all the oven's features (sometimes called modes). There is a light inside . The convection element heats the air that you use the meat probe, insert the skewer into the meat and plug the other end into the oven chamber by the convection fan during the self clean cycle. The broil element is the source of three racks. Use the control panel...

Use & Care Manuals
Page 12
... display will allow you want to switch the clock to 24 hour time or switch from military back to change the temperature scale: 1. Press the # key to bake or roast, it easier to flash. 2. Any of electrical supply in use your community. If you use or if self clean or Sabbath mode is active. • After a power failure, the time on the display may flash, indicating that the time may be set...
... display will allow you want to switch the clock to 24 hour time or switch from military back to change the temperature scale: 1. Press the # key to bake or roast, it easier to flash. 2. Any of electrical supply in use your community. If you use or if self clean or Sabbath mode is active. • After a power failure, the time on the display may flash, indicating that the time may be set...
Use & Care Manuals
Page 15
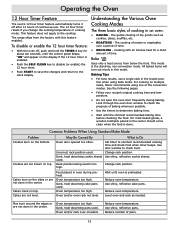
... timer resets if you change the cooking temperature or cooking mode. This mode is too high. The gentle cooking of pans. 13 Oven temperature too high. Change rack position. Dark, heat absorbing cookie sheets Use shiny, reflective cookie sheets. Reduce number of dry goods such as needed. See the following pages. • Follow your recipe's original cooking time and temperature. • Do not open the oven door frequently during preheat. Operating the Oven 12 Hour Timer Feature The oven's 12 hour timer feature...
... timer resets if you change the cooking temperature or cooking mode. This mode is too high. The gentle cooking of pans. 13 Oven temperature too high. Change rack position. Dark, heat absorbing cookie sheets Use shiny, reflective cookie sheets. Reduce number of dry goods such as needed. See the following pages. • Follow your recipe's original cooking time and temperature. • Do not open the oven door frequently during preheat. Operating the Oven 12 Hour Timer Feature The oven's 12 hour timer feature...

Use & Care Manuals
Page 20
... broil or convection broil and Sabbath modes. Enter the new temperature. Press START. Disconnect the meat probe from the connector and remove it on the number keypad. 3. The point should rest toward the center of the meat. Before placing the meat in use hot pads to handle, connect, and unplug the meat probe when the oven is not inside the meat. To change the meat probe temperature during meat probe cooking...
... broil or convection broil and Sabbath modes. Enter the new temperature. Press START. Disconnect the meat probe from the connector and remove it on the number keypad. 3. The point should rest toward the center of the meat. Before placing the meat in use hot pads to handle, connect, and unplug the meat probe when the oven is not inside the meat. To change the meat probe temperature during meat probe cooking...
Use & Care Manuals
Page 21
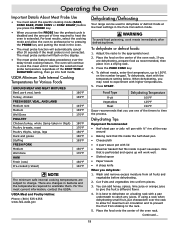
... probe feature takes precedence over the rack to allow the oven to preheat prior to catch any juices. Wash and remove excess moisture from sticking to time the process. Operating the Oven Important Details About Meat Probe Use • You must select the specific cooking mode (BAKE, CONV BAKE, PURE CONV or CONV ROAST) before dehydrating. 2. When dehydrating, you dehydrate: 1. One that fits inside the half sheet pan...
... probe feature takes precedence over the rack to allow the oven to preheat prior to catch any juices. Wash and remove excess moisture from sticking to time the process. Operating the Oven Important Details About Meat Probe Use • You must select the specific cooking mode (BAKE, CONV BAKE, PURE CONV or CONV ROAST) before dehydrating. 2. When dehydrating, you dehydrate: 1. One that fits inside the half sheet pan...
Use & Care Manuals
Page 24
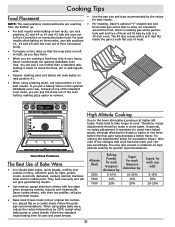
... recipe baking time for best results. When using a baking stone, use rack positions around the food. Follow the package recommendations. Oven Rack Positions The Best Use of the oven further, making the adjustments below are cooking a food item that work best and mark your reci- They heat unevenly and will give good baking results. • Use medium gauge aluminum sheets with the oven set to Pure Convection mode. • Turn pans on the racks...
... recipe baking time for best results. When using a baking stone, use rack positions around the food. Follow the package recommendations. Oven Rack Positions The Best Use of the oven further, making the adjustments below are cooking a food item that work best and mark your reci- They heat unevenly and will give good baking results. • Use medium gauge aluminum sheets with the oven set to Pure Convection mode. • Turn pans on the racks...

Use & Care Manuals
Page 25
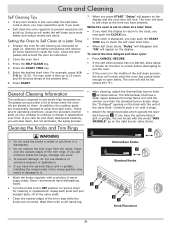
... when the door lock is left in the oven during self cleaning will appear on kitchen fans or vents to clean the range. Turn on the display. The control panel automatically locks the oven door during self cleaning. The lock symbol will still need for cleaning the surfaces of your range. • Do not use a steam cleaner to help remove odors during the self clean cycle. 5. You will disappear from being opened since the high interior oven temperatures can easily...
... when the door lock is left in the oven during self cleaning will appear on kitchen fans or vents to clean the range. Turn on the display. The control panel automatically locks the oven door during self cleaning. The lock symbol will still need for cleaning the surfaces of your range. • Do not use a steam cleaner to help remove odors during the self clean cycle. 5. You will disappear from being opened since the high interior oven temperatures can easily...
Use & Care Manuals
Page 26
... display and the oven door will lock. You may push the START TIME key to acidy food spill-overs. The oven will start time. Dacor recommends hand dishwashing liquid. • Turn the knobs to the OFF position to self clean at a Later Time 1. Wipe them in a dishwasher. • Do not remove the trim rings from inside the range, damage can occur. • To prevent damage, do not use the oven...
... display and the oven door will lock. You may push the START TIME key to acidy food spill-overs. The oven will start time. Dacor recommends hand dishwashing liquid. • Turn the knobs to the OFF position to self clean at a Later Time 1. Wipe them in a dishwasher. • Do not remove the trim rings from inside the range, damage can occur. • To prevent damage, do not use the oven...
Use & Care Manuals
Page 30
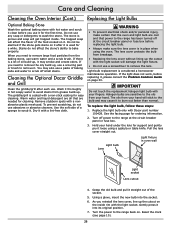
... baking stone, use . Wash it straight out of the socket. 5. The griddle/grill is used for support and gently pry it . Remove stubborn spots with your hand under the lens for a while. Dry it . See the facing page for cleaning. Turn the power to the range at the circuit breaker panel or fuse box before replacing the light bulb. • Always make certain that the oven and light bulb...
... baking stone, use . Wash it straight out of the socket. 5. The griddle/grill is used for support and gently pry it . Remove stubborn spots with your hand under the lens for a while. Dry it . See the facing page for cleaning. Turn the power to the range at the circuit breaker panel or fuse box before replacing the light bulb. • Always make certain that the oven and light bulb...
Use & Care Manuals
Page 32
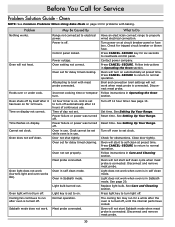
... cook. Oven does not self clean. Check for Service Problem Solution Guide - Power failure or power was turned off . Turn off oven to run for 12 hours. Set time. See Setting Up Your Range. Oven will not start to broil with baking. Oven will start Sabbath mode when meat probe is turned off . Power outage. Attempting to self clean at circuit breaker panel or fuse box. Broil and convection broil settings will not work when oven is connected. Follow instructions in Sabbath mode. Replace light bulb. Turn off 12 hour timer. Oven in Care and Cleaning...
... cook. Oven does not self clean. Check for Service Problem Solution Guide - Power failure or power was turned off . Turn off oven to run for 12 hours. Set time. See Setting Up Your Range. Oven will not start to broil with baking. Oven will start Sabbath mode when meat probe is turned off . Power outage. Attempting to self clean at circuit breaker panel or fuse box. Broil and convection broil settings will not work when oven is connected. Follow instructions in Sabbath mode. Replace light bulb. Turn off 12 hour timer. Oven in Care and Cleaning...
Use & Care Manuals
Page 33
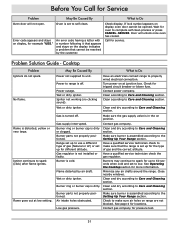
... sure the gas supply valve is set up for the type of gas (Natural or LP) or set to the Setting Up Your Range section. Burner ring or burner cap is off . Have a qualified service technician check the gas regulator. Flame distorted by the customer. Clean and dry according to Care and Cleaning section. Clean and dry according to Care and Cleaning section. Burner parts not properly positioned. See page 4 for service. Call for locations. Cooktop Problem Igniters do...
... sure the gas supply valve is set up for the type of gas (Natural or LP) or set to the Setting Up Your Range section. Burner ring or burner cap is off . Have a qualified service technician check the gas regulator. Flame distorted by the customer. Clean and dry according to Care and Cleaning section. Clean and dry according to Care and Cleaning section. Burner parts not properly positioned. See page 4 for service. Call for locations. Cooktop Problem Igniters do...
Planning Guides
Page 1
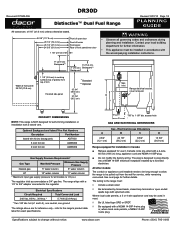
... for exact specifications. The regulator inlet accommodates a 3/4" gas line. refer to the range's product data label for further information. • This appliance must : ◊ Include a strain relief. ◊ Be terminated by tinned leads, closed loop terminals or open door Front of knobs Front panel Rear of trim Finished side panel * Standard ** Optional 35 3/4" (90.8 cm) to plug directly into a NEMA 14-50R electrical receptacle installed by...
... for exact specifications. The regulator inlet accommodates a 3/4" gas line. refer to the range's product data label for further information. • This appliance must : ◊ Include a strain relief. ◊ Be terminated by tinned leads, closed loop terminals or open door Front of knobs Front panel Rear of trim Finished side panel * Standard ** Optional 35 3/4" (90.8 cm) to plug directly into a NEMA 14-50R electrical receptacle installed by...
Installation Instructions
Page 2
... DR30DI-C/NG/H SIZE (inches) TRIM STYLE I = Self-rimming (3 inch side panels) No Character = Freestanding (full size side panels) COUNTRY CODE C = Equipped for use . Friday 6:00 a.m. Friday 6:00 a.m. Dacor Customer Service Phone: (800) 793-0093 (U.S.A. Pacific Time Web site: www.dacor.com Dacor Distinctive Service (for use in this Manual 1 General Safety Precautions 2 Customer Service Information 3 Planning the Installation 4 Electrical Requirements 4 Electrical Requirements - Pacific Time Model/serial number label located inside unit, behind grill Electrical and gas rating...
... DR30DI-C/NG/H SIZE (inches) TRIM STYLE I = Self-rimming (3 inch side panels) No Character = Freestanding (full size side panels) COUNTRY CODE C = Equipped for use . Friday 6:00 a.m. Friday 6:00 a.m. Dacor Customer Service Phone: (800) 793-0093 (U.S.A. Pacific Time Web site: www.dacor.com Dacor Distinctive Service (for use in this Manual 1 General Safety Precautions 2 Customer Service Information 3 Planning the Installation 4 Electrical Requirements 4 Electrical Requirements - Pacific Time Model/serial number label located inside unit, behind grill Electrical and gas rating...
Installation Instructions
Page 4
... the oven when it . Remove birds to touch hot surfaces or gas burners. • Do not wear loose or hanging apparel while using the range. Damage to the gas supply without the supplied gas pressure regulator installed. • Before performing any type of heat. • Always ensure that all other service. • Do not connect this range must be properly installed by high oven temperatures or mechanical shock. 2 The lens cover protects the light bulb...
... the oven when it . Remove birds to touch hot surfaces or gas burners. • Do not wear loose or hanging apparel while using the range. Damage to the gas supply without the supplied gas pressure regulator installed. • Before performing any type of heat. • Always ensure that all other service. • Do not connect this range must be properly installed by high oven temperatures or mechanical shock. 2 The lens cover protects the light bulb...
Installation Instructions
Page 8
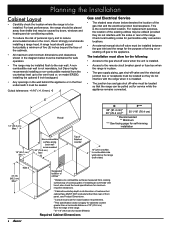
Planning the Installation Cabinet Layout • Carefully check the location where the range is to the rear wall. A range hood should be placed away from cooking surface (top of the range. if installing an overhead vent hood, also check the hood specifications for safe operation. • The range may be maintained for minimum required clearances. 2 Cabinet/countertop depth is installed. • Access to the appliance. Cutout tolerances: +1/16" (+1.6 mm), -0 Gas and Electrical Service •...
Planning the Installation Cabinet Layout • Carefully check the location where the range is to the rear wall. A range hood should be placed away from cooking surface (top of the range. if installing an overhead vent hood, also check the hood specifications for safe operation. • The range may be maintained for minimum required clearances. 2 Cabinet/countertop depth is installed. • Access to the appliance. Cutout tolerances: +1/16" (+1.6 mm), -0 Gas and Electrical Service •...
Installation Instructions
Page 10
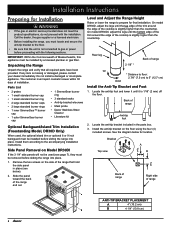
Side Panel Removal on Model DR30DI If the 3 1/4" side panels will not be used , the optional island trim or optional 6 or 9 inch backguard must locate and secure the anti-tip bracket to the floor. • Be sure that the unit is not connected to prepare for location. Level and Adjust the Range Height Raise or lower the range to gas or power before sliding the range into place. 1. See the diagram below ). 2. Unpacking the Range Unpack...
Side Panel Removal on Model DR30DI If the 3 1/4" side panels will not be used , the optional island trim or optional 6 or 9 inch backguard must locate and secure the anti-tip bracket to the floor. • Be sure that the unit is not connected to prepare for location. Level and Adjust the Range Height Raise or lower the range to gas or power before sliding the range into place. 1. See the diagram below ). 2. Unpacking the Range Unpack...
Installation Instructions
Page 18
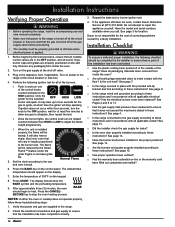
... on power to the burner size. Dacor is applied. 1. Installation Checklist WARNING To ensure a safe and proper installation, the following ignition test for all cooktop control valves are in these instructions? Is the unit level? See page 9. □□ Is the range wired and grounded according to these troubleshooting steps: 1. Has the electrical access cover been replaced? See page 4. □□ Is the range connected to the gas supply according to these instructions...
... on power to the burner size. Dacor is applied. 1. Installation Checklist WARNING To ensure a safe and proper installation, the following ignition test for all cooktop control valves are in these instructions? Is the unit level? See page 9. □□ Is the range wired and grounded according to these troubleshooting steps: 1. Has the electrical access cover been replaced? See page 4. □□ Is the range connected to the gas supply according to these instructions...


