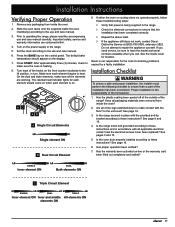
Installation Instructions
Page 2
...site: www.dacor.com Dacor Distinctive Service (for changes to specifications. © 2012 Dacor, all rights reserved. and Canada) Monday - to 5:00 p.m. to 5:00 p.m. Dacor® assumes no liability for repairs under warranty call , have questions or problems with flashlight) Model Identification DR30EIFS-C SIZE (...the Anti-Tip Bracket 8 Backguard Installation 10 Raised Vent Installation 10 Removing the Oven Door 10 Electrical Connection 10 Installing the Range 16 Re-installing the Oven Door 16 Verifying Proper Operation 17 IMPORTANT: • Installer: In the interest ...
...site: www.dacor.com Dacor Distinctive Service (for changes to specifications. © 2012 Dacor, all rights reserved. and Canada) Monday - to 5:00 p.m. to 5:00 p.m. Dacor® assumes no liability for repairs under warranty call , have questions or problems with flashlight) Model Identification DR30EIFS-C SIZE (...the Anti-Tip Bracket 8 Backguard Installation 10 Raised Vent Installation 10 Removing the Oven Door 10 Electrical Connection 10 Installing the Range 16 Re-installing the Oven Door 16 Verifying Proper Operation 17 IMPORTANT: • Installer: In the interest ...
Installation Instructions
Page 3
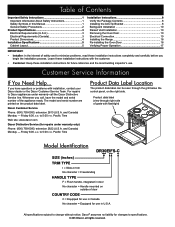
...sliding the rear leg on the range into the anti-tip bracket as a space heater to heat or warm the room. Always contact the Dacor Customer Service Team about problems and conditions that COULD result in minor personal injury or property damage. caution Hazards or unsafe practices that you ...flow of the appliance. warning Hazards or unsafe practices that WILL result in severe personal injury or death. Doing so blocks air flow through the oven and may result in overheating of ventilation air to the unit. • Keep appliance area clear and free from combustible material. Doing so ...
...sliding the rear leg on the range into the anti-tip bracket as a space heater to heat or warm the room. Always contact the Dacor Customer Service Team about problems and conditions that COULD result in minor personal injury or property damage. caution Hazards or unsafe practices that you ...flow of the appliance. warning Hazards or unsafe practices that WILL result in severe personal injury or death. Doing so blocks air flow through the oven and may result in overheating of ventilation air to the unit. • Keep appliance area clear and free from combustible material. Doing so ...
Installation Instructions
Page 10
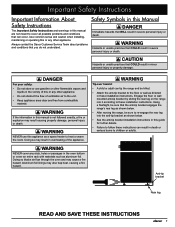
There are provided along with screws and anchors • Oven racks (2) • Razor blade scraper • Dacor Cooktop Cleaning Cream Installing the Anti-Tip Bracket Locate the anti-tip bracket included in its intended function, the anti-tip bracket must not be ...
There are provided along with screws and anchors • Oven racks (2) • Razor blade scraper • Dacor Cooktop Cleaning Cream Installing the Anti-Tip Bracket Locate the anti-tip bracket included in its intended function, the anti-tip bracket must not be ...

Installation Instructions
Page 12
... blade screwdriver, rotate the catch over the retaining arm on the appliance. • Do not use in an electrical shock hazard. Dacor is connected to a 208 volt power supply, preheat times and cavity temperature recovery times will be connected to the grounding terminal or ...installing a prewired range, skip to its fully opened position. 2. Raised Vent Installation If installing a raised vent, install it away from the oven while continuing to do not proceed with the door removed from the factory pre-wired. Call the selling dealer or a licensed electrician. Alternatively,...
... blade screwdriver, rotate the catch over the retaining arm on the appliance. • Do not use in an electrical shock hazard. Dacor is connected to a 208 volt power supply, preheat times and cavity temperature recovery times will be connected to the grounding terminal or ...installing a prewired range, skip to its fully opened position. 2. Raised Vent Installation If installing a raised vent, install it away from the oven while continuing to do not proceed with the door removed from the factory pre-wired. Call the selling dealer or a licensed electrician. Alternatively,...

Installation Instructions
Page 18
...Installation of plastic that covers the stainless steel surfaces. Adjust the leveling legs to position the bottom edge of the door. 1. Re-installing the Oven Door warning To avoid personal injury or damage to hold it at countertop height. 3. Continue to the door from the front of each hinge ... the range into place the rear leg should engage the antitip bracket. 4. Re-adjust the legs to the fully opened position. 3. Grasp the oven door on the bottom of each hinge rests on the cabinet and countertop installation. 2. Push until the notch on opposite sides and hold the door...
...Installation of plastic that covers the stainless steel surfaces. Adjust the leveling legs to position the bottom edge of the door. 1. Re-installing the Oven Door warning To avoid personal injury or damage to hold it at countertop height. 3. Continue to the door from the front of each hinge ... the range into place the rear leg should engage the antitip bracket. 4. Re-adjust the legs to the fully opened position. 3. Grasp the oven door on the bottom of each hinge rests on the cabinet and countertop installation. 2. Push until the notch on opposite sides and hold the door...
Installation Instructions
Page 19
...16. 3. Set the clock according to make sure the oven is on. The default bake temperature should come on the display. 7. Make sure each element begins to repair the appliance yourself. Dacor is the responsibility of correcting problems caused by a faulty ... 4. Has the electrical access cover been replaced? Has proper operation been verified? 7. Installation Instructions Verifying Proper Operation 1. If either the oven or cooktop does not operate properly, follow these instructions? Do not attempt to heat. See page 16. 6. Turn each element is heating...
...16. 3. Set the clock according to make sure the oven is on. The default bake temperature should come on the display. 7. Make sure each element begins to repair the appliance yourself. Dacor is the responsibility of correcting problems caused by a faulty ... 4. Has the electrical access cover been replaced? Has proper operation been verified? 7. Installation Instructions Verifying Proper Operation 1. If either the oven or cooktop does not operate properly, follow these instructions? Do not attempt to heat. See page 16. 6. Turn each element is heating...
Use & Care Manuals
Page 1
Use and Care Manual Distinctive™ Electric Range Models: DR30ES, DR30EIS, DR30EFS and DR30EIFS Style varies, model DR30ES shown Ta b le o f C o nt e nt s Important Safety Instructions 1 Getting to Know Your Range 4 Operating the Cooktop 7 Operating the Oven 10 Care and Cleaning 22 Parts and Accessories 27 Before You Call for Service 27 Warranty and Service 29 Warranty Card Back Cover Part No. 105907 Rev B
Use and Care Manual Distinctive™ Electric Range Models: DR30ES, DR30EIS, DR30EFS and DR30EIFS Style varies, model DR30ES shown Ta b le o f C o nt e nt s Important Safety Instructions 1 Getting to Know Your Range 4 Operating the Cooktop 7 Operating the Oven 10 Care and Cleaning 22 Parts and Accessories 27 Before You Call for Service 27 Warranty and Service 29 Warranty Card Back Cover Part No. 105907 Rev B
Use & Care Manuals
Page 3
...Important Safety Instructions and warnings in severe personal injury or death. For service and warranty information, see page 29. NEVER cover any questions call: Dacor Customer Service Phone: (800) 793-0093 (U.S.A. Doing so may result in severe personal injury or death. Important Safety Instructions Installer: Leave these...-tip bracket has been properly attached to the floor or wall as shown below the control panel, on the range or cover an entire oven rack with the anti-tip bracket. • Failure to heat or warm the room. Friday 6:00 a.m. Model number Serial number Date...
...Important Safety Instructions and warnings in severe personal injury or death. For service and warranty information, see page 29. NEVER cover any questions call: Dacor Customer Service Phone: (800) 793-0093 (U.S.A. Doing so may result in severe personal injury or death. Important Safety Instructions Installer: Leave these...-tip bracket has been properly attached to the floor or wall as shown below the control panel, on the range or cover an entire oven rack with the anti-tip bracket. • Failure to heat or warm the room. Friday 6:00 a.m. Model number Serial number Date...
Use & Care Manuals
Page 4
.... • Do not operate the cooktop without overflow caused by a qualified installer according to cover the heating element. Foods with the cooktop, oven interior or surrounding areas during and immediately after use. Utilize a deep fat frying thermometer to avoid heating the fat to determine if a utensil... recommended in the literature accompanying it . ▪▪ Wipe up spill-overs immediately. • DO NOT TOUCH THE SURFACES OF THE OVEN OR COOKTOP DURING OR IMMEDIATELY AFTER USE. Have the installer show you know where and how to turn off power to removing them for...
.... • Do not operate the cooktop without overflow caused by a qualified installer according to cover the heating element. Foods with the cooktop, oven interior or surrounding areas during and immediately after use. Utilize a deep fat frying thermometer to avoid heating the fat to determine if a utensil... recommended in the literature accompanying it . ▪▪ Wipe up spill-overs immediately. • DO NOT TOUCH THE SURFACES OF THE OVEN OR COOKTOP DURING OR IMMEDIATELY AFTER USE. Have the installer show you know where and how to turn off power to removing them for...

Use & Care Manuals
Page 5
... more than one hour before operating it started. ▪▪ The fire department is not installed, the spinning fan blades at the back of the oven may result. you are "flaming" liquors or other parts of the range. • Make sure individuals who use the range are exposed. •...; Do not try to operate it properly. • Clean the range thoroughly before or after cooking. Sharp objects may stain. • Never use the oven to an exit. If the cooktop should break, cleaning solutions and spill-overs may cause them to burst and cause injury. • For your back...
... more than one hour before operating it started. ▪▪ The fire department is not installed, the spinning fan blades at the back of the oven may result. you are "flaming" liquors or other parts of the range. • Make sure individuals who use the range are exposed. •...; Do not try to operate it properly. • Clean the range thoroughly before or after cooking. Sharp objects may stain. • Never use the oven to an exit. If the cooktop should break, cleaning solutions and spill-overs may cause them to burst and cause injury. • For your back...
Use & Care Manuals
Page 6
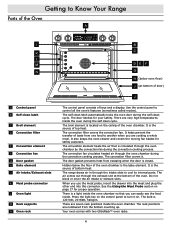
... convection filter covers the convection fan. Do not block or cover the air intake or exhaust slots. Getting to Know Your Range Parts of the Oven A j k L M n A Control panel B Self clean latch C Broil element D Convection filter E Convection element F Convection fan G Door gasket H Bake element J Air intake... probe, insert the skewer into the meat and plug the other end into this connector. The self clean latch automatically locks the oven door during the convection cooking process. The door latches for safety purposes. The convection filter covers it on page 17 for proper ...
... convection filter covers the convection fan. Do not block or cover the air intake or exhaust slots. Getting to Know Your Range Parts of the Oven A j k L M n A Control panel B Self clean latch C Broil element D Convection filter E Convection element F Convection fan G Door gasket H Bake element J Air intake... probe, insert the skewer into the meat and plug the other end into this connector. The self clean latch automatically locks the oven door during the convection cooking process. The door latches for safety purposes. The convection filter covers it on page 17 for proper ...
Use & Care Manuals
Page 7
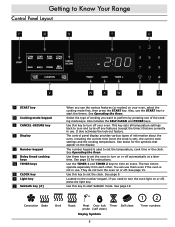
...types of the cooking mode keys. Use these keys to set the temperature, cook time or the clock. Located on or off your oven, select the cooking mode first, then press the START key. Convection Bake Broil Roast Meat Door lock Timer Self clean probe (self ... at a later time. Use this key to set ), the current cook settings and the cooking temperature. See below for instructions. See page 9. See Operating the Oven. See page 15 for the symbols that are currently in use . Getting to Know Your Range Control Panel Layout p R S T U V W X W y Z P START key R...
...types of the cooking mode keys. Use these keys to set the temperature, cook time or the clock. Located on or off your oven, select the cooking mode first, then press the START key. Convection Bake Broil Roast Meat Door lock Timer Self clean probe (self ... at a later time. Use this key to set ), the current cook settings and the cooking temperature. See below for instructions. See page 9. See Operating the Oven. See page 15 for the symbols that are currently in use . Getting to Know Your Range Control Panel Layout p R S T U V W X W y Z P START key R...

Use & Care Manuals
Page 11
... the clock mode. It is currently set to carve. 9 To leave the setting as is set during the manufacturing process. Before Using the Oven... • Dacor recommends turning the oven on ): 1. The colon between "On" and "Off". 3. If you to burn off (or on for any time you want to switch the ...clock to 24 hour time or switch from military back to 12-hour (non-military) time at the factory to flash. 2. The oven is , do ...
... the clock mode. It is currently set to carve. 9 To leave the setting as is set during the manufacturing process. Before Using the Oven... • Dacor recommends turning the oven on ): 1. The colon between "On" and "Off". 3. If you to burn off (or on for any time you want to switch the ...clock to 24 hour time or switch from military back to 12-hour (non-military) time at the factory to flash. 2. The oven is , do ...
Use & Care Manuals
Page 12
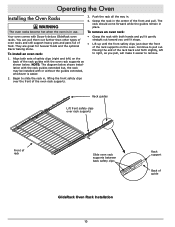
...Moving the end of the rack back and forth slightly, left ) on the oven. Rack guides Lift front safety clips over the front of the rack supports on the back of the rack guides with Dacor's deluxe GlideRack oven racks. Begin to pull out. NOTE: The diagram below . To install an... oven rack: 1. The rack should come forward while the guides remain in , lifting the front safety ...
...Moving the end of the rack back and forth slightly, left ) on the oven. Rack guides Lift front safety clips over the front of the rack supports on the back of the rack guides with Dacor's deluxe GlideRack oven racks. Begin to pull out. NOTE: The diagram below . To install an... oven rack: 1. The rack should come forward while the guides remain in , lifting the front safety ...
Use & Care Manuals
Page 13
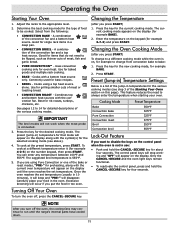
... • CONVECTION BAKE - Press the key for the new cooking mode, for detailed descriptions of 1 the various cooking modes. Turning Off Your Oven To turn off , press the CANCEL · SECURE key. A combination of the convection fan and a bottom heat source. Uses convection cooking .... To cook at the preset temperature, press START. You can enter any temperature between 100°F and 555°F. Carefully place your oven. 12 Cooking Mode Preset Temperature 2Bake1 2 Convection bake Pure Convection 350°F 325°F 325°F Convection roast Broil Convection broil 375...
... • CONVECTION BAKE - Press the key for the new cooking mode, for detailed descriptions of 1 the various cooking modes. Turning Off Your Oven To turn off , press the CANCEL · SECURE key. A combination of the convection fan and a bottom heat source. Uses convection cooking .... To cook at the preset temperature, press START. You can enter any temperature between 100°F and 555°F. Carefully place your oven. 12 Cooking Mode Preset Temperature 2Bake1 2 Convection bake Pure Convection 350°F 325°F 325°F Convection roast Broil Convection broil 375...
Use & Care Manuals
Page 14
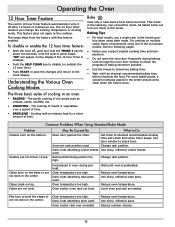
...if you change the cooking temperature or cooking mode. "ON" will turn out nicely in the center. All baked items will appear on multiple racks, Dacor recommends using bake mode. For cooking on the display if the 12 hour timer is enabled. • Push the SELF CLEAN key to disable (... from the factory with an intense heat for about ten seconds, until the control panel beeps. This mode is too high. Look through the oven door window to shortest recommended cooking time and check food when timer beeps. The gentle cooking of the convection modes. Common Problems When Using Standard...
...if you change the cooking temperature or cooking mode. "ON" will turn out nicely in the center. All baked items will appear on multiple racks, Dacor recommends using bake mode. For cooking on the display if the 12 hour timer is enabled. • Push the SELF CLEAN key to disable (... from the factory with an intense heat for about ten seconds, until the control panel beeps. This mode is too high. Look through the oven door window to shortest recommended cooking time and check food when timer beeps. The gentle cooking of the convection modes. Common Problems When Using Standard...
Use & Care Manuals
Page 15
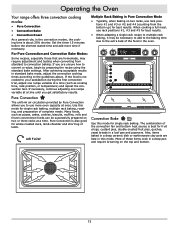
... multiple rack baking, it may require adjustment and testing when converting from the bottom up) for best results. Most of these items cook in the oven. 7 6 5 4 32 1 Convection Bake Use this first convection trial, adjust one recipe variable at once. If you are unsure how to ... recipe using the standard bake settings. Many foods, such as cooking time, rack position, or temperature) and repeat the convection test. Operating the Oven Your range offers three convection cooking modes: • Pure Convection • Convection Bake • Convection Roast As a general rule, in the ...
... multiple rack baking, it may require adjustment and testing when converting from the bottom up) for best results. Most of these items cook in the oven. 7 6 5 4 32 1 Convection Bake Use this first convection trial, adjust one recipe variable at once. If you are unsure how to ... recipe using the standard bake settings. Many foods, such as cooking time, rack position, or temperature) and repeat the convection test. Operating the Oven Your range offers three convection cooking modes: • Pure Convection • Convection Bake • Convection Roast As a general rule, in the ...

Use & Care Manuals
Page 16
... and flavorful way to the pan. Season the second side just before removing the food from the oven when the thermometer registers 5 to successfully roast in record time. For easier cleaning, remove the broiler...the second temperature registers below the first, continue cooking the meat. • Remove meats from the oven. • To prevent sticking, lightly grease the broiler grill. Never pierce meat with a fork ...on a rack in heavy smoke. warning • To avoid burns, keep the oven door completely shut when using the roast mode, do not need to be used to 10°F ...
... and flavorful way to the pan. Season the second side just before removing the food from the oven when the thermometer registers 5 to successfully roast in record time. For easier cleaning, remove the broiler...the second temperature registers below the first, continue cooking the meat. • Remove meats from the oven. • To prevent sticking, lightly grease the broiler grill. Never pierce meat with a fork ...on a rack in heavy smoke. warning • To avoid burns, keep the oven door completely shut when using the roast mode, do not need to be used to 10°F ...

Use & Care Manuals
Page 17
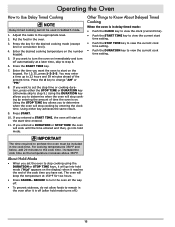
...is an important consideration when using foods that will appear on , 1 second off at a later time, you are done cooking. • Turn the oven on a timer: 1. Typical foods to avoid include those containing eggs and dairy products, cream soups and cooked or uncooked meats, poultry and fish. ... automatically turn off , 2 seconds on the display and begin immediately, place only very cold or frozen food into hold mode (see facing page for the oven to the main display. Timer Alarm Pattern 1 1 second on, 1 second off, repeat 2 1 second on, 1 second off at a later time ...
...is an important consideration when using foods that will appear on , 1 second off at a later time, you are done cooking. • Turn the oven on a timer: 1. Typical foods to avoid include those containing eggs and dairy products, cream soups and cooked or uncooked meats, poultry and fish. ... automatically turn off , 2 seconds on the display and begin immediately, place only very cold or frozen food into hold mode (see facing page for the oven to the main display. Timer Alarm Pattern 1 1 second on, 1 second off, repeat 2 1 second on, 1 second off at a later time ...
Use & Care Manuals
Page 18
... on the keypad. If you want to set the stop cooking by entering the clock time. Press START. 10. If you to determine when the oven will go into hold mode turns off automatically at 150°F for the desired cooking mode (except broil or convection broil). 4. Increase the cook time... .) 16 Using either the STOP TIME or DURATION key (otherwise skip to step 9.) Using the DURATION key allows you entered a DURATION or STOP TIME the oven will start at the start time setting. • Push the STOP TIME key to view the current cook time setting. • Push the DURATION key...
... on the keypad. If you want to set the stop cooking by entering the clock time. Press START. 10. If you to determine when the oven will go into hold mode turns off automatically at 150°F for the desired cooking mode (except broil or convection broil). 4. Increase the cook time... .) 16 Using either the STOP TIME or DURATION key (otherwise skip to step 9.) Using the DURATION key allows you entered a DURATION or STOP TIME the oven will start at the start time setting. • Push the STOP TIME key to view the current cook time setting. • Push the DURATION key...


