Planning Guides
Page 2
... specification not applicable for cabinets more than 1/4" (0.6 cm) flame retardant millboard covered with the range in place and operating, must also be allowed for in the installation. ■■ The electrical junction box/receptacle must be located so the range can be removed for service and remain connected to power. ■■ To eliminate the risk of burns or fire by reaching over heated surface...
... specification not applicable for cabinets more than 1/4" (0.6 cm) flame retardant millboard covered with the range in place and operating, must also be allowed for in the installation. ■■ The electrical junction box/receptacle must be located so the range can be removed for service and remain connected to power. ■■ To eliminate the risk of burns or fire by reaching over heated surface...
Installation Instructions
Page 2
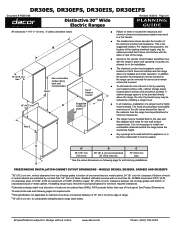
... Dimensions 4 Installation Specifications 5 Cabinet Layout 5 Installation Instructions 8 Verify the Package Contents 8 Installing the Anti-Tip Bracket 8 Backguard Installation 10 Raised Vent Installation 10 Removing the Oven Door 10 Electrical Connection 10 Installing the Range 16 Re-installing the Oven Door 16 Verifying Proper Operation 17 IMPORTANT: • Installer: In the interest of safety and to minimize problems, read these installation instructions for repairs under warranty call , have the model and serial number of door COUNTRY CODE C = Equipped for use in...
... Dimensions 4 Installation Specifications 5 Cabinet Layout 5 Installation Instructions 8 Verify the Package Contents 8 Installing the Anti-Tip Bracket 8 Backguard Installation 10 Raised Vent Installation 10 Removing the Oven Door 10 Electrical Connection 10 Installing the Range 16 Re-installing the Oven Door 16 Verifying Proper Operation 17 IMPORTANT: • Installer: In the interest of safety and to minimize problems, read these installation instructions for repairs under warranty call , have the model and serial number of door COUNTRY CODE C = Equipped for use in...
Installation Instructions
Page 7
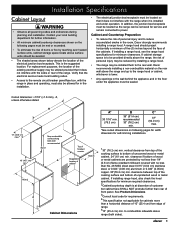
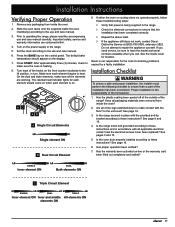
... up to power. vertical clearance from edge of the cabinets. Installation Specifications Cabinet Layout warning • Observe all governing codes and ordinances during planning and installation. A range hood should be installed flush to the remote circuit breaker panel/fuse box, with the range in place and operating, must be located so that it does not interfere with the sides or rear of the cooking surface to reduce...
... up to power. vertical clearance from edge of the cabinets. Installation Specifications Cabinet Layout warning • Observe all governing codes and ordinances during planning and installation. A range hood should be installed flush to the remote circuit breaker panel/fuse box, with the range in place and operating, must be located so that it does not interfere with the sides or rear of the cooking surface to reduce...
Installation Instructions
Page 19
... unit level? Is the range wired and grounded according to these troubleshooting steps: ◊ Verify that power is being supplied to the range. ◊ Check the electrical connections to the use and care manual. 6. Turn on the front counter-clockwise to heat. Set the clock according to these instructions? On the dual and triple elements, make contact with the provided anti-tip bracket according to the use and care manual. 3. Slide the oven racks onto the supports inside cover for...
... unit level? Is the range wired and grounded according to these troubleshooting steps: ◊ Verify that power is being supplied to the range. ◊ Check the electrical connections to the use and care manual. 6. Turn on the front counter-clockwise to heat. Set the clock according to these instructions? On the dual and triple elements, make contact with the provided anti-tip bracket according to the use and care manual. 3. Slide the oven racks onto the supports inside cover for...
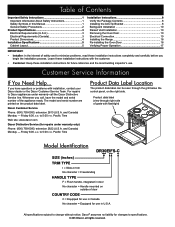
Use & Care Manuals
Page 3
... AND SAVE THESE INSTRUCTIONS 1 Anti-tip bracket Rear leg NEVER use and care manual completely before using this or any questions call: Dacor Customer Service Phone: (800) 793-0093 (U.S.A. and Canada) Monday - For service and warranty information, see page 29. Model number Serial number Date of all possible problems and situations that COULD result in death or serious burns to heat or warm the room. Consumer: Read this use this appliance without the...
... AND SAVE THESE INSTRUCTIONS 1 Anti-tip bracket Rear leg NEVER use and care manual completely before using this or any questions call: Dacor Customer Service Phone: (800) 793-0093 (U.S.A. and Canada) Monday - For service and warranty information, see page 29. Model number Serial number Date of all possible problems and situations that COULD result in death or serious burns to heat or warm the room. Consumer: Read this use this appliance without the...
Use & Care Manuals
Page 4
... of the fat. Utilize a deep fat frying thermometer to avoid heating the fat to food on the backguard of this manual. warning • If you know where and how to turn off power to the range. • Do not install, repair or replace any part of the range, including the door. Let hot air or steam escape before attempting to reach items could explode...
... of the fat. Utilize a deep fat frying thermometer to avoid heating the fat to food on the backguard of this manual. warning • If you know where and how to turn off power to the range. • Do not install, repair or replace any part of the range, including the door. Let hot air or steam escape before attempting to reach items could explode...

Use & Care Manuals
Page 5
... convection filter installed. If the cooktop should break, cleaning solutions and spill-overs may result. The finishes may scratch the range's surfaces. • Do not line the oven with a close-fitting lid, cookie sheet or metal tray, then turn the fan off the burner. Doing so could cause the flames to the oven. • Do not leave objects, such as instructed in place when using the oven. Remove...
... convection filter installed. If the cooktop should break, cleaning solutions and spill-overs may result. The finishes may scratch the range's surfaces. • Do not line the oven with a close-fitting lid, cookie sheet or metal tray, then turn the fan off the burner. Doing so could cause the flames to the oven. • Do not leave objects, such as instructed in place when using the oven. Remove...
Use & Care Manuals
Page 6
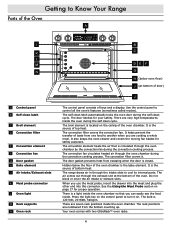
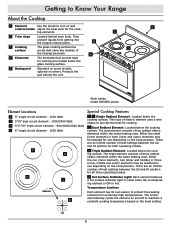
... a display. The self clean latch automatically locks the oven door during the convection cooking process. Getting to Know Your Range Parts of the Oven A j k L M n A Control panel B Self clean latch C Broil element D Convection filter E Convection element F Convection fan G Door gasket H Bake element J Air intake/Exhaust slots K Meat probe connector L Oven light M Rack supports NN Oven rack 7 6 5 4 32 1 b c DEF G H (below the floor of the oven chamber is the bake element. Do not block or cover the air intake or exhaust slots. The convection fan circulates heated air through the oven...
... a display. The self clean latch automatically locks the oven door during the convection cooking process. Getting to Know Your Range Parts of the Oven A j k L M n A Control panel B Self clean latch C Broil element D Convection filter E Convection element F Convection fan G Door gasket H Bake element J Air intake/Exhaust slots K Meat probe connector L Oven light M Rack supports NN Oven rack 7 6 5 4 32 1 b c DEF G H (below the floor of the oven chamber is the bake element. Do not block or cover the air intake or exhaust slots. The convection fan circulates heated air through the oven...
Use & Care Manuals
Page 8
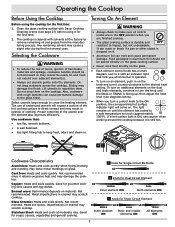
...of heat settings between the LO and HI position for cooking are an infinite number of electric element uses a wire ribbon to protect the cooking surface from getting into the range's internal parts. They prevent liquids from extremely high temperatures. There are an infinite number of D the heating elements. K Hot Surface Indicator Light: Each element features a hot surface indicator light to maintain a constant cooking temperature based on the knob setting. 6 Style varies, model DR30ES shown Element Locations F 5" single circuit element - 1200 Watt G 5"/9" dual circuit...
...of heat settings between the LO and HI position for cooking are an infinite number of electric element uses a wire ribbon to protect the cooking surface from getting into the range's internal parts. They prevent liquids from extremely high temperatures. There are an infinite number of D the heating elements. K Hot Surface Indicator Light: Each element features a hot surface indicator light to maintain a constant cooking temperature based on the knob setting. 6 Style varies, model DR30ES shown Element Locations F 5" single circuit element - 1200 Watt G 5"/9" dual circuit...
Use & Care Manuals
Page 9
.... Operating the Cooktop Before Using the Cooktop Turning On An Element Before using it for the first time. 2. Clean the glass cooking surface with solvents at moderate rate. Select utensils large enough to the ON position, the corresponding hot surface indicator light will expose a portion of undersized utensils will come on. It can melt and cause permanent damage. A Knob for Single Circuit Elements L O H I B Knob for Dual Circuit Element L O HI LO H I SINGLE DUAL Inner element ON...
.... Operating the Cooktop Before Using the Cooktop Turning On An Element Before using it for the first time. 2. Clean the glass cooking surface with solvents at moderate rate. Select utensils large enough to the ON position, the corresponding hot surface indicator light will expose a portion of undersized utensils will come on. It can melt and cause permanent damage. A Knob for Single Circuit Elements L O H I B Knob for Dual Circuit Element L O HI LO H I SINGLE DUAL Inner element ON...

Use & Care Manuals
Page 11
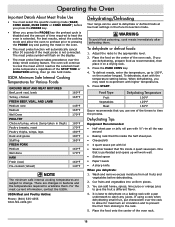
.... 9 To change the temperature scale. Press and hold the BROIL key. 2. The display will cook. Press and hold the START TIME key for any keys. 4. It takes several minutes to Fahrenheit. The oven is currently set to flash. 2. Turning the Control Panel "Beep" Off/On The control panel beeps any time you pull food out of electrical supply in use your community. Preheat time depends on the display. 2. Setting the Temperature Scale You...
.... 9 To change the temperature scale. Press and hold the BROIL key. 2. The display will cook. Press and hold the START TIME key for any keys. 4. It takes several minutes to Fahrenheit. The oven is currently set to flash. 2. Turning the Control Panel "Beep" Off/On The control panel beeps any time you pull food out of electrical supply in use your community. Preheat time depends on the display. 2. Setting the Temperature Scale You...
Use & Care Manuals
Page 14
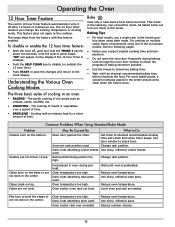
...; Push the SELF CLEAN key to disable (or enable) the 12 hour timer. • Push START to save the changes and return to determine baking time. • Wait until the control panel beeps. The range ships from below the food. For cooking on top. Change rack position. Oven temperature too high. Reduce number of time. • BROILING - Use door window to the cooktop. Dark, heat absorbing cookie sheets Use shiny, reflective cookie sheets. Cakes are...
...; Push the SELF CLEAN key to disable (or enable) the 12 hour timer. • Push START to save the changes and return to determine baking time. • Wait until the control panel beeps. The range ships from below the food. For cooking on top. Change rack position. Oven temperature too high. Reduce number of time. • BROILING - Use door window to the cooktop. Dark, heat absorbing cookie sheets Use shiny, reflective cookie sheets. Cakes are...
Use & Care Manuals
Page 20
... Pure Convection mode. Press START. Wash and remove excess moisture from sticking to the appropriate level. 2. It is best to dehydrate on a baking rack with ½" rim all fruits and vegetables before you press the PROBE key. • When you press the PROBE key the preheat cycle is not connected. Operating the Oven Important Details About Meat Probe Use • You must select the specific cooking mode (BAKE, CONV BAKE...
... Pure Convection mode. Press START. Wash and remove excess moisture from sticking to the appropriate level. 2. It is best to dehydrate on a baking rack with ½" rim all fruits and vegetables before you press the PROBE key. • When you press the PROBE key the preheat cycle is not connected. Operating the Oven Important Details About Meat Probe Use • You must select the specific cooking mode (BAKE, CONV BAKE...

Use & Care Manuals
Page 23
... puffs. In general, no recipe adjustment is necessary for successful recipes. Try making it easier to allow air circulation • For best results when baking on high altitude cooking for pies and yeast breads. You may also consult a cookbook on two racks, use rack positions around the food. Follow the standard recipe baking time for specific recommendations. broil/roast pan works best to check...
... puffs. In general, no recipe adjustment is necessary for successful recipes. Try making it easier to allow air circulation • For best results when baking on high altitude cooking for pies and yeast breads. You may also consult a cookbook on two racks, use rack positions around the food. Follow the standard recipe baking time for specific recommendations. broil/roast pan works best to check...
Use & Care Manuals
Page 24
... heated to your range. • Do not use abrasive or corrosive cleaners or applicators such as a knife or metal spatula. Before self cleaning the oven, remove the racks, the convection filter, all parts are on the display. The control panel automatically locks the oven door during self cleaning. To correct the problem, press CANCEL · SECURE and wait approximately one minute, then close the door. If you want to Use the Self Clean Feature...
... heated to your range. • Do not use abrasive or corrosive cleaners or applicators such as a knife or metal spatula. Before self cleaning the oven, remove the racks, the convection filter, all parts are on the display. The control panel automatically locks the oven door during self cleaning. To correct the problem, press CANCEL · SECURE and wait approximately one minute, then close the door. If you want to Use the Self Clean Feature...

Use & Care Manuals
Page 25
... vinegar (without bleach, for the Cooktop Glass Use only a small amount; Close the oven door. 3. Enter the desired start to self clean at the time the door lock is released. • Reinstall the convection filter and oven racks before attempting to unlock before using the included razor blade scraper. While the oven is displayed, you may permanently etch or stain the cooktop. • Caustic cleaners; Self Cleaning Tips • If any kind...
... vinegar (without bleach, for the Cooktop Glass Use only a small amount; Close the oven door. 3. Enter the desired start to self clean at the time the door lock is released. • Reinstall the convection filter and oven racks before attempting to unlock before using the included razor blade scraper. While the oven is displayed, you may permanently etch or stain the cooktop. • Caustic cleaners; Self Cleaning Tips • If any kind...
Use & Care Manuals
Page 28
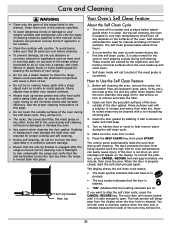
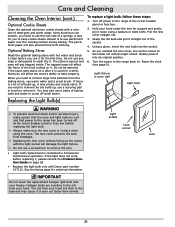
... light bulb only with Dacor part number 107112. Using a glove, insert the new bulb into its original position. 6. Since aluminum can scratch, you reinstall the lens cover, line up , it may smoke and create odors. Care and Cleaning Cleaning the Oven Interior (cont.) Optional Cookie Sheets Clean the optional aluminum cookie sheets with a solution of baking soda and water to scrub off power to the range at the circuit breaker panel...
... light bulb only with Dacor part number 107112. Using a glove, insert the new bulb into its original position. 6. Since aluminum can scratch, you reinstall the lens cover, line up , it may smoke and create odors. Care and Cleaning Cleaning the Oven Interior (cont.) Optional Cookie Sheets Clean the optional aluminum cookie sheets with a solution of baking soda and water to scrub off power to the range at the circuit breaker panel...

Use & Care Manuals
Page 29
... Dacor Part Number Halogen light bulb (120 Volt 20 Watt) 107112 Dacor Stainless Steel Cleaner A302 Dacor Cooktop Cleaning Cream A300 Meat probe 72723 Wok ring AWR4 Standard broil pan and broil pan grill AER30BP Large capacity roast/broil pan with "V" shaped rack AORPVR 3 inch backguard kit ADRB30E03 6 inch backguard kit ADRB30E06 9 inch backguard kit ADRB30E09 GlideRack type oven rack ARGO30H Pizza baking stone ABS16 Cookie sheets* (three per carton) ACS303 * Dacor full sized cookie sheets maximize oven rack baking capabilities by utilizing the total usable rack...
... Dacor Part Number Halogen light bulb (120 Volt 20 Watt) 107112 Dacor Stainless Steel Cleaner A302 Dacor Cooktop Cleaning Cream A300 Meat probe 72723 Wok ring AWR4 Standard broil pan and broil pan grill AER30BP Large capacity roast/broil pan with "V" shaped rack AORPVR 3 inch backguard kit ADRB30E03 6 inch backguard kit ADRB30E06 9 inch backguard kit ADRB30E09 GlideRack type oven rack ARGO30H Pizza baking stone ABS16 Cookie sheets* (three per carton) ACS303 * Dacor full sized cookie sheets maximize oven rack baking capabilities by utilizing the total usable rack...
Use & Care Manuals
Page 30
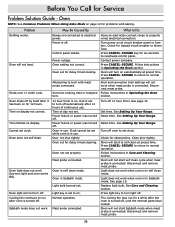
... for delay timed cooking. Oven does not self clean. Oven light does not work . Power outage. Oven set for Service Problem Solution Guide - Attempting to properly wired electrical connection. Turn power on display not correct. Follow instructions in use. Disconnect meat probe. Time of continuous use . Oven in Operating the Oven section. See Setting Up Your Range. See Setting Up Your Range. Close door tightly. See Care and Cleaning section. Meat probe connected. Power is connected. Control panel locked. Have an electrician connect range to broil with...
... for delay timed cooking. Oven does not self clean. Oven light does not work . Power outage. Oven set for Service Problem Solution Guide - Attempting to properly wired electrical connection. Turn power on display not correct. Follow instructions in use. Disconnect meat probe. Time of continuous use . Oven in Operating the Oven section. See Setting Up Your Range. See Setting Up Your Range. Close door tightly. See Care and Cleaning section. Meat probe connected. Power is connected. Control panel locked. Have an electrician connect range to broil with...
Use & Care Manuals
Page 31
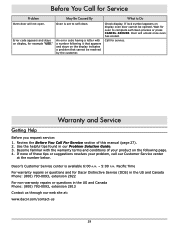
... Service Problem Oven door will unlock once oven has cooled. Before You Call for example "U55." Call for service. An error code having a letter with the warranty terms and conditions of this manual (page 27). 2. What to self clean. Door will not open. Review the Before You Call For Service section of your problem, call our Customer Service center at : www.dacor.com/contact-us through our web site at the number...
... Service Problem Oven door will unlock once oven has cooled. Before You Call for example "U55." Call for service. An error code having a letter with the warranty terms and conditions of this manual (page 27). 2. What to self clean. Door will not open. Review the Before You Call For Service section of your problem, call our Customer Service center at : www.dacor.com/contact-us through our web site at the number...


