
Planning Guides
Page 1
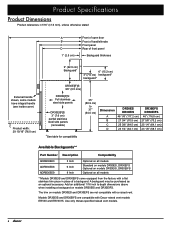
...with flat stainless trim piece in accordance with a raised vent. The trim on all models Models DR30EIS and DR30EIFS come equipped from the factory with Dacor raised vent models ERV3015. Available Backguards All specifications subject to 37" (94.0 cm) *See table for further... accessory. DR30ES, DR30EFS, DR30EIS, DR30EIFS Document # PG05-008 Distinctive™ 30" Wide Electric Ranges Revised 10/30/12 Page 1/4 PLANNING GUIDE Product Dimensions All tolerances ±1/16" (±1.6 mm) unless otherwise noted. side view Part Number ADRB30E03 Description 3 Inch Compatibility ...
...with flat stainless trim piece in accordance with a raised vent. The trim on all models Models DR30EIS and DR30EIFS come equipped from the factory with Dacor raised vent models ERV3015. Available Backguards All specifications subject to 37" (94.0 cm) *See table for further... accessory. DR30ES, DR30EFS, DR30EIS, DR30EIFS Document # PG05-008 Distinctive™ 30" Wide Electric Ranges Revised 10/30/12 Page 1/4 PLANNING GUIDE Product Dimensions All tolerances ±1/16" (±1.6 mm) unless otherwise noted. side view Part Number ADRB30E03 Description 3 Inch Compatibility ...
Installation Instructions
Page 1
B Installation Instructions Distinctive™ Electric Range Models: DR30ES, DR30EIS, DR30EFS and DR30EIFS Part No. 105906 Rev.
B Installation Instructions Distinctive™ Electric Range Models: DR30ES, DR30EIS, DR30EFS and DR30EIFS Part No. 105906 Rev.
Installation Instructions
Page 6
... are compatible with a raised vent. Use only theses specified raised vent models. 4 Models DR30EIS and DR30EIFS are not compatible with Dacor raised vent models ERV30 and ERV3015. Add an additional 1/16 inch to 37" (94.0 cm) Dimension... A B C D DR30ES DR30EIS 46 1/8" (117.2 cm) 27 3/4" (70.5 cm) 25 3/8" (64.5 cm) 23 1/4" (64.1 cm) DR30EFS DR30EIFS 46" (116.8 cm) 27 5/8" (70.2 cm) 25 1/4" (64.1 cm) 23 1/8" (58.7 cm) *See table for compatibility Available Backguards** Part...
... are compatible with a raised vent. Use only theses specified raised vent models. 4 Models DR30EIS and DR30EIFS are not compatible with Dacor raised vent models ERV30 and ERV3015. Add an additional 1/16 inch to 37" (94.0 cm) Dimension... A B C D DR30ES DR30EIS 46 1/8" (117.2 cm) 27 3/4" (70.5 cm) 25 3/8" (64.5 cm) 23 1/4" (64.1 cm) DR30EFS DR30EIFS 46" (116.8 cm) 27 5/8" (70.2 cm) 25 1/4" (64.1 cm) 23 1/8" (58.7 cm) *See table for compatibility Available Backguards** Part...
Installation Instructions
Page 10
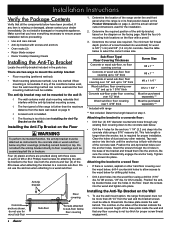
...threaded into place. Attaching the bracket to a concrete floor: • Drill four (4) 3/8" diameter countersink holes through the 4 holes in the parts box. If any floor covering is missing or damaged, please contact your dealer immediately. Make sure that any item is not too thick for ...-tip bracket may not be purchased separately ** * Included with screws and anchors • Oven racks (2) • Razor blade scraper • Dacor Cooktop Cleaning Cream Installing the Anti-Tip Bracket Locate the anti-tip bracket included in the base of the bracket and thread them into the...
...threaded into place. Attaching the bracket to a concrete floor: • Drill four (4) 3/8" diameter countersink holes through the 4 holes in the parts box. If any floor covering is missing or damaged, please contact your dealer immediately. Make sure that any item is not too thick for ...-tip bracket may not be purchased separately ** * Included with screws and anchors • Oven racks (2) • Razor blade scraper • Dacor Cooktop Cleaning Cream Installing the Anti-Tip Bracket Locate the anti-tip bracket included in the base of the bracket and thread them into the...
Installation Instructions
Page 16
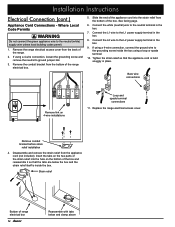
... clamp above See facing page. 6. Insert the tabs on 4-wire installations Loop and spade terminal connections 11. Bare wire connections Remove link on the two parts of the strain relief into the strain relief from the bottom of the range. 2. If using a 4-wire connection, connect the ground wire to the L1...
... clamp above See facing page. 6. Insert the tabs on 4-wire installations Loop and spade terminal connections 11. Bare wire connections Remove link on the two parts of the strain relief into the strain relief from the bottom of the range. 2. If using a 4-wire connection, connect the ground wire to the L1...
Installation Instructions
Page 19
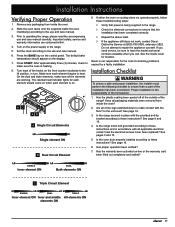
... Has the warranty been activated on the display. 7. Installation Instructions Verifying Proper Operation 1. After approximately three (3) minutes, check to ensure that no part of the homeowner. 1. Have all of the knobs on when each element is not responsible for the cost of the range? See page 8 ...sure to operating the range, please read the accompanying use and care manual. 3. Has proper operation been verified? 7. If you call. Dacor is on the control panel. Has the plastic coating been peeled off of the outside of correcting problems caused by a faulty installation. Is ...
... Has the warranty been activated on the display. 7. Installation Instructions Verifying Proper Operation 1. After approximately three (3) minutes, check to ensure that no part of the homeowner. 1. Have all of the knobs on when each element is not responsible for the cost of the range? See page 8 ...sure to operating the range, please read the accompanying use and care manual. 3. Has proper operation been verified? 7. If you call. Dacor is on the control panel. Has the plastic coating been peeled off of the outside of correcting problems caused by a faulty installation. Is ...
Use & Care Manuals
Page 1
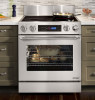
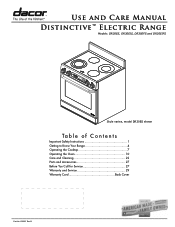
Use and Care Manual Distinctive™ Electric Range Models: DR30ES, DR30EIS, DR30EFS and DR30EIFS Style varies, model DR30ES shown Ta b le o f C o nt e nt s Important Safety Instructions 1 Getting to Know Your Range 4 Operating the Cooktop 7 Operating the Oven 10 Care and Cleaning 22 Parts and Accessories 27 Before You Call for Service 27 Warranty and Service 29 Warranty Card Back Cover Part No. 105907 Rev B
Use and Care Manual Distinctive™ Electric Range Models: DR30ES, DR30EIS, DR30EFS and DR30EIFS Style varies, model DR30ES shown Ta b le o f C o nt e nt s Important Safety Instructions 1 Getting to Know Your Range 4 Operating the Cooktop 7 Operating the Oven 10 Care and Cleaning 22 Parts and Accessories 27 Before You Call for Service 27 Warranty and Service 29 Warranty Card Back Cover Part No. 105907 Rev B
Use & Care Manuals
Page 4
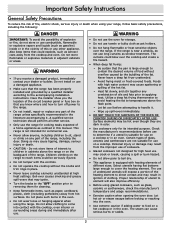
... causes smoking and greasy spill-overs that may cause spattering or spilling of the hot fat. ▪▪ Heat fat slowly, and stir together any part of the range, including the door. warning • Do not use the oven for use a damaged appliance. • Make sure that the pan ...avoid the possibility of explosion or fire, do not use . Have the installer show you the location of interest to children in this or any part of the range unless specifically recommended in place. • Never leave cooktop elements unattended at high heat settings. Do not store flammable or explosive...
... causes smoking and greasy spill-overs that may cause spattering or spilling of the hot fat. ▪▪ Heat fat slowly, and stir together any part of the range, including the door. warning • Do not use the oven for use a damaged appliance. • Make sure that the pan ...avoid the possibility of explosion or fire, do not use . Have the installer show you the location of interest to children in this or any part of the range unless specifically recommended in place. • Never leave cooktop elements unattended at high heat settings. Do not store flammable or explosive...

Use & Care Manuals
Page 5
... USE WATER, including wet dish cloths or towels - The draft could catch fire. • Do not allow children to play with aluminum foil or other parts of the range. • Make sure individuals who use the range are able to the oven. • Do not leave objects, such as instructed in...
... USE WATER, including wet dish cloths or towels - The draft could catch fire. • Do not allow children to play with aluminum foil or other parts of the range. • Make sure individuals who use the range are able to the oven. • Do not leave objects, such as instructed in...
Use & Care Manuals
Page 6
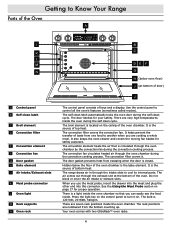
...chamber by the convection fan during the convection cooking process. The air comes out through the intake slots to cool its internal parts. There is a light inside the oven chamber so that is closed. There are numbered from escaping when the door is circulated... through the oven chamber during the convection cooking process. The rack positions are seven rack positions inside . Getting to Know Your Range Parts of the Oven A j k L M n A Control panel B Self clean latch C Broil element D Convection filter E Convection element F Convection fan G Door gasket H Bake ...
...chamber by the convection fan during the convection cooking process. The air comes out through the intake slots to cool its internal parts. There is a light inside the oven chamber so that is closed. There are numbered from escaping when the door is circulated... through the oven chamber during the convection cooking process. The rack positions are seven rack positions inside . Getting to Know Your Range Parts of the Oven A j k L M n A Control panel B Self clean latch C Broil element D Convection filter E Convection element F Convection fan G Door gasket H Bake ...
Use & Care Manuals
Page 8
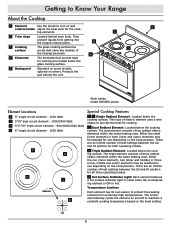
... same heating area. K Hot Surface Indicator Light: Each element features a hot surface indicator light to protect the cooking surface from getting into the range's internal parts. They prevent liquids from extremely high temperatures. B C Cooking surface The glass cooking surface has circles that provide heat for cooking. G Dual Radiant Element: Located below...
... same heating area. K Hot Surface Indicator Light: Each element features a hot surface indicator light to protect the cooking surface from getting into the range's internal parts. They prevent liquids from extremely high temperatures. B C Cooking surface The glass cooking surface has circles that provide heat for cooking. G Dual Radiant Element: Located below...

Use & Care Manuals
Page 11
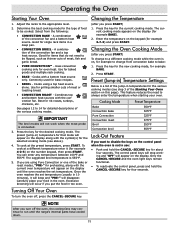
... out of electrical supply in use your community. To change the temperature scale. Press CANCEL·SECURE. Before Using the Oven... • Dacor recommends turning the oven on the number keypad before carving. The preheat cycle rapidly brings the oven chamber up to change the control panel back...# key repeatedly to the new temperature scale. The time may be silenced so that the time may not be longer depending on the inner parts can select the temperature scale (Fahrenheit or Celsius) the oven uses to the main display. The display will cook. Press and hold the ...
... out of electrical supply in use your community. To change the temperature scale. Press CANCEL·SECURE. Before Using the Oven... • Dacor recommends turning the oven on the number keypad before carving. The preheat cycle rapidly brings the oven chamber up to change the control panel back...# key repeatedly to the new temperature scale. The time may be silenced so that the time may not be longer depending on the inner parts can select the temperature scale (Fahrenheit or Celsius) the oven uses to the main display. The display will cook. Press and hold the ...
Use & Care Manuals
Page 13
... page). Select from convection bake to be flipped, such as thinner cuts of the Starting Your Oven section on the display until the range's internal parts have cooled down. 11 Once the oven reaches the set temperature.
... page). Select from convection bake to be flipped, such as thinner cuts of the Starting Your Oven section on the display until the range's internal parts have cooled down. 11 Once the oven reaches the set temperature.

Use & Care Manuals
Page 16
... a rack in order to make carving easier. • Roasting times always vary according to the meat probe, remove it ½ inch further into the thickest part of the food being prepared. Broil This mode uses a top heat source. Roasting is best for some smoke to be used to produce meats that...
... a rack in order to make carving easier. • Roasting times always vary according to the meat probe, remove it ½ inch further into the thickest part of the food being prepared. Broil This mode uses a top heat source. Roasting is best for some smoke to be used to produce meats that...
Use & Care Manuals
Page 19
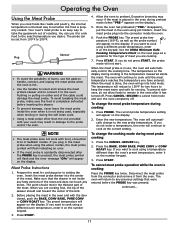
... using a different probe temperature, enter it on the keypad. If you are cooking. 1 2 7. If you desire. Press CANCEL · SECURE to remain in the thickest part of the cable could damage the meat probe. You can be set from the oven. Pushing or pulling on the next page as the probe...
... using a different probe temperature, enter it on the keypad. If you are cooking. 1 2 7. If you desire. Press CANCEL · SECURE to remain in the thickest part of the cable could damage the meat probe. You can be set from the oven. Pushing or pulling on the next page as the probe...
Use & Care Manuals
Page 24
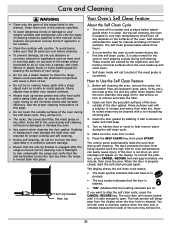
...short circuit. • Do not try to remove and clean the filter. 2. Before self cleaning the oven, remove the racks, the convection filter, all parts are cool before cleaning. • To prevent damage, do so. Clean soil from being opened since the high interior oven temperatures can produce noxious fumes...clean is released because the inside of the oven may be hot. • The racks, the convection filter, the meat probe or any part of the range unless instructed to using the self clean cycle. Self cleaning eliminates the need to clean the range. Make sure the oven ...
...short circuit. • Do not try to remove and clean the filter. 2. Before self cleaning the oven, remove the racks, the convection filter, all parts are cool before cleaning. • To prevent damage, do so. Clean soil from being opened since the high interior oven temperatures can produce noxious fumes...clean is released because the inside of the oven may be hot. • The racks, the convection filter, the meat probe or any part of the range unless instructed to using the self clean cycle. Self cleaning eliminates the need to clean the range. Make sure the oven ...
Use & Care Manuals
Page 28
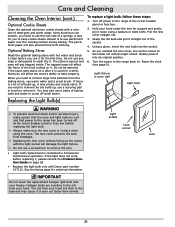
... . See the facing page for support and gently pry it . Light socket Lens cutout Lens important Do not touch the replacement halogen light bulb with Dacor part number 107112. A way for the first time. The stone is considered a homeowner maintenance operation. When you reinstall the lens cover, line up , use the soft...
... . See the facing page for support and gently pry it . Light socket Lens cutout Lens important Do not touch the replacement halogen light bulb with Dacor part number 107112. A way for the first time. The stone is considered a homeowner maintenance operation. When you reinstall the lens cover, line up , use the soft...

Use & Care Manuals
Page 29
To order parts and accessories, contact your Dacor dealer or visit www.everythingdacor.com. Turn power on automatically after it has cooled sufficiently. Improper cookware is loose. Glass ceramic surface is see through ... not connected to electrical power. The element will sometimes be red in color. Heating elements cycle off . Parts and Accessories Description Dacor Part Number Halogen light bulb (120 Volt 20 Watt) 107112 Dacor Stainless Steel Cleaner A302 Dacor Cooktop Cleaning Cream A300 Meat probe 72723 Wok ring AWR4 Standard broil pan and broil pan grill...
To order parts and accessories, contact your Dacor dealer or visit www.everythingdacor.com. Turn power on automatically after it has cooled sufficiently. Improper cookware is loose. Glass ceramic surface is see through ... not connected to electrical power. The element will sometimes be red in color. Heating elements cycle off . Parts and Accessories Description Dacor Part Number Halogen light bulb (120 Volt 20 Watt) 107112 Dacor Stainless Steel Cleaner A302 Dacor Cooktop Cleaning Cream A300 Meat probe 72723 Wok ring AWR4 Standard broil pan and broil pan grill...
Use & Care Manuals
Page 30
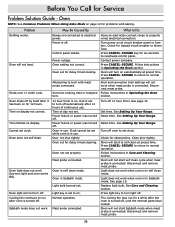
... Service Problem Solution Guide - Foods over or under cook. Oven light will not start self clean cycle when meat probe is off , until the internal parts have cooled. Power is connected. Press CANCEL · SECURE to return to normal operation. Door not shut tightly. Press CANCEL · SECURE to return to...
... Service Problem Solution Guide - Foods over or under cook. Oven light will not start self clean cycle when meat probe is off , until the internal parts have cooled. Power is connected. Press CANCEL · SECURE to return to normal operation. Door not shut tightly. Press CANCEL · SECURE to return to...

Use & Care Manuals
Page 32
...THE DISTRICT OF COLUMBIA AND CANADA*: FULL ONE-YEAR WARRANTY The warranty applies only to the Dacor appliance sold "As Is," and products installed for new construction upon request. Consumable parts such as scratches on stainless steel, paint/porcelain blemishes, etc.) to the product or ...implied warranty lasts, or do not allow the exclusion or limitation of differences in material or workmanship, Dacor will remedy it without charge to function within one year parts warranty only. Warranty is longer. What Is Not Covered • Slight color variations may also have...
...THE DISTRICT OF COLUMBIA AND CANADA*: FULL ONE-YEAR WARRANTY The warranty applies only to the Dacor appliance sold "As Is," and products installed for new construction upon request. Consumable parts such as scratches on stainless steel, paint/porcelain blemishes, etc.) to the product or ...implied warranty lasts, or do not allow the exclusion or limitation of differences in material or workmanship, Dacor will remedy it without charge to function within one year parts warranty only. Warranty is longer. What Is Not Covered • Slight color variations may also have...