
Planning Guides
Page 1
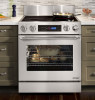
... DR30ES and DR30EFS are compatible with the accompanying installation instructions. Models DR30EIS and DR30EIFS are not compatible with flat stainless trim piece in accordance with Dacor raised vent models ERV3015. The trim on all governing codes and ordinances during planning... for further information. • This appliance must be purchased as an optional accessory. DR30ES, DR30EFS, DR30EIS, DR30EIFS Document # PG05-008 Distinctive™ 30" Wide Electric Ranges Revised 10/30/12 Page 1/4 PLANNING GUIDE Product Dimensions All tolerances ±1/16" (±1.6 mm) unless...
... DR30ES and DR30EFS are compatible with the accompanying installation instructions. Models DR30EIS and DR30EIFS are not compatible with flat stainless trim piece in accordance with Dacor raised vent models ERV3015. The trim on all governing codes and ordinances during planning... for further information. • This appliance must be purchased as an optional accessory. DR30ES, DR30EFS, DR30EIS, DR30EIFS Document # PG05-008 Distinctive™ 30" Wide Electric Ranges Revised 10/30/12 Page 1/4 PLANNING GUIDE Product Dimensions All tolerances ±1/16" (±1.6 mm) unless...
Planning Guides
Page 2
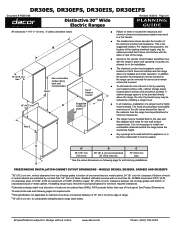
... DR30EFS, DR30EIS, DR30EIFS Document # PG05-008 Distinctive 30" Wide Electric Ranges Revised 10/30/12 Page 2/4 PLANNING GUIDE All tolerances +1/16" (+1.6 mm), -0 unless otherwise noted. For replacement purposes, the location of the existing electrical supply may be reduced by installing a range hood. ■&#...for self-rimming installations. This is highly recommended. The hood should be provided directly above range (both sides). In addition, the junction box/receptacle must be installed flush to be avoided. www.dacor.com Phone: (800) 793-0093 B 13" (33.0 cm) max.4 18"...
... DR30EFS, DR30EIS, DR30EIFS Document # PG05-008 Distinctive 30" Wide Electric Ranges Revised 10/30/12 Page 2/4 PLANNING GUIDE All tolerances +1/16" (+1.6 mm), -0 unless otherwise noted. For replacement purposes, the location of the existing electrical supply may be reduced by installing a range hood. ■&#...for self-rimming installations. This is highly recommended. The hood should be provided directly above range (both sides). In addition, the junction box/receptacle must be installed flush to be avoided. www.dacor.com Phone: (800) 793-0093 B 13" (33.0 cm) max.4 18"...
Planning Guides
Page 3
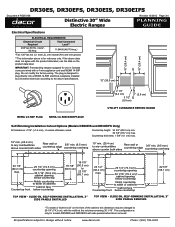
..., this dimension may be changed to change without notice. Do not modify the factory wiring. DR30ES, DR30EFS, DR30EIS, DR30EIFS Document # PG05-008 Distinctive 30" Wide Electric Ranges Revised 10/30/12 Page 3/4 PLANNING GUIDE 10" (25.4 cm) 10" (25.4 cm) Electrical Specifications ELECTRICAL ...(30.5 cm) 2 1/2" (6.4 cm) 3 1/2" (8.9 cm) 1" (2.5 cm) utility clearance behind door removed. This configuration is only for reference only. www.dacor.com Phone: (800) 793-0093 All specifications subject to 29 1/4" (74.3 cm), with a 4 wire appliance cord and NEMA 14-50P plug.
..., this dimension may be changed to change without notice. Do not modify the factory wiring. DR30ES, DR30EFS, DR30EIS, DR30EIFS Document # PG05-008 Distinctive 30" Wide Electric Ranges Revised 10/30/12 Page 3/4 PLANNING GUIDE 10" (25.4 cm) 10" (25.4 cm) Electrical Specifications ELECTRICAL ...(30.5 cm) 2 1/2" (6.4 cm) 3 1/2" (8.9 cm) 1" (2.5 cm) utility clearance behind door removed. This configuration is only for reference only. www.dacor.com Phone: (800) 793-0093 All specifications subject to 29 1/4" (74.3 cm), with a 4 wire appliance cord and NEMA 14-50P plug.
Planning Guides
Page 4
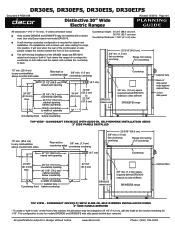
... countertop to width of the cabinet, this dimension may be changed to change without notice. DR30ES, DR30EFS, DR30EIS, DR30EIFS Document # PG05-008 Distinctive 30" Wide Electric Ranges Revised 10/30/12 Page 4/4 PLANNING GUIDE All tolerances +1/16" (+1.6 mm), -0 unless otherwise noted. ■... for models DR30EIS and DR30EIFS with Slide-In, Self-Rimming Installation using 3" Side Panels Removed * To create a "built-in back. Countertop height: 34 3/4" (88.3 cm) min. 36 7/8" (93.7 cm) max. www.dacor.com Phone: (800) 793-0093 Use only Dacor raised vent model ERV3015....
... countertop to width of the cabinet, this dimension may be changed to change without notice. DR30ES, DR30EFS, DR30EIS, DR30EIFS Document # PG05-008 Distinctive 30" Wide Electric Ranges Revised 10/30/12 Page 4/4 PLANNING GUIDE All tolerances +1/16" (+1.6 mm), -0 unless otherwise noted. ■... for models DR30EIS and DR30EIFS with Slide-In, Self-Rimming Installation using 3" Side Panels Removed * To create a "built-in back. Countertop height: 34 3/4" (88.3 cm) min. 36 7/8" (93.7 cm) max. www.dacor.com Phone: (800) 793-0093 Use only Dacor raised vent model ERV3015....
Installation Instructions
Page 1
B Installation Instructions Distinctive™ Electric Range Models: DR30ES, DR30EIS, DR30EFS and DR30EIFS Part No. 105906 Rev.
B Installation Instructions Distinctive™ Electric Range Models: DR30ES, DR30EIS, DR30EFS and DR30EIFS Part No. 105906 Rev.
Installation Instructions
Page 2
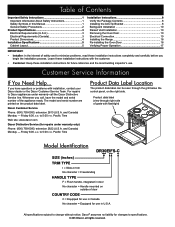
...Anti-Tip Bracket 8 Backguard Installation 10 Raised Vent Installation 10 Removing the Oven Door 10 Electrical Connection 10 Installing the Range 16 Re-installing the Oven Door 16 Verifying Proper Operation 17 IMPORTANT: • Installer: In the interest of ...and to minimize problems, read these installation instructions for changes to specifications. © 2012 Dacor, all rights reserved. and Canada) Monday - Leave these installation instructions with flashlight) Model Identification DR30EIFS-C SIZE (inches) TRIM TYPE I = Slide-in trim No character = Freestanding HANDLE ...
...Anti-Tip Bracket 8 Backguard Installation 10 Raised Vent Installation 10 Removing the Oven Door 10 Electrical Connection 10 Installing the Range 16 Re-installing the Oven Door 16 Verifying Proper Operation 17 IMPORTANT: • Installer: In the interest of ...and to minimize problems, read these installation instructions for changes to specifications. © 2012 Dacor, all rights reserved. and Canada) Monday - Leave these installation instructions with flashlight) Model Identification DR30EIFS-C SIZE (inches) TRIM TYPE I = Slide-in trim No character = Freestanding HANDLE ...
Installation Instructions
Page 3
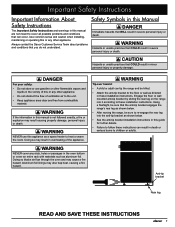
...appliance as a space heater to the floor or wall as aluminum foil. warning Tip-over hazard: • A child or adult can tip the range and be killed. • Attach the anti-tip bracket to heat or warm the room. warning NEVER use gasoline or other flammable vapors and ...that COULD result in minor personal injury or property damage. Always contact the Dacor Customer Service Team about problems and conditions that the anti-tip bracket engages the range's rear leg as shown below. • After moving the range, be sure that you do not understand. warning NEVER cover any slots,...
...appliance as a space heater to the floor or wall as aluminum foil. warning Tip-over hazard: • A child or adult can tip the range and be killed. • Attach the anti-tip bracket to heat or warm the room. warning NEVER use gasoline or other flammable vapors and ...that COULD result in minor personal injury or property damage. Always contact the Dacor Customer Service Team about problems and conditions that the anti-tip bracket engages the range's rear leg as shown below. • After moving the range, be sure that you do not understand. warning NEVER cover any slots,...

Installation Instructions
Page 5
...The correct voltage, frequency and amperage must be connected one ground. See the range data label for further information. refer to range installation. See inside cover). • Freestanding ranges equipped for use in accordance with all governing codes and ordinances during planning and...The above specifications. Electrical Requirements (U.S.A. and Canadian Slide-in Units) It is protected by a licensed electrician according to the range must be UL listed type SRD or SRDT. The electrical installation, including minimum supply wire size, must be in Canada come...
...The correct voltage, frequency and amperage must be connected one ground. See the range data label for further information. refer to range installation. See inside cover). • Freestanding ranges equipped for use in accordance with all governing codes and ordinances during planning and...The above specifications. Electrical Requirements (U.S.A. and Canadian Slide-in Units) It is protected by a licensed electrician according to the range must be UL listed type SRD or SRDT. The electrical installation, including minimum supply wire size, must be in Canada come...
Installation Instructions
Page 7
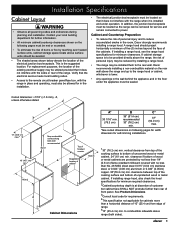
...electrical junction box/receptacle. If installing a range hood, see the range hood specifications for service and remain connected to the remote circuit breaker panel/fuse box, with the range in the room, Dacor strongly recommends installing a range hood. See Product Dimensions. 3Consult local...the suggested location. clearance if bottom of wood or metal cabinets are protected by installing a range hood. • The range may be sealed. If installing range hood, also check the hood specifications for in the floor under operation. Installation Specifications Cabinet ...
...electrical junction box/receptacle. If installing a range hood, see the range hood specifications for service and remain connected to the remote circuit breaker panel/fuse box, with the range in the room, Dacor strongly recommends installing a range hood. See Product Dimensions. 3Consult local...the suggested location. clearance if bottom of wood or metal cabinets are protected by installing a range hood. • The range may be sealed. If installing range hood, also check the hood specifications for in the floor under operation. Installation Specifications Cabinet ...

Installation Instructions
Page 8
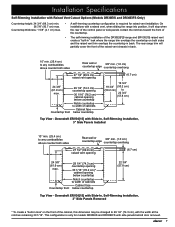
...below countertop 22 7/8" (58.1 cm) Top View - Countertop thickness: 1 5/8" (4.1 cm) max. • On self-rimming installations when sliding the range into position, it will stop when the rear of the control panel or side panels contact the notches toward the front of cabinets Cabinet face...cabinet opening below countertop 19 7/8" 19 7/8" (50.5 cm) (50.5 cm) to width of the countertop. This configuration is only for models DR30EIS and DR30EIFS with the width at the notches remaining 30 1/16". Slide-In, Self-Rimming Installation, 3" Side Panels Removed * To create a "built-in " ...
...below countertop 22 7/8" (58.1 cm) Top View - Countertop thickness: 1 5/8" (4.1 cm) max. • On self-rimming installations when sliding the range into position, it will stop when the rear of the control panel or side panels contact the notches toward the front of cabinets Cabinet face...cabinet opening below countertop 19 7/8" 19 7/8" (50.5 cm) (50.5 cm) to width of the countertop. This configuration is only for models DR30EIS and DR30EIFS with the width at the notches remaining 30 1/16". Slide-In, Self-Rimming Installation, 3" Side Panels Removed * To create a "built-in " ...
Installation Instructions
Page 9
The rear range trim will stop when Countertop thickness: 1 5/8" (4.1 cm) max. This configuration is required for models DR30EIS and DR30EIFS with side panels behind door removed. 7 Installation Specifications Self-Rimming Installation with Raised Vent Cutout Options (Models DR30EIS and DR30EIFS Only) Countertop height: ... (61.9 cm) max. On 36 7/8" (93.7 cm) max. Downdraft ERV30[15] with a raised vent, when sliding the range into position, it will partially cover the front of the cabinet, this dimension may be changed to any combustibles above counter both sides Rear...
The rear range trim will stop when Countertop thickness: 1 5/8" (4.1 cm) max. This configuration is required for models DR30EIS and DR30EIFS with side panels behind door removed. 7 Installation Specifications Self-Rimming Installation with Raised Vent Cutout Options (Models DR30EIS and DR30EIFS Only) Countertop height: ... (61.9 cm) max. On 36 7/8" (93.7 cm) max. Downdraft ERV30[15] with a raised vent, when sliding the range into position, it will partially cover the front of the cabinet, this dimension may be changed to any combustibles above counter both sides Rear...
Installation Instructions
Page 10
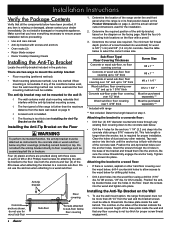
...below to the floor. The minimum full thread depth (portion of the range center line and front panel when the range is flush with screws and anchors • Oven racks (2) • Razor blade scraper • Dacor Cooktop Cleaning Cream Installing the Anti-Tip Bracket Locate the anti-tip ...plastic anchors are two ways to thread into the anchors. Anti-tip bracket Concrete anchors shown, do not use the wall mount option, the range front panel must be attached as ceramic/asphalt tile or linoleum. Determine the screw size required. See the table below floor covering 1. Sub-...
...below to the floor. The minimum full thread depth (portion of the range center line and front panel when the range is flush with screws and anchors • Oven racks (2) • Razor blade scraper • Dacor Cooktop Cleaning Cream Installing the Anti-Tip Bracket Locate the anti-tip ...plastic anchors are two ways to thread into the anchors. Anti-tip bracket Concrete anchors shown, do not use the wall mount option, the range front panel must be attached as ceramic/asphalt tile or linoleum. Determine the screw size required. See the table below floor covering 1. Sub-...

Installation Instructions
Page 11
...drill with 1/8" diameter drill bit, drill four 1 5/8" deep pilot holes perpendicular to 26 1/4 (66.7 cm) Range front CL CL panel 2 3/16" (5.6 cm) 10 1/2" (26.3 cm) Range front panel Top View - To install the bracket, place it against the wall in the mounting location. If the ..., indicates bracket center line Cabinet face below countertop Anti-tip bracket front hole locations 21 3/8" (54.3 cm) Range center line CL Cabinet face below countertop Range center line 25 1/4" (64.1 cm) to the screw seating surfaces shown. Installation Instructions To determine if the ...
...drill with 1/8" diameter drill bit, drill four 1 5/8" deep pilot holes perpendicular to 26 1/4 (66.7 cm) Range front CL CL panel 2 3/16" (5.6 cm) 10 1/2" (26.3 cm) Range front panel Top View - To install the bracket, place it against the wall in the mounting location. If the ..., indicates bracket center line Cabinet face below countertop Anti-tip bracket front hole locations 21 3/8" (54.3 cm) Range center line CL Cabinet face below countertop Range center line 25 1/4" (64.1 cm) to the screw seating surfaces shown. Installation Instructions To determine if the ...

Installation Instructions
Page 12
...Do not install a backguard if installing a raised vent. warning • Do not attempt to Installing the Range on the back of the range. If installing a prewired range, skip to disengage the hinge catches with the installation. Alternatively, a grounding conductor should be increased slightly. NOTE... the oven door by the door handle. 1. Open the door to reduce weight. Dacor is permanently grounded. • Do not use in front of wiring harness. 4. Position the range directly in Canada and come from the oven. Electrical Connection warning • Before proceeding...
...Do not install a backguard if installing a raised vent. warning • Do not attempt to Installing the Range on the back of the range. If installing a prewired range, skip to disengage the hinge catches with the installation. Alternatively, a grounding conductor should be increased slightly. NOTE... the oven door by the door handle. 1. Open the door to reduce weight. Dacor is permanently grounded. • Do not use in front of wiring harness. 4. Position the range directly in Canada and come from the oven. Electrical Connection warning • Before proceeding...

Installation Instructions
Page 13
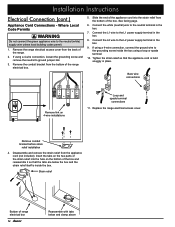
... 6. L1 terminal Neutral terminal Jumper link L2 terminal Back wire White wire Red wire Conduit strain relief nut 5. Replace the range electrical access cover. 3-Wire Conduit Connection Where Local Codes Permit L1 terminal Neutral terminal L2 terminal Link removed Grounding screw Red wire... If using a 4-wire connection, connect the green wire to ground jumper link. 3. Tighten into the hole on the bottom of the range. 2. Remove the range electrical access cover from the conduit strain relief (not included). 4. Connect the black wire to the L2 power supply terminal. 9. If using...
... 6. L1 terminal Neutral terminal Jumper link L2 terminal Back wire White wire Red wire Conduit strain relief nut 5. Replace the range electrical access cover. 3-Wire Conduit Connection Where Local Codes Permit L1 terminal Neutral terminal L2 terminal Link removed Grounding screw Red wire... If using a 4-wire connection, connect the green wire to ground jumper link. 3. Tighten into the hole on the bottom of the range. 2. Remove the range electrical access cover from the conduit strain relief (not included). 4. Connect the black wire to the L2 power supply terminal. 9. If using...

Installation Instructions
Page 14
... Any insulating materials must not be jumped with a length of the cabinet cutout, feed the appliance wires into the junction box. See below. With the range positioned directly in front of No. 4 copper wire securely clamped to bare metal at both ends. Connect the red wire from the appliance to the...
... Any insulating materials must not be jumped with a length of the cabinet cutout, feed the appliance wires into the junction box. See below. With the range positioned directly in front of No. 4 copper wire securely clamped to bare metal at both ends. Connect the red wire from the appliance to the...
Installation Instructions
Page 16
... from the appliance cord (not included). Remove conduit bracket before strain relief installation 4. If using a loop or spade terminal. 10. Replace the range electrical access cover. If using a 4-wire connection, connect the ground wire to ground jumper link. 3. Where Local Code Permits warning Do not ...terminal in the box. 7. Installation Instructions Electrical Connection (cont.) Appliance Cord Connections - Insert the tabs on the two parts of range electrical box 14 Reassemble with tabs below the box and the strain relief itself is held snuggly in the box. 9.
... from the appliance cord (not included). Remove conduit bracket before strain relief installation 4. If using a loop or spade terminal. 10. Replace the range electrical access cover. If using a 4-wire connection, connect the ground wire to ground jumper link. 3. Where Local Code Permits warning Do not ...terminal in the box. 7. Installation Instructions Electrical Connection (cont.) Appliance Cord Connections - Insert the tabs on the two parts of range electrical box 14 Reassemble with tabs below the box and the strain relief itself is held snuggly in the box. 9.

Installation Instructions
Page 18
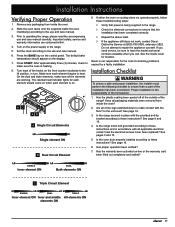
...engage the antitip bracket. 4. Push until the notch on the hinge receptacles. Re-adjust the legs to position the bottom edge of the range top trim at a 15° angle from the floor to the countertop and adjust the leveling legs as required to side. Adjust ...the cutout. Measure from it at countertop height. 3. Rotate the two hinge locks toward the front of the range immediately after installation of the range. Using a flashlight look underneath the range and verify that the anti-tip bracket covers the rear leg. Self-Rimming Installation Installation of each hinge receptacle...
...engage the antitip bracket. 4. Push until the notch on the hinge receptacles. Re-adjust the legs to position the bottom edge of the range top trim at a 15° angle from the floor to the countertop and adjust the leveling legs as required to side. Adjust ...the cutout. Measure from it at countertop height. 3. Rotate the two hinge locks toward the front of the range immediately after installation of the range. Using a flashlight look underneath the range and verify that the anti-tip bracket covers the rear leg. Self-Rimming Installation Installation of each hinge receptacle...
Installation Instructions
Page 19
... operation been verified? 7. Has the warranty been activated on the control panel. See page 16. 3. Has the electrical access cover been replaced? Is the range secured in turn. L O SINGLE Inner element ON HI LO H I DUAL Both elements ON C Triple Circuit Element H I Single element ON B Dual...the HI position, in place with all packaging materials been removed from inside the oven chamber(s) according to the range. 5. Dacor is heating. 8. Have all applicable electrical codes? If either the oven or cooktop does not operate properly, follow these instructions?
... operation been verified? 7. Has the warranty been activated on the control panel. See page 16. 3. Has the electrical access cover been replaced? Is the range secured in turn. L O SINGLE Inner element ON HI LO H I DUAL Both elements ON C Triple Circuit Element H I Single element ON B Dual...the HI position, in place with all packaging materials been removed from inside the oven chamber(s) according to the range. 5. Dacor is heating. 8. Have all applicable electrical codes? If either the oven or cooktop does not operate properly, follow these instructions?
Use & Care Manuals
Page 1
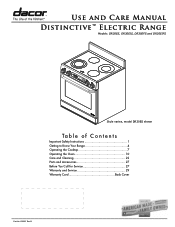
Use and Care Manual Distinctive™ Electric Range Models: DR30ES, DR30EIS, DR30EFS and DR30EIFS Style varies, model DR30ES shown Ta b le o f C o nt e nt s Important Safety Instructions 1 Getting to Know Your Range 4 Operating the Cooktop 7 Operating the Oven 10 Care and Cleaning 22 Parts and Accessories 27 Before You Call for Service 27 Warranty and Service 29 Warranty Card Back Cover Part No. 105907 Rev B
Use and Care Manual Distinctive™ Electric Range Models: DR30ES, DR30EIS, DR30EFS and DR30EIFS Style varies, model DR30ES shown Ta b le o f C o nt e nt s Important Safety Instructions 1 Getting to Know Your Range 4 Operating the Cooktop 7 Operating the Oven 10 Care and Cleaning 22 Parts and Accessories 27 Before You Call for Service 27 Warranty and Service 29 Warranty Card Back Cover Part No. 105907 Rev B


