Installation Instructions
Page 10
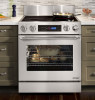
.... • Use and care manual • Anti-tip bracket with screws and anchors • Oven racks (2) • Razor blade scraper • Dacor Cooktop Cleaning Cream Installing the Anti-Tip Bracket Locate the anti-tip bracket included in the parts box. The anti-tip bracket may not be mounted to thread into the anchors...
.... • Use and care manual • Anti-tip bracket with screws and anchors • Oven racks (2) • Razor blade scraper • Dacor Cooktop Cleaning Cream Installing the Anti-Tip Bracket Locate the anti-tip bracket included in the parts box. The anti-tip bracket may not be mounted to thread into the anchors...
Installation Instructions
Page 19
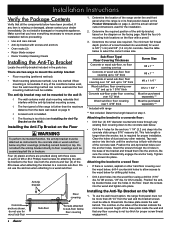
...be sure to the use and care manual carefully. Has the warranty been activated on the front counter-clockwise to ensure that no part of the knobs on -line or the warranty card been filled out completely and mailed? Turn each of the installation has been ... onto the supports inside the oven. 2. After approximately three (3) minutes, check to ensure that the installation has been completed correctly. ◊ Repeat the above tests. ◊ If the appliance still does not work, contact Dacor Distinctive Service at (800) 793-0093, extension 2822. Installation Checklist warning To ...
...be sure to the use and care manual carefully. Has the warranty been activated on the front counter-clockwise to ensure that no part of the knobs on -line or the warranty card been filled out completely and mailed? Turn each of the installation has been ... onto the supports inside the oven. 2. After approximately three (3) minutes, check to ensure that the installation has been completed correctly. ◊ Repeat the above tests. ◊ If the appliance still does not work, contact Dacor Distinctive Service at (800) 793-0093, extension 2822. Installation Checklist warning To ...
Use & Care Manuals
Page 1
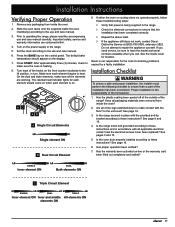
Use and Care Manual Distinctive™ Electric Range Models: DR30ES, DR30EIS, DR30EFS and DR30EIFS Style varies, model DR30ES shown Ta b le o f C o nt e nt s Important Safety Instructions 1 Getting to Know Your Range 4 Operating the Cooktop 7 Operating the Oven 10 Care and Cleaning 22 Parts and Accessories 27 Before You Call for Service 27 Warranty and Service 29 Warranty Card Back Cover Part No. 105907 Rev B
Use and Care Manual Distinctive™ Electric Range Models: DR30ES, DR30EIS, DR30EFS and DR30EIFS Style varies, model DR30ES shown Ta b le o f C o nt e nt s Important Safety Instructions 1 Getting to Know Your Range 4 Operating the Cooktop 7 Operating the Oven 10 Care and Cleaning 22 Parts and Accessories 27 Before You Call for Service 27 Warranty and Service 29 Warranty Card Back Cover Part No. 105907 Rev B
Use & Care Manuals
Page 4
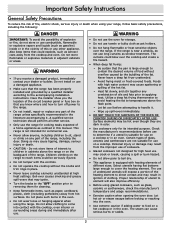
... the hot fat. ▪▪ Heat fat slowly, and stir together any part of a home appliance as paper, cardboard, plastic, cloth (including potholders) away from hot surfaces. warning • Do not use the oven for use towels or bulky cloth as pot holders. • Do not hang...cabinets or areas. Check the manufacturer's recommendations before use the range for cleaning. • Keep flammable items, such as outlined in this or any part of different sizes. Boil-over the cooktop and create a fire hazard. • When deep fat frying: ▪▪ Be certain that may ...
... the hot fat. ▪▪ Heat fat slowly, and stir together any part of a home appliance as paper, cardboard, plastic, cloth (including potholders) away from hot surfaces. warning • Do not use the oven for use towels or bulky cloth as pot holders. • Do not hang...cabinets or areas. Check the manufacturer's recommendations before use the range for cleaning. • Keep flammable items, such as outlined in this or any part of different sizes. Boil-over the cooktop and create a fire hazard. • When deep fat frying: ▪▪ Be certain that may ...

Use & Care Manuals
Page 5
...the event that can be burned. on a broken cooktop. Do not allow acids (citrus juices, tomato sauces, etc.) to become covered up by high oven temperatures or mechanical shock. 3 BE CAREFUL TO PREVENT BURNS. DO NOT USE WATER, including wet dish cloths or towels - caution • Do not... The draft could catch fire. • Do not allow the broil element on the oven ceiling to remain on the handle or touch other parts of the oven may scratch the range's surfaces. • Do not line the oven with the controls, pull on the range's surfaces. Sharp objects may cause damage. &#...
...the event that can be burned. on a broken cooktop. Do not allow acids (citrus juices, tomato sauces, etc.) to become covered up by high oven temperatures or mechanical shock. 3 BE CAREFUL TO PREVENT BURNS. DO NOT USE WATER, including wet dish cloths or towels - caution • Do not... The draft could catch fire. • Do not allow the broil element on the oven ceiling to remain on the handle or touch other parts of the oven may scratch the range's surfaces. • Do not line the oven with the controls, pull on the range's surfaces. Sharp objects may cause damage. &#...
Use & Care Manuals
Page 6
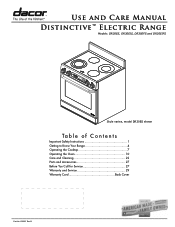
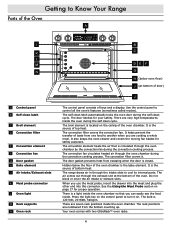
... filter covers the convection fan. There are numbered from one food to cool its internal parts. The door latches for safety purposes. There are cooking a whole meal. Use the control panel to Know Your Range Parts of the Oven A j k L M n A Control panel B Self clean latch C Broil element D Convection filter E Convection element F Convection fan G Door...
... filter covers the convection fan. There are numbered from one food to cool its internal parts. The door latches for safety purposes. There are cooking a whole meal. Use the control panel to Know Your Range Parts of the Oven A j k L M n A Control panel B Self clean latch C Broil element D Convection filter E Convection element F Convection fan G Door...

Use & Care Manuals
Page 11
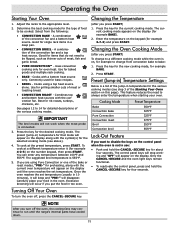
... beeps any time you press any residual oils used . • When you have set to change the AM-PM indicator. 3. Before Using the Oven... • Dacor recommends turning the oven on for 10 to cook. Setting the Temperature Scale You can cause an undesirable smell the first few times the... to change the temperature scale. Press and hold the CLOCK key for six seconds, until "beep" appears on the inner parts can select the temperature scale (Fahrenheit or Celsius) the oven uses to change the clock mode. It takes several minutes to enter military time when setting the clock. The...
... beeps any time you press any residual oils used . • When you have set to change the AM-PM indicator. 3. Before Using the Oven... • Dacor recommends turning the oven on for 10 to cook. Setting the Temperature Scale You can cause an undesirable smell the first few times the... to change the temperature scale. Press and hold the CLOCK key for six seconds, until "beep" appears on the inner parts can select the temperature scale (Fahrenheit or Celsius) the oven uses to change the clock mode. It takes several minutes to enter military time when setting the clock. The...
Use & Care Manuals
Page 13
...bread. • PURE CONVECTION™ - Enter the temperature on the display until the range's internal parts have cooled down. 11 Select from convection bake to run until the oven reaches the set temperature (usually in a deep pan. • CONVECTION BROIL - Cooks using Pure ...heat source. Use for the various cookin1g mo2des (see above). 4. To cook at the preset temperature, press START. Carefully place your oven. 12 Cooking Mode Preset Temperature 2Bake1 2 Convection bake Pure Convection 350°F 325°F 325°F Convection roast Broil Convection broil...
...bread. • PURE CONVECTION™ - Enter the temperature on the display until the range's internal parts have cooled down. 11 Select from convection bake to run until the oven reaches the set temperature (usually in a deep pan. • CONVECTION BROIL - Cooks using Pure ...heat source. Use for the various cookin1g mo2des (see above). 4. To cook at the preset temperature, press START. Carefully place your oven. 12 Cooking Mode Preset Temperature 2Bake1 2 Convection bake Pure Convection 350°F 325°F 325°F Convection roast Broil Convection broil...

Use & Care Manuals
Page 16
... the natural juices will cause a steamed effect. If the second temperature registers below the first, continue cooking the meat. • Remove meats from the oven. • To prevent sticking, lightly grease the broiler grill. It is a dry heat process. • Poultry should not touch bone, fat or ... • Reduce spatter by lining the bottom of the food. • When using a meat thermometer, insert the probe halfway into the thickest part of me1at, fis2h1 and2garlic bread. Foods that fits the size of the roasting pan with tall sides. The meat will reduce spatter, smoke and ...
... the natural juices will cause a steamed effect. If the second temperature registers below the first, continue cooking the meat. • Remove meats from the oven. • To prevent sticking, lightly grease the broiler grill. It is a dry heat process. • Poultry should not touch bone, fat or ... • Reduce spatter by lining the bottom of the food. • When using a meat thermometer, insert the probe halfway into the thickest part of me1at, fis2h1 and2garlic bread. Foods that fits the size of the roasting pan with tall sides. The meat will reduce spatter, smoke and ...
Use & Care Manuals
Page 19
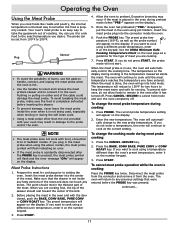
... the BAKE, CONV BAKE, PURE CONV or CONV ROAST key. When you are cooking. 1 2 7. Before placing the meat in the thickest part of the meat. Allow the oven to setting the oven. When the meat probe is in damage to cook until the meat temperature reaches the temperature you have entered. When the... the new probe temperature. To prevent sickness, do not allow foods to keep the meat warm and safe for two hours to remain in the oven during meat probe cooking: 1. To avoid breaking the meat probe, make sure the food is completely defrosted before the PROBE key was pressed. Meat ...
... the BAKE, CONV BAKE, PURE CONV or CONV ROAST key. When you are cooking. 1 2 7. Before placing the meat in the thickest part of the meat. Allow the oven to setting the oven. When the meat probe is in damage to cook until the meat temperature reaches the temperature you have entered. When the... the new probe temperature. To prevent sickness, do not allow foods to keep the meat warm and safe for two hours to remain in the oven during meat probe cooking: 1. To avoid breaking the meat probe, make sure the food is completely defrosted before the PROBE key was pressed. Meat ...
Use & Care Manuals
Page 24
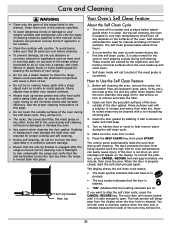
...Do not use abrasive or corrosive cleaners or applicators such as a knife or metal spatula. During self cleaning, the oven is heated to very high temperatures which burn off any part of the range unless instructed to clean the range. Heavily soiled areas may still be cleaned with a solution of... and verify that the heating elements are caused by dabbing it is moved out for the oven to force the door open . Before self cleaning the oven, remove the racks, the convection filter, all parts are cool before cleaning. • To prevent damage, do not try to exercise caution...
...Do not use abrasive or corrosive cleaners or applicators such as a knife or metal spatula. During self cleaning, the oven is heated to very high temperatures which burn off any part of the range unless instructed to clean the range. Heavily soiled areas may still be cleaned with a solution of... and verify that the heating elements are caused by dabbing it is moved out for the oven to force the door open . Before self cleaning the oven, remove the racks, the convection filter, all parts are cool before cleaning. • To prevent damage, do not try to exercise caution...
Use & Care Manuals
Page 28
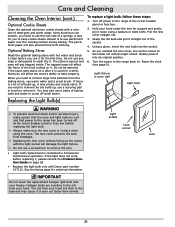
... your fingers. See the facing page for the first time. Light socket Lens cutout Lens important Do not touch the replacement halogen light bulb with Dacor part number 107112. A way for you need to remove it for ordering information. Do not be alarmed if the stone gets stains on . Turn off ...small stains. Halogen bulbs are cool and that power to the range back on it after it loose using the oven. Do not use a screwdriver to use warm water and a scrub brush. Stains do not affect the stone's ability to the oils from breakage. •...
... your fingers. See the facing page for the first time. Light socket Lens cutout Lens important Do not touch the replacement halogen light bulb with Dacor part number 107112. A way for you need to remove it for ordering information. Do not be alarmed if the stone gets stains on . Turn off ...small stains. Halogen bulbs are cool and that power to the range back on it after it loose using the oven. Do not use a screwdriver to use warm water and a scrub brush. Stains do not affect the stone's ability to the oils from breakage. •...

Use & Care Manuals
Page 29
...6 inch backguard kit ADRB30E06 9 inch backguard kit ADRB30E09 GlideRack type oven rack ARGO30H Pizza baking stone ABS16 Cookie sheets* (three per carton) ACS303 * Dacor full sized cookie sheets maximize oven rack baking capabilities by utilizing the total usable rack space. Before You...operating condition, especially during rapid heat-up. You may also notice a red tint under these conditions. To order parts and accessories, contact your Dacor dealer or visit www.everythingdacor.com. Range not connected to correct voltage. Contact power company. Select proper cookware. ...
...6 inch backguard kit ADRB30E06 9 inch backguard kit ADRB30E09 GlideRack type oven rack ARGO30H Pizza baking stone ABS16 Cookie sheets* (three per carton) ACS303 * Dacor full sized cookie sheets maximize oven rack baking capabilities by utilizing the total usable rack space. Before You...operating condition, especially during rapid heat-up. You may also notice a red tint under these conditions. To order parts and accessories, contact your Dacor dealer or visit www.everythingdacor.com. Range not connected to correct voltage. Contact power company. Select proper cookware. ...
Use & Care Manuals
Page 30
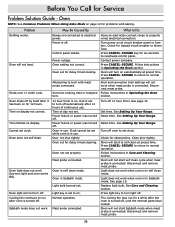
... 12. Check for six seconds to on for delay timed cleaning. Oven set to turn off . Meat probe connected. Oven in self clean mode. Press light key to turn light off , until the internal parts have cooled. Attempting to self clean at preset time. Time of continuous... use . Oven not set . Meat probe connected. Problem Nothing works. Oven in Operating the Oven section. 12 hour timer is set for 12 hours. Disconnect ...
... 12. Check for six seconds to on for delay timed cleaning. Oven set to turn off . Meat probe connected. Oven in self clean mode. Press light key to turn light off , until the internal parts have cooled. Attempting to self clean at preset time. Time of continuous... use . Oven not set . Meat probe connected. Problem Nothing works. Oven in Operating the Oven section. 12 hour timer is set for 12 hours. Disconnect ...

Use & Care Manuals
Page 36
... future and giving you the support you first exposed to fill in one onl y.) A. Web site: Corporate phone: www.dacor.com (800) 793-0093 Cooking Show F Builder B. Magazine G. Appliance Dealer B. Builder ...Supplier D. For what purpose was the product purchased? A. Cooktop C. Dishwasher B. Oven D. Other 2. How were you deserve. Appliance Dealer Showroom H. Part of appliances do not consider the sale of expressing our gratitude! Under $75,000 B. $75,000 - $100...
... future and giving you the support you first exposed to fill in one onl y.) A. Web site: Corporate phone: www.dacor.com (800) 793-0093 Cooking Show F Builder B. Magazine G. Appliance Dealer B. Builder ...Supplier D. For what purpose was the product purchased? A. Cooktop C. Dishwasher B. Oven D. Other 2. How were you deserve. Appliance Dealer Showroom H. Part of appliances do not consider the sale of expressing our gratitude! Under $75,000 B. $75,000 - $100...


