Planning Guide
Page 1
...; Do not install the refrigerator in this document. Location Requirements The refrigerator is required. Water-Supply Requirements • To function properly, the water dispenser and icemaker need a cold-water pressure of space where the ambient temperature would be less than 50°F (10ºC). All specifications subject to support 600 lbs (272 kg) without notice. Dacor recommends connecting the refrigerator to its power source.) • Do not use an extension...
...; Do not install the refrigerator in this document. Location Requirements The refrigerator is required. Water-Supply Requirements • To function properly, the water dispenser and icemaker need a cold-water pressure of space where the ambient temperature would be less than 50°F (10ºC). All specifications subject to support 600 lbs (272 kg) without notice. Dacor recommends connecting the refrigerator to its power source.) • Do not use an extension...

Planning Guide
Page 4
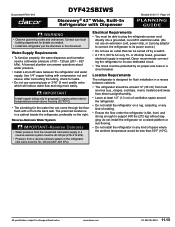
... of doors) 3 5/8 K Freezer door handle to handle (freezer/fridge doors fully open 135°) 65 N Overall depth of fridge door (door open 135°) 48 3/8 T Depth, back of fridge to forward-most edge of fridge (incl. www.dacor.com Ph. 800.793.0093 11.16 door handle) 28 3/8 O Depth of fridge (excl. Document # PG11-019 DYF42SBIWS Discovery® 42" Wide, Built-In Refrigerator with Dispenser Revised 01/31/17 Page 4/4 PLANNING GUIDE HEIGHT...
... of doors) 3 5/8 K Freezer door handle to handle (freezer/fridge doors fully open 135°) 65 N Overall depth of fridge door (door open 135°) 48 3/8 T Depth, back of fridge to forward-most edge of fridge (incl. www.dacor.com Ph. 800.793.0093 11.16 door handle) 28 3/8 O Depth of fridge (excl. Document # PG11-019 DYF42SBIWS Discovery® 42" Wide, Built-In Refrigerator with Dispenser Revised 01/31/17 Page 4/4 PLANNING GUIDE HEIGHT...

Installation Instructions
Page 3
... BEGIN 1 REFRIGERATOR SAFETY 2 LOCATION & INSTALLATION SAFETY 4 INSTALLATION REQUIREMENTS 5 Tools and Parts 6 Grounding the Refrigerator 6 Water-Pressure Requirements 6 Water-Line Requirements 7 Installing the Water Filter 7 Cabinet Cutout Dimensions 8 PRODUCT SPECIFICATIONS 9 Refrigerator Dimensions 9 INSTALLATION INSTRUCTIONS 11 Removing the Packaging 11 Connecting the Water-Supply Line 11 Setting Up the Ice Maker 13 Attaching the Kickplate 13 Installing the Anti-Tip Brackets 14 Installing the Refrigerator 14 Aligning the Refrigerator Doors 15 Anchoring the Refrig. to...
... BEGIN 1 REFRIGERATOR SAFETY 2 LOCATION & INSTALLATION SAFETY 4 INSTALLATION REQUIREMENTS 5 Tools and Parts 6 Grounding the Refrigerator 6 Water-Pressure Requirements 6 Water-Line Requirements 7 Installing the Water Filter 7 Cabinet Cutout Dimensions 8 PRODUCT SPECIFICATIONS 9 Refrigerator Dimensions 9 INSTALLATION INSTRUCTIONS 11 Removing the Packaging 11 Connecting the Water-Supply Line 11 Setting Up the Ice Maker 13 Attaching the Kickplate 13 Installing the Anti-Tip Brackets 14 Installing the Refrigerator 14 Aligning the Refrigerator Doors 15 Anchoring the Refrig. to...

Installation Instructions
Page 9
... location. • If the water shut-off the water supply to the refrigerator. 2. Set the filter in place, and turn it stops snugly, and close the grill cover. 4. The water-filter life-cycle detector sets itself; The water-supply line must be connected to back of refrig. (allowing for service and cleaning without disconnecting/damaging the line. • All installations must be in the graphic. Dacor is not covered by third-party water filters. the filter indicator goes out. 5. Installing...
... location. • If the water shut-off the water supply to the refrigerator. 2. Set the filter in place, and turn it stops snugly, and close the grill cover. 4. The water-filter life-cycle detector sets itself; The water-supply line must be connected to back of refrig. (allowing for service and cleaning without disconnecting/damaging the line. • All installations must be in the graphic. Dacor is not covered by third-party water filters. the filter indicator goes out. 5. Installing...

Installation Instructions
Page 13
... in heavy cardboard. INSTALLATION INSTRUCTIONS Removing the Packaging Connecting the Water-Supply Line The refrigerator comes bolted to refrigerator) 2. (With the open end of the tubing in a bucket) Turn on the shut-off valve, check the fittings for leaks, and tighten any loose connections. 11 This consists of two options in a space with the kickplate. Remove the packaging outdoors or in which either side. Carefully cut the corner...
... in heavy cardboard. INSTALLATION INSTRUCTIONS Removing the Packaging Connecting the Water-Supply Line The refrigerator comes bolted to refrigerator) 2. (With the open end of the tubing in a bucket) Turn on the shut-off valve, check the fittings for leaks, and tighten any loose connections. 11 This consists of two options in a space with the kickplate. Remove the packaging outdoors or in which either side. Carefully cut the corner...

Installation Instructions
Page 15
... of the appliance. The refrigerator's front leveling legs were packed with the provided screws. 13 Open the upper grill door, and press the master power switch to refrigerator inlet tube) F Refrigerator water-supply inlet tube 5. (With the open end of ice cubes. Setting Up the Icemaker NOTE • The appliance temperatures are provided for 2 seconds. set the legs aside for leaks, and tighten any loose connections. To install the kickplate: Align...
... of the appliance. The refrigerator's front leveling legs were packed with the provided screws. 13 Open the upper grill door, and press the master power switch to refrigerator inlet tube) F Refrigerator water-supply inlet tube 5. (With the open end of ice cubes. Setting Up the Icemaker NOTE • The appliance temperatures are provided for 2 seconds. set the legs aside for leaks, and tighten any loose connections. To install the kickplate: Align...

Installation Instructions
Page 16
... Method Use this measurement to avoid complicating the installation. 3. Install a 38 mm drywall screw into the wood trim above the refrigerator. 5. Open the upper grill panel, and press the master power switch. Measure the distance from the floor to the refrigerator. 2. Turn off the refrigerator, and attach the front leveling legs. (You separated these legs from the main water line to the refrigerator so you...
... Method Use this measurement to avoid complicating the installation. 3. Install a 38 mm drywall screw into the wood trim above the refrigerator. 5. Open the upper grill panel, and press the master power switch. Measure the distance from the floor to the refrigerator. 2. Turn off the refrigerator, and attach the front leveling legs. (You separated these legs from the main water line to the refrigerator so you...

Use and Care Manual
Page 2
... Customer Service Team for assistance with your new Dacor Appliance, read this manual for guidance. It provides useful suggestions and remedies prior to 5:00 P.M. Pacific Time Website: www.Dacor.com T hank you ever experience a problem with any of your product support needs. In order to familiarize yourself with the controls, functions and full potential of your product, please first check the Troubleshooting...
... Customer Service Team for assistance with your new Dacor Appliance, read this manual for guidance. It provides useful suggestions and remedies prior to 5:00 P.M. Pacific Time Website: www.Dacor.com T hank you ever experience a problem with any of your product support needs. In order to familiarize yourself with the controls, functions and full potential of your product, please first check the Troubleshooting...

Use and Care Manual
Page 3
...-find place. Record the model/serial numbers below, then store this manual thoroughly, and save it for warranty/service, have the appliance's model and serial numbers ready. Visit www.dacor.com to properly assist you as the owner and to view/download the latest version of its products, changes may be updated. Proof of the refrigerator compartment between the top drawer and the bottom shelf. Dacor Customer Service Phone: (800) 793...
...-find place. Record the model/serial numbers below, then store this manual thoroughly, and save it for warranty/service, have the appliance's model and serial numbers ready. Visit www.dacor.com to properly assist you as the owner and to view/download the latest version of its products, changes may be updated. Proof of the refrigerator compartment between the top drawer and the bottom shelf. Dacor Customer Service Phone: (800) 793...

Use and Care Manual
Page 4
... refrigerator's proper installation (as needed. • Dispose of electrical equipment inside , nor light a candle to avoid damaging sensitive components. • The refrigerator is not designed for details. • Take care when handling, moving, using your dealer/builder. circuit controlled by the plug, and pull straight out. • Do not install/repair/modify/replace components unless specifically recommended in the manuals. When you do not understand. insulation on refrigerator doors/shelves/ drawers...
... refrigerator's proper installation (as needed. • Dispose of electrical equipment inside , nor light a candle to avoid damaging sensitive components. • The refrigerator is not designed for details. • Take care when handling, moving, using your dealer/builder. circuit controlled by the plug, and pull straight out. • Do not install/repair/modify/replace components unless specifically recommended in the manuals. When you do not understand. insulation on refrigerator doors/shelves/ drawers...

Use and Care Manual
Page 5
... Industry Canada technical specifications were met. IMPORTANT SAFETY INSTRUCTIONS WARNING • Opening and closing the door of the refrigerator vigorously may cause the stored food in the door bins to fall. • Do not use or store flammable materials like ether, benzene, alcohol, medicine, LP gas, sprays, or cosmetics near or in the refrigerator; Operation is installed. This device may cause electric shock...
... Industry Canada technical specifications were met. IMPORTANT SAFETY INSTRUCTIONS WARNING • Opening and closing the door of the refrigerator vigorously may cause the stored food in the door bins to fall. • Do not use or store flammable materials like ether, benzene, alcohol, medicine, LP gas, sprays, or cosmetics near or in the refrigerator; Operation is installed. This device may cause electric shock...

Use and Care Manual
Page 9
... Removable; not owner serviceable I Shelving Metal-framed, tempered glass; adjustable (both fridge and freezer) J Door bins (freezer/fridge) Adjustable (both fridge and freezer) K Metal cooling duct (freezer/fridge rear panel) Appliance compartments are cooled through this metal panel and by automatic ice maker F Dispenser outlet Ice dispenses from appliance P Product label Features fridge model/serial nos. REFRIGERATOR FEATURES (Interior) Callout Feature Comment A Grill cover Swings up from bottom to reveal main power switch and water filter B Main power switch...
... Removable; not owner serviceable I Shelving Metal-framed, tempered glass; adjustable (both fridge and freezer) J Door bins (freezer/fridge) Adjustable (both fridge and freezer) K Metal cooling duct (freezer/fridge rear panel) Appliance compartments are cooled through this metal panel and by automatic ice maker F Dispenser outlet Ice dispenses from appliance P Product label Features fridge model/serial nos. REFRIGERATOR FEATURES (Interior) Callout Feature Comment A Grill cover Swings up from bottom to reveal main power switch and water filter B Main power switch...

Use and Care Manual
Page 11
... Power Cool; fridge runs at least 20 hrs, then load freezer. USING THE REFRIGERATOR Using the Control Panel Feature Description A Freezer/Power Freeze button • Sets freezer temp or turns Power Freeze on/off (in this case, you must manually deactivate Shabbat mode.) D Control Lock Prevents accidental setting changes; freezer runs at full power for several hours, then reverts to normal operation at preset temp). to -8°F/-23°C) • Power Freeze lowers freezer temp and accelerates freezing; freezer returns to restore default settings, press Lighting...
... Power Cool; fridge runs at least 20 hrs, then load freezer. USING THE REFRIGERATOR Using the Control Panel Feature Description A Freezer/Power Freeze button • Sets freezer temp or turns Power Freeze on/off (in this case, you must manually deactivate Shabbat mode.) D Control Lock Prevents accidental setting changes; freezer runs at full power for several hours, then reverts to normal operation at preset temp). to -8°F/-23°C) • Power Freeze lowers freezer temp and accelerates freezing; freezer returns to restore default settings, press Lighting...

Use and Care Manual
Page 12
...app) or support discontinued due to open the Refrigerator page, where you need this mode, the Energy Management Refrigerator function can check the operational status and notifications concerning your Samsung account. (iPhone users must provide their operating status Master Key Controls locking system for customer service. Refrigerator Settings Feature Description Fridge • 01 Displays currently set freezer temp • 04 Turn Power Freeze on /off; check ice-making status with all models) Customer Service Settings User manual is downloadable; Using Smart Grid...
...app) or support discontinued due to open the Refrigerator page, where you need this mode, the Energy Management Refrigerator function can check the operational status and notifications concerning your Samsung account. (iPhone users must provide their operating status Master Key Controls locking system for customer service. Refrigerator Settings Feature Description Fridge • 01 Displays currently set freezer temp • 04 Turn Power Freeze on /off; check ice-making status with all models) Customer Service Settings User manual is downloadable; Using Smart Grid...

Use and Care Manual
Page 13
...-66, the temperature display shows the address for 3 seconds. DAL controls large energy-consumption operations (e.g., adjusting cooling system, running defrost cycle, making ice). • In TALR mode, "L4" appears on ) appear in this procedure, the MAC address displays on fridge display. • DAL mode self-deactivates when timespan stipulated by delaying defrost to 31 Oct 11 user settings/ messages • View freezer/fridge temp settings • Receive an alarm when freezer/fridge door is pressed. Fridge responds by the...
...-66, the temperature display shows the address for 3 seconds. DAL controls large energy-consumption operations (e.g., adjusting cooling system, running defrost cycle, making ice). • In TALR mode, "L4" appears on ) appear in this procedure, the MAC address displays on fridge display. • DAL mode self-deactivates when timespan stipulated by delaying defrost to 31 Oct 11 user settings/ messages • View freezer/fridge temp settings • Receive an alarm when freezer/fridge door is pressed. Fridge responds by the...

Use and Care Manual
Page 14
... dispense the first glassful of water. • The basin on the control panel. 2. Troubleshooting If ice does not dispense, inspect the ice maker. 1. To disable the ice dispenser, press-hold glasses directly under the outlet; www.csep.org/) Open API Description • Energy Consumption Reporting • Demand Response • Operational State; User Settings & Messages • Ice Maker State: GET /devices/0/Fridge/iceMaker • Door-Open Alarm: GET /devices/0 Door/ / openState • DR Status: GET /devices/0/drlc • Delay Defrost Capability...
... dispense the first glassful of water. • The basin on the control panel. 2. Troubleshooting If ice does not dispense, inspect the ice maker. 1. To disable the ice dispenser, press-hold glasses directly under the outlet; www.csep.org/) Open API Description • Energy Consumption Reporting • Demand Response • Operational State; User Settings & Messages • Ice Maker State: GET /devices/0/Fridge/iceMaker • Door-Open Alarm: GET /devices/0 Door/ / openState • DR Status: GET /devices/0/drlc • Delay Defrost Capability...

Use and Care Manual
Page 16
... CARE & MAINTENANCE Cleaning the Refrigerator WARNING-DO NOT: • clean the refrigerator with a dry towel. Aligning the notches in the waterline. Close the grill cover, and press-hold Water on the refrigerator control panel appears in the dishwasher. USING THE REFRIGERATOR Replacing the Water Filter When the water filter needs replacing, the filter indicator on the control panel for replacement service: • a local service agent • Dacor Customer Service (800) 793-0093 • www.dacor.com. Open the water valve, and run water through the dispenser...
... CARE & MAINTENANCE Cleaning the Refrigerator WARNING-DO NOT: • clean the refrigerator with a dry towel. Aligning the notches in the waterline. Close the grill cover, and press-hold Water on the refrigerator control panel appears in the dishwasher. USING THE REFRIGERATOR Replacing the Water Filter When the water filter needs replacing, the filter indicator on the control panel for replacement service: • a local service agent • Dacor Customer Service (800) 793-0093 • www.dacor.com. Open the water valve, and run water through the dispenser...

Use and Care Manual
Page 17
... 15 A or 20 A. TROUBLESHOOTING Refrigerator Settings Before troubleshooting, cross-check the data in this section. not freezing or keeping food cold Possible Cause(s) Solution Power cord loose/disconnected/improperly connected Plug in power cord properly Temp control set incorrectly Increase freezer/fridge temp Hot interior wall Heat-proof piping in this table with strong aroma Solution Remove spoiled food; clean the door gasket Condensation Symptom Condensation on interior walls Possible Cause(s) Vents...
... 15 A or 20 A. TROUBLESHOOTING Refrigerator Settings Before troubleshooting, cross-check the data in this section. not freezing or keeping food cold Possible Cause(s) Solution Power cord loose/disconnected/improperly connected Plug in power cord properly Temp control set incorrectly Increase freezer/fridge temp Hot interior wall Heat-proof piping in this table with strong aroma Solution Remove spoiled food; clean the door gasket Condensation Symptom Condensation on interior walls Possible Cause(s) Vents...

Use and Care Manual
Page 18
... control-panel display, L3 and L4 should not appear.) 16 TROUBLESHOOTING Water/Ice (dispenser models) Symptom Possible Cause(s) Weak water flow Water pressure too low Ice maker buzzes Water supply to fridge disconnected Ice maker is new Ice maker not functioning Freezer temp set too low Control Lock or Child Lock mode enabled Ice maker turned off Properly insert ice bucket Verify that supply line is connected and valve is open Verify that supply line is connected and valve is open Disable Control Lock or Child Lock mode Install/use only Dacor-provided/approved filter Replace filter...
... control-panel display, L3 and L4 should not appear.) 16 TROUBLESHOOTING Water/Ice (dispenser models) Symptom Possible Cause(s) Weak water flow Water pressure too low Ice maker buzzes Water supply to fridge disconnected Ice maker is new Ice maker not functioning Freezer temp set too low Control Lock or Child Lock mode enabled Ice maker turned off Properly insert ice bucket Verify that supply line is connected and valve is open Verify that supply line is connected and valve is open Disable Control Lock or Child Lock mode Install/use only Dacor-provided/approved filter Replace filter...

Use and Care Manual
Page 19
... installations (incl. the refrigerator's serial numbers and tags are : • compressor • evaporator • condenser • dryer • connective tubing. a non-CSA approved product is operated/maintained per officially provided Dacor instructions), Dacor will pay for help or to defective material/workmanship, the refrigerator stops functioning within 60 days of Dacor. • These products carry a 1-yr parts-only warranty: -- Pacific Time: • for warranty repairs/questions, and for Dacor Distinctive Service...
... installations (incl. the refrigerator's serial numbers and tags are : • compressor • evaporator • condenser • dryer • connective tubing. a non-CSA approved product is operated/maintained per officially provided Dacor instructions), Dacor will pay for help or to defective material/workmanship, the refrigerator stops functioning within 60 days of Dacor. • These products carry a 1-yr parts-only warranty: -- Pacific Time: • for warranty repairs/questions, and for Dacor Distinctive Service...


