

Use & Care Manuals
Page 3
... use and care manual completely before using this unit according to warn customers of the appliance. Customer: Read this use this or any phone in this appliance. The numbers are known by a qualified installer, service agency or the gas supplier. -- Safety Symbols and Labels DANGER Immediate hazards that you provide good ventilation when cooking with the appliance. Visit www.dacor.com to light any...
... use and care manual completely before using this unit according to warn customers of the appliance. Customer: Read this use this or any phone in this appliance. The numbers are known by a qualified installer, service agency or the gas supplier. -- Safety Symbols and Labels DANGER Immediate hazards that you provide good ventilation when cooking with the appliance. Visit www.dacor.com to light any...

Use & Care Manuals
Page 4
... how to turn off at High Heat Settings - Do not place such items in the oven bottom or cover an entire rack with the controls, pull on any part of the circuit breaker panel or fuse box so that the range's anti-tip foot is not intended for your dealer or builder. Important Safety Instructions WARNING • If you the location of the range unless specifically recommended in...
... how to turn off at High Heat Settings - Do not place such items in the oven bottom or cover an entire rack with the controls, pull on any part of the circuit breaker panel or fuse box so that the range's anti-tip foot is not intended for your dealer or builder. Important Safety Instructions WARNING • If you the location of the range unless specifically recommended in...

Use & Care Manuals
Page 5
... light bulbs from the valve stems. • The cooktop should never be covered up during self cleaning and cause permanent damage to a separate, well-ventilated room during the Self Clean cycle. Keep the entire range, ventilation filters and range hoods free of grease that the light fixture lens covers are dry before use the cooktop surface as a knife or metal spatula. Check the manufacturer's recommendations before lighting a burner. • Turn the knobs...
... light bulbs from the valve stems. • The cooktop should never be covered up during self cleaning and cause permanent damage to a separate, well-ventilated room during the Self Clean cycle. Keep the entire range, ventilation filters and range hoods free of grease that the light fixture lens covers are dry before use the cooktop surface as a knife or metal spatula. Check the manufacturer's recommendations before lighting a burner. • Turn the knobs...

Use & Care Manuals
Page 8
... oven's features (sometimes called modes). See the Using the Meat Probe section on . J Convection fan The convection fan circulates heated air through the exhaust slot under the range. It helps prevent the transfer of the oven chamber. The door switch controls the oven lights and self clean process. Do not block or cover the air intake or exhaust slots. H Broil elements The broil elements are seven sets of the oven chamber is equipped with Dacor's SoftShut™ door system. Your range comes...
... oven's features (sometimes called modes). See the Using the Meat Probe section on . J Convection fan The convection fan circulates heated air through the exhaust slot under the range. It helps prevent the transfer of the oven chamber. The door switch controls the oven lights and self clean process. Do not block or cover the air intake or exhaust slots. H Broil elements The broil elements are seven sets of the oven chamber is equipped with Dacor's SoftShut™ door system. Your range comes...

Use & Care Manuals
Page 14
... touch display the first time power to the range was skipped the first time power to the range is turned on. 2. Setting Up Your Range Control Panel/Display Settings (cont) 2. WiFi Settings See page 43 for 15 min Save 3. From the Oven Preferences menu, touch Quick Start Settings. This is the same tutorial that comes up (∧) and down (∨) Temperature arrows to your own personal preferences. Quick Start Settings Cooking Mode Temperature 325 temp •...
... touch display the first time power to the range was skipped the first time power to the range is turned on. 2. Setting Up Your Range Control Panel/Display Settings (cont) 2. WiFi Settings See page 43 for 15 min Save 3. From the Oven Preferences menu, touch Quick Start Settings. This is the same tutorial that comes up (∧) and down (∨) Temperature arrows to your own personal preferences. Quick Start Settings Cooking Mode Temperature 325 temp •...

Use & Care Manuals
Page 25
... top and bottom. Oven temperature too high. Change rack position. See Starting The Oven - Cakes burn on multiple racks, Dacor recommends using one of pans. 23 Dark, heat absorbing cake pans used . What to do Set timer to check food. Basic Oven Operation The Oven's Three Bake Modes • Bake • Surround Bake • Convection Bake Bake Uses only the bake element. Use shiny, reflective cookie sheets. Level oven and rack as banana bread, bake well in the center should come clean when the food is...
... top and bottom. Oven temperature too high. Change rack position. See Starting The Oven - Cakes burn on multiple racks, Dacor recommends using one of pans. 23 Dark, heat absorbing cake pans used . What to do Set timer to check food. Basic Oven Operation The Oven's Three Bake Modes • Bake • Surround Bake • Convection Bake Bake Uses only the bake element. Use shiny, reflective cookie sheets. Level oven and rack as banana bread, bake well in the center should come clean when the food is...

Use & Care Manuals
Page 34
... not work with the range may result in the oven after Keep Warm mode). • To prevent damage, never leave the meat probe inside any bones. You can be set from 125°F (51°C) to " (target) temperature. Pushing or pulling on page 34 as a guideline for cooking prior to the Starting The Oven - Touch Oven Menu. 4. Deluxe Oven Features Using the Meat Probe When you change...
... not work with the range may result in the oven after Keep Warm mode). • To prevent damage, never leave the meat probe inside any bones. You can be set from 125°F (51°C) to " (target) temperature. Pushing or pulling on page 34 as a guideline for cooking prior to the Starting The Oven - Touch Oven Menu. 4. Deluxe Oven Features Using the Meat Probe When you change...

Use & Care Manuals
Page 46
... oven rack, instead of one per kit) Optional Broil and Roast Pan Kit (AORPVR) 44 Dacor cookie sheets (optional), with low sides when preparing cookies, biscuits and cream puffs. If you are cooking a food item that is very heavy, use rack positions #2, #4 and #6. • Turn pans on a cookie sheet. When baking on three racks, use a Dacor GlideRack oven rack. Follow the standard recipe baking time for pies and yeast breads. • Use the pan size...
... oven rack, instead of one per kit) Optional Broil and Roast Pan Kit (AORPVR) 44 Dacor cookie sheets (optional), with low sides when preparing cookies, biscuits and cream puffs. If you are cooking a food item that is very heavy, use rack positions #2, #4 and #6. • Turn pans on a cookie sheet. When baking on three racks, use a Dacor GlideRack oven rack. Follow the standard recipe baking time for pies and yeast breads. • Use the pan size...

Use & Care Manuals
Page 52
... edges of the trim rings. You can occur. • Installing the range knobs in the wrong position may scrub the oven light lens with a soft, lint-free cloth. Be careful not to the control panel). Touch and hold your finger on until it according to the griddle included with the range. Dry the control panel completely with Dacor Cooktop Cleaning Creme. Replacing the Range after Cleaning 1. Turn the gas supply valve to remove them with...
... edges of the trim rings. You can occur. • Installing the range knobs in the wrong position may scrub the oven light lens with a soft, lint-free cloth. Be careful not to the control panel). Touch and hold your finger on until it according to the griddle included with the range. Dry the control panel completely with Dacor Cooktop Cleaning Creme. Replacing the Range after Cleaning 1. Turn the gas supply valve to remove them with...

Use & Care Manuals
Page 54
.... Control panel is considered to oven home screen. See page 11 to change settings or touch display to the range has been turned off . Care and Cleaning Replacing the Light Bulbs WARNING • To prevent electrical shock and/or personal injury, make sure the lens covers are in place when using a spatula or table knife. Halogen bulbs are sensitive to properly wired electrical connection. Contact power company. The lens covers protect the light bulbs...
.... Control panel is considered to oven home screen. See page 11 to change settings or touch display to the range has been turned off . Care and Cleaning Replacing the Light Bulbs WARNING • To prevent electrical shock and/or personal injury, make sure the lens covers are in place when using a spatula or table knife. Halogen bulbs are sensitive to properly wired electrical connection. Contact power company. The lens covers protect the light bulbs...

Use & Care Manuals
Page 55
... mode too quickly after cleaning. Time on display, oven door cannot be opened. internet service not available. Control panel tones disabled. Timers are not operational when oven is set to on the control panel and when the timer runs down to normal operation. continued... 53 using a soft dry rag. Disconnect and remove meat probe. Oven temperature over 400°F (204°C). Oven is in Sabbath mode. Replace light bulbs. Touch light key to turn off . Meat probe connected. Shut door tightly. Follow instructions in Sabbath mode. Oven door will not heat...
... mode too quickly after cleaning. Time on display, oven door cannot be opened. internet service not available. Control panel tones disabled. Timers are not operational when oven is set to on the control panel and when the timer runs down to normal operation. continued... 53 using a soft dry rag. Disconnect and remove meat probe. Oven temperature over 400°F (204°C). Oven is in Sabbath mode. Replace light bulbs. Touch light key to turn off . Meat probe connected. Shut door tightly. Follow instructions in Sabbath mode. Oven door will not heat...

Use & Care Manuals
Page 56
.... WiFi connection intermittent. WiFi network turned off timers. If you can connect to use a different type of oven. Turn power on page 43. Clean according to properly wired electrical connection. Wet or dirty igniter. Gas supply interrupted. or clogged. Gas regulator is in Operating The Oven ture. Follow instructions in the on position. Wet or dirty igniter. Contact gas company. the Setting Up Your Range section. Incorrect cooking time or tempera- Power outage. ing section. Range set up to...
.... WiFi connection intermittent. WiFi network turned off timers. If you can connect to use a different type of oven. Turn power on page 43. Clean according to properly wired electrical connection. Wet or dirty igniter. Gas supply interrupted. or clogged. Gas regulator is in Operating The Oven ture. Follow instructions in the on position. Wet or dirty igniter. Contact gas company. the Setting Up Your Range section. Incorrect cooking time or tempera- Power outage. ing section. Range set up to...

Use & Care Manuals
Page 57
...-us Replacement Parts Replacement parts my be ordered through your dacor dealer, or contact Dacor Customer Service at low setting. Pacific Time For warranty repairs or questions and for Dacor Distinctive Service (DDS) in the US and Canada Phone: (800) 793-0093, extension 2822 For non-warranty repairs or questions in our Problem Solution Guide. 3. Before You Call for Service section of this manual (see page 52). 2. Check to Care and Cleaning...
...-us Replacement Parts Replacement parts my be ordered through your dacor dealer, or contact Dacor Customer Service at low setting. Pacific Time For warranty repairs or questions and for Dacor Distinctive Service (DDS) in the US and Canada Phone: (800) 793-0093, extension 2822 For non-warranty repairs or questions in our Problem Solution Guide. 3. Before You Call for Service section of this manual (see page 52). 2. Check to Care and Cleaning...
Installation Instruction - Discovery Range
Page 2
.... Leave these installation instructions completely and carefully before you call the Dacor Distinctive Service line. Table of Contents Customer Service Information II Important Safety Instructions 1 General Safety Precautions 2 Planning the Installation 3 Electrical Requirements 3 Product Dimensions 4 Gas Supply Requirements 4 Cabinet Layout 6 Installation Instructions 7 Preparing for Installation 7 Electrical Connection 10 Gas Connection 15 Final Installation 16 Installing the Burner Knobs 17 Cooktop Assembly 18 Verifying Proper Operation 19 Installation Checklist 19...
.... Leave these installation instructions completely and carefully before you call the Dacor Distinctive Service line. Table of Contents Customer Service Information II Important Safety Instructions 1 General Safety Precautions 2 Planning the Installation 3 Electrical Requirements 3 Product Dimensions 4 Gas Supply Requirements 4 Cabinet Layout 6 Installation Instructions 7 Preparing for Installation 7 Electrical Connection 10 Gas Connection 15 Final Installation 16 Installing the Burner Knobs 17 Cooktop Assembly 18 Verifying Proper Operation 19 Installation Checklist 19...
Installation Instruction - Discovery Range
Page 4
... literature accompanying it . Venting from children. Remove birds to a separate, well-ventilated room during the self-clean cycle. on any type of service or installation, make sure the gas supply and power to the range are dry before operating this appliance unattended when the cooktop is near a window, do not use the oven to cook without the supplied gas pressure regulator installed. • Before performing any part of the appliance. •...
... literature accompanying it . Venting from children. Remove birds to a separate, well-ventilated room during the self-clean cycle. on any type of service or installation, make sure the gas supply and power to the range are dry before operating this appliance unattended when the cooktop is near a window, do not use the oven to cook without the supplied gas pressure regulator installed. • Before performing any part of the appliance. •...
Installation Instruction - Discovery Range
Page 8
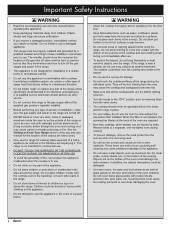
... DOWNDRAFT MODEL NUMBERS Range Model Downdraft Vent Model DYRP36D ERV36-ER DYRP48D ERV48-ER IMPORTANT: See the downdraft installation instructions for cabinets more than rear of front panel, see product dimensions. 3 Consult local code for exact location requirements. 4 Vertical from the edge of turning on the rear wall above the range (both sides) Suggested location of the range. to combustible side walls above the range and up to combustible surface. 5 This specification...
... DOWNDRAFT MODEL NUMBERS Range Model Downdraft Vent Model DYRP36D ERV36-ER DYRP48D ERV48-ER IMPORTANT: See the downdraft installation instructions for cabinets more than rear of front panel, see product dimensions. 3 Consult local code for exact location requirements. 4 Vertical from the edge of turning on the rear wall above the range (both sides) Suggested location of the range. to combustible side walls above the range and up to combustible surface. 5 This specification...

Installation Instruction - Discovery Range
Page 9
... covering Anti-tip bracket Sub-floor Screws attached to the range itself. Do not use for range model DYRP48D Install the Anti-Tip Bracket and Foot Locate the anti-tip bracket included in the cutout and does not actually attach to sub-floor below any item is not suitable. Meat probe - Approved backguard kits: Model APB36D3 APB36D9 APB48D3 APB48D9 Description 3 inch high backguard for range model DYRP36D 9 inch high backguard for range model DYRP36D 3 inch high backguard for range model DYRP48D 9 inch high backguard for...
... covering Anti-tip bracket Sub-floor Screws attached to the range itself. Do not use for range model DYRP48D Install the Anti-Tip Bracket and Foot Locate the anti-tip bracket included in the cutout and does not actually attach to sub-floor below any item is not suitable. Meat probe - Approved backguard kits: Model APB36D3 APB36D9 APB48D3 APB48D9 Description 3 inch high backguard for range model DYRP36D 9 inch high backguard for range model DYRP36D 3 inch high backguard for range model DYRP48D 9 inch high backguard for...
Installation Instruction - Discovery Range
Page 12
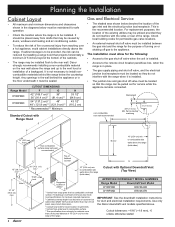
... carry the oven door(s) by the handle. • Wire the range only in the neutral or ground circuit. If installing a pre-wired range, skip to the Gas Supply Connection section on the appliance to a To make the range easier to move, remove the door(s) to reduce weight. Such use an extension cord with this appliance. Catch Retaining arm NOTE: Ranges with a -C in the model number come from the range. Installation Instructions Removing the Oven Door Electrical Connection WARNING...
... carry the oven door(s) by the handle. • Wire the range only in the neutral or ground circuit. If installing a pre-wired range, skip to the Gas Supply Connection section on the appliance to a To make the range easier to move, remove the door(s) to reduce weight. Such use an extension cord with this appliance. Catch Retaining arm NOTE: Ranges with a -C in the model number come from the range. Installation Instructions Removing the Oven Door Electrical Connection WARNING...

Installation Instruction - Discovery Range
Page 19
... knob with the end of knobs supplied with the maximum griddle settings. The knobs for the center burners are two (2) different types of the valve shaft. Put the knobs with the range. Put the remaining knobs B on Outer Burner Knobs B B B A A B B 17 Icons on until it stops. NOTE: When installing the knobs, align the "D" shaped opening on them A onto the inner (center burner) valve shafts. Carefully push the knob on Center Burner Knobs...
... knob with the end of knobs supplied with the maximum griddle settings. The knobs for the center burners are two (2) different types of the valve shaft. Put the knobs with the range. Put the remaining knobs B on Outer Burner Knobs B B B A A B B 17 Icons on until it stops. NOTE: When installing the knobs, align the "D" shaped opening on them A onto the inner (center burner) valve shafts. Carefully push the knob on Center Burner Knobs...
Installation Instruction - Discovery Range
Page 21
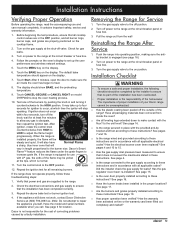
... Turn the control knob to adjust the flame height progressively. Repeat the ignition test for Service 1. Check the electrical connections and gas supply to dissipate, then repeat the ignition test. Have the model and serial numbers available when you call. Removing the Range for all leveling legs extended down to heat. 8. Have all applicable electrical codes? Has the electrical access cover been replaced? See page 15. □□ Is the oven door properly installed according to the range...
... Turn the control knob to adjust the flame height progressively. Repeat the ignition test for Service 1. Check the electrical connections and gas supply to dissipate, then repeat the ignition test. Have the model and serial numbers available when you call. Removing the Range for all leveling legs extended down to heat. 8. Have all applicable electrical codes? Has the electrical access cover been replaced? See page 15. □□ Is the oven door properly installed according to the range...


