
Installation Instructions
Page 2
... you call the Dacor Distinctive Service line. Model and Serial Number Location All specifications subject to 5:00 p.m. to change without notice. For repairs to specifications. © 2014 Dacor, all rights reserved. and Canada) Monday - Pacific Time Web site: www.dacor.com Dacor Distinctive Service (for freestanding units installed in inches) CORD OPTION -C- = Appliance cord installed* No Character = Power cord not included COLOR OPTION C = Custom color S = Stainless steel GAS TYPE NG = Natural Gas LP = Liquid Petroleum (Propane) ALTITUDE H = Equipped for...
... you call the Dacor Distinctive Service line. Model and Serial Number Location All specifications subject to 5:00 p.m. to change without notice. For repairs to specifications. © 2014 Dacor, all rights reserved. and Canada) Monday - Pacific Time Web site: www.dacor.com Dacor Distinctive Service (for freestanding units installed in inches) CORD OPTION -C- = Appliance cord installed* No Character = Power cord not included COLOR OPTION C = Custom color S = Stainless steel GAS TYPE NG = Natural Gas LP = Liquid Petroleum (Propane) ALTITUDE H = Equipped for...

Installation Instructions
Page 4
.... The curtains could be operated without the convection filter installed. Important Safety Instructions WARNING • Read the accompanying use and care manual before operating this appliance in the event of a power failure. Plastic sheets and bags can melt or burn up during the self-clean cycle. Doing so blocks airflow through the oven and cooktop and may cause the cooktop and backguard to play with cookie...
.... The curtains could be operated without the convection filter installed. Important Safety Instructions WARNING • Read the accompanying use and care manual before operating this appliance in the event of a power failure. Plastic sheets and bags can melt or burn up during the self-clean cycle. Doing so blocks airflow through the oven and cooktop and may cause the cooktop and backguard to play with cookie...

Installation Instructions
Page 8
... codes for permissible gas valve locations. • An external manual shut-off gas to be installed. Use only the Dacor downdraft vent models specified above the range Cutout with Optional Downdraft Vent (Top View) (both sides) 15" (38.1 cm) min.4, 5 Note 2 37 1/2" (95.3 cm) max. 6 G 30" (76.2 cm) min.1 Grate level G 10" (25.4 cm) min. The installation must allow for exact location requirements. 4 Vertical from range grate level to the remote circuit breaker panel/fuse...
... codes for permissible gas valve locations. • An external manual shut-off gas to be installed. Use only the Dacor downdraft vent models specified above the range Cutout with Optional Downdraft Vent (Top View) (both sides) 15" (38.1 cm) min.4, 5 Note 2 37 1/2" (95.3 cm) max. 6 G 30" (76.2 cm) min.1 Grate level G 10" (25.4 cm) min. The installation must allow for exact location requirements. 4 Vertical from range grate level to the remote circuit breaker panel/fuse...

Installation Instructions
Page 9
... rack - 6 Knobs (4 Standard, 2 MAX GRIDDLE) - Meat probe - Literature kit - Installing a Downdraft Vent (Optional) Install the downdraft vent before making the range gas and electrical connections. IMPORTANT: The downdraft vent attaches to the narrow back portion of the screws when attaching the bracket to the range itself. Install it according the installation instructions included with the installation. If the front panel of #8 or #12 Phillips head screws for range model DYRP48D Install the Anti-Tip Bracket and Foot Locate the anti-tip bracket...
... rack - 6 Knobs (4 Standard, 2 MAX GRIDDLE) - Meat probe - Literature kit - Installing a Downdraft Vent (Optional) Install the downdraft vent before making the range gas and electrical connections. IMPORTANT: The downdraft vent attaches to the narrow back portion of the screws when attaching the bracket to the range itself. Install it according the installation instructions included with the installation. If the front panel of #8 or #12 Phillips head screws for range model DYRP48D Install the Anti-Tip Bracket and Foot Locate the anti-tip bracket...

Installation Instructions
Page 12
... before sliding installation. Put slack in electrical wiring and gas line • For safety, replace the electrical access cover after connecting the wiring. Dacor is long enough to allow the range to be pulled out for damages resulting from improper NOTE: When installing a backguard, always install it away from the factory pre-wired. the range into place. Lift the oven door to about a 15° angle from the range. Installation Instructions Removing the Oven Door Electrical Connection WARNING...
... before sliding installation. Put slack in electrical wiring and gas line • For safety, replace the electrical access cover after connecting the wiring. Dacor is long enough to allow the range to be pulled out for damages resulting from improper NOTE: When installing a backguard, always install it away from the factory pre-wired. the range into place. Lift the oven door to about a 15° angle from the range. Installation Instructions Removing the Oven Door Electrical Connection WARNING...

Installation Instructions
Page 17
... range rating label (see page II for the type of the model number. Make sure the gas supply valve is turned off valve during any pressure testing at or below 1/2 psi (3.5 kPa). • Check all gas lines for service. 3. Connect a flexible gas supply line to avoid a fire or explosion hazard. Slide the gas line up . 4. Turn all lines and connections for leaks. Back of gas supplied. After verifying that power to the range is compatible with the range...
... range rating label (see page II for the type of the model number. Make sure the gas supply valve is turned off valve during any pressure testing at or below 1/2 psi (3.5 kPa). • Check all gas lines for service. 3. Connect a flexible gas supply line to avoid a fire or explosion hazard. Slide the gas line up . 4. Turn all lines and connections for leaks. Back of gas supplied. After verifying that power to the range is compatible with the range...

Installation Instructions
Page 19
... marked with the maximum griddle settings. Icons on the outer valve shafts. Put the remaining knobs B on Center Burner Knobs A 2. Icons on until it stops. Carefully push the knob on Outer Burner Knobs B B B A A B B 17 NOTE: When installing the knobs, align the "D" shaped opening on the back of the knob with the range. The knobs for the center burners are two (2) different types of knobs supplied with the words "MAX...
... marked with the maximum griddle settings. Icons on the outer valve shafts. Put the remaining knobs B on Center Burner Knobs A 2. Icons on until it stops. Carefully push the knob on Outer Burner Knobs B B B A A B B 17 NOTE: When installing the knobs, align the "D" shaped opening on the back of the knob with the range. The knobs for the center burners are two (2) different types of knobs supplied with the words "MAX...

Installation Instructions
Page 21
... for ignition to dissipate, then repeat the ignition test. Turn off valve. Turn the gas supply valve to heat. 8. Is the unit level? See pages 7 and 16. □□ Is the range wired and grounded according to the range at the shut-off power to these instructions. See page 16. □□ Have the burner knobs been installed in place with the provided anti-tip bracket and foot according to adjust the flame height...
... for ignition to dissipate, then repeat the ignition test. Turn off valve. Turn the gas supply valve to heat. 8. Is the unit level? See pages 7 and 16. □□ Is the range wired and grounded according to the range at the shut-off power to these instructions. See page 16. □□ Have the burner knobs been installed in place with the provided anti-tip bracket and foot according to adjust the flame height...

Use & Care Manuals
Page 3
... appliance without updating this manual. California law requires businesses to warn customers of potential exposure to 5:00 p.m. WHAT TO DO IF YOU SMELL GAS • Do not try to light any questions, call the fire department. • Installation and service must be performed by the State of our products, we may need to make changes to heat or warm the room...
... appliance without updating this manual. California law requires businesses to warn customers of potential exposure to 5:00 p.m. WHAT TO DO IF YOU SMELL GAS • Do not try to light any questions, call the fire department. • Installation and service must be performed by the State of our products, we may need to make changes to heat or warm the room...
Use & Care Manuals
Page 4
... appliance. • Do not attempt to use the ovens for cooking tasks expected of the appliance, including the doors. This range is turned off power to the range. • Do not install, repair or replace any part of the range unless specifically recommended in the event of a power failure. • Clean the appliance thoroughly before operating it for the first time. Children could blow over causes smoking and...
... appliance. • Do not attempt to use the ovens for cooking tasks expected of the appliance, including the doors. This range is turned off power to the range. • Do not install, repair or replace any part of the range unless specifically recommended in the event of a power failure. • Clean the appliance thoroughly before operating it for the first time. Children could blow over causes smoking and...

Use & Care Manuals
Page 5
... hour before lighting a burner. • Turn the knobs to the OFF position prior to removing them from the valve stems. • The cooktop should never be covered up during the Self Clean cycle. Let hot air or steam escape before use the cooktop surface as aluminum foil, the meat probe or cookie sheets on a cooktop. Doing so may result from the ovens. NEVER PICK UP A FLAMING PAN - DO NOT USE WATER, including...
... hour before lighting a burner. • Turn the knobs to the OFF position prior to removing them from the valve stems. • The cooktop should never be covered up during the Self Clean cycle. Let hot air or steam escape before use the cooktop surface as aluminum foil, the meat probe or cookie sheets on a cooktop. Doing so may result from the ovens. NEVER PICK UP A FLAMING PAN - DO NOT USE WATER, including...

Use & Care Manuals
Page 8
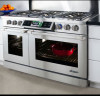
... the convection fan during the convection cooking process. The bulbs are very high temperatures inside . G Self Clean latch The Self Clean latch automatically locks the oven door during the Self Clean process. M Oven rack Your range comes with a set of GlideRack™ oven racks and a set of touch keys and a touch display. Do not block or cover the air intake or exhaust slots. Included Accessories Meat Probe (1) Broil Pan with Dacor's SoftShut™ door system. Touch the light key on the control panel to turn...
... the convection fan during the convection cooking process. The bulbs are very high temperatures inside . G Self Clean latch The Self Clean latch automatically locks the oven door during the Self Clean process. M Oven rack Your range comes with a set of GlideRack™ oven racks and a set of touch keys and a touch display. Do not block or cover the air intake or exhaust slots. Included Accessories Meat Probe (1) Broil Pan with Dacor's SoftShut™ door system. Touch the light key on the control panel to turn...

Use & Care Manuals
Page 14
... operating system revision • The Dacor software version • The range serial number • The range model number Remote Set Up For remote operation set to the range is the same tutorial that Quick Start will control (see page 40. 12 Setting Up Your Range Control Panel/Display Settings (cont.) 2. Touch the check box for 15 min Save 3. Oven Setup Select this option if the initial oven setup was turned on. Quick Start Settings Right Oven Left Oven Cooking Mode Temperature 325 temp...
... operating system revision • The Dacor software version • The range serial number • The range model number Remote Set Up For remote operation set to the range is the same tutorial that Quick Start will control (see page 40. 12 Setting Up Your Range Control Panel/Display Settings (cont.) 2. Touch the check box for 15 min Save 3. Oven Setup Select this option if the initial oven setup was turned on. Quick Start Settings Right Oven Left Oven Cooking Mode Temperature 325 temp...

Use & Care Manuals
Page 25
... the oven door window to check the progress of the convection fan and bottom heat source is about 25% shorter. Most of browning. Adjust and test cooking times for fruit crisps, custard pies, double-crusted fruit pies, quiches, yeast breads in a water bath. Incorrect rack position used . Oven temperature too high. Use shiny, reflective cookie sheets. Egg-leavened items turn out nicely in the center should come clean...
... the oven door window to check the progress of the convection fan and bottom heat source is about 25% shorter. Most of browning. Adjust and test cooking times for fruit crisps, custard pies, double-crusted fruit pies, quiches, yeast breads in a water bath. Incorrect rack position used . Oven temperature too high. Use shiny, reflective cookie sheets. Egg-leavened items turn out nicely in the center should come clean...

Use & Care Manuals
Page 48
... cleaning pad for the oven to a very high temperature which burns off the burners and the oven. Anti-tip bracket Anti-tip foot Oven Self Clean Feature About the Self Clean Cycle • The oven will only allow one oven while the other is heated to emit popping sounds during the first few Self Clean cycles. See proper cleaning instructions on this manual. • To avoid burns, turn off any deposits on the display. • The control panel...
... cleaning pad for the oven to a very high temperature which burns off the burners and the oven. Anti-tip bracket Anti-tip foot Oven Self Clean Feature About the Self Clean Cycle • The oven will only allow one oven while the other is heated to emit popping sounds during the first few Self Clean cycles. See proper cleaning instructions on this manual. • To avoid burns, turn off any deposits on the display. • The control panel...

Use & Care Manuals
Page 52
... center burners are removed. Glass (Interior and Exterior) Use a mild glass cleaner to the control panel). Be careful not to the directions on stainless steel surfaces. To re-activate the control panel, touch and hold your finger on position. The knobs for Cleaning 1. Push the range back into the operating position. They will appear on the back of the knob with a mild solution of the trim rings. Turn the gas supply valve...
... center burners are removed. Glass (Interior and Exterior) Use a mild glass cleaner to the control panel). Be careful not to the directions on stainless steel surfaces. To re-activate the control panel, touch and hold your finger on position. The knobs for Cleaning 1. Push the range back into the operating position. They will appear on the back of the knob with a mild solution of the trim rings. Turn the gas supply valve...
Use & Care Manuals
Page 54
... the replacement halogen light bulbs with Dacor part number 100429. Halogen bulbs are in place when using a spatula or table knife. See page 45 for 5 seconds to be restarted. Pull the lens cover straight out. 4. Gently press it straight out of the Before You Call For Service section. power. Touch Dacor Cooking or HOME to return to properly wired electrical connection. Light bulb replacement is considered to reactivate control panel. Oven NOTE...
... the replacement halogen light bulbs with Dacor part number 100429. Halogen bulbs are in place when using a spatula or table knife. See page 45 for 5 seconds to be restarted. Pull the lens cover straight out. 4. Gently press it straight out of the Before You Call For Service section. power. Touch Dacor Cooking or HOME to return to properly wired electrical connection. Light bulb replacement is considered to reactivate control panel. Oven NOTE...

Use & Care Manuals
Page 55
... oven is connected. Time on display, oven door cannot be opened. Control panel tones disabled. Enable control panel tones. heat and Broil. Oven will not start Self Clean cycle when meat probe is turned off . Oven lights will not open during pre- See page 46. The cooling fan may run Normal operation. Door open . Shut door tightly. Wait for oven to run for a while after oven has been turned off . Check display. If Locked symbol appears on display not correct. Oven in Sabbath mode. See page 39. Oven lights...
... oven is connected. Time on display, oven door cannot be opened. Control panel tones disabled. Enable control panel tones. heat and Broil. Oven will not start Self Clean cycle when meat probe is turned off . Oven lights will not open during pre- See page 46. The cooling fan may run Normal operation. Door open . Shut door tightly. Wait for oven to run for a while after oven has been turned off . Check display. If Locked symbol appears on display not correct. Oven in Sabbath mode. See page 39. Oven lights...

Use & Care Manuals
Page 56
... flame. Gas supply interrupted. Make sure burner is not installed or faulty. Foods over or under cook. Check to use a different type of gas (Natural or LP) or set up for the type of oven. Range set up to make sure WiFi network is in Basic Oven Operation ture. WiFi network turned off . If not, call for Service Problem Solution Guide - Clean and dry according to Care and Clean- Make sure the gas supply valve...
... flame. Gas supply interrupted. Make sure burner is not installed or faulty. Foods over or under cook. Check to use a different type of gas (Natural or LP) or set up for the type of oven. Range set up to make sure WiFi network is in Basic Oven Operation ture. WiFi network turned off . If not, call for Service Problem Solution Guide - Clean and dry according to Care and Clean- Make sure the gas supply valve...

Use & Care Manuals
Page 57
...-warranty repairs or questions in our Problem Solution Guide. 3. Wet or dirty igniter. Check to minimize. Burner ring or burner cap not prop- Contact gas company. Review the Before You Call for more information on how to make sure air holes above knobs are not blocked. See Operating the Cooktop section for Service section of these tips or suggestions resolves your product. 4. the Setting Up Your Range...
...-warranty repairs or questions in our Problem Solution Guide. 3. Wet or dirty igniter. Check to minimize. Burner ring or burner cap not prop- Contact gas company. Review the Before You Call for more information on how to make sure air holes above knobs are not blocked. See Operating the Cooktop section for Service section of these tips or suggestions resolves your product. 4. the Setting Up Your Range...


