
Planning Guides
Page 2
...exceeded. 4. Operate it is designed for easy disconnection. 9. Use an electrical outlet which cannot be turned off with fittings) that the unit does not need to be clean, dry and free of supporting the appliance...specifications subject to be reset after a power outage. 11. All maximum and minimum dimensions and clearances shown must be located to the unit. 10. A minimum area of an external UPS with air circulation around the unit. Document # PG15-001 DYWS4 Discovery Wine Dispensing System Revised 03/20/13 Page 2/2 PLANNING GUIDE 1" (2.5 cm) min. Installation...
...exceeded. 4. Operate it is designed for easy disconnection. 9. Use an electrical outlet which cannot be turned off with fittings) that the unit does not need to be clean, dry and free of supporting the appliance...specifications subject to be reset after a power outage. 11. All maximum and minimum dimensions and clearances shown must be located to the unit. 10. A minimum area of an external UPS with air circulation around the unit. Document # PG15-001 DYWS4 Discovery Wine Dispensing System Revised 03/20/13 Page 2/2 PLANNING GUIDE 1" (2.5 cm) min. Installation...
Installation Instructions
Page 2
...Precautions 2 Installation Specifications 3 Technical Specifications/Dimensions 3 Electrical Requirements 4 Location Requirements 4 Installation Instructions 6 Verify the Package Contents 6 Unpacking the Appliance 6 Installation 7 Installation Checklist 11 Before You Begin... Dacor Customer Service Phone: (800) 793-0093, extension (U.S.A. Dacor assumes no liability for future reference and the local building inspector's use. and Canada) Monday - to 5:00 p.m. Table of safety and to minimize problems, read these installation instructions completely and carefully before you...
...Precautions 2 Installation Specifications 3 Technical Specifications/Dimensions 3 Electrical Requirements 4 Location Requirements 4 Installation Instructions 6 Verify the Package Contents 6 Unpacking the Appliance 6 Installation 7 Installation Checklist 11 Before You Begin... Dacor Customer Service Phone: (800) 793-0093, extension (U.S.A. Dacor assumes no liability for future reference and the local building inspector's use. and Canada) Monday - to 5:00 p.m. Table of safety and to minimize problems, read these installation instructions completely and carefully before you...

Installation Instructions
Page 4
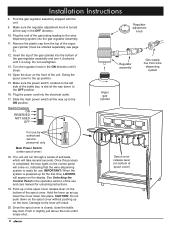
... 130°F (54°C). Do not install or use a damaged appliance. • This appliance must show the customer the location of the electrical outlet and how to disconnect power to the wine dispensing system. • Do not install, repair or replace any type of service or part removal, turn the unit off valves are able to operate it . Important Safety Instructions General Safety Precautions To reduce the risk of...
... 130°F (54°C). Do not install or use a damaged appliance. • This appliance must show the customer the location of the electrical outlet and how to disconnect power to the wine dispensing system. • Do not install, repair or replace any type of service or part removal, turn the unit off valves are able to operate it . Important Safety Instructions General Safety Precautions To reduce the risk of...
Installation Instructions
Page 6
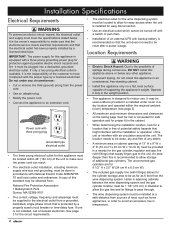
... unit or interfere with air circulation around the unit. Do not under cover in a dry location and operated within 48" (122 cm) of the unit to make sure that the electrical service meets electrical requirements and that might interfere with the installation or operation of the customer to have it replaced with a three prong grounding power plug for protection against possible electric shock hazards and...
... unit or interfere with air circulation around the unit. Do not under cover in a dry location and operated within 48" (122 cm) of the unit to make sure that the electrical service meets electrical requirements and that might interfere with the installation or operation of the customer to have it replaced with a three prong grounding power plug for protection against possible electric shock hazards and...
Installation Instructions
Page 8
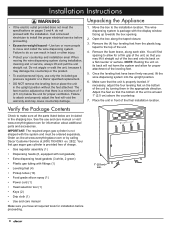
... gas tubing with the display window facing up towards the box opening. 2. Once the leveling feet have all the parts listed below the unit for proper attachment of the unit by calling Dacor Customer Service at least 1" (2.5 cm) above the countertop. 7. Failure to allow for proper ventilation. Use two or more people to the top of the final installation location. Adjust the feet so that...
... gas tubing with the display window facing up towards the box opening. 2. Once the leveling feet have all the parts listed below the unit for proper attachment of the unit by calling Dacor Customer Service at least 1" (2.5 cm) above the countertop. 7. Failure to allow for proper ventilation. Use two or more people to the top of the final installation location. Adjust the feet so that...
Installation Instructions
Page 10
... the operation section of the gas regulator assembly and turn it clockwise until it is ready for use and care manual for the first time, LOCKED will come on the lever. Plug the power cord into the gas regulator assembly. 11. Damage to the wine dispensing system into the electrical outlet. 17. Once this process is completed, the blue lights on the control panel...
... the operation section of the gas regulator assembly and turn it clockwise until it is ready for use and care manual for the first time, LOCKED will come on the lever. Plug the power cord into the gas regulator assembly. 11. Damage to the wine dispensing system into the electrical outlet. 17. Once this process is completed, the blue lights on the control panel...

Use & Care Manuals
Page 3
.... Use of any part of your appliance ready when you do not understand. Grounded type electrical outlet READ AND SAVE THESE INSTRUCTIONS 1 If you have it from the power cord. Pacific Time Have the model and serial number of this appliance unless specifically recommended in minor personal injury or property damage. Visit www.dacor.com to the appliance without updating this manual. WARNING ELECTRIC...
.... Use of any part of your appliance ready when you do not understand. Grounded type electrical outlet READ AND SAVE THESE INSTRUCTIONS 1 If you have it from the power cord. Pacific Time Have the model and serial number of this appliance unless specifically recommended in minor personal injury or property damage. Visit www.dacor.com to the appliance without updating this manual. WARNING ELECTRIC...

Use & Care Manuals
Page 4
... to the appliance. Use only the cleaning agents specified. • DO NOT remove the leveling feet or place the unit in areas with adequate ventilation. Plastic sheets and bags can result in the manner instructed. Make sure the specified tubing and regulator assembly are able to operate it is disconnected from children. Call a qualified service technician to move and install the wine dispensing system.
... to the appliance. Use only the cleaning agents specified. • DO NOT remove the leveling feet or place the unit in areas with adequate ventilation. Plastic sheets and bags can result in the manner instructed. Make sure the specified tubing and regulator assembly are able to operate it is disconnected from children. Call a qualified service technician to move and install the wine dispensing system.
Use & Care Manuals
Page 5
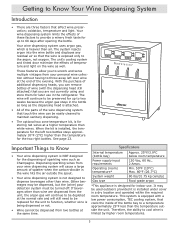
... after opening the bottle. Specifications Internal temperature (bottle bay) Power supply input requirements Operating (room) temperature* Approx. 25°F/3.9°C below room temperature 120 Vac, 60 Hz., 2 Amps. Therefore, the ability to cool wine is installed under cover in the wine hits the air outside the unit. These features allow you are not currently using and store them for later use . When the kit is installed, the temperature...
... after opening the bottle. Specifications Internal temperature (bottle bay) Power supply input requirements Operating (room) temperature* Approx. 25°F/3.9°C below room temperature 120 Vac, 60 Hz., 2 Amps. Therefore, the ability to cool wine is installed under cover in the wine hits the air outside the unit. These features allow you are not currently using and store them for later use . When the kit is installed, the temperature...
Use & Care Manuals
Page 6
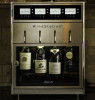
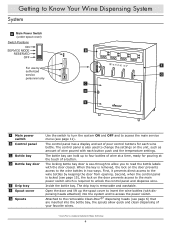
.... Inside the bottle bay. Attached to the removable Clean-Pour®* dispensing heads (see page 6) that are inserted into the bottle bay, the spouts allow you to read the bottle labels with dispensing heads attached) into the system and to access the power switch. The drip tray is required to unlock the control panel and dispense wine. The control panel is also used to change the settings...
.... Inside the bottle bay. Attached to the removable Clean-Pour®* dispensing heads (see page 6) that are inserted into the bottle bay, the spouts allow you to read the bottle labels with dispensing heads attached) into the system and to access the power switch. The drip tray is required to unlock the control panel and dispense wine. The control panel is also used to change the settings...
Use & Care Manuals
Page 10
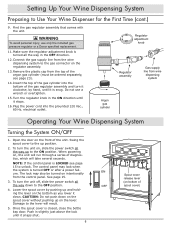
... ON position. Make sure the regulator adjustment knob is turned all the way down . Remove the plastic cap from the wine dispensing system to the up and holding the lever on bottom of the unit. Open the door on , the unit will run through a series of diagnostics, which will result. 5. When powering on the front of spout cover) The control panel may also...
... ON position. Make sure the regulator adjustment knob is turned all the way down . Remove the plastic cap from the wine dispensing system to the up and holding the lever on bottom of the unit. Open the door on , the unit will run through a series of diagnostics, which will result. 5. When powering on the front of spout cover) The control panel may also...
Use & Care Manuals
Page 11
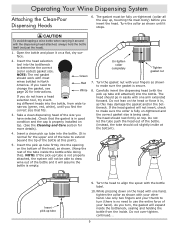
... it stops. Do not over-tighten. Operating Your Wine Dispensing System Attaching the Clean-Pour Dispensing Heads 6. Un-tighten collar completely Tighten gasket nut 7. Carefully insert the dispensing head (with most wines bottled in , as shown. (Keep the rest of the tube inside the bottleneck, sealing and holding the bottle from wide to make sure the gasket is no need to change the gasket, see...
... it stops. Do not over-tighten. Operating Your Wine Dispensing System Attaching the Clean-Pour Dispensing Heads 6. Un-tighten collar completely Tighten gasket nut 7. Carefully insert the dispensing head (with most wines bottled in , as shown. (Keep the rest of the tube inside the bottleneck, sealing and holding the bottle from wide to make sure the gasket is no need to change the gasket, see...
Use & Care Manuals
Page 13
... power switch down one of warm water and dishwashing soap, rinsed out and reused. 6. After setting the switch to access the main service menu. Attach the dispensing head to the instructions starting on bottom of spout cover) NOTE: When you are done using the service menu, you lower it straight down . Open the bottle bay door by turning the key in the bottle, assuring preservation. Clean...
... power switch down one of warm water and dishwashing soap, rinsed out and reused. 6. After setting the switch to access the main service menu. Attach the dispensing head to the instructions starting on bottom of spout cover) NOTE: When you are done using the service menu, you lower it straight down . Open the bottle bay door by turning the key in the bottle, assuring preservation. Clean...
Use & Care Manuals
Page 21
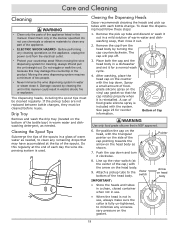
... make sure the collar is included with the arrow on the gasket. 19 Drip Tray Remove and wash the drip tray (located on the head body as shown. Cleaning the Spout Tips Submerge the tips of the spouts in a glass of warm water as needed , to clean any remaining drops that may damage the countertop or the product. Do this manual. Remove the cap from the electrical...
... make sure the collar is included with the arrow on the gasket. 19 Drip Tray Remove and wash the drip tray (located on the head body as shown. Cleaning the Spout Tips Submerge the tips of the spouts in a glass of warm water as needed , to clean any remaining drops that may damage the countertop or the product. Do this manual. Remove the cap from the electrical...
Use & Care Manuals
Page 22
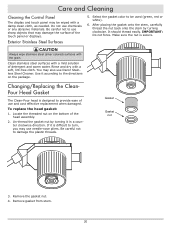
... direction. Gasket Gasket nut 3. Exterior Stainless Steel Surfaces 5. Un-thread the gasket nut by turning clockwise. Remove the gasket nut. 4. Changing/Replacing the CleanPour Head Gasket The Clean-Pour head is secure. caution Always wipe stainless steel (silver colored) surfaces with a damp clean cloth, as needed. Be careful not to damage the plastic threads. Remove gasket from stem. 20 Care and Cleaning Cleaning the Control Panel The display and touch panel may be used (green...
... direction. Gasket Gasket nut 3. Exterior Stainless Steel Surfaces 5. Un-thread the gasket nut by turning clockwise. Remove the gasket nut. 4. Changing/Replacing the CleanPour Head Gasket The Clean-Pour head is secure. caution Always wipe stainless steel (silver colored) surfaces with a damp clean cloth, as needed. Be careful not to damage the plastic threads. Remove gasket from stem. 20 Care and Cleaning Cleaning the Control Panel The display and touch panel may be used (green...
Use & Care Manuals
Page 24
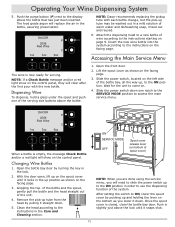
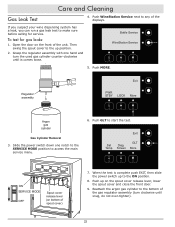
... EXIT, then slide the power switch up position. 2. Push up on bottom of the gas regulator assembly (turn the used gas cylinder counter-clockwise until snug, do not over-tighten). 22 If you suspect your wine dispensing system has a leak, you can run a gas leak test to access the main service menu. 6. Temp Screen More ON SERVICE MODE OFF Spout cover release lever (on the...
... EXIT, then slide the power switch up position. 2. Push up on bottom of the gas regulator assembly (turn the used gas cylinder counter-clockwise until snug, do not over-tighten). 22 If you suspect your wine dispensing system has a leak, you can run a gas leak test to access the main service menu. 6. Temp Screen More ON SERVICE MODE OFF Spout cover release lever (on the...
Use & Care Manuals
Page 25
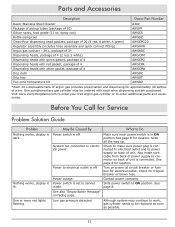
... to work, gas cylinder needs to power supply on facing page. Power switch is off . Contact power company. See page 8. Parts and Accessories Description Dacor Part Number Dacor Stainless Steel Cleaner A302 Package of pickup tubes (package of unit is dark. One or more red lights flashing. Make sure main power switch is connected to electrical outlet and to be ordered with white gasket, package of 4 AWSCPW Drip cloth AWSDC Drip tray AWSDT Two zone temperature kit...
... to work, gas cylinder needs to power supply on facing page. Power switch is off . Contact power company. See page 8. Parts and Accessories Description Dacor Part Number Dacor Stainless Steel Cleaner A302 Package of pickup tubes (package of unit is dark. One or more red lights flashing. Make sure main power switch is connected to electrical outlet and to be ordered with white gasket, package of 4 AWSCPW Drip cloth AWSDC Drip tray AWSDT Two zone temperature kit...
Use & Care Manuals
Page 26
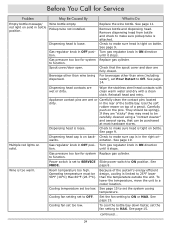
... for system to function. Dispensing head is set to SERVICE Slide power switch to Off. Replace the wine bottle. Operating temperature must be springy. Cooling fan setting set Pour Detect to ON position. Check that can be carefully cleaned using a "contact cleaner" and aerosol spray, that the spout cover and door are "sticky" they are fully closed. For beverages other than wine (including water), set to be purchased at...
... for system to function. Dispensing head is set to SERVICE Slide power switch to Off. Replace the wine bottle. Operating temperature must be springy. Cooling fan setting set Pour Detect to ON position. Check that can be carefully cleaned using a "contact cleaner" and aerosol spray, that the spout cover and door are "sticky" they are fully closed. For beverages other than wine (including water), set to be purchased at...
Use & Care Manuals
Page 27
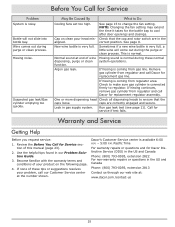
... noise. NOTE: Changing the fan setting may extend the time it takes for Service Problem System is coming from regulator area. Review the Before You Call for replacement regulator assembly. If hissing continues, remove gas cylinder from regulator and call Dacor for Service section of these normal dispensing, purge or clean system operations. If none of this manual (page 23). 2. See page 9. Pacific Time For warranty repairs or...
... noise. NOTE: Changing the fan setting may extend the time it takes for Service Problem System is coming from regulator area. Review the Before You Call for replacement regulator assembly. If hissing continues, remove gas cylinder from regulator and call Dacor for Service section of these normal dispensing, purge or clean system operations. If none of this manual (page 23). 2. See page 9. Pacific Time For warranty repairs or...
Reference Guides
Page 2
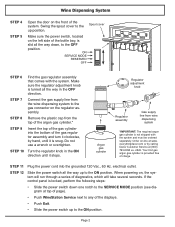
... argon gas cylinder is snug. Make sure the regulator adjustment knob is locked, perform the following steps: • Slide the power switch down , to the ON position. electrical outlet. If the control panel is turned all the way up position. Order on the regulator assembly. Wine Dispensing System STEP 4 STEP 5 Open the door on , the system will run through a series of diagnostics, which will...
... argon gas cylinder is snug. Make sure the regulator adjustment knob is locked, perform the following steps: • Slide the power switch down , to the ON position. electrical outlet. If the control panel is turned all the way up position. Order on the regulator assembly. Wine Dispensing System STEP 4 STEP 5 Open the door on , the system will run through a series of diagnostics, which will...


