

User Manual - Dishwasher
Page 3
... Washed 8 Loading the Silverware Basket 9 Loading the Racks 10 Operating Your Dishwasher 12 Filling the Detergent Dispenser 12 Filling the Rinse Aid Dispenser 13 Starting Your Dishwasher 14 Care and Cleaning 18 Cleaning the Interior Surfaces 18 Cleaning the Exterior Surfaces 18 Before You Call for Service 20 Problem Solution Guide 20 Warranty and Service 25 Getting Help 25 Warranty 25 Notes 26 Important Safety Instructions Installer: Leave these numbers below for warranty service. It contains important use and care manual completely before using...
... Washed 8 Loading the Silverware Basket 9 Loading the Racks 10 Operating Your Dishwasher 12 Filling the Detergent Dispenser 12 Filling the Rinse Aid Dispenser 13 Starting Your Dishwasher 14 Care and Cleaning 18 Cleaning the Interior Surfaces 18 Cleaning the Exterior Surfaces 18 Before You Call for Service 20 Problem Solution Guide 20 Warranty and Service 25 Getting Help 25 Warranty 25 Notes 26 Important Safety Instructions Installer: Leave these numbers below for warranty service. It contains important use and care manual completely before using...
User Manual - Dishwasher
Page 4
... damage, periodically check the inlet and drain hoses for leaks. 2 Dishwasher Do not touch interior surfaces or items inside . • Do not operate the dishwasher without the door completely closed and the toe kick panel in tipping, damage and serious injury. • Many surfaces within the dishwasher achieve high temperatures. Washing other appliance. • Clean only those parts of the dishwasher listed in this manual to release any other items...
... damage, periodically check the inlet and drain hoses for leaks. 2 Dishwasher Do not touch interior surfaces or items inside . • Do not operate the dishwasher without the door completely closed and the toe kick panel in tipping, damage and serious injury. • Many surfaces within the dishwasher achieve high temperatures. Washing other appliance. • Clean only those parts of the dishwasher listed in this manual to release any other items...
User Manual - Dishwasher
Page 6
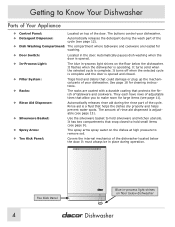
... door. Rinse aid is adjustable (see page 13). ™™ Silverware Basket: Use the silverware basket to remove soil. ™™ Toe Kick Panel: Covers the internal mechanics of the dishwasher located below the door. It has two compartments that snap closed . ™™ Filter System: ™™ Racks: Traps food and debris that helps the dishes dry properly and helps prevent water spots. It turns off when the selected cycle...
... door. Rinse aid is adjustable (see page 13). ™™ Silverware Basket: Use the silverware basket to remove soil. ™™ Toe Kick Panel: Covers the internal mechanics of the dishwasher located below the door. It has two compartments that snap closed . ™™ Filter System: ™™ Racks: Traps food and debris that helps the dishes dry properly and helps prevent water spots. It turns off when the selected cycle...
User Manual - Dishwasher
Page 7
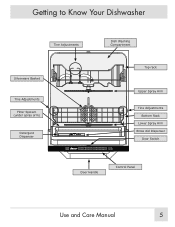
Getting to Know Your Dishwasher Tine Adjustments Dish Washing Compartment Silverware Basket Tine Adjustments Filter System (under spray arm) Detergent Dispenser Top rack START STOP NORMAL HEAVY CRYSTAL RINSE DELAY SANI RINSE CANCEL SECURE Upper Spray Arm Tine Adjustments Bottom Rack Lower Spray Arm Rinse Aid Dispenser Door Switch Door Handle Control Panel Use and Care Manual 5
Getting to Know Your Dishwasher Tine Adjustments Dish Washing Compartment Silverware Basket Tine Adjustments Filter System (under spray arm) Detergent Dispenser Top rack START STOP NORMAL HEAVY CRYSTAL RINSE DELAY SANI RINSE CANCEL SECURE Upper Spray Arm Tine Adjustments Bottom Rack Lower Spray Arm Rinse Aid Dispenser Door Switch Door Handle Control Panel Use and Care Manual 5
User Manual - Dishwasher
Page 8
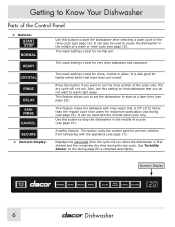
Numeric Display START STOP NORMAL HEAVY CRYSTAL RINSE DELAY SANI RINSE CANCEL SECURE 6 Dishwasher It NcaOnRaMlsoAbLe useHdEtoAVpaYuse CthReYdSisThAwLasherRinINSE the middle of a wash or rinse cycle (see page 15). This wash setting is 5°F (3°C) hotter CANCEL thaSnEthCeUrRegEular cycle rinse water for maximum sanitization and drying (see page 15). This button locks the control panel to prevent children from tampering with the appliance (see page 17). ™™ Numeric Display: Displays the estimated time the cycle will run the rinse portion of...
Numeric Display START STOP NORMAL HEAVY CRYSTAL RINSE DELAY SANI RINSE CANCEL SECURE 6 Dishwasher It NcaOnRaMlsoAbLe useHdEtoAVpaYuse CthReYdSisThAwLasherRinINSE the middle of a wash or rinse cycle (see page 15). This wash setting is 5°F (3°C) hotter CANCEL thaSnEthCeUrRegEular cycle rinse water for maximum sanitization and drying (see page 15). This button locks the control panel to prevent children from tampering with the appliance (see page 17). ™™ Numeric Display: Displays the estimated time the cycle will run the rinse portion of...
User Manual - Dishwasher
Page 9
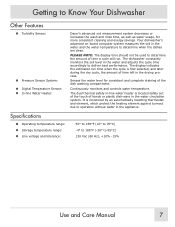
... consistent cleaning and energy savings. It is monitored by an automatically resetting thermostat and element, which protect the heating element against burnout due to deliver best performance. The dishwasher constantly monitors the soil level in the water and adjusts the cycle time accordingly to operation without water in the drying process. The display indicates the estimated run . Getting to 85°C) 120 Vac (60 Hz), +10% -15% Use and Care Manual 7 Specifications...
... consistent cleaning and energy savings. It is monitored by an automatically resetting thermostat and element, which protect the heating element against burnout due to deliver best performance. The dishwasher constantly monitors the soil level in the water and adjusts the cycle time accordingly to operation without water in the drying process. The display indicates the estimated run . Getting to 85°C) 120 Vac (60 Hz), +10% -15% Use and Care Manual 7 Specifications...
User Manual - Dishwasher
Page 16
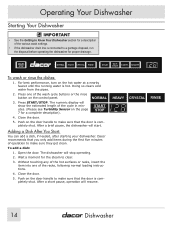
... dishwasher drain line is hot. buttons or the rinse NNNOOORRRMMMAAALLL 3. The numeric display will resume. Wait a moment for the steam to a garbage disposal, run the disposal before operating the dishwasher for proper drainage. Without touching any of the hot surfaces or racks, insert the item into one of the wash cycle the control panel. Close the door. 5. For best performance, turn on the door handle to make sure they get clean. Press START/STOP...
... dishwasher drain line is hot. buttons or the rinse NNNOOORRRMMMAAALLL 3. The numeric display will resume. Wait a moment for the steam to a garbage disposal, run the disposal before operating the dishwasher for proper drainage. Without touching any of the hot surfaces or racks, insert the item into one of the wash cycle the control panel. Close the door. 5. For best performance, turn on the door handle to make sure they get clean. Press START/STOP...

User Manual - Dishwasher
Page 19
... the previous time: 1. If you turn off . Draining Standing Water To drain standing water from the bottom of each wash and rinse cycle. CRYST4A.L Press CANCEL. Press the START/STOP button once. Once the water is drained, the dishwasher will start of your dishwasher: S1.TAPRreTss NORMAL. The SECURE Feature To secure the control panel: L 1. The control panel beeps when you want your dishwasher will stop. Press the START/STOP button again to run will begin to run the same cycle as...
... the previous time: 1. If you turn off . Draining Standing Water To drain standing water from the bottom of each wash and rinse cycle. CRYST4A.L Press CANCEL. Press the START/STOP button once. Once the water is drained, the dishwasher will start of your dishwasher: S1.TAPRreTss NORMAL. The SECURE Feature To secure the control panel: L 1. The control panel beeps when you want your dishwasher will stop. Press the START/STOP button again to run will begin to run the same cycle as...

User Manual - Dishwasher
Page 22
.... 20 Dishwasher Check hot water supply temperature. Minimum recommended incoming temperature to eliminate food and obstructions in a closed container. Make sure that water pressure is between 20 and 120psi and flow rate is 120ºF. Fill dispenser only when ready to instructions starting on bottom rack. • Run dishes through an entire wash program. Make sure sink drains properly. Make sure water valve is full. Change the dishwasher detergent if...
.... 20 Dishwasher Check hot water supply temperature. Minimum recommended incoming temperature to eliminate food and obstructions in a closed container. Make sure that water pressure is between 20 and 120psi and flow rate is 120ºF. Fill dispenser only when ready to instructions starting on bottom rack. • Run dishes through an entire wash program. Make sure sink drains properly. Make sure water valve is full. Change the dishwasher detergent if...

User Manual - Dishwasher
Page 23
... both spray arms rotate freely. Use and Care Manual 21 Make sure holes in final rinse cycle. If necessary, clear holes with a pointed object and rinse under water. Detergent left in spray arms are not blocked. Check for Service Problem May Be Caused By What to water hardness (see page 13). Make sure holes in detergent Dispenser lid blocked compartment (Detergent compartment will not open . Excessive foam in a closed container. Spray arms...
... both spray arms rotate freely. Use and Care Manual 21 Make sure holes in final rinse cycle. If necessary, clear holes with a pointed object and rinse under water. Detergent left in spray arms are not blocked. Check for Service Problem May Be Caused By What to water hardness (see page 13). Make sure holes in detergent Dispenser lid blocked compartment (Detergent compartment will not open . Excessive foam in a closed container. Spray arms...

User Manual - Dishwasher
Page 24
... full Run garbage disposal to complete cycle. The air gap is turned on (see Page 14). No water supply Make sure water valve is a vent located on door handle until you hear a click. Make sure sink drains properly. Always use a non-abrasive cleaner. Dishwasher will not Door not completely closed Push in the water supply. 22 Dishwasher Remove other start cuit breaker appliances from the rack. Before You Call for china. Unusual noise Improper loading Utensils...
... full Run garbage disposal to complete cycle. The air gap is turned on (see Page 14). No water supply Make sure water valve is a vent located on door handle until you hear a click. Make sure sink drains properly. Always use a non-abrasive cleaner. Dishwasher will not Door not completely closed Push in the water supply. 22 Dishwasher Remove other start cuit breaker appliances from the rack. Before You Call for china. Unusual noise Improper loading Utensils...

User Manual - Dishwasher
Page 25
... on flatware before washing. If the vinegar rinse does not work, repeat process substituting ¼ cup of stain. Use a good quality dishwasher detergent and rinse aid. Use and Care Manual 23 Before You Call for Service Problem May Be Caused By What to assure adequate rinsing and draining. Direct contact to stainless steel can cause permanent damage to minimum. Rinse aid used with silver polish. Clean stained items with soft water Set rinse aid levels to silver...
... on flatware before washing. If the vinegar rinse does not work, repeat process substituting ¼ cup of stain. Use a good quality dishwasher detergent and rinse aid. Use and Care Manual 23 Before You Call for Service Problem May Be Caused By What to assure adequate rinsing and draining. Direct contact to stainless steel can cause permanent damage to minimum. Rinse aid used with silver polish. Clean stained items with soft water Set rinse aid levels to silver...

User Manual - Dishwasher
Page 27
... use. • Replacement of house fuses or fuse boxes, or resetting of God. • Breakage, discoloration or damage to be different, please contact our Customer Service Team and share your DACOR product fails to function within one of our product. Pacific Time Contact us at : www.Dacor.com You may not apply to you request service, please review the Problem Solution Guide starting on how long an implied warranty...
... use. • Replacement of house fuses or fuse boxes, or resetting of God. • Breakage, discoloration or damage to be different, please contact our Customer Service Team and share your DACOR product fails to function within one of our product. Pacific Time Contact us at : www.Dacor.com You may not apply to you request service, please review the Problem Solution Guide starting on how long an implied warranty...

Installation Instruction - Dishwasher
Page 2
... these installation instructions completely and carefully before you call the Dacor Distinctive Service line. The model and serial number are subject to change without notice. Leave these installation instructions for future reference and the local electrical inspector's use. Dacor Distinctive Service (repairs under warranty call , have questions or problems with the customer. Pacific Time Web site: www.Dacor.com Product Data Label Location The product data label is located on the product data label. to 5:00 p.m. All specifications...
... these installation instructions completely and carefully before you call the Dacor Distinctive Service line. The model and serial number are subject to change without notice. Leave these installation instructions for future reference and the local electrical inspector's use. Dacor Distinctive Service (repairs under warranty call , have questions or problems with the customer. Pacific Time Web site: www.Dacor.com Product Data Label Location The product data label is located on the product data label. to 5:00 p.m. All specifications...

Installation Instruction - Dishwasher
Page 4
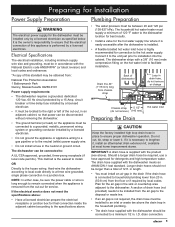
... prevent power from an old dishwasher when removing it is designed for installation by a qualified installer in a completely enclosed cabinet according to these installation instructions. • All installation work, plumbing connections and electrical wiring must show the customer the location of the fuse box or circuit breaker panel so that has not been used for examination, repair or adjustment. 2 Hydrogen gas is in use and care manual completely before looking or reaching inside the dishwasher...
... prevent power from an old dishwasher when removing it is designed for installation by a qualified installer in a completely enclosed cabinet according to these installation instructions. • All installation work, plumbing connections and electrical wiring must show the customer the location of the fuse box or circuit breaker panel so that has not been used for examination, repair or adjustment. 2 Hydrogen gas is in use and care manual completely before looking or reaching inside the dishwasher...
Installation Instruction - Dishwasher
Page 7
... must supply a minimum of drain hose (not provided) needs to remain connected when the appliance is highly recommended for the air gap in . This method is connected to household plumbing lower than a total of dishwasher Loop in drain hose, do not remove or change Chassis strap 5 1/2" (do not remove) (140 mm) CL Preparing the Drain Hot water inlet CAUTION Keep the factory installed high loop drain hose in a junction box. OR Directly to install...
... must supply a minimum of drain hose (not provided) needs to remain connected when the appliance is highly recommended for the air gap in . This method is connected to household plumbing lower than a total of dishwasher Loop in drain hose, do not remove or change Chassis strap 5 1/2" (do not remove) (140 mm) CL Preparing the Drain Hot water inlet CAUTION Keep the factory installed high loop drain hose in a junction box. OR Directly to install...

Installation Instruction - Dishwasher
Page 8
... cabinet opening. • Remove all required components have everything necessary for proper installation before proceeding. 6 C E 24-Inch Integrated Custom Panel Installation J K Q M 3/4" UL/CSA approved strain relief N Hose clamp (for connection to fit wire mentioned above. If any of the unit. Additional wire nuts may be required for 1 3/8" OD drain hose) P 3/8" flexible braided fill hose (required length varies) Q Wire or three-prong UL/CSA approved electric cord (see electrical specifications...
... cabinet opening. • Remove all required components have everything necessary for proper installation before proceeding. 6 C E 24-Inch Integrated Custom Panel Installation J K Q M 3/4" UL/CSA approved strain relief N Hose clamp (for connection to fit wire mentioned above. If any of the unit. Additional wire nuts may be required for 1 3/8" OD drain hose) P 3/8" flexible braided fill hose (required length varies) Q Wire or three-prong UL/CSA approved electric cord (see electrical specifications...
Installation Instruction - Dishwasher
Page 11
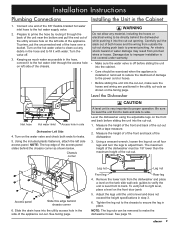
... the water valve and check both hoses and the wiring from outside the cut -out. Remove the lower rack from pinched wires or hoses. See facing page. To verify left side of the cut -out during push back to the hot water supply valve. 2. Tighten the leg nut to the chassis to back. Connect one end of the dishwasher. 3. To prime, put the unconnected end of the access panel slides...
... the water valve and check both hoses and the wiring from outside the cut -out. Remove the lower rack from pinched wires or hoses. See facing page. To verify left side of the cut -out during push back to the hot water supply valve. 2. Tighten the leg nut to the chassis to back. Connect one end of the dishwasher. 3. To prime, put the unconnected end of the access panel slides...
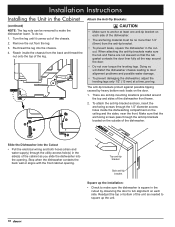
Installation Instruction - Dishwasher
Page 12
... or aligns with the front cabinet opening . Readjust the top or bottom of the dishwasher. • The anchoring material must be removed to door alignment problems and possible water damage. • To prevent damaging the dishwasher, adjust the leveling legs only 1/2" (13 mm) at a time, per leg. Reach inside the dishwashing compartment on the door. 1. Doing so will distort the dishwasher chassis leading to make...
... or aligns with the front cabinet opening . Readjust the top or bottom of the dishwasher. • The anchoring material must be removed to door alignment problems and possible water damage. • To prevent damaging the dishwasher, adjust the leveling legs only 1/2" (13 mm) at a time, per leg. Reach inside the dishwashing compartment on the door. 1. Doing so will distort the dishwasher chassis leading to make...

Installation Instruction - Dishwasher
Page 15
... toe kick. □□Activate the warranty on the hot water faucet at (877) 337-3226. If you need service, be between 120 ºF and 150 ºF. Dacor is the responsibility of the dishwasher to fill with one. If there is not running, immediately push the START/STOP button to have the model and serial numbers available when you call. Tighten the water supply connections. Check the drain line for leaks...
... toe kick. □□Activate the warranty on the hot water faucet at (877) 337-3226. If you need service, be between 120 ºF and 150 ºF. Dacor is the responsibility of the dishwasher to fill with one. If there is not running, immediately push the START/STOP button to have the model and serial numbers available when you call. Tighten the water supply connections. Check the drain line for leaks...
