
User Manual - Dishwasher
Page 1
... and tips. C Place Serial Number Label Here Part No. 65300 Rev. Use & Care Dishwasher SAFETY IS EVERYONE'S RESPONSIBILITY. THE OPERATION WILL BE FURTHER ENHANCED IF PROPER CARE AND JUDGEMENT ARE EXERCISED IN THE USE AND MAINTENANCE OF THIS APPLIANCE. ALL DACOR APPLIANCES ARE DESIGNED AND CONSTRUCTED TO GIVE YOU MANY YEARS OF SAFE OPERATION. IMPORTANT INFORMATION • Operating Instructions • Care and Cleaning Instructions • Safety Tips...
... and tips. C Place Serial Number Label Here Part No. 65300 Rev. Use & Care Dishwasher SAFETY IS EVERYONE'S RESPONSIBILITY. THE OPERATION WILL BE FURTHER ENHANCED IF PROPER CARE AND JUDGEMENT ARE EXERCISED IN THE USE AND MAINTENANCE OF THIS APPLIANCE. ALL DACOR APPLIANCES ARE DESIGNED AND CONSTRUCTED TO GIVE YOU MANY YEARS OF SAFE OPERATION. IMPORTANT INFORMATION • Operating Instructions • Care and Cleaning Instructions • Safety Tips...

User Manual - Dishwasher
Page 3
... 1 Purpose of this Manual 1 Product Registration 1 IMPORTANT INSTRUCTIONS 1 DISHWASHER OPERATION 2-5 Safety and Efficiency Devices 2 Getting Started 2 Dishwasher Racks 2 Silverware Basket 3 Detergent/Rinse Aide Dispenser 3 Which Program is Best 3 Control Panel Operation 3 Control Panel Indicator Lights 4 Remote Indicating Light 4 Starting the Dishwasher 4 Mid-Cycle Operations 4-5 CARE AND CLEANING 5 Normal Care of the Dishwasher 5 Strainer Baskets 5 PROBLEM SOLVING 6-8 Troubleshooting 6-8 Product Maintenance 8 If You Need Service 8 PRODUCT WARRANTY 8 What Is Covered...
... 1 Purpose of this Manual 1 Product Registration 1 IMPORTANT INSTRUCTIONS 1 DISHWASHER OPERATION 2-5 Safety and Efficiency Devices 2 Getting Started 2 Dishwasher Racks 2 Silverware Basket 3 Detergent/Rinse Aide Dispenser 3 Which Program is Best 3 Control Panel Operation 3 Control Panel Indicator Lights 4 Remote Indicating Light 4 Starting the Dishwasher 4 Mid-Cycle Operations 4-5 CARE AND CLEANING 5 Normal Care of the Dishwasher 5 Strainer Baskets 5 PROBLEM SOLVING 6-8 Troubleshooting 6-8 Product Maintenance 8 If You Need Service 8 PRODUCT WARRANTY 8 What Is Covered...
User Manual - Dishwasher
Page 4
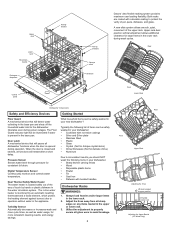
... pan and shuts off the household water inlet to lower rack Adjusting the Upper Basket (30" Model Only) Upper rack dual position vertical adjustment allows additional clearance for delicate china) • Aluminum Due to inconsistent results you should NOT wash the following list of the upper rack. Door Latch A mechanical device that will restart after a short delay. Pressure Sensor Senses water level through pressure for more consistent cleaning results, and energy savings. Turbidity...
... pan and shuts off the household water inlet to lower rack Adjusting the Upper Basket (30" Model Only) Upper rack dual position vertical adjustment allows additional clearance for delicate china) • Aluminum Due to inconsistent results you should NOT wash the following list of the upper rack. Door Latch A mechanical device that will restart after a short delay. Pressure Sensor Senses water level through pressure for more consistent cleaning results, and energy savings. Turbidity...

User Manual - Dishwasher
Page 5
... position silverware basket offers flexibility. Fill the detergent dispenser just prior to starting the dishwasher, to improve the water quality and detergent effectiveness. Open the door slowly and add detergent to the chart below . 8. Detergent alone may not be used , to conserve energy SAVER during a wash cycle. The only solutions is placed in the lower rack. RINSE Best for the wash. Check with water before the mix is to install a water softener...
... position silverware basket offers flexibility. Fill the detergent dispenser just prior to starting the dishwasher, to improve the water quality and detergent effectiveness. Open the door slowly and add detergent to the chart below . 8. Detergent alone may not be used , to conserve energy SAVER during a wash cycle. The only solutions is placed in the lower rack. RINSE Best for the wash. Check with water before the mix is to install a water softener...

User Manual - Dishwasher
Page 6
... light will deactivate a preset sani rinse select. START STOP NORMAL HEAVY CRYSTAL RINSE ENERGY SAVER DRY DELAY SANI RINSE CANCEL SECURE Sanitized Rinse Aid Floor Guard Diagnostic Washing Rinsing Drying Clean Control Panel Buttons 4 Entering the Secure mode will illuminate continuously in the first 5 minutes of operation to ensure cleanliness of the dishes. • To add a dish, open the door of a cycle failure. To turn off when the door is opened then closed...
... light will deactivate a preset sani rinse select. START STOP NORMAL HEAVY CRYSTAL RINSE ENERGY SAVER DRY DELAY SANI RINSE CANCEL SECURE Sanitized Rinse Aid Floor Guard Diagnostic Washing Rinsing Drying Clean Control Panel Buttons 4 Entering the Secure mode will illuminate continuously in the first 5 minutes of operation to ensure cleanliness of the dishes. • To add a dish, open the door of a cycle failure. To turn off when the door is opened then closed...

User Manual - Dishwasher
Page 7
.... To remove the small particle filter for cleaning, turn the filter counterclockwise and lift straight out. Clean the filters in the digital display indicating the time remaining. Medium particle filter. Strainer Baskets WARNING: Do not operate the dishwasher without running a complete wash cycle, press the START key twice, close the dishwasher door. The digital display will turn off and the START button light will re-start the unit, press the START button again. Cancel a Cycle • To cancel a dishwasher cycle in mid-cycle or at...
.... To remove the small particle filter for cleaning, turn the filter counterclockwise and lift straight out. Clean the filters in the digital display indicating the time remaining. Medium particle filter. Strainer Baskets WARNING: Do not operate the dishwasher without running a complete wash cycle, press the START key twice, close the dishwasher door. The digital display will turn off and the START button light will re-start the unit, press the START button again. Cancel a Cycle • To cancel a dishwasher cycle in mid-cycle or at...

User Manual - Dishwasher
Page 8
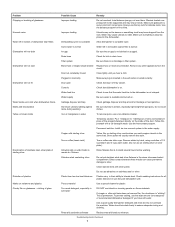
... or handle has not prevented their turning. Troubleshooting Guide 6 Store the dishwasher detergent in a dry place and in a closed container in the final rinse cycle. Make sure spray can rotate freely and that items do not nest in the sink. Compartment cover blocked The cover may need to the servicer when you call for the vinegar. To remove hard water spots, try a vinegar rinse: • Wash and rinse load...
... or handle has not prevented their turning. Troubleshooting Guide 6 Store the dishwasher detergent in a dry place and in a closed container in the final rinse cycle. Make sure spray can rotate freely and that items do not nest in the sink. Compartment cover blocked The cover may need to the servicer when you call for the vinegar. To remove hard water spots, try a vinegar rinse: • Wash and rinse load...
User Manual - Dishwasher
Page 9
... the door. Dishwashing cycle not complete Allow dishwasher to assure adequate rinsing and draining. Some water is normal. Air gap Be sure the air gap is not crimped. Drain hose Check for all plastic items to be supported and may cause utensils to see that door is firmly closed Close tightly until you hear a click. Remove any other appliances from the rack. Door not completely closed . Water supply Be sure water is to remain on stainless steel...
... the door. Dishwashing cycle not complete Allow dishwasher to assure adequate rinsing and draining. Some water is normal. Air gap Be sure the air gap is not crimped. Drain hose Check for all plastic items to be supported and may cause utensils to see that door is firmly closed Close tightly until you hear a click. Remove any other appliances from the rack. Door not completely closed . Water supply Be sure water is to remain on stainless steel...

User Manual - Dishwasher
Page 10
... or nest items. Be sure all parts. Load items with the sani rinse setting will dry the fastest. First, review the recommended checks listed in the PRODUCT WARRANTY section. Your dealer can run off , trapping warm humid air, It is transported from the U.S. If the service agency is being operated correctly. What Is Covered CERTIFICATE OF WARRANTIES DACOR DISHWASHERS WITHIN THE FIFTY STATES OF THE U.S.A., THE...
... or nest items. Be sure all parts. Load items with the sani rinse setting will dry the fastest. First, review the recommended checks listed in the PRODUCT WARRANTY section. Your dealer can run off , trapping warm humid air, It is transported from the U.S. If the service agency is being operated correctly. What Is Covered CERTIFICATE OF WARRANTIES DACOR DISHWASHERS WITHIN THE FIFTY STATES OF THE U.S.A., THE...
User Manual - Dishwasher
Page 11
fold here BUSINESS REPLY MAIL FIRST-CLASS MAIL PERMIT NO. 4507 DIAMOND BAR CA POSTAGE WILL BE PAID BY ADDRESSEE ATTN: WARRANTY PROCESSING DEPT DACOR 1440 BRIDGEGATE DR STE 200 PO BOX 6532 DIAMOND BAR CA 91765-9861 NO POSTAGE NECESSARY IF MAILED IN THE UNITED STATES
fold here BUSINESS REPLY MAIL FIRST-CLASS MAIL PERMIT NO. 4507 DIAMOND BAR CA POSTAGE WILL BE PAID BY ADDRESSEE ATTN: WARRANTY PROCESSING DEPT DACOR 1440 BRIDGEGATE DR STE 200 PO BOX 6532 DIAMOND BAR CA 91765-9861 NO POSTAGE NECESSARY IF MAILED IN THE UNITED STATES

User Manual - Dishwasher
Page 12
... Showroom H. Other 4. WARRANTY INFORMATION IMPORTANT: Your warranty for mailing list purposes. Please rest assured that you have chosen Dacor products for your home and do you deserve. T.V. Architect/Designer C. Kitchen Dealer Showroom I. Model Home E. Kitchen Dealer C. Builder Supplier D. Replacement only B. Part of expressing our gratitude! (Please Print or Type) Owner's Name: Last Street: First...
... Showroom H. Other 4. WARRANTY INFORMATION IMPORTANT: Your warranty for mailing list purposes. Please rest assured that you have chosen Dacor products for your home and do you deserve. T.V. Architect/Designer C. Kitchen Dealer Showroom I. Model Home E. Kitchen Dealer C. Builder Supplier D. Replacement only B. Part of expressing our gratitude! (Please Print or Type) Owner's Name: Last Street: First...

Installation Instruction - Dishwasher
Page 1
... drain Page 3 Installing the dishwasher Page 3 Installing the door front panel Page 4 Installing final hook ups Page 4 Verifying proper operation Page 5 Installing front toe-kick plate Part No. 65301 Rev. Owner: Please keep these instructions. 2. B Page 5 NOTES: Contain helpful hints and tips to operating this appliance. Installation and service must be followed carefully to avoid personal injury or damage. Installer: Please leave these Installation Instructions with these instructions for local electrical inspector's use...
... drain Page 3 Installing the dishwasher Page 3 Installing the door front panel Page 4 Installing final hook ups Page 4 Verifying proper operation Page 5 Installing front toe-kick plate Part No. 65301 Rev. Owner: Please keep these instructions. 2. B Page 5 NOTES: Contain helpful hints and tips to operating this appliance. Installation and service must be followed carefully to avoid personal injury or damage. Installer: Please leave these Installation Instructions with these instructions for local electrical inspector's use...

Installation Instruction - Dishwasher
Page 2
... hot water system has not been used for several minutes. Properly install the dishwasher. Read all the enclosure panels are properly in or on the dishwasher. 10. Use the dishwasher only for use an open flame during construction and installation. For plastic items not marked dishwasher safe, check the manufacturer's cleaning instructions. 6. As the gas is explosive. Do not operate your dishwasher unless all of the Use and Care Manual...
... hot water system has not been used for several minutes. Properly install the dishwasher. Read all the enclosure panels are properly in or on the dishwasher. 10. Use the dishwasher only for use an open flame during construction and installation. For plastic items not marked dishwasher safe, check the manufacturer's cleaning instructions. 6. As the gas is explosive. Do not operate your dishwasher unless all of the Use and Care Manual...

Installation Instruction - Dishwasher
Page 3
...-862kPa). Remove the racks and set aside for the application of a custom integrated cabinet front. EWD or IDW24/30 Overall Dimensions Side View (EDW Shown) Electrical supply should be exercised when the appliance is supplied with ground to connect to remain in order to a hot water supply with Door Closed (EDW Shown) A 3/8 inch flexible stainless steel water line is ready for later installation. The electrical power source must be replaced by a Dacor Authorized Service Agent, or similar...
...-862kPa). Remove the racks and set aside for the application of a custom integrated cabinet front. EWD or IDW24/30 Overall Dimensions Side View (EDW Shown) Electrical supply should be exercised when the appliance is supplied with ground to connect to remain in order to a hot water supply with Door Closed (EDW Shown) A 3/8 inch flexible stainless steel water line is ready for later installation. The electrical power source must be replaced by a Dacor Authorized Service Agent, or similar...

Installation Instruction - Dishwasher
Page 4
... Rear leg adjustment hex rod Leveling Adjustment Locations IMPORTANT: 1. The drain hose must be connected to a minimum 1/2 inch I.D. Longer replacement drain hoses should be installed to an inlet or waste tee above the floor. IMPORTANT: Do not allow any Dacor dishwasher. drain connection. Install the air gap in the opening , the legs must be used by heavy bottom rack loads on the outside of the countertop. Take care to feed the drain hose, water supply line and electrical cord into the...
... Rear leg adjustment hex rod Leveling Adjustment Locations IMPORTANT: 1. The drain hose must be connected to a minimum 1/2 inch I.D. Longer replacement drain hoses should be installed to an inlet or waste tee above the floor. IMPORTANT: Do not allow any Dacor dishwasher. drain connection. Install the air gap in the opening , the legs must be used by heavy bottom rack loads on the outside of the countertop. Take care to feed the drain hose, water supply line and electrical cord into the...

Installation Instruction - Dishwasher
Page 5
... air gap. Disposal Installation Electrical Insert the power cord plug into the grounded receptacle, and turn on the panel before proceeding to the left and right of countertop 20" Min. The counterbalance screws will allow adjustment for installation of decorative panels with two near the top of the supply line to underside of 3/4". Fasten to the hot water valve in the closed position align the custom panel flush with the control panel...
... air gap. Disposal Installation Electrical Insert the power cord plug into the grounded receptacle, and turn on the panel before proceeding to the left and right of countertop 20" Min. The counterbalance screws will allow adjustment for installation of decorative panels with two near the top of the supply line to underside of 3/4". Fasten to the hot water valve in the closed position align the custom panel flush with the control panel...

Installation Instruction - Dishwasher
Page 6
... the Use & Care manual. Remove the any leaks are provided through another fill and drain cycle. The water going to the dishwasher must be facing into to verify they are correct and complete. Close and latch the door. Check for leaks. If the fill cycle, wash cycle, and drain cycles operate correctly, then install the lower toe-kick panel. Reinstall the rear toe-kick plate before installing the front toe-kick plate. Install the adjustable lower toe-kick finish panel at...
... the Use & Care manual. Remove the any leaks are provided through another fill and drain cycle. The water going to the dishwasher must be facing into to verify they are correct and complete. Close and latch the door. Check for leaks. If the fill cycle, wash cycle, and drain cycles operate correctly, then install the lower toe-kick panel. Reinstall the rear toe-kick plate before installing the front toe-kick plate. Install the adjustable lower toe-kick finish panel at...
