
Installation Instructions
Page 2
...your Dacor ® dealer or the Dacor Customer Service Team. If you have the model and serial number of Contents Important Safety Instructions 1 Important Information About Safety Instructions... 1 Safety Symbols and Labels 1 General Safety Precautions 2 Product Specifications 3 Product Dimensions 3 Planning the Installation 4 Electrical Specifications 4 Water Supply Specifications 4 Preparing the Location 4 Preparing the Drain 6 Installation Instructions 7 Verify the Package Contents 7 Installation Preparation 8 Installing the Unit in the Cabinet 10 Water Line Connection 11...
...your Dacor ® dealer or the Dacor Customer Service Team. If you have the model and serial number of Contents Important Safety Instructions 1 Important Information About Safety Instructions... 1 Safety Symbols and Labels 1 General Safety Precautions 2 Product Specifications 3 Product Dimensions 3 Planning the Installation 4 Electrical Specifications 4 Water Supply Specifications 4 Preparing the Location 4 Preparing the Drain 6 Installation Instructions 7 Verify the Package Contents 7 Installation Preparation 8 Installing the Unit in the Cabinet 10 Water Line Connection 11...

Installation Instructions
Page 4
... install, repair or replace any part of the dishwasher unless specifically recommended in place. • Many surfaces within the dishwasher can cause suffocation. • To prevent child entrapment, always remove the door from an old dishwasher when removing it may be performed in the use and care manual. Do not smoke or use . • Use only detergents and rinse aids recommended for leaks. 2 Do not touch interior surfaces or items inside . • During loading...
... install, repair or replace any part of the dishwasher unless specifically recommended in place. • Many surfaces within the dishwasher can cause suffocation. • To prevent child entrapment, always remove the door from an old dishwasher when removing it may be performed in the use and care manual. Do not smoke or use . • Use only detergents and rinse aids recommended for leaks. 2 Do not touch interior surfaces or items inside . • During loading...
Installation Instructions
Page 5
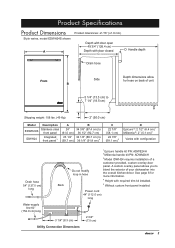
...) Depth with door open 49 3/4" (126.4 cm) Depth with door closed C D Handle depth Drain hose Front B Side Depth dimensions allow for more information. 4 Height with configuration Drain hose 54" (137.0 cm) long Back Do not modify loop in hose 1 Epicure handle kit PN: ADWE24H 2 Millennia handle kit PN: ADWM24H 3 Model IDWH24 requires installation of a customer provided, custom overlay door panel. See page 6 for hose on back of your dishwasher into the overall kitchen décor...
...) Depth with door open 49 3/4" (126.4 cm) Depth with door closed C D Handle depth Drain hose Front B Side Depth dimensions allow for more information. 4 Height with configuration Drain hose 54" (137.0 cm) long Back Do not modify loop in hose 1 Epicure handle kit PN: ADWE24H 2 Millennia handle kit PN: ADWM24H 3 Model IDWH24 requires installation of a customer provided, custom overlay door panel. See page 6 for hose on back of your dishwasher into the overall kitchen décor...

Installation Instructions
Page 6
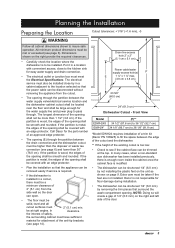
... least resistance for this appliance. 4 Dacor recommends using a hot water supply of the dishwasher cutout. If a cold water supply is not properly grounded. Do not modify the plug provided with the appliance, if it is easily accessible after the dishwasher is installed. • The dishwasher water supply line is needed, follow the instructions on the end. supplied. For exact specifications see the product data label, located inside the right door jamb. Damage to a circuit...
... least resistance for this appliance. 4 Dacor recommends using a hot water supply of the dishwasher cutout. If a cold water supply is not properly grounded. Do not modify the plug provided with the appliance, if it is easily accessible after the dishwasher is installed. • The dishwasher water supply line is needed, follow the instructions on the end. supplied. For exact specifications see the product data label, located inside the right door jamb. Damage to a circuit...
Installation Instructions
Page 7
... solid, level and all cabinet dimensions shown to see if the cabinet face can be disconnected without removing the appliance from the side wall so the door can be taken if the feet are not installed. Drain line access hole 2" x 2" (5.1 cm x 5.1 cm) Power cable/water supply access hole(s) F E 1 ½" x 1 ½" max. (3.8 cm x 3.8 cm) 23 5/8" (60.0 cm) 24" (61.0 cm) Dishwasher Cutout - Front View Model EDWH24S IDWH24...
... solid, level and all cabinet dimensions shown to see if the cabinet face can be disconnected without removing the appliance from the side wall so the door can be taken if the feet are not installed. Drain line access hole 2" x 2" (5.1 cm x 5.1 cm) Power cable/water supply access hole(s) F E 1 ½" x 1 ½" max. (3.8 cm x 3.8 cm) 23 5/8" (60.0 cm) 24" (61.0 cm) Dishwasher Cutout - Front View Model EDWH24S IDWH24...
Installation Instructions
Page 8
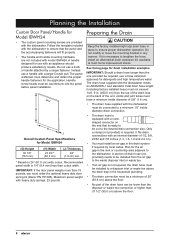
.... Planning the Installation Custom Door Panel/Handle for Model IDWH24 • The custom panel mounting screws are not included with the dishwasher to ensure that is ready to be cut to a disposer inlet or waste tee above the drain trap in the household plumbing. • The drain connection must order the optional heavy duty door spring kit (Dacor PN 701385). Follow the template included with model IDWH24. Handle screw heads...
.... Planning the Installation Custom Door Panel/Handle for Model IDWH24 • The custom panel mounting screws are not included with the dishwasher to ensure that is ready to be cut to a disposer inlet or waste tee above the drain trap in the household plumbing. • The drain connection must order the optional heavy duty door spring kit (Dacor PN 701385). Follow the template included with model IDWH24. Handle screw heads...
Installation Instructions
Page 10
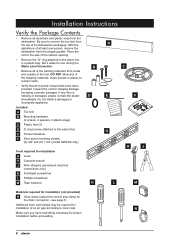
... appliance. Included A Toe kick B Mounting hardware (2 screws, 2 spacers, 2 plastic plugs) C Plastic feet (3) D O ring (comes attached to the water line) E Product literature F Door panel mounting screws, (2) 3/8" and (6) 1 3/4" (model IWDH24 only) B D Tools required for installation G Level H Crescent wrench J Wire strippers (permanent electrical connections only) K Flat blade screwdriver L Phillips screwdriver M Tape measure K A C E F G H J L M Materials required for installation (not provided) N Hose clamp (select the correct size clamp for the drain connection...see page...
... appliance. Included A Toe kick B Mounting hardware (2 screws, 2 spacers, 2 plastic plugs) C Plastic feet (3) D O ring (comes attached to the water line) E Product literature F Door panel mounting screws, (2) 3/8" and (6) 1 3/4" (model IWDH24 only) B D Tools required for installation G Level H Crescent wrench J Wire strippers (permanent electrical connections only) K Flat blade screwdriver L Phillips screwdriver M Tape measure K A C E F G H J L M Materials required for installation (not provided) N Hose clamp (select the correct size clamp for the drain connection...see page...
Installation Instructions
Page 13
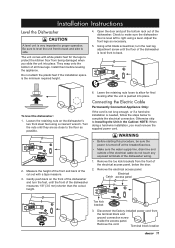
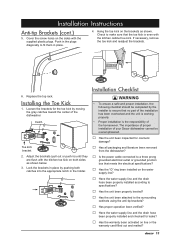
... dishwasher's two front steel feet using a level. Connecting the Electric Cable Permanently Connected Appliance Only: If the cord is not long enough, or if a hard-wire installation is needed, follow the steps below the door. 2. NOTE: When doing a hard-wire installation, you slide the unit into place. warning • Before starting this procedure, be sure the power is the minimum required height. 4. Electrical Catch access panel Toe kick bracket 3. Installation Instructions Level the Dishwasher caution A level...
... dishwasher's two front steel feet using a level. Connecting the Electric Cable Permanently Connected Appliance Only: If the cord is not long enough, or if a hard-wire installation is needed, follow the steps below the door. 2. NOTE: When doing a hard-wire installation, you slide the unit into place. warning • Before starting this procedure, be sure the power is the minimum required height. 4. Electrical Catch access panel Toe kick bracket 3. Installation Instructions Level the Dishwasher caution A level...
Installation Instructions
Page 14
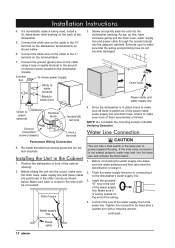
.... Connect the black wire on the cable to make sure the water pressure and flow rate meet the specification on the back of the water supply line. Position the dishwasher in the utility cutouts as shown below . Insert the provided "O" ring in the Cabinet 1. Installing the Unit in the end of the dishwasher. 5. Installation Instructions 4. If the inlet valve connection is being used, install a UL-listed strain relief bushing on page 4. 2. Power...
.... Connect the black wire on the cable to make sure the water pressure and flow rate meet the specification on the back of the water supply line. Position the dishwasher in the utility cutouts as shown below . Insert the provided "O" ring in the Cabinet 1. Installing the Unit in the end of the dishwasher. 5. Installation Instructions 4. If the inlet valve connection is being used, install a UL-listed strain relief bushing on page 4. 2. Power...
Installation Instructions
Page 15
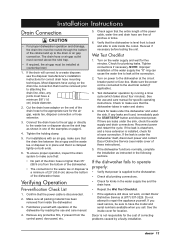
..., see inside cover of the drain hose to the drain or air gap connection. Cut the drain hose adapter on the water supply and wait for location. Turn on the end of these instructions). 5. NOTE: Improper installation of pinches or kinks. 6. Test dishwasher operation by reading the use and care manual for the cost of the examples on both ends. 6. Check to make sure that the entire length of the power cable, water line and drain hose are free of the water supply line...
..., see inside cover of the drain hose to the drain or air gap connection. Cut the drain hose adapter on the water supply and wait for location. Turn on the end of these instructions). 5. NOTE: Improper installation of pinches or kinks. 6. Test dishwasher operation by reading the use and care manual for the cost of the examples on both ends. 6. Check to make sure that the entire length of the power cable, water line and drain hose are free of the water supply line...
Installation Instructions
Page 17
... are flush with the supplied plastic plugs. Catch Toe kick bracket 2. If necessary, remove the toe kick and readjust the brackets. Adjust the brackets (pull out or push in the holder. Push in the plugs diagonally to the surrounding cabinets using the anti-tip brackets? □□ Has proper operation been verified? □□ Have the water supply line and the drain hose been properly installed and checked for the...
... are flush with the supplied plastic plugs. Catch Toe kick bracket 2. If necessary, remove the toe kick and readjust the brackets. Adjust the brackets (pull out or push in the holder. Push in the plugs diagonally to the surrounding cabinets using the anti-tip brackets? □□ Has proper operation been verified? □□ Have the water supply line and the drain hose been properly installed and checked for the...

User Manaual - Renaissance 24" Built-in Dishwasher
Page 4
... damage, periodically check the inlet and drain hoses for an extended period of the dishwasher. Hydrogen gas is not in use . • To prevent child entrapment, always remove the door from service. If the hot water system has not been used for leaks. • Turn off of the electrical outlet or circuit breaker and the water supply valve so that the dishwasher has been properly installed and grounded by a qualified...
... damage, periodically check the inlet and drain hoses for an extended period of the dishwasher. Hydrogen gas is not in use . • To prevent child entrapment, always remove the door from service. If the hot water system has not been used for leaks. • Turn off of the electrical outlet or circuit breaker and the water supply valve so that the dishwasher has been properly installed and grounded by a qualified...
User Manaual - Renaissance 24" Built-in Dishwasher
Page 5
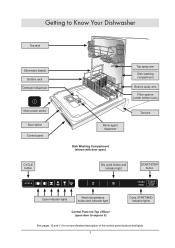
...Your Dishwasher Top rack Silverware basket Bottom rack Detergent dispenser Main power switch Door switch Control panel CYCLE button Rinse agent dispenser Top spray arm Dish washing compartment Bottom spray arm Filter system (under bottom rack) Toe kick Dish Washing Compartment (shown with door open) Dry cycle button and indicator light START/STOP button Cycle indicator lights Wash temperature button and indicator light Cycle START/END indicator lights Control Panel on Top of Door (open door to expose it) See pages 10 and 11 for a more detailed description of the control panel buttons...
...Your Dishwasher Top rack Silverware basket Bottom rack Detergent dispenser Main power switch Door switch Control panel CYCLE button Rinse agent dispenser Top spray arm Dish washing compartment Bottom spray arm Filter system (under bottom rack) Toe kick Dish Washing Compartment (shown with door open) Dry cycle button and indicator light START/STOP button Cycle indicator lights Wash temperature button and indicator light Cycle START/END indicator lights Control Panel on Top of Door (open door to expose it) See pages 10 and 11 for a more detailed description of the control panel buttons...
User Manaual - Renaissance 24" Built-in Dishwasher
Page 12
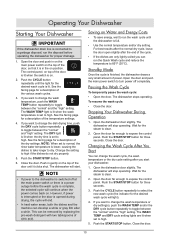
... "normal" and the "high" setting. The WASH TEMP light is lit when the wash temperature is set to normal, the rinse water temperature is lower, causing the dishes to take longer to expose the control panel. Push the START/STOP button. 6. Push in the on the top of the various wash cycles. 3. The dishwasher will stop operating. note • If power to toggle between the "normal" and "high" setting. This can change the dish drying time, push the DRY cycle button...
... "normal" and the "high" setting. The WASH TEMP light is lit when the wash temperature is set to normal, the rinse water temperature is lower, causing the dishes to take longer to expose the control panel. Push the START/STOP button. 6. Push in the on the top of the various wash cycles. 3. The dishwasher will stop operating. note • If power to toggle between the "normal" and "high" setting. This can change the dish drying time, push the DRY cycle button...
User Manaual - Renaissance 24" Built-in Dishwasher
Page 13
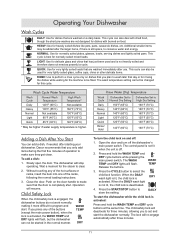
...: Use for dishes that the door is completely shut. Slowly open the door. The child safety lock will stop operating. Open the door and turn the child lock on a daily basis. This cycle is off the dishwasher's main power switch. The wash temperature setting cannot be used and is not heavily soiled and therefore does not need as powerful a cycle. Rinse Water (Dry) Temperature Wash Cycle Dishwasher Set to Dishwasher Set to make sure they get clean. Push on the door handle to Normal Dry Setting High Dry Setting Daily Heavy Normal Light Quick Rinse...
...: Use for dishes that the door is completely shut. Slowly open the door. The child safety lock will stop operating. Open the door and turn the child lock on a daily basis. This cycle is off the dishwasher's main power switch. The wash temperature setting cannot be used and is not heavily soiled and therefore does not need as powerful a cycle. Rinse Water (Dry) Temperature Wash Cycle Dishwasher Set to Dishwasher Set to make sure they get clean. Push on the door handle to Normal Dry Setting High Dry Setting Daily Heavy Normal Light Quick Rinse...
User Manaual - Renaissance 24" Built-in Dishwasher
Page 14
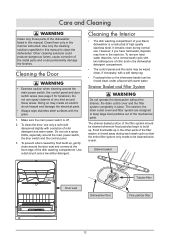
... water. Care and Cleaning warning Clean only those parts of the dishwasher listed in place. The strainer, the drain outlet cover and filter system are designed to build up , gently clean around these areas. It remains clean during each wash cycle so that builds up in the machine. Do not use a spray bottle, especially around the main power switch, the control panel and door switch areas (see page 3 for locations...
... water. Care and Cleaning warning Clean only those parts of the dishwasher listed in place. The strainer, the drain outlet cover and filter system are designed to build up , gently clean around these areas. It remains clean during each wash cycle so that builds up in the machine. Do not use a spray bottle, especially around the main power switch, the control panel and door switch areas (see page 3 for locations...

User Manaual - Renaissance 24" Built-in Dishwasher
Page 18
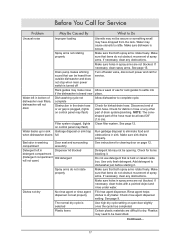
... detected a fault condition (lights on control panel are properly set and door is properly connected to Do HEAVY, NORMAL, LIGHT, QUICK and RINSE lights flashing: Too much water in hose or any other appliances from circuit. AUTO and NORMAL lights flashing: clogged filter Clean entire filter system. lights flashing when a button is pressed: child safety lock on Dishwasher will not start Main power switch is off water supply valve and call for service, please review the Problem Solution Guide below ). Make sure dishwasher controls are flashing) Open door and turn on main power switch...
... detected a fault condition (lights on control panel are properly set and door is properly connected to Do HEAVY, NORMAL, LIGHT, QUICK and RINSE lights flashing: Too much water in hose or any other appliances from circuit. AUTO and NORMAL lights flashing: clogged filter Clean entire filter system. lights flashing when a button is pressed: child safety lock on Dishwasher will not start Main power switch is off water supply valve and call for service, please review the Problem Solution Guide below ). Make sure dishwasher controls are flashing) Open door and turn on main power switch...
User Manaual - Renaissance 24" Built-in Dishwasher
Page 19
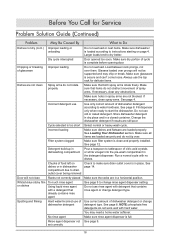
... secure. Turn off Rack guides may make noise if the dishwasher is brand new Dish washing cycle not complete Obstruction in the drain hose or air gap is plugged, (lights on control panel may flash) Filter system clogged, (lights on page 12. Clean filter system. See instructions for cleaning door on control panel may flash) Garbage disposal or sink trap full Door seal and surrounding area dirty Dispenser lid blocked Old detergent Spray arms do not rotate properly No rinse agent or rinse agent dispenser not set properly The normal dry cycle is...
... secure. Turn off Rack guides may make noise if the dishwasher is brand new Dish washing cycle not complete Obstruction in the drain hose or air gap is plugged, (lights on control panel may flash) Filter system clogged, (lights on page 12. Clean filter system. See instructions for cleaning door on control panel may flash) Garbage disposal or sink trap full Door seal and surrounding area dirty Dispenser lid blocked Old detergent Spray arms do not rotate properly No rinse agent or rinse agent dispenser not set properly The normal dry cycle is...
User Manaual - Renaissance 24" Built-in Dishwasher
Page 20
..., clean spray arms. See page 4. Change the dishwasher detergent if results are loaded properly. Make sure rinse agent dispenser is clean and properly installed. Do not use of dishwasher detergent according to drain outlet cover being removed Door will not be supported and may need a home water softener. Always use old or caked detergent. Make sure dry portion of dishwasher detergent or change detergent type. Run a normal cycle with detergent that already contains rinse agent Spotting and filming Hard water/incorrect use rinse agent with no dishes. Make sure filter...
..., clean spray arms. See page 4. Change the dishwasher detergent if results are loaded properly. Make sure rinse agent dispenser is clean and properly installed. Do not use of dishwasher detergent according to drain outlet cover being removed Door will not be supported and may need a home water softener. Always use old or caked detergent. Make sure dry portion of dishwasher detergent or change detergent type. Run a normal cycle with detergent that already contains rinse agent Spotting and filming Hard water/incorrect use rinse agent with no dishes. Make sure filter...
User Manaual - Renaissance 24" Built-in Dishwasher
Page 22
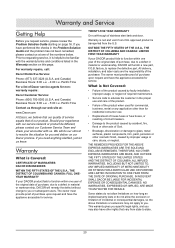
... Covered: • Failure of the product caused by faulty installation, improper usage, or neglect of required maintenance. • Service calls to educate the customer in the Warranty section on our Dacor promise. This warranty gives you specific legal rights, and you may not apply to replace the defective part. Prior to requesting service, it is Covered: CERTIFICATE OF WARRANTIES: DACOR DISHWASHERS WITHIN THE FIFTY STATES OF...
... Covered: • Failure of the product caused by faulty installation, improper usage, or neglect of required maintenance. • Service calls to educate the customer in the Warranty section on our Dacor promise. This warranty gives you specific legal rights, and you may not apply to replace the defective part. Prior to requesting service, it is Covered: CERTIFICATE OF WARRANTIES: DACOR DISHWASHERS WITHIN THE FIFTY STATES OF...
