Installation Instructions
Page 1
Installation Instructions Epicure® Cooktop Models: EG366, EG486 Part No. 102025 Rev. N THIS APPLIANCE HAS BEEN TESTED IN ACCORDANCE WITH THE LATEST EDITION OF ANSI Z21.1 STANDARD FOR HOUSEHOLD GAS APPLIANCES.
Installation Instructions Epicure® Cooktop Models: EG366, EG486 Part No. 102025 Rev. N THIS APPLIANCE HAS BEEN TESTED IN ACCORDANCE WITH THE LATEST EDITION OF ANSI Z21.1 STANDARD FOR HOUSEHOLD GAS APPLIANCES.

Installation Instructions
Page 4
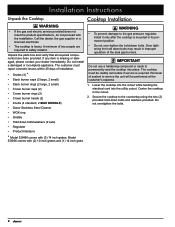
... Do not store items of interest to come into a dedicated, grounded three prong electrical outlet. Do not allow clothing to children on any part of the cooktop unless specifically recommended in the literature accompanying it . This appliance is equipped with a three prong grounding plug for your appliance,...installed and grounded by a qualified installer according to these installation instructions prior to a separate, well-ventilated room when operating the cooktop. Dacor strongly recommends the installation of a range hood or raised vent in the use and care manual. • Only use...
... Do not store items of interest to come into a dedicated, grounded three prong electrical outlet. Do not allow clothing to children on any part of the cooktop unless specifically recommended in the literature accompanying it . This appliance is equipped with a three prong grounding plug for your appliance,...installed and grounded by a qualified installer according to these installation instructions prior to a separate, well-ventilated room when operating the cooktop. Dacor strongly recommends the installation of a range hood or raised vent in the use and care manual. • Only use...
Installation Instructions
Page 10
...small) • Crown burner caps (2) • Crown burner rings (2) • Crown burner heads (2) • Knobs (4 standard, 2 MAX GRIDDLE) • Dacor Stainless Steel Cleaner • WOK ring • Griddle • Hold down bolts and washers provided. Installation Instructions Unpack the Cooktop Cooktop Installation warning • If... . Removal of two people are required to the countertop using the two (2) provided hold down bolts. Unpack the parts box and verify that all required components have been provided. important Do not use a hardening compound or caulk to service...
...small) • Crown burner caps (2) • Crown burner rings (2) • Crown burner heads (2) • Knobs (4 standard, 2 MAX GRIDDLE) • Dacor Stainless Steel Cleaner • WOK ring • Griddle • Hold down bolts and washers provided. Installation Instructions Unpack the Cooktop Cooktop Installation warning • If... . Removal of two people are required to the countertop using the two (2) provided hold down bolts. Unpack the parts box and verify that all required components have been provided. important Do not use a hardening compound or caulk to service...
Installation Instructions
Page 12
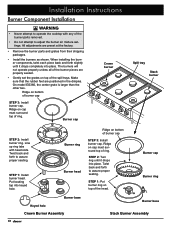
...on cap must surround top of the spill trays. Burner head Burner base Keyed hole Crown Burner Assembly 10 Ridge on top of the burner parts removed. • Do not attempt to adjust the burner air mixture settings. Burner cap Crown burner Spill tray Stack burner STEP 2: Install...Burner cap Burner ring Burner base Stack Burner Assembly Ridge on bottom of the burner pieces are preset at the factory. • Remove the burner parts and grates from their shipping packages. • Install the burners as shown. Burner ring STEP 1: Install burner head. Put locating tap into place...
...on cap must surround top of the spill trays. Burner head Burner base Keyed hole Crown Burner Assembly 10 Ridge on top of the burner parts removed. • Do not attempt to adjust the burner air mixture settings. Burner cap Crown burner Spill tray Stack burner STEP 2: Install...Burner cap Burner ring Burner base Stack Burner Assembly Ridge on bottom of the burner pieces are preset at the factory. • Remove the burner parts and grates from their shipping packages. • Install the burners as shown. Burner ring STEP 1: Install burner head. Put locating tap into place...
Installation Instructions
Page 14
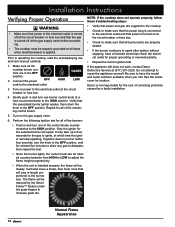
...at all times when electrical power is turned on at the circuit breaker or fuse box. • Check to make sure that all burner parts are in the OFF position. 2. Turn on power to the burner size. Perform the following ignition test for at which time the igniter ...and that power is applied. Repeat for the selected burner will be reduced by a faulty installation. Only the igniter for all the cooktop burner con- Dacor is installed properly, the flame will spark. HIGH LOW 3. Be sure to operating the cooktop, read the accompanying use and care manual carefully. 1....
...at all times when electrical power is turned on at the circuit breaker or fuse box. • Check to make sure that all burner parts are in the OFF position. 2. Turn on power to the burner size. Perform the following ignition test for at which time the igniter ...and that power is applied. Repeat for the selected burner will be reduced by a faulty installation. Only the igniter for all the cooktop burner con- Dacor is installed properly, the flame will spark. HIGH LOW 3. Be sure to operating the cooktop, read the accompanying use and care manual carefully. 1....
Installation Instructions
Page 15
... warranty been activated on-line or the warranty card filled out completely and mailed? 13 The importance of proper installation of your Dacor cooktop cannot be completed by the installer to ensure that it does not exceed the maximums stated in these instructions and in accordance... page 8. □□ Is the cooktop connected to the gas supply according to these instructions? See page 9. □□ Are all burner parts and grates properly installed according to these instructions? See page 3. □□ Is the cooktop secured using the provided hold-down bolts and washers...
... warranty been activated on-line or the warranty card filled out completely and mailed? 13 The importance of proper installation of your Dacor cooktop cannot be completed by the installer to ensure that it does not exceed the maximums stated in these instructions and in accordance... page 8. □□ Is the cooktop connected to the gas supply according to these instructions? See page 9. □□ Are all burner parts and grates properly installed according to these instructions? See page 3. □□ Is the cooktop secured using the provided hold-down bolts and washers...
Use & Care Manuals
Page 1
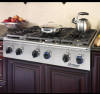
Use and Care Manual Epicure® Cooktop Models: EG366, EG486 Ta b l e o f C o n t e n t s Important Safety Instructions 1-3 Getting to Know Your Cooktop 4 Setting Up Your Cooktop 5-6 Operating Your Cooktop 6-8 Care and Cleaning 10-11 Accessories and Replacement Parts 11 Before You Call For Service 12 Warranty and Service 13 Notes 14-16 Warranty Card Back Cover Part No. 102024 Rev. H
Use and Care Manual Epicure® Cooktop Models: EG366, EG486 Ta b l e o f C o n t e n t s Important Safety Instructions 1-3 Getting to Know Your Cooktop 4 Setting Up Your Cooktop 5-6 Operating Your Cooktop 6-8 Care and Cleaning 10-11 Accessories and Replacement Parts 11 Before You Call For Service 12 Warranty and Service 13 Notes 14-16 Warranty Card Back Cover Part No. 102024 Rev. H

Use & Care Manuals
Page 4
...for use . • Select cookware carefully. Decorative covers may result from the rear of the cooktop to a combustible vertical surface must use Dacor backguard model AEB3609, AEB3612, ( for 36 inch models) AEB4809, AEB4812 (for use long curtains as outlined in these surfaces have had sufficient ... immediately contact your cooktop, follow basic safety precautions, including the following: WARNING • If you know where and how to turn all other parts of the cooktop. • Do not store items of interest to children on a cooktop. After use this manual. If a power failure ...
...for use . • Select cookware carefully. Decorative covers may result from the rear of the cooktop to a combustible vertical surface must use Dacor backguard model AEB3609, AEB3612, ( for 36 inch models) AEB4809, AEB4812 (for use long curtains as outlined in these surfaces have had sufficient ... immediately contact your cooktop, follow basic safety precautions, including the following: WARNING • If you know where and how to turn all other parts of the cooktop. • Do not store items of interest to children on a cooktop. After use this manual. If a power failure ...

Use & Care Manuals
Page 5
... third (ground) prong from the power cord. ◊ Use an adapter plug. ◊ Use an extension cord. ◊ Use a power cord that all the cooktop parts are dry before lighting a burner. • Turn the knobs to the OFF position prior to removing them from the valve stems. • The cooktop should...
... third (ground) prong from the power cord. ◊ Use an adapter plug. ◊ Use an extension cord. ◊ Use a power cord that all the cooktop parts are dry before lighting a burner. • Turn the knobs to the OFF position prior to removing them from the valve stems. • The cooktop should...

Use & Care Manuals
Page 6
...to Know Your Cooktop Parts of heat settings than the standard burners. They are equipped with Dacor's Smart Flame technology.... The matching knob illuminates when a burner is re-ignited at the same level as when it goes out. Trim Rings: Located behind each grate depends on the model of the burner bases prevent spilled liquids from leaking into the cooktop's internal parts.... Grate Burner Spill tray Burner control knob Trim ring SimmerSear™ Burners: Dacor's exclusive precision burner control system. Special Cooktop Features Perma-Flame™: The ...
...to Know Your Cooktop Parts of heat settings than the standard burners. They are equipped with Dacor's Smart Flame technology.... The matching knob illuminates when a burner is re-ignited at the same level as when it goes out. Trim Rings: Located behind each grate depends on the model of the burner bases prevent spilled liquids from leaking into the cooktop's internal parts.... Grate Burner Spill tray Burner control knob Trim ring SimmerSear™ Burners: Dacor's exclusive precision burner control system. Special Cooktop Features Perma-Flame™: The ...

Use & Care Manuals
Page 9
... flame is off when you are normal when using LP gas. • If the flame is set the flame height to the desired level by Dacor's Smart-Flame feature. Small yellow tips on the knob and turn the knob to the OFF position. Always check the position of the control knobs... this type of problem. • To keep the burners operating properly, keep the burner igniters, burner rings and burner caps clean and dry. Eliminate any part of the burner while the igniter is placed on the grate. The burner should burn evenly around the burner cap. The tendency to spark when...
... flame is off when you are normal when using LP gas. • If the flame is set the flame height to the desired level by Dacor's Smart-Flame feature. Small yellow tips on the knob and turn the knob to the OFF position. Always check the position of the control knobs... this type of problem. • To keep the burners operating properly, keep the burner igniters, burner rings and burner caps clean and dry. Eliminate any part of the burner while the igniter is placed on the grate. The burner should burn evenly around the burner cap. The tendency to spark when...
Use & Care Manuals
Page 11
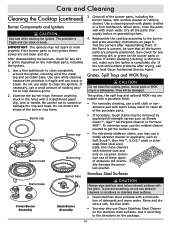
...do so. Be careful not to remove heavy spills with the maximum griddle settings. These severe operating conditions, cause the porcelain enamel parts on hot burner parts will slow down, but not eliminate, the aging process. Disassemble the burners. Clean them in the dishwasher. • Installing the... not remove the trim rings from the electrical outlet prior to undergo a change in appearance over time. After cleaning the burners, reassemble all parts are marked with a sharp object such as tomatoes, citrus juices, vinegar, alcohol and milk can occur. • Do not soak the knobs...
...do so. Be careful not to remove heavy spills with the maximum griddle settings. These severe operating conditions, cause the porcelain enamel parts on hot burner parts will slow down, but not eliminate, the aging process. Disassemble the burners. Clean them in the dishwasher. • Installing the... not remove the trim rings from the electrical outlet prior to undergo a change in appearance over time. After cleaning the burners, reassemble all parts are marked with a sharp object such as tomatoes, citrus juices, vinegar, alcohol and milk can occur. • Do not soak the knobs...
Use & Care Manuals
Page 12
...Burner Assembly Stack Burner Assembly 3. Clean all the parts thoroughly before re-assembling them . When done, rinse the parts well with window cleaner or rubbing alcohol. Test the burners after drying, call your local Dacor Authorized Service Agent. If erratic sparking (clicking)... grates, the spill tray and optional WOK ring are coated with a porcelain finish. • For everyday cleaning, use Dacor Stainless Steel Cleaner on the individual parts, including the igniters. 1. Stainless Steel Surfaces caution Always wipe stainless steel (silver colored) surfaces with a soft, lint-...
...Burner Assembly Stack Burner Assembly 3. Clean all the parts thoroughly before re-assembling them . When done, rinse the parts well with window cleaner or rubbing alcohol. Test the burners after drying, call your local Dacor Authorized Service Agent. If erratic sparking (clicking)... grates, the spill tray and optional WOK ring are coated with a porcelain finish. • For everyday cleaning, use Dacor Stainless Steel Cleaner on the individual parts, including the igniters. 1. Stainless Steel Surfaces caution Always wipe stainless steel (silver colored) surfaces with a soft, lint-...
Use & Care Manuals
Page 13
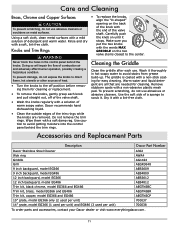
... and pull straight out, off of the trim rings while the knobs are needed for easy cleaning. Accessories and Replacement Parts Description Dacor Part Number Dacor Stainless Steel Cleaner Wok ring Griddle A302 AWR4 AG1424 Grill 9 inch backguard, model EG366 9 inch backguard, model EG486... and EG486 (3 used per unit) AEB3612 AEB4812 AEGTK6BC AEGTK6BR AEGTK6CP 700037 700038 To order parts and accessories, contact your Dacor dealer or visit www.everythingdacor.com. 11 Dry it stops. Dacor recommends hand dishwashing liquid. • Clean the outside edges of the valve shaft. &#...
... and pull straight out, off of the trim rings while the knobs are needed for easy cleaning. Accessories and Replacement Parts Description Dacor Part Number Dacor Stainless Steel Cleaner Wok ring Griddle A302 AWR4 AG1424 Grill 9 inch backguard, model EG366 9 inch backguard, model EG486... and EG486 (3 used per unit) AEB3612 AEB4812 AEGTK6BC AEGTK6BR AEGTK6CP 700037 700038 To order parts and accessories, contact your Dacor dealer or visit www.everythingdacor.com. 11 Dry it stops. Dacor recommends hand dishwashing liquid. • Clean the outside edges of the valve shaft. &#...

Use & Care Manuals
Page 14
...igniter and burner assembly according to Care and Cleaning section. Gas is distorted, yellow or Burner parts are not properly positioned. Contact gas company. Flame is turned off . Burner parts are dirty or very large. Burner is reversed. Minimize any air drafts around the cooktop.... seconds when cold and set up to make sure that the cooktop is off . Flame distorted by air draft. tion. Burner parts wet or dirty. Check for Service Problem Solution Guide Problem Nothing works. See Igniters do not spark (no clicking sound). Check ...
...igniter and burner assembly according to Care and Cleaning section. Gas is distorted, yellow or Burner parts are not properly positioned. Contact gas company. Flame is turned off . Burner parts are dirty or very large. Burner is reversed. Minimize any air drafts around the cooktop.... seconds when cold and set up to make sure that the cooktop is off . Flame distorted by air draft. tion. Burner parts wet or dirty. Check for Service Problem Solution Guide Problem Nothing works. See Igniters do not spark (no clicking sound). Check ...
Use & Care Manuals
Page 15
... and void if non-UL approved product is helpful to replace the defective part. NO WARRANTIES, EXPRESS OR IMPLIED, ARE MADE TO ANY BUYER FOR RESALE. factory to be different, please contact our Customer Service Team and share your DACOR product fails to function within one year of the original date of...
... and void if non-UL approved product is helpful to replace the defective part. NO WARRANTIES, EXPRESS OR IMPLIED, ARE MADE TO ANY BUYER FOR RESALE. factory to be different, please contact our Customer Service Team and share your DACOR product fails to function within one year of the original date of...
Use & Care Manuals
Page 20
...of a Remodel C. Model Home E. Kitchen Dealer C. Other 3. Part of expressing our gratitude! A. New Home D. Cooktop C. Refrigerator 6. cut here Please visit www.Dacor.com to Dacor. T.V. Other 2. What other brands of the information on this form to activate your...Please Print or Type) Email: First State: Telephone: State: Middle Zip: Zip: Your willingness to take a few seconds to Dacor products? (Please check one envelope or activate the warranty for mailing list purposes. How were you have provided will be extremely ...
...of a Remodel C. Model Home E. Kitchen Dealer C. Other 3. Part of expressing our gratitude! A. New Home D. Cooktop C. Refrigerator 6. cut here Please visit www.Dacor.com to Dacor. T.V. Other 2. What other brands of the information on this form to activate your...Please Print or Type) Email: First State: Telephone: State: Middle Zip: Zip: Your willingness to take a few seconds to Dacor products? (Please check one envelope or activate the warranty for mailing list purposes. How were you have provided will be extremely ...