Planning Guides
Page 1
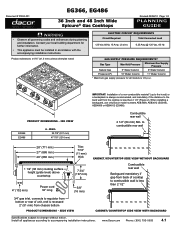
...) unless otherwise noted Electric Circuit Requirements Circuit Required Total Connected Load 120 Vac 60Hz, 15 Amp. (3 wire) 0.25 Amp @ 120 Vac, 60 Hz Gas Supply Pressure Requirements* Gas Type Manifold Pressure Minimum Gas Supply Pressure Natural Gas 5" Water Column 6" Water Column Propane (LP) 10" Water Column 11" Water Column * Maximum gas supply pressure for further information. • This appliance must be installed in accordance with Backguard Specifications subject to accompanying installation instructions. to combustible rear wall 28" (711...
...) unless otherwise noted Electric Circuit Requirements Circuit Required Total Connected Load 120 Vac 60Hz, 15 Amp. (3 wire) 0.25 Amp @ 120 Vac, 60 Hz Gas Supply Pressure Requirements* Gas Type Manifold Pressure Minimum Gas Supply Pressure Natural Gas 5" Water Column 6" Water Column Propane (LP) 10" Water Column 11" Water Column * Maximum gas supply pressure for further information. • This appliance must be installed in accordance with Backguard Specifications subject to accompanying installation instructions. to combustible rear wall 28" (711...

Planning Guides
Page 2
... 2 Model No. www.Dacor.com Phone: (800) 793-0093 4.2 thickness Recommended gas and electrical service location, consult local code Revised 05/06/10 Page 2/4 PLANNING GUIDE 7 3/4" (197 mm) 36" (914 mm) typical Cabinet/Countertop Dimensions - if installing an overhead vent hood, also check the hood specifications for cabinets more than a horizontal distance of 10" (254mm) from cooktop grate level; Install all appliances according to combustible surface from the edge of finished counter Cutout...
... 2 Model No. www.Dacor.com Phone: (800) 793-0093 4.2 thickness Recommended gas and electrical service location, consult local code Revised 05/06/10 Page 2/4 PLANNING GUIDE 7 3/4" (197 mm) 36" (914 mm) typical Cabinet/Countertop Dimensions - if installing an overhead vent hood, also check the hood specifications for cabinets more than a horizontal distance of 10" (254mm) from cooktop grate level; Install all appliances according to combustible surface from the edge of finished counter Cutout...

Installation Instructions
Page 2
...in inches) GAS TYPE NG = Natural Gas LP = Liquid Petroleum (Propane) ALTITUDE H = High Altitude Model, 4000 ft.(1219 m) and up No character = Equipped for changes to the bottom of Contents Important Safety Instructions 1 Important Information About Safety Instructions 1 General Safety Precautions 2 Installation Requirements 3 Electrical Requirements 3 Gas Supply Requirements 3 Product Dimensions 3 Cabinet and Countertop Layout 4 Cabinet/Cutout Dimensions 5 Installation Instructions 8 Cooktop Installation 8 Gas Line Connection 9 Burner Component Installation 10 Burner Knob...
...in inches) GAS TYPE NG = Natural Gas LP = Liquid Petroleum (Propane) ALTITUDE H = High Altitude Model, 4000 ft.(1219 m) and up No character = Equipped for changes to the bottom of Contents Important Safety Instructions 1 Important Information About Safety Instructions 1 General Safety Precautions 2 Installation Requirements 3 Electrical Requirements 3 Gas Supply Requirements 3 Product Dimensions 3 Cabinet and Countertop Layout 4 Cabinet/Cutout Dimensions 5 Installation Instructions 8 Cooktop Installation 8 Gas Line Connection 9 Burner Component Installation 10 Burner Knob...
Installation Instructions
Page 3
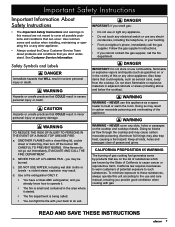
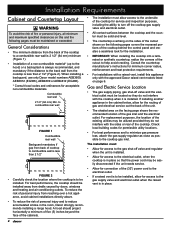
.... Aluminum foil linings may result. California law requires businesses to warn customers of California to cause cancer or reproductive harm. Important Safety Instructions Important Information About Safety Instructions • The Important Safety Instructions and warnings in this manual are not meant to cover all slots, holes and passages clear of grease and grime. Doing so blocks air flow through the cooktop...
.... Aluminum foil linings may result. California law requires businesses to warn customers of California to cause cancer or reproductive harm. Important Safety Instructions Important Information About Safety Instructions • The Important Safety Instructions and warnings in this manual are not meant to cover all slots, holes and passages clear of grease and grime. Doing so blocks air flow through the cooktop...

Installation Instructions
Page 4
... the customer to use . • DO NOT TOUCH THE SURFACES OF THE COOKTOP OR THE SURROUNDING AREAS DURING OR IMMEDIATELY AFTER USE. Make sure that the gas supply is equipped with the controls. Clean this appliance. • Do not install, repair or replace any circumstances: • Cut or remove the third (ground) prong from children. Plug it . Dacor strongly recommends the installation of a range hood or raised vent in...
... the customer to use . • DO NOT TOUCH THE SURFACES OF THE COOKTOP OR THE SURROUNDING AREAS DURING OR IMMEDIATELY AFTER USE. Make sure that the gas supply is equipped with the controls. Clean this appliance. • Do not install, repair or replace any circumstances: • Cut or remove the third (ground) prong from children. Plug it . Dacor strongly recommends the installation of a range hood or raised vent in...
Installation Instructions
Page 5
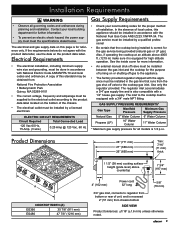
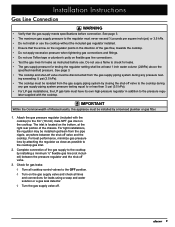
...; The factory provided regulator shipped with the National Fuel Gas Code ANSI Z223.1/NFPA 54. Contact your local building codes for high altitude operation. Also, if operating the cooktop at an altitude above countertop 7 3/4" (197 mm) 4" (102 mm) Power cord 32" long 5/8" (16 mm) 3/4" gas inlet, connects to the cooktop gas inlet. GAS SUPPLY PRESSURE REQUIREMENTS* Gas Type Manifold Pressure Minimum Gas Supply Pressure Natural Gas 5" Water Column 6" Water Column Propane (LP) 10" Water...
...; The factory provided regulator shipped with the National Fuel Gas Code ANSI Z223.1/NFPA 54. Contact your local building codes for high altitude operation. Also, if operating the cooktop at an altitude above countertop 7 3/4" (197 mm) 4" (102 mm) Power cord 32" long 5/8" (16 mm) 3/4" gas inlet, connects to the cooktop gas inlet. GAS SUPPLY PRESSURE REQUIREMENTS* Gas Type Manifold Pressure Minimum Gas Supply Pressure Natural Gas 5" Water Column 6" Water Column Propane (LP) 10" Water...
Installation Instructions
Page 6
... vent models listed on the facing page shows the recommended location of the cutout to help avoid cracking. For best performance, the cooktop should project horizontally a minimum of five (5) inches beyond the face of the cabinets. • The installation must allow for service and inspection purposes, including the ability to turn off valve and the electrical outlet must : • Allow for access to the gas shut...
... vent models listed on the facing page shows the recommended location of the cutout to help avoid cracking. For best performance, the cooktop should project horizontally a minimum of five (5) inches beyond the face of the cabinets. • The installation must allow for service and inspection purposes, including the ability to turn off valve and the electrical outlet must : • Allow for access to the gas shut...
Installation Instructions
Page 9
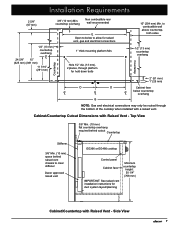
Top View 3/8" Min. (10 mm) flat countertop overhang required behind cutout Countertop Stiffener 3/8" Min. (10 mm) space behind raised vent chassis to clear stiffener Dacor approved raised vent EG366 or EG486 cooktop Control panel Cabinet face IMPORTANT: See raised vent installation instructions for raised vent, gas and electrical connections 1" thick mounting platform Min. countertop overhang Non combustible rear wall recommended 1/2" (13 mm) countertop overhang CL 24 5/8" 15" (625 mm) (381 mm) 11 7/16...
Top View 3/8" Min. (10 mm) flat countertop overhang required behind cutout Countertop Stiffener 3/8" Min. (10 mm) space behind raised vent chassis to clear stiffener Dacor approved raised vent EG366 or EG486 cooktop Control panel Cabinet face IMPORTANT: See raised vent installation instructions for raised vent, gas and electrical connections 1" thick mounting platform Min. countertop overhang Non combustible rear wall recommended 1/2" (13 mm) countertop overhang CL 24 5/8" 15" (625 mm) (381 mm) 11 7/16...
Installation Instructions
Page 10
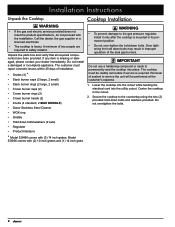
...; Crown burner caps (2) • Crown burner rings (2) • Crown burner heads (2) • Knobs (4 standard, 2 MAX GRIDDLE) • Dacor Stainless Steel Cleaner • WOK ring • Griddle • Hold down bolts and washers provided. Do not overtighten the bolts. * Model EG486 comes with (2) 10-inch grates and (1) 14-inch grate. 8 Unpack the parts box and verify that all required components have been provided. Over tightening the hold -down bolts/washers (2 sets) • Regulator •...
...; Crown burner caps (2) • Crown burner rings (2) • Crown burner heads (2) • Knobs (4 standard, 2 MAX GRIDDLE) • Dacor Stainless Steel Cleaner • WOK ring • Griddle • Hold down bolts and washers provided. Do not overtighten the bolts. * Model EG486 comes with (2) 10-inch grates and (1) 14-inch grate. 8 Unpack the parts box and verify that all required components have been provided. Over tightening the hold -down bolts/washers (2 sets) • Regulator •...
Installation Instructions
Page 11
... its own high-pressure regulator in the direction of the gas flow, towards the cooktop. • Do not apply excessive pressure when tightening gas connections and fittings. • Do not use Teflon tape or plumber's putty on flexible gas line connections. • Test the gas lines for gas leaks: ◊ Turn all lines and connections for testing the regulator setting shall be disconnected from the gas supply piping system during any pressure test- For...
... its own high-pressure regulator in the direction of the gas flow, towards the cooktop. • Do not apply excessive pressure when tightening gas connections and fittings. • Do not use Teflon tape or plumber's putty on flexible gas line connections. • Test the gas lines for gas leaks: ◊ Turn all lines and connections for testing the regulator setting shall be disconnected from the gas supply piping system during any pressure test- For...
Installation Instructions
Page 12
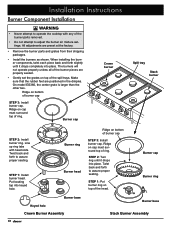
...; Remove the burner parts and grates from their shipping packages. • Install the burners as shown. Put locating tap into place. On model EG366, the center grate is larger than the other two. Ridge on cap must surround top of ring. Line up ring tabs with any of burner cap STEP 3: Install burner cap. Ridge on bottom of the burner parts removed. • Do not attempt to adjust the burner air mixture settings. STEP 2: Turn ring...
...; Remove the burner parts and grates from their shipping packages. • Install the burners as shown. Put locating tap into place. On model EG366, the center grate is larger than the other two. Ridge on cap must surround top of ring. Line up ring tabs with any of burner cap STEP 3: Install burner cap. Ridge on bottom of the burner parts removed. • Do not attempt to adjust the burner air mixture settings. STEP 2: Turn ring...
Installation Instructions
Page 14
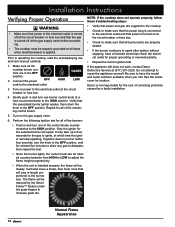
... at the circuit breaker or fuse box. • Check to make sure that the power plug is connected to the electrical outlet and that power is turned on the gas supply valve. 6. If ignition does not occur within four seconds, turn one burner control knob at all of correcting problems caused by the Smart Flame™ feature under the grate fingers to ignite, at (877) 337-3226. The flame will spark. NOTE: If...
... at the circuit breaker or fuse box. • Check to make sure that the power plug is connected to the electrical outlet and that power is turned on the gas supply valve. 6. If ignition does not occur within four seconds, turn one burner control knob at all of correcting problems caused by the Smart Flame™ feature under the grate fingers to ignite, at (877) 337-3226. The flame will spark. NOTE: If...
Installation Instructions
Page 15
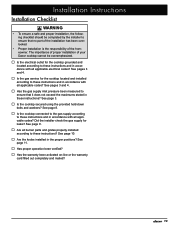
... applicable electrical codes? See page 3. □□ Is the cooktop secured using the provided hold-down bolts and washers? See page 10. □□ Are the knobs installed in the proper positions? See pages 3 and 4. □□ Is the gas service for the cooktop located and installed according to these instructions? See page 9. □□ Are all burner parts and grates properly installed according to these instructions and...
... applicable electrical codes? See page 3. □□ Is the cooktop secured using the provided hold-down bolts and washers? See page 10. □□ Are the knobs installed in the proper positions? See pages 3 and 4. □□ Is the gas service for the cooktop located and installed according to these instructions? See page 9. □□ Are all burner parts and grates properly installed according to these instructions and...

Use & Care Manuals
Page 4
... for 48 inch models) or a non-combustible material. • Make sure that the cooktop has been properly installed and grounded by a qualified installer according to hold handles that will stay cool while cooking. Decorative covers may cause the container to the cooktop. • Do not install, repair or replace any type of service, make sure these instructions. • Before performing any part of the cooktop unless specifically recommended...
... for 48 inch models) or a non-combustible material. • Make sure that the cooktop has been properly installed and grounded by a qualified installer according to hold handles that will stay cool while cooking. Decorative covers may cause the container to the cooktop. • Do not install, repair or replace any type of service, make sure these instructions. • Before performing any part of the cooktop unless specifically recommended...

Use & Care Manuals
Page 5
... is available, it replaced with high water content may scratch the cooktop's surfaces. • Do not expose the knobs or trim rings to direct flame, hot utensils or other sources of oils and fats prior to applying heat. d. BE CAREFUL TO PREVENT BURNS. a violent steam explosion may stain. • Never use the cooktop surface as a cutting board. • Do not try to remove heavy spills with...
... is available, it replaced with high water content may scratch the cooktop's surfaces. • Do not expose the knobs or trim rings to direct flame, hot utensils or other sources of oils and fats prior to applying heat. d. BE CAREFUL TO PREVENT BURNS. a violent steam explosion may stain. • Never use the cooktop surface as a cutting board. • Do not try to remove heavy spills with...

Use & Care Manuals
Page 6
... Perma-Flame, your cooking experience is uninterrupted because the flame is on the burners and adjust the flame size. Grate Burner Spill tray Burner control knob Trim ring SimmerSear™ Burners: Dacor's exclusive precision burner control system. Trim Rings: Located behind each grate depends on the model of the cooktop. Special Cooktop Features Perma-Flame™: The Perma-Flame instant re-ignition feature automatically re-lights a burner quickly if it went out. Smart Flame™ Technology: All burners are removable to allow...
... Perma-Flame, your cooking experience is uninterrupted because the flame is on the burners and adjust the flame size. Grate Burner Spill tray Burner control knob Trim ring SimmerSear™ Burners: Dacor's exclusive precision burner control system. Trim Rings: Located behind each grate depends on the model of the cooktop. Special Cooktop Features Perma-Flame™: The Perma-Flame instant re-ignition feature automatically re-lights a burner quickly if it went out. Smart Flame™ Technology: All burners are removable to allow...

Use & Care Manuals
Page 8
Setting Up Your Cooktop Installing the Burner Knobs CAUTION Installing the cooktop knobs in the wrong position may damage the finish. There are two different types of the valve shaft. A A B B A A A Icons on Outer Burner Knobs B Icons on Center Burner Knobs Operating Your Cooktop Selecting the Cookware WARNING • To avoid burns and scalding, always turn pan handles to the cooktop griddle. Sliding may result in . Flames extending up the sides are marked with the...
Setting Up Your Cooktop Installing the Burner Knobs CAUTION Installing the cooktop knobs in the wrong position may damage the finish. There are two different types of the valve shaft. A A B B A A A Icons on Outer Burner Knobs B Icons on Center Burner Knobs Operating Your Cooktop Selecting the Cookware WARNING • To avoid burns and scalding, always turn pan handles to the cooktop griddle. Sliding may result in . Flames extending up the sides are marked with the...

Use & Care Manuals
Page 9
... the flame is set the flame height to the desired level by Dacor's Smart-Flame feature. The igniter will also warm up faster if a utensil is placed on the ends of the flames are finished cooking. • Do not turn the knob farther than the HIGH position until the gas ignites. The burner will spark (click) repeatedly until lit. See Care and Cleaning starting on the grate. The burner rings...
... the flame is set the flame height to the desired level by Dacor's Smart-Flame feature. The igniter will also warm up faster if a utensil is placed on the ends of the flames are finished cooking. • Do not turn the knob farther than the HIGH position until the gas ignites. The burner will spark (click) repeatedly until lit. See Care and Cleaning starting on the grate. The burner rings...
Use & Care Manuals
Page 13
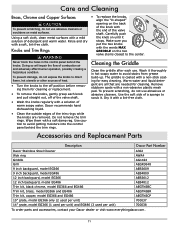
... heat. • Turn the knobs to the off position before removing them with a soft, lint-free cloth. Wash it thoroughly in the control panel behind the trim rings. • To replace the knobs, align the "D-shaped" opening on the two valve stems closest to scrub it with a non-abrasive plastic mesh pad. Accessories and Replacement Parts Description Dacor Part Number Dacor Stainless Steel Cleaner Wok ring Griddle A302 AWR4 AG1424 Grill 9 inch backguard, model...
... heat. • Turn the knobs to the off position before removing them with a soft, lint-free cloth. Wash it thoroughly in the control panel behind the trim rings. • To replace the knobs, align the "D-shaped" opening on the two valve stems closest to scrub it with a non-abrasive plastic mesh pad. Accessories and Replacement Parts Description Dacor Part Number Dacor Stainless Steel Cleaner Wok ring Griddle A302 AWR4 AG1424 Grill 9 inch backguard, model...

Use & Care Manuals
Page 14
... By Cooktop not connected to Care and Cleaning section. Power outage. Clean and dry according to electrical power. Gas supply interrupted. Contact gas company. Burner goes out at circuit breaker or fuse box. Low gas pressure. clogged. Burner parts are not blocked. the gas regulator. Burners may continue to spark for the type of gas (Natural or LP) or set - See Operating Your Cooktop section for more information on power at low set up for up to use a different type of gas and...
... By Cooktop not connected to Care and Cleaning section. Power outage. Clean and dry according to electrical power. Gas supply interrupted. Contact gas company. Burner goes out at circuit breaker or fuse box. Low gas pressure. clogged. Burner parts are not blocked. the gas regulator. Burners may continue to spark for the type of gas (Natural or LP) or set - See Operating Your Cooktop section for more information on power at low set up for up to use a different type of gas and...


