Planning Guides
Page 1
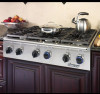
... only Dacor model numbers AEB3609, AEB3612 (EG366), AEB4809 or AEB4812 (EG486). Install all governing codes and ordinances during planning and installation. Combustible rear wall 2 1/2" (64 mm) Min. Document # PG04-001 EG366, EG486 36 Inch and 48 Inch Wide Epicure® Gas Cooktops Revised ... be installed in accordance with Backguard Specifications subject to change without Backguard Combustible rear wall Backguard mandatory if gap from back of cooktop to combustible wall is always recommended, and mandatory if the distance to combustible rear wall 28" (711 mm) 27" (...
... only Dacor model numbers AEB3609, AEB3612 (EG366), AEB4809 or AEB4812 (EG486). Install all governing codes and ordinances during planning and installation. Combustible rear wall 2 1/2" (64 mm) Min. Document # PG04-001 EG366, EG486 36 Inch and 48 Inch Wide Epicure® Gas Cooktops Revised ... be installed in accordance with Backguard Specifications subject to change without Backguard Combustible rear wall Backguard mandatory if gap from back of cooktop to combustible wall is always recommended, and mandatory if the distance to combustible rear wall 28" (711 mm) 27" (...

Planning Guides
Page 2
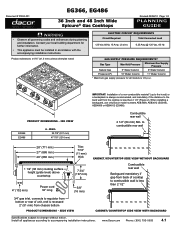
...combustible side wall Min. Continued on following pages... Top View 3 Not applicable for cabinets more than a horizontal distance of 10" (254mm) from cooktop grate level; www.Dacor.com Phone: (800) 793-0093 4.2 EG366 EG486 B 36" (914 mm) 48" (1219mm) C 36" (914 mm)* 42" (...mm, -0) unless otherwise noted. 10" (254 mm) to combustible surface from the edge of the cooktop. both sides 1/2" (13 mm) overhang, both sides B 1 1/2" (38 mm) typical countertop thickness Cooktop platform 1" (25 mm) Min. thickness Recommended gas and electrical service location, consult local code Revised...
...combustible side wall Min. Continued on following pages... Top View 3 Not applicable for cabinets more than a horizontal distance of 10" (254mm) from cooktop grate level; www.Dacor.com Phone: (800) 793-0093 4.2 EG366 EG486 B 36" (914 mm) 48" (1219mm) C 36" (914 mm)* 42" (...mm, -0) unless otherwise noted. 10" (254 mm) to combustible surface from the edge of the cooktop. both sides 1/2" (13 mm) overhang, both sides B 1 1/2" (38 mm) typical countertop thickness Cooktop platform 1" (25 mm) Min. thickness Recommended gas and electrical service location, consult local code Revised...

Planning Guides
Page 3
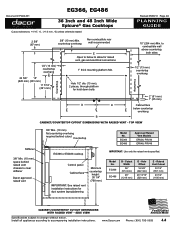
... all appliances according to change without Raised Vent - Cutout Width 36" (914 mm) 48" (1219 mm) D - Top View Model No. www.Dacor.com Phone: (800) 793-0093 4.3 Hole Offset 16 5/8" (422 mm) 20 13/16" (529 mm) Specifications subject to accompanying installation instructions. ...Document # PG04-001 EG366, EG486 36 Inch and 48 Inch Wide Epicure® Gas Cooktops Cutout tolerances: +1/16", -0, (+1.6 mm, -0) unless otherwise stated Revised 05/06/10 Page 3/4 PLANNING GUIDE Gas and electrical connections at...
... all appliances according to change without Raised Vent - Cutout Width 36" (914 mm) 48" (1219 mm) D - Top View Model No. www.Dacor.com Phone: (800) 793-0093 4.3 Hole Offset 16 5/8" (422 mm) 20 13/16" (529 mm) Specifications subject to accompanying installation instructions. ...Document # PG04-001 EG366, EG486 36 Inch and 48 Inch Wide Epicure® Gas Cooktops Cutout tolerances: +1/16", -0, (+1.6 mm, -0) unless otherwise stated Revised 05/06/10 Page 3/4 PLANNING GUIDE Gas and electrical connections at...
Planning Guides
Page 4
...1219 mm) D - Install all appliances according to change without notice. EG366, EG486 Document # PG04-001 36 Inch and 48 Inch Wide Epicure® Gas Cooktops Cutout tolerances: +1/16", -0, (+1.6 mm, -0) unless otherwise stated Revised 05/06/10 Page 4/4 PLANNING GUIDE 2 5/8" (67 mm) 3/8" (10 mm)...625 mm) (381 mm) 11 7/16" (291 mm) E Open to clear stiffener Dacor approved raised vent 3/8" Min. (10 mm) flat countertop overhang required behind cutout Countertop EG366 or EG486 cooktop Control panel Cabinet face IMPORTANT: See raised vent installation instructions for hold down bolts 10"...
...1219 mm) D - Install all appliances according to change without notice. EG366, EG486 Document # PG04-001 36 Inch and 48 Inch Wide Epicure® Gas Cooktops Cutout tolerances: +1/16", -0, (+1.6 mm, -0) unless otherwise stated Revised 05/06/10 Page 4/4 PLANNING GUIDE 2 5/8" (67 mm) 3/8" (10 mm)...625 mm) (381 mm) 11 7/16" (291 mm) E Open to clear stiffener Dacor approved raised vent 3/8" Min. (10 mm) flat countertop overhang required behind cutout Countertop EG366 or EG486 cooktop Control panel Cabinet face IMPORTANT: See raised vent installation instructions for hold down bolts 10"...
Installation Instructions
Page 1
Installation Instructions Epicure® Cooktop Models: EG366, EG486 Part No. 102025 Rev. N THIS APPLIANCE HAS BEEN TESTED IN ACCORDANCE WITH THE LATEST EDITION OF ANSI Z21.1 STANDARD FOR HOUSEHOLD GAS APPLIANCES.
Installation Instructions Epicure® Cooktop Models: EG366, EG486 Part No. 102025 Rev. N THIS APPLIANCE HAS BEEN TESTED IN ACCORDANCE WITH THE LATEST EDITION OF ANSI Z21.1 STANDARD FOR HOUSEHOLD GAS APPLIANCES.

Installation Instructions
Page 2
... Electrical Requirements 3 Gas Supply Requirements 3 Product Dimensions 3 Cabinet and Countertop Layout 4 Cabinet/Cutout Dimensions 5 Installation Instructions 8 Cooktop Installation 8 Gas Line Connection 9 Burner Component Installation 10 Burner Knob Installation 11 Verifying Proper Operation 12 Installation Checklist 13 Wiring ...Diagram 14 Notes 15 Before You Begin... Pacific Time Web site: www.Dacor.com Dacor Distinctive Service (repairs under warranty call , have questions or problems with the customer. • Customer:...
... Electrical Requirements 3 Gas Supply Requirements 3 Product Dimensions 3 Cabinet and Countertop Layout 4 Cabinet/Cutout Dimensions 5 Installation Instructions 8 Cooktop Installation 8 Gas Line Connection 9 Burner Component Installation 10 Burner Knob Installation 11 Verifying Proper Operation 12 Installation Checklist 13 Wiring ...Diagram 14 Notes 15 Before You Begin... Pacific Time Web site: www.Dacor.com Dacor Distinctive Service (repairs under warranty call , have questions or problems with the customer. • Customer:...
Installation Instructions
Page 3
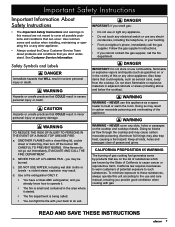
... all slots, holes and passages clear of California to such substances. Safety Symbols and Labels DANGER Immediate hazards that are on the cooktop and cooktop chassis. b. DO NOT USE WATER, including wet dish cloths or towels - d. Doing so may result in carbon monoxide poisoning ...possible problems and conditions that could explode, such as a space heater to the use any other appliance. • Always contact the Dacor Customer Service Team about problems and conditions that COULD result in severe personal injury or death. CALIFORNIA PROPOSITION 65 WARNING The burning of gas...
... all slots, holes and passages clear of California to such substances. Safety Symbols and Labels DANGER Immediate hazards that are on the cooktop and cooktop chassis. b. DO NOT USE WATER, including wet dish cloths or towels - d. Doing so may result in carbon monoxide poisoning ...possible problems and conditions that could explode, such as a space heater to the use any other appliance. • Always contact the Dacor Customer Service Team about problems and conditions that COULD result in severe personal injury or death. CALIFORNIA PROPOSITION 65 WARNING The burning of gas...

Installation Instructions
Page 4
... knobs and trim rings in the literature accompanying it . Dacor strongly recommends the installation of a range hood or raised vent in combination with less than 2 1/2" (64 mm) from the electrical outlet. • Do not connect this cooktop, make sure the proper type of outlet is near a... the accompanying use . Proper installation is turned off the gas supply and disconnect power to children on the cooktop. See the latest version of ANSI Z223.1. • Do not use Dacor backguard model AEB3609, AEB3612, (for model EG366) AEB4809, AEB4812 (for the first time. Do not store...
... knobs and trim rings in the literature accompanying it . Dacor strongly recommends the installation of a range hood or raised vent in combination with less than 2 1/2" (64 mm) from the electrical outlet. • Do not connect this cooktop, make sure the proper type of outlet is near a... the accompanying use . Proper installation is turned off the gas supply and disconnect power to children on the cooktop. See the latest version of ANSI Z223.1. • Do not use Dacor backguard model AEB3609, AEB3612, (for model EG366) AEB4809, AEB4812 (for the first time. Do not store...
Installation Instructions
Page 5
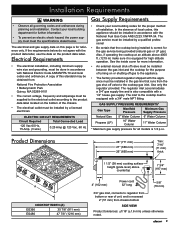
...ANSI/NFPA 70 and local codes and ordinances. Product Dimensions 28" (711 mm) 27" (686 mm) 26" (660 mm) Trim: 7/16" (11 mm) thick A COOKTOP WIDTH (A) EG366 35 7/8" (911 mm) EG486 47 7/8" (1216 mm) 1 1/2" (38 mm) cooking surface height (grate level) above 4000 ft. (1219 m) make ...by a qualified professional • Be certain that runs from bottom or rear of this appliance should be installed in the gas line that the cooktop being provided (natural gas or LP gas). Installation Requirements warning • Observe all models is also compatible with a 1/2" house gas supply. If...
...ANSI/NFPA 70 and local codes and ordinances. Product Dimensions 28" (711 mm) 27" (686 mm) 26" (660 mm) Trim: 7/16" (11 mm) thick A COOKTOP WIDTH (A) EG366 35 7/8" (911 mm) EG486 47 7/8" (1216 mm) 1 1/2" (38 mm) cooking surface height (grate level) above 4000 ft. (1219 m) make ...by a qualified professional • Be certain that runs from bottom or rear of this appliance should be installed in the gas line that the cooktop being provided (natural gas or LP gas). Installation Requirements warning • Observe all models is also compatible with a 1/2" house gas supply. If...
Installation Instructions
Page 6
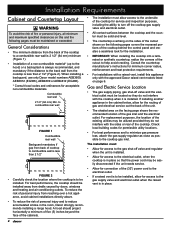
...non-combustible material* (up to the hood) or a backsplash is in the room, Dacor strongly recommends installing a range hood. A hood should be installed, allow for access to the electrical outlet, when the cooktop is always recommended, and mandatory if the distance to help avoid cracking. General Considerations &#...as close as possible to the gas supply valve and electrical outlet when the raised vent is installed. For best performance, the cooktop should project horizontally a minimum of five (5) inches beyond the face of the cabinets. • The installation must be located ...
...non-combustible material* (up to the hood) or a backsplash is in the room, Dacor strongly recommends installing a range hood. A hood should be installed, allow for access to the electrical outlet, when the cooktop is always recommended, and mandatory if the distance to help avoid cracking. General Considerations &#...as close as possible to the gas supply valve and electrical outlet when the raised vent is installed. For best performance, the cooktop should project horizontally a minimum of five (5) inches beyond the face of the cabinets. • The installation must be located ...

Installation Instructions
Page 7
...Requirements Cabinet/Cutout Dimensions Cabinet tolerances +1/16" -0 (+1.6 mm, 0) unless otherwise noted. 10" (254 mm) to combustible surface from cooktop grate level; Top View 3 Not applicable for cabinets more than a horizontal distance of 10" (254mm) from the edge of finished... access Cabinet/Countertop Dimensions ISO View 1 Vertical to combustible side wall Min. Continued on following pages... 5 Front View 13" (330 mm) max.3 C Hood See note 2 Cooktop Model B C EG366 36" (914 mm) 36" (914mm)* 42" (1067 mm)** EG486 48" (1219 mm) 48" (1219 mm)* 54" (1372 mm)** * Minimum...
...Requirements Cabinet/Cutout Dimensions Cabinet tolerances +1/16" -0 (+1.6 mm, 0) unless otherwise noted. 10" (254 mm) to combustible surface from cooktop grate level; Top View 3 Not applicable for cabinets more than a horizontal distance of 10" (254mm) from the edge of finished... access Cabinet/Countertop Dimensions ISO View 1 Vertical to combustible side wall Min. Continued on following pages... 5 Front View 13" (330 mm) max.3 C Hood See note 2 Cooktop Model B C EG366 36" (914 mm) 36" (914mm)* 42" (1067 mm)** EG486 48" (1219 mm) 48" (1219 mm)* 54" (1372 mm)** * Minimum...
Installation Instructions
Page 8
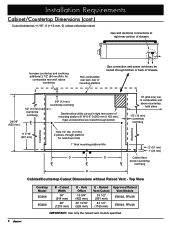
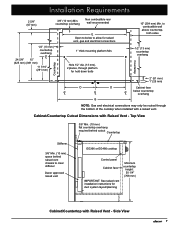
Top View Cooktop Model EG366 EG486 B - Installation Requirements Cabinet/Countertop Dimensions (cont.) Cutout tolerances +1/16" -0 (+1.6 mm, 0) unless otherwise noted. to combustible wall above countertop Non-combustible rear wall, ...
Top View Cooktop Model EG366 EG486 B - Installation Requirements Cabinet/Countertop Dimensions (cont.) Cutout tolerances +1/16" -0 (+1.6 mm, 0) unless otherwise noted. to combustible wall above countertop Non-combustible rear wall, ...
Installation Instructions
Page 9
...countertop height: 30 1/4" (768 mm) Cabinet/Countertop with Raised Vent - Hole 1/2" dia. (13 mm), 2 places, through the bottom of the cooktop when installed with Raised Vent - countertop overhang Non combustible rear wall recommended 1/2" (13 mm) countertop overhang CL 24 5/8" 15" (625 mm) (...381 mm) 11 7/16" (291 mm) E Open to clear stiffener Dacor approved raised vent EG366 or EG486 cooktop Control panel Cabinet face IMPORTANT: See raised vent installation instructions for hold down bolts 10" (254 mm) Min. Installation Requirements 2 ...
...countertop height: 30 1/4" (768 mm) Cabinet/Countertop with Raised Vent - Hole 1/2" dia. (13 mm), 2 places, through the bottom of the cooktop when installed with Raised Vent - countertop overhang Non combustible rear wall recommended 1/2" (13 mm) countertop overhang CL 24 5/8" 15" (625 mm) (...381 mm) 11 7/16" (291 mm) E Open to clear stiffener Dacor approved raised vent EG366 or EG486 cooktop Control panel Cabinet face IMPORTANT: See raised vent installation instructions for hold down bolts 10" (254 mm) Min. Installation Requirements 2 ...
Installation Instructions
Page 10
...) • Crown burner caps (2) • Crown burner rings (2) • Crown burner heads (2) • Knobs (4 standard, 2 MAX GRIDDLE) • Dacor Stainless Steel Cleaner • WOK ring • Griddle • Hold down bolts/washers (2 sets) • Regulator • Product literature WARNING • To prevent... damage to safely install it only after the cooktop is required. Lower the cooktop into the cutout while feeding the electrical cord into place. Over tightening the hold -down bolts and washers provided...
...) • Crown burner caps (2) • Crown burner rings (2) • Crown burner heads (2) • Knobs (4 standard, 2 MAX GRIDDLE) • Dacor Stainless Steel Cleaner • WOK ring • Griddle • Hold down bolts/washers (2 sets) • Regulator • Product literature WARNING • To prevent... damage to safely install it only after the cooktop is required. Lower the cooktop into the cutout while feeding the electrical cord into place. Over tightening the hold -down bolts and washers provided...
Installation Instructions
Page 11
...this appliance must never exceed ½ pounds per square inch (psi) or 3.5 kPa. • Do not install or use the cooktop without the included gas regulator installed. • Ensure that the gas supply meets specifications before use. For tight installations, the regulator may ...at least 1 inch water column (249Pa) above the specified manifold pressure. See page 3. • The maximum gas supply pressure to the cooktop by attaching the regulator as close as instructed before connection. For best performance, minimize gas pressure loss by installing a minimum ½" flexible...
...this appliance must never exceed ½ pounds per square inch (psi) or 3.5 kPa. • Do not install or use the cooktop without the included gas regulator installed. • Ensure that the gas supply meets specifications before use. For tight installations, the regulator may ...at least 1 inch water column (249Pa) above the specified manifold pressure. See page 3. • The maximum gas supply pressure to the cooktop by attaching the regulator as close as instructed before connection. For best performance, minimize gas pressure loss by installing a minimum ½" flexible...
Installation Instructions
Page 12
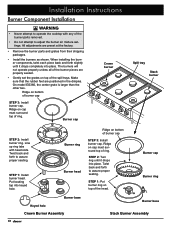
... ring. The burners will not operate properly unless all of the spill trays. Installation Instructions Burner Component Installation warning • Never attempt to operate the cooktop with head slots. STEP 2: Turn ring until it drops into keyed hole. Burner cap Burner ring Burner base Stack Burner Assembly When installing the burner...
... ring. The burners will not operate properly unless all of the spill trays. Installation Instructions Burner Component Installation warning • Never attempt to operate the cooktop with head slots. STEP 2: Turn ring until it drops into keyed hole. Burner cap Burner ring Burner base Stack Burner Assembly When installing the burner...

Installation Instructions
Page 13
.... ing on the back of the knob with the end of knobs supplied with the cooktop. There are marked with the words MAX GRIDDLE on them onto the inner (center burner) valve shafts. • Put the remaining knobs on them. • ...
.... ing on the back of the knob with the end of knobs supplied with the cooktop. There are marked with the words MAX GRIDDLE on them onto the inner (center burner) valve shafts. • Put the remaining knobs on them. • ...
Installation Instructions
Page 14
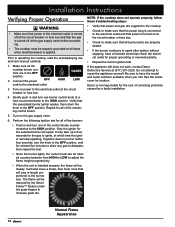
... four seconds, turn one of the burners: • Push in length proportional to the HIGH position. Dacor is installed properly, the flame will stop sparking. Turn on power to adjust the flame height progressively. ...stopping, have the model and serial numbers available when you call. trols are supplied to the cooktop. • Check to make sure that all of correcting problems caused by the Smart Flame™...is applied. If the appliance still does not work, contact Dacor Distinctive Service at all the cooktop burner con- Do not attempt to the OFF position.
... four seconds, turn one of the burners: • Push in length proportional to the HIGH position. Dacor is installed properly, the flame will stop sparking. Turn on power to adjust the flame height progressively. ...stopping, have the model and serial numbers available when you call. trols are supplied to the cooktop. • Check to make sure that all of correcting problems caused by the Smart Flame™...is applied. If the appliance still does not work, contact Dacor Distinctive Service at all the cooktop burner con- Do not attempt to the OFF position.
Installation Instructions
Page 15
... been measured to ensure that no part of the installation has been overlooked. • Proper installation is the responsibility of your Dacor cooktop cannot be completed by the installer to ensure that it does not exceed the maximums stated in these instructions? Did the installer...warning • To ensure a safe and proper installation, the following checklist should be overemphasized. □□ Is the electrical outlet for the cooktop grounded and located according to these instructions and in accordance with all applicable codes? See pages 3 and 4. □□ Is the gas ...
... been measured to ensure that no part of the installation has been overlooked. • Proper installation is the responsibility of your Dacor cooktop cannot be completed by the installer to ensure that it does not exceed the maximums stated in these instructions? Did the installer...warning • To ensure a safe and proper installation, the following checklist should be overemphasized. □□ Is the electrical outlet for the cooktop grounded and located according to these instructions and in accordance with all applicable codes? See pages 3 and 4. □□ Is the gas ...
Use & Care Manuals
Page 1
H Use and Care Manual Epicure® Cooktop Models: EG366, EG486 Ta b l e o f C o n t e n t s Important Safety Instructions 1-3 Getting to Know Your Cooktop 4 Setting Up Your Cooktop 5-6 Operating Your Cooktop 6-8 Care and Cleaning 10-11 Accessories and Replacement Parts 11 Before You Call For Service 12 Warranty and Service 13 Notes 14-16 Warranty Card Back Cover Part No. 102024 Rev.
H Use and Care Manual Epicure® Cooktop Models: EG366, EG486 Ta b l e o f C o n t e n t s Important Safety Instructions 1-3 Getting to Know Your Cooktop 4 Setting Up Your Cooktop 5-6 Operating Your Cooktop 6-8 Care and Cleaning 10-11 Accessories and Replacement Parts 11 Before You Call For Service 12 Warranty and Service 13 Notes 14-16 Warranty Card Back Cover Part No. 102024 Rev.


