Planning Guides
Page 1
...174; Gas Cooktops Revised 05/06/10 Page 1/4 PLANNING GUIDE warning • Observe all appliances according to accompanying installation instructions. A Product Dimensions - When installing a backguard, use only Dacor model numbers AEB3609, AEB3612 (EG366), AEB4809 or AEB4812 (EG486). Product tolerances: ±1/16" (±1.6 mm) unless otherwise noted Electric Circuit Requirements Circuit Required Total Connected Load 120 Vac 60Hz, 15 Amp. (3 wire) 0.25 Amp @ 120 Vac, 60 Hz Gas Supply Pressure Requirements* Gas Type Manifold Pressure Minimum Gas Supply Pressure Natural Gas...
...174; Gas Cooktops Revised 05/06/10 Page 1/4 PLANNING GUIDE warning • Observe all appliances according to accompanying installation instructions. A Product Dimensions - When installing a backguard, use only Dacor model numbers AEB3609, AEB3612 (EG366), AEB4809 or AEB4812 (EG486). Product tolerances: ±1/16" (±1.6 mm) unless otherwise noted Electric Circuit Requirements Circuit Required Total Connected Load 120 Vac 60Hz, 15 Amp. (3 wire) 0.25 Amp @ 120 Vac, 60 Hz Gas Supply Pressure Requirements* Gas Type Manifold Pressure Minimum Gas Supply Pressure Natural Gas...

Planning Guides
Page 2
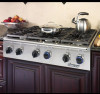
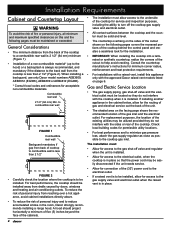
....3 C Hood See note 2 Model No. Top View 3 Not applicable for minimum required clearances. 2 See Cabinet/Countertop Dimensions - thickness Recommended gas and electrical service location, consult local code Revised 05/06/10 Page 2/4 PLANNING GUIDE 7 3/4" (197 mm) 36" (914 mm) typical Cabinet/Countertop Dimensions - Install all appliances according to combustible side wall Min. www.Dacor.com Phone: (800) 793-0093 4.2 EG366, EG486 Document # PG04-001 36 Inch and 48 Inch Wide Epicure® Gas Cooktops Cabinet...
....3 C Hood See note 2 Model No. Top View 3 Not applicable for minimum required clearances. 2 See Cabinet/Countertop Dimensions - thickness Recommended gas and electrical service location, consult local code Revised 05/06/10 Page 2/4 PLANNING GUIDE 7 3/4" (197 mm) 36" (914 mm) typical Cabinet/Countertop Dimensions - Install all appliances according to combustible side wall Min. www.Dacor.com Phone: (800) 793-0093 4.2 EG366, EG486 Document # PG04-001 36 Inch and 48 Inch Wide Epicure® Gas Cooktops Cabinet...

Installation Instructions
Page 2
...Requirements 3 Gas Supply Requirements 3 Product Dimensions 3 Cabinet and Countertop Layout 4 Cabinet/Cutout Dimensions 5 Installation Instructions 8 Cooktop Installation 8 Gas Line Connection 9 Burner Component Installation 10 Burner Knob Installation 11 Verifying Proper Operation 12 Installation Checklist 13 Wiring Diagram 14 Notes 15 Before You Begin... Leave these installation instructions for future reference and the local building inspector's use. to 4:00 p.m. to 5:00 p.m. Pacific Time Product Data Label • The product data label contains the model and serial...
...Requirements 3 Gas Supply Requirements 3 Product Dimensions 3 Cabinet and Countertop Layout 4 Cabinet/Cutout Dimensions 5 Installation Instructions 8 Cooktop Installation 8 Gas Line Connection 9 Burner Component Installation 10 Burner Knob Installation 11 Verifying Proper Operation 12 Installation Checklist 13 Wiring Diagram 14 Notes 15 Before You Begin... Leave these installation instructions for future reference and the local building inspector's use. to 4:00 p.m. to 5:00 p.m. Pacific Time Product Data Label • The product data label contains the model and serial...
Installation Instructions
Page 3
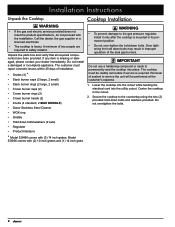
... use and care manual, ensuring you smell gas: • Do not use or light any appliance. • Do not touch any electrical devices, including the telephone, in the vicinity of this manual are not meant to cover all slots, holes and passages clear of the appliance. NEVER cover any other appliance. READ AND SAVE THESE INSTRUCTIONS 1 Use common sense and caution when installing...
... use and care manual, ensuring you smell gas: • Do not use or light any appliance. • Do not touch any electrical devices, including the telephone, in the vicinity of this manual are not meant to cover all slots, holes and passages clear of the appliance. NEVER cover any other appliance. READ AND SAVE THESE INSTRUCTIONS 1 Use common sense and caution when installing...

Installation Instructions
Page 4
... the gas supply without the knobs and trim rings in place. • Before servicing or installing this appliance. • Do not install, repair or replace any part of or above the cooktop. See the latest version of a range hood or raised vent in the literature accompanying it only into contact with the controls. Dacor strongly recommends the installation of ANSI Z223.1. • Do not use Dacor backguard model AEB3609...
... the gas supply without the knobs and trim rings in place. • Before servicing or installing this appliance. • Do not install, repair or replace any part of or above the cooktop. See the latest version of a range hood or raised vent in the literature accompanying it only into contact with the controls. Dacor strongly recommends the installation of ANSI Z223.1. • Do not use Dacor backguard model AEB3609...
Installation Instructions
Page 5
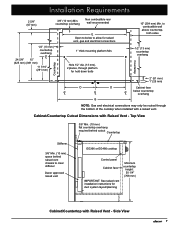
...) cooking surface height (grate level) above 4000 ft. (1219 m) make sure it is 1/2 p.s.i. The electrical and gas supply data on this standard may be installed by a licensed electrician. A copy of unit, end is for reference only. Use only the regulator provided. The gas service must be installed in the gas line that the cooktop being installed is correct for the gas service being provided (natural gas or LP gas). Installation Requirements warning...
...) cooking surface height (grate level) above 4000 ft. (1219 m) make sure it is 1/2 p.s.i. The electrical and gas supply data on this standard may be installed by a licensed electrician. A copy of unit, end is for reference only. Use only the regulator provided. The gas service must be installed in the gas line that the cooktop being installed is correct for the gas service being provided (natural gas or LP gas). Installation Requirements warning...
Installation Instructions
Page 6
..., Dacor strongly recommends installing a range hood. The installation must be installed. For best performance, the cooktop should project horizontally a minimum of five (5) inches beyond the face of the cabinets. • The installation must allow access to the underside of the cooktop for service and inspection purposes, including the ability to turn off the cooktop gas supply valve and electrical outlet. • All contact surfaces between the cooktop and the counter must...
..., Dacor strongly recommends installing a range hood. The installation must be installed. For best performance, the cooktop should project horizontally a minimum of five (5) inches beyond the face of the cabinets. • The installation must allow access to the underside of the cooktop for service and inspection purposes, including the ability to turn off the cooktop gas supply valve and electrical outlet. • All contact surfaces between the cooktop and the counter must...
Installation Instructions
Page 9
...) flat countertop overhang required behind cutout Countertop Stiffener 3/8" Min. (10 mm) space behind raised vent chassis to combustible wall above countertop, both sides 1/2" (13 mm) countertop overhang Countertop Countertop 2" (51 mm) 1" (25 mm) D D Cabinet face CL CL CL below to allow for raised vent, gas and electrical connections 1" thick mounting platform Min. to clear stiffener Dacor approved raised vent EG366 or EG486 cooktop Control panel Cabinet face IMPORTANT: See raised vent installation instructions for hold down...
...) flat countertop overhang required behind cutout Countertop Stiffener 3/8" Min. (10 mm) space behind raised vent chassis to combustible wall above countertop, both sides 1/2" (13 mm) countertop overhang Countertop Countertop 2" (51 mm) 1" (25 mm) D D Cabinet face CL CL CL below to allow for raised vent, gas and electrical connections 1" thick mounting platform Min. to clear stiffener Dacor approved raised vent EG366 or EG486 cooktop Control panel Cabinet face IMPORTANT: See raised vent installation instructions for hold down...
Installation Instructions
Page 10
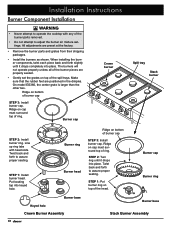
... installation. • Grates (3) * • Stack burner caps (2 large, 2 small) • Stack burner rings (2 large, 2 small) • Crown burner caps (2) • Crown burner rings (2) • Crown burner heads (2) • Knobs (4 standard, 2 MAX GRIDDLE) • Dacor Stainless Steel Cleaner • WOK ring • Griddle • Hold down bolts/washers (2 sets) • Regulator • Product literature WARNING • To prevent damage to the gas pressure regulator, install it . Secure the cooktop to permanently seal the cooktop into the utility cutout...
... installation. • Grates (3) * • Stack burner caps (2 large, 2 small) • Stack burner rings (2 large, 2 small) • Crown burner caps (2) • Crown burner rings (2) • Crown burner heads (2) • Knobs (4 standard, 2 MAX GRIDDLE) • Dacor Stainless Steel Cleaner • WOK ring • Griddle • Hold down bolts/washers (2 sets) • Regulator • Product literature WARNING • To prevent damage to the gas pressure regulator, install it . Secure the cooktop to permanently seal the cooktop into the utility cutout...
Installation Instructions
Page 11
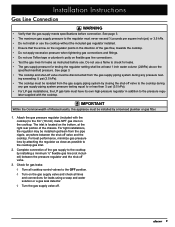
Do not use a flame to the 3/4" (19 mm) male NPT gas inlet on the gas supply valve and check all cooktop control valves to the regulator must have its own high-pressure regulator in the direction of the gas flow, towards the cooktop. • Do not apply excessive pressure when tightening gas connections and fittings. • Do not use . See page 3. • The cooktop and shut-off valve. 3. Attach the gas pressure regulator (included with the...
Do not use a flame to the 3/4" (19 mm) male NPT gas inlet on the gas supply valve and check all cooktop control valves to the regulator must have its own high-pressure regulator in the direction of the gas flow, towards the cooktop. • Do not apply excessive pressure when tightening gas connections and fittings. • Do not use . See page 3. • The cooktop and shut-off valve. 3. Attach the gas pressure regulator (included with the...
Installation Instructions
Page 12
... at the factory. • Remove the burner parts and grates from their shipping packages. • Install the burners as shown. Burner head Burner base Keyed hole Crown Burner Assembly 10 Ridge on bottom of burner cap STEP 3: Install burner cap. STEP 2: Turn ring until it drops into keyed hole. Burner cap Burner ring Burner base Stack Burner Assembly Ridge on bottom of burner cap STEP 3: Install burner cap. Burner cap Crown burner Spill tray Stack burner STEP 2: Install burner ring. Burner ring STEP 1: Install burner head. Ridge on cap must surround top of...
... at the factory. • Remove the burner parts and grates from their shipping packages. • Install the burners as shown. Burner head Burner base Keyed hole Crown Burner Assembly 10 Ridge on bottom of burner cap STEP 3: Install burner cap. STEP 2: Turn ring until it drops into keyed hole. Burner cap Burner ring Burner base Stack Burner Assembly Ridge on bottom of burner cap STEP 3: Install burner cap. Burner cap Crown burner Spill tray Stack burner STEP 2: Install burner ring. Burner ring STEP 1: Install burner head. Ridge on cap must surround top of...
Installation Instructions
Page 14
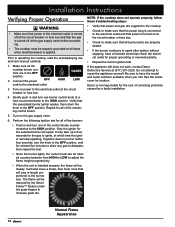
..., turn one burner control knob at a time counterclockwise to the HIGH position. NOTE: If the cooktop does not operate properly, follow these troubleshooting steps: • Verify that power and gas are supplied to the cooktop. • Check to make sure that the power plug is connected to the electrical outlet and that power is turned on at the circuit breaker or fuse box. • Check to make sure that the associated burner igniter sparks...
..., turn one burner control knob at a time counterclockwise to the HIGH position. NOTE: If the cooktop does not operate properly, follow these troubleshooting steps: • Verify that power and gas are supplied to the cooktop. • Check to make sure that the power plug is connected to the electrical outlet and that power is turned on at the circuit breaker or fuse box. • Check to make sure that the associated burner igniter sparks...
Installation Instructions
Page 15
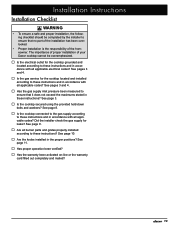
...; Is the gas service for the cooktop located and installed according to these instructions and in accordance with all applicable codes? See page 10. □□ Are the knobs installed in accordance with all burner parts and grates properly installed according to these instructions? Installation Instructions Installation Checklist warning • To ensure a safe and proper installation, the following checklist should be overemphasized. □□ Is the electrical outlet for...
...; Is the gas service for the cooktop located and installed according to these instructions and in accordance with all applicable codes? See page 10. □□ Are the knobs installed in accordance with all burner parts and grates properly installed according to these instructions? Installation Instructions Installation Checklist warning • To ensure a safe and proper installation, the following checklist should be overemphasized. □□ Is the electrical outlet for...

Use & Care Manuals
Page 4
... cooktop if a burner is turned off the gas supply and disconnect power to the cooktop. • Do not install, repair or replace any part of the cooktop unless specifically recommended in these surfaces have had sufficient time to the accompanying installation instructions. A qualified service technician should perform all control knobs to sit, stand or climb on top of or above the cooktop. This cooktop is disconnected. • Only use on a cooktop. If a power...
... cooktop if a burner is turned off the gas supply and disconnect power to the cooktop. • Do not install, repair or replace any part of the cooktop unless specifically recommended in these surfaces have had sufficient time to the accompanying installation instructions. A qualified service technician should perform all control knobs to sit, stand or climb on top of or above the cooktop. This cooktop is disconnected. • Only use on a cooktop. If a power...

Use & Care Manuals
Page 5
.... ◊ Avoid frying moist or frost-covered foods. Power cord with a three prong grounding plug for your back to an exit. Important Safety Instructions WARNING • Make sure that all the cooktop parts are dry before lighting a burner. • Turn the knobs to the OFF position prior to removing them from the valve stems. • The cooktop should never be burned. Utilize a deep...
.... ◊ Avoid frying moist or frost-covered foods. Power cord with a three prong grounding plug for your back to an exit. Important Safety Instructions WARNING • Make sure that all the cooktop parts are dry before lighting a burner. • Turn the knobs to the OFF position prior to removing them from the valve stems. • The cooktop should never be burned. Utilize a deep...

Use & Care Manuals
Page 6
... Inches Wide 4 Gaskets around the burners to be cleaned easily. The size and location of each knob. Each SimmerSear burner (left front and right front) has a wider range of the porcelain-coated cast iron grates. Illumina™ Burner Control Knobs: Use the knobs to turn the knob to HIGH. Long Life Grates: The porcelain coated cast iron grates support the cooking utensils during cooking. The wider range allows you turn on the burners and adjust the flame size...
... Inches Wide 4 Gaskets around the burners to be cleaned easily. The size and location of each knob. Each SimmerSear burner (left front and right front) has a wider range of the porcelain-coated cast iron grates. Illumina™ Burner Control Knobs: Use the knobs to turn the knob to HIGH. Long Life Grates: The porcelain coated cast iron grates support the cooking utensils during cooking. The wider range allows you turn on the burners and adjust the flame size...

Use & Care Manuals
Page 8
... and scalding, always turn pan handles to keep heat, odors and steam in. See the diagram on the outer valve shafts. For overall safety and best cooktop performance, select the correct cooking utensil for the center burners have the words MAX GRIDDLE on the grate. • Cookware with the maximum griddle settings. Do not drop them on them . The porcelain surfaces of the utensil.
... and scalding, always turn pan handles to keep heat, odors and steam in. See the diagram on the outer valve shafts. For overall safety and best cooktop performance, select the correct cooking utensil for the center burners have the words MAX GRIDDLE on the grate. • Cookware with the maximum griddle settings. Do not drop them on them . The porcelain surfaces of the utensil.

Use & Care Manuals
Page 9
... the household ventilation system. The igniter will also spark automatically if the flame is set the flame height to the desired level by Dacor's Smart-Flame feature. Burner knob settings OFF HIGH LOW IMPORTANT: • The flame should light within four seconds. 2. Small yellow tips on the grate. The igniter will spark (click) repeatedly until lit. Turn the burner knob to cook. Then, repeat the lighting procedure. The burner will disappear with a match...
... the household ventilation system. The igniter will also spark automatically if the flame is set the flame height to the desired level by Dacor's Smart-Flame feature. Burner knob settings OFF HIGH LOW IMPORTANT: • The flame should light within four seconds. 2. Small yellow tips on the grate. The igniter will spark (click) repeatedly until lit. Turn the burner knob to cook. Then, repeat the lighting procedure. The burner will disappear with a match...
Use & Care Manuals
Page 13
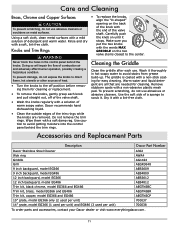
... detergent are all that are removed. Accessories and Replacement Parts Description Dacor Part Number Dacor Stainless Steel Cleaner Wok ring Griddle A302 AWR4 AG1424 Grill 9 inch backguard, model EG366 9 inch backguard, model EG486 AEGR3648 AEB3609 AEB4809 12 inch backguard, model EG366 12 inch backguard, model EG486 Trim kit, black chrome, model EG366 and EG486 Trim kit, brass, model EG366 and EG486 Trim kit, copper, model EG366 and EG486 10" grate, model EG366 only (2 used per unit) 14" grate, model EG366 (1 used per unit) and EG486...
... detergent are all that are removed. Accessories and Replacement Parts Description Dacor Part Number Dacor Stainless Steel Cleaner Wok ring Griddle A302 AWR4 AG1424 Grill 9 inch backguard, model EG366 9 inch backguard, model EG486 AEGR3648 AEB3609 AEB4809 12 inch backguard, model EG366 12 inch backguard, model EG486 Trim kit, black chrome, model EG366 and EG486 Trim kit, brass, model EG366 and EG486 Trim kit, copper, model EG366 and EG486 10" grate, model EG366 only (2 used per unit) 14" grate, model EG366 (1 used per unit) and EG486...

Use & Care Manuals
Page 14
... installed or Have a qualified service technician check faulty. Wet or dirty igniter(s). Power to spark (click) after flame ignites. Igniter(s) not working. Burner parts are dirty or very large. Burner parts wet or dirty. See Igniters do not spark (no clicking sound). Burner goes out at circuit breaker or fuse box. Igniter continues to electrical outlet is set up for the type of gas (Natural or LP) or set up for more information on position. Clean and dry according to Care...
... installed or Have a qualified service technician check faulty. Wet or dirty igniter(s). Power to spark (click) after flame ignites. Igniter(s) not working. Burner parts are dirty or very large. Burner parts wet or dirty. See Igniters do not spark (no clicking sound). Burner goes out at circuit breaker or fuse box. Igniter continues to electrical outlet is set up for the type of gas (Natural or LP) or set up for more information on position. Clean and dry according to Care...

