
Planning Guides
Page 1
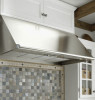
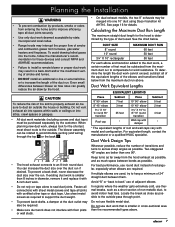
... Page 1/3 PLANNING GUIDE warning • Observe all appliances according to change without notice. Minimum Cabinet Width Models EH3012, EH3018, MH3012, MH3018 EH3612, EH3618, MH3612, MH3618 EH4212, EH4218 EH4812, EH4818, MH4812, MH4818 EH5418 D 30" (76.2 cm) 36" (91.5 cm) 42...(121.9 cm) 54" (137.2 cm) Specifications subject to accompanying installation instructions. www.Dacor.com Phone: (800) 793-0093 7.4 Check the manufacturers specifications for the particular range or cooktop in accordance with the accompanying installation instructions. The minimum specified distance may be...
... Page 1/3 PLANNING GUIDE warning • Observe all appliances according to change without notice. Minimum Cabinet Width Models EH3012, EH3018, MH3012, MH3018 EH3612, EH3618, MH3612, MH3618 EH4212, EH4218 EH4812, EH4818, MH4812, MH4818 EH5418 D 30" (76.2 cm) 36" (91.5 cm) 42...(121.9 cm) 54" (137.2 cm) Specifications subject to accompanying installation instructions. www.Dacor.com Phone: (800) 793-0093 7.4 Check the manufacturers specifications for the particular range or cooktop in accordance with the accompanying installation instructions. The minimum specified distance may be...
Planning Guides
Page 2
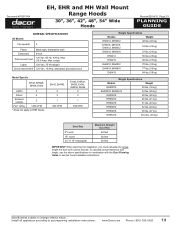
...in combination with the Duct Planning Guide or see the hood installation instructions. www.Dacor.com Phone: (800) 793-0093 7.5 Specifications subject to accompanying installation instructions. Document # PG07-004 EH, EHR and MH Wall Mount Range Hoods 30", 36", 42", 48", 54" Wide Hoods Revised 05/14/10... 1 600 CFM EH30, EHR30, MH30, EH36, EHR36, MH36 2 2 1 600 CFM Weight Specifications Models Weight EH3012, MH3012 48 lbs. (22 kg) EH3018, MH3018, EH3612, MH3612 53 lbs. (24 kg) EH3618, MH3618 57 lbs. (26 kg) EH4212 55 lbs. (25 kg) EH4218 60 lbs. (27 kg) EH4812, MH4812 70 lbs...
...in combination with the Duct Planning Guide or see the hood installation instructions. www.Dacor.com Phone: (800) 793-0093 7.5 Specifications subject to accompanying installation instructions. Document # PG07-004 EH, EHR and MH Wall Mount Range Hoods 30", 36", 42", 48", 54" Wide Hoods Revised 05/14/10... 1 600 CFM EH30, EHR30, MH30, EH36, EHR36, MH36 2 2 1 600 CFM Weight Specifications Models Weight EH3012, MH3012 48 lbs. (22 kg) EH3018, MH3018, EH3612, MH3612 53 lbs. (24 kg) EH3618, MH3618 57 lbs. (26 kg) EH4212 55 lbs. (25 kg) EH4218 60 lbs. (27 kg) EH4812, MH4812 70 lbs...

Planning Guides
Page 3
....1 cm) Electrical access holes 7/8" Dia. (5.1 cm) CL 6 1/8" (15.6 cm) E*** Bottom of the hood. www.Dacor.com Phone: (800) 793-0093 7.6 Install all appliances according to change without notice. Document # PG07-004 EH, EHR and MH Wall Mount Range Hoods 30", 36", 42", 48", 54" Wide Hoods Revised 05/14/10 Page 3/3 PLANNING...
....1 cm) Electrical access holes 7/8" Dia. (5.1 cm) CL 6 1/8" (15.6 cm) E*** Bottom of the hood. www.Dacor.com Phone: (800) 793-0093 7.6 Install all appliances according to change without notice. Document # PG07-004 EH, EHR and MH Wall Mount Range Hoods 30", 36", 42", 48", 54" Wide Hoods Revised 05/14/10 Page 3/3 PLANNING...
Installation Instructions
Page 1
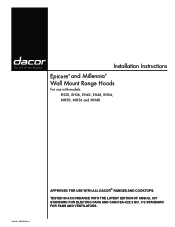
Installation Instructions Epicure® and Millennia® Wall Mount Range Hoods For use with the latest edition of ANSI/UL 507 standard for electric fans and can/csa-c22.2 no. 113 standard for use with all dacor® ranges and cooktops. Tested in accordance with models: EH30, EH36, EH42, EH48, EH54, MH30, MH36 and MH48 Part No. 102139 Rev. J Approved for fans and ventilators.
Installation Instructions Epicure® and Millennia® Wall Mount Range Hoods For use with the latest edition of ANSI/UL 507 standard for electric fans and can/csa-c22.2 no. 113 standard for use with all dacor® ranges and cooktops. Tested in accordance with models: EH30, EH36, EH42, EH48, EH54, MH30, MH36 and MH48 Part No. 102139 Rev. J Approved for fans and ventilators.
Installation Instructions
Page 2
...4 Product Specifications 5 Parts List 5 Planning the Installation 6 Cabinet Layout 6 Power Supply 6 Preparing for changes to 4:00 p.m. Dacor assumes no liability for Installation 8 Verify the Package Contents 8 Mounting Location Preparation 8 Electrical Service Installation 8 Duct Cutout 8 Installation Instructions... 9 Rotating the Blower 10 AHT10 Transition Kit Installation 16 Mounting Bracket Installation 17 Hanging the Range Hood 18 Duct Work Installation 18 Final Electrical Installation 19 Verifying Proper Operation 21 Installation Checklist 21 Wiring...
...4 Product Specifications 5 Parts List 5 Planning the Installation 6 Cabinet Layout 6 Power Supply 6 Preparing for changes to 4:00 p.m. Dacor assumes no liability for Installation 8 Verify the Package Contents 8 Mounting Location Preparation 8 Electrical Service Installation 8 Duct Cutout 8 Installation Instructions... 9 Rotating the Blower 10 AHT10 Transition Kit Installation 16 Mounting Bracket Installation 17 Hanging the Range Hood 18 Duct Work Installation 18 Final Electrical Installation 19 Verifying Proper Operation 21 Installation Checklist 21 Wiring...

Installation Instructions
Page 3
... servicing or cleaning unit, switch power off at service panel and lock the service disconnecting means to prevent power from cooktop burners, ovens and range hoods. READ AND SAVE THESE INSTRUCTIONS 1 TO REDUCE THE RISK OF FIRE, ELECTRIC SHOCK, OR INJURY TO PERSONS, OBSERVE THE FOLLOWING: a)...gases through the flue(chimney) of explosion or fire, do not damage electrical wiring and other appliance. • Always contact the Dacor Customer Service Team about problems and conditions that can occur. Do not store flammable or explosive materials in accordance with all possible ...
... servicing or cleaning unit, switch power off at service panel and lock the service disconnecting means to prevent power from cooktop burners, ovens and range hoods. READ AND SAVE THESE INSTRUCTIONS 1 TO REDUCE THE RISK OF FIRE, ELECTRIC SHOCK, OR INJURY TO PERSONS, OBSERVE THE FOLLOWING: a)...gases through the flue(chimney) of explosion or fire, do not damage electrical wiring and other appliance. • Always contact the Dacor Customer Service Team about problems and conditions that can occur. Do not store flammable or explosive materials in accordance with all possible ...

Installation Instructions
Page 4
...this appliance. • The installer must show the customer the location of the range hood unless specifically recommended in use and care manual. Never allow children to sit or stand on accidentally. Contact the nearest Dacor authorized service representative at (800) 793-0093, or at the fuse box ...window coverings that the customer knows where and how to turn the power off. • Before installing or servicing the range hood, switch power off at www.Dacor.com for the minimum and maximum vertical distance from the appliance being switched on an appliance. Do not store items of...
...this appliance. • The installer must show the customer the location of the range hood unless specifically recommended in use and care manual. Never allow children to sit or stand on accidentally. Contact the nearest Dacor authorized service representative at (800) 793-0093, or at the fuse box ...window coverings that the customer knows where and how to turn the power off. • Before installing or servicing the range hood, switch power off at www.Dacor.com for the minimum and maximum vertical distance from the appliance being switched on an appliance. Do not store items of...

Installation Instructions
Page 8
...; The ground terminal on the hood must be avoided. E Electrical access 25" Min. (63.5 cm) MINIMUM CABINET WIDTH Models E EH3012, EH3018, MH3012, MH3018 EH3612, EH3618, MH3612, MH3618 30" (76.2 cm) 36" (91.5 cm) EH4212, EH4218 42" (106.7 cm) EH4812, EH4818, MH4812, MH4818 EH5418 48" ... removed if service is the owner's responsibility to an electrical junction box. Power Supply warning The electric service to the range hood should be connected to be placed for further information. Contact your local building department for convenient access. The electrical ...
...; The ground terminal on the hood must be avoided. E Electrical access 25" Min. (63.5 cm) MINIMUM CABINET WIDTH Models E EH3012, EH3018, MH3012, MH3018 EH3612, EH3618, MH3612, MH3618 30" (76.2 cm) 36" (91.5 cm) EH4212, EH4218 42" (106.7 cm) EH4812, EH4818, MH4812, MH4818 EH5418 48" ... removed if service is the owner's responsibility to an electrical junction box. Power Supply warning The electric service to the range hood should be connected to be placed for further information. Contact your local building department for convenient access. The electrical ...
Installation Instructions
Page 9
.... • Failure to install a remote blower or proper duct work is smaller than 8 inches in cross-sectional area than one 10" duct using Dacor transition kit AHT10. You can greatly reduce the air draw by the customer. DUCT SIZE MAXIMUM DUCT RUN 8" round 10" round 3¼" X 10... can increase the duct size over the run if desired. When planning new duct work deemed acceptable by state, municipal and local codes. • Range hoods may interrupt the proper flow of rectangular, especially when elbows are better than the recommended types above . A B • The hood exhaust...
.... • Failure to install a remote blower or proper duct work is smaller than 8 inches in cross-sectional area than one 10" duct using Dacor transition kit AHT10. You can greatly reduce the air draw by the customer. DUCT SIZE MAXIMUM DUCT RUN 8" round 10" round 3¼" X 10... can increase the duct size over the run if desired. When planning new duct work deemed acceptable by state, municipal and local codes. • Range hoods may interrupt the proper flow of rectangular, especially when elbows are better than the recommended types above . A B • The hood exhaust...

Installation Instructions
Page 10
...your local building department for further information. • Failure to properly anchor the hood to the wall may attach screws directly to the range hood should be located. Install a junction box in place during site preparation and installation. Extend the line down 10" (25.4 cm...a licensed electrician. • Observe all governing codes and ordinances during installation are used to handle the full weight of the cooktop or range. See the diagrams on page 5. Mounting Location Preparation warning • The electrical service to local codes. The line will be installed only...
...your local building department for further information. • Failure to properly anchor the hood to the wall may attach screws directly to the range hood should be located. Install a junction box in place during site preparation and installation. Extend the line down 10" (25.4 cm...a licensed electrician. • Observe all governing codes and ordinances during installation are used to handle the full weight of the cooktop or range. See the diagrams on page 5. Mounting Location Preparation warning • The electrical service to local codes. The line will be installed only...
Installation Instructions
Page 11
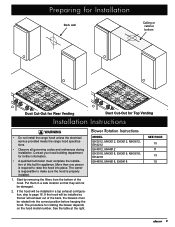
...to page 16. The procedure for Top Venting Installation Instructions warning • Do not install the range hood unless the electrical service provided meets the range hood specifications. • Observe all governing codes and ordinances during installation. Put them in a ...Contact your local building department for further information. • A qualified technician must be damaged. 2. Blower Rotation Instructions MODEL EH3012, MH3012, EH3612, MH3612, EH4212 EH4812, MH4812 EH3018, MH3018, EH3618, MH3618, EH4218 EH4818, MH4818, EH5418 SEE PAGE 10 11 13 15 9 Start ...
...to page 16. The procedure for Top Venting Installation Instructions warning • Do not install the range hood unless the electrical service provided meets the range hood specifications. • Observe all governing codes and ordinances during installation. Put them in a ...Contact your local building department for further information. • A qualified technician must be damaged. 2. Blower Rotation Instructions MODEL EH3012, MH3012, EH3612, MH3612, EH4212 EH4812, MH4812 EH3018, MH3018, EH3618, MH3618, EH4218 EH4818, MH4818, EH5418 SEE PAGE 10 11 13 15 9 Start ...
Installation Instructions
Page 20
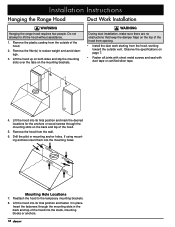
... metal screws and seal with duct tape or certified silver tape. 4. Lift the hood into the mounting holes. Installation Instructions Hanging the Range Hood Duct Work Installation warning Hanging the range hood requires two people. Drill the pilot or mounting anchor holes. Remove the filter(s) to reduce weight and avoid damage. 3. Remove...
... metal screws and seal with duct tape or certified silver tape. 4. Lift the hood into the mounting holes. Installation Instructions Hanging the Range Hood Duct Work Installation warning Hanging the range hood requires two people. Drill the pilot or mounting anchor holes. Remove the filter(s) to reduce weight and avoid damage. 3. Remove...

Installation Instructions
Page 21
... grounded wire installed by a licensed electrician. • Make sure all wire used N1 Gnd L1 Hood power terminals UL/CSA approved NEMA strain relief To range hood 3 Wire Connection to an electrical junction box on the following page.
... grounded wire installed by a licensed electrician. • Make sure all wire used N1 Gnd L1 Hood power terminals UL/CSA approved NEMA strain relief To range hood 3 Wire Connection to an electrical junction box on the following page.
Installation Instructions
Page 22
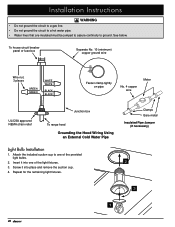
..., 3 places GREEN GREEN WHITE WHITE BLACK BLACK Fasten clamp tightly on pipe No. 4 copper wire Meter UL/CSA approved NEMA strain relief Junction box To range hood Grounding the Hood Wiring Using an External Cold Water Pipe Light Bulb Installation 1. Attach the included suction cup to ground. Screw it into place...
..., 3 places GREEN GREEN WHITE WHITE BLACK BLACK Fasten clamp tightly on pipe No. 4 copper wire Meter UL/CSA approved NEMA strain relief Junction box To range hood Grounding the Hood Wiring Using an External Cold Water Pipe Light Bulb Installation 1. Attach the included suction cup to ground. Screw it into place...

Installation Instructions
Page 23
... lights come on. 6. Verify that one light is on -line warranty activation? Verify that with each touch of the key, the number of your Dacor range hood cannot be sure to the use and care manual? □□ Has proper operation been verified? □□ Have any problems been noted... panel will flash several times during the on at the circuit breaker panel or fuse box. 3. See page 18. □□ Is the range hood wired and grounded according to the instructions on power at low speed. Touch the FAN key again to correct a faulty installation. Verify that all...
... lights come on. 6. Verify that one light is on -line warranty activation? Verify that with each touch of the key, the number of your Dacor range hood cannot be sure to the use and care manual? □□ Has proper operation been verified? □□ Have any problems been noted... panel will flash several times during the on at the circuit breaker panel or fuse box. 3. See page 18. □□ Is the range hood wired and grounded according to the instructions on power at low speed. Touch the FAN key again to correct a faulty installation. Verify that all...
Installation Instructions
Page 29
E Approved for fans and ventilators. Installation Instructions Epicure® Wall Mount Range Hood with Remote Blower For use with models: EHR30, EHR36, EHR42, EHR48, EHR54 Part No. 103781 Rev. Tested in accordance with the latest edition of ANSI/UL 507 standard for electric fans and can/csa-c22.2 no. 113 standard for use with all dacor® ranges and cooktops.
E Approved for fans and ventilators. Installation Instructions Epicure® Wall Mount Range Hood with Remote Blower For use with models: EHR30, EHR36, EHR42, EHR48, EHR54 Part No. 103781 Rev. Tested in accordance with the latest edition of ANSI/UL 507 standard for electric fans and can/csa-c22.2 no. 113 standard for use with all dacor® ranges and cooktops.
Installation Instructions
Page 30
... local electrical inspector's use. Pacific Time Web site: www.Dacor.com Dacor Distinctive Service (for Installation 8 Verify the Package Contents 8 Mounting Location Preparation 8 Electrical Service Installation 9 Duct Cutout 9 Installation Instructions 10 AHT10 Transition Kit Installation 10 Mounting Bracket Installation 11 Hanging the Range Hood 12 Duct Work Installation 12 Final Electrical Installation 12...
... local electrical inspector's use. Pacific Time Web site: www.Dacor.com Dacor Distinctive Service (for Installation 8 Verify the Package Contents 8 Mounting Location Preparation 8 Electrical Service Installation 9 Duct Cutout 9 Installation Instructions 10 AHT10 Transition Kit Installation 10 Mounting Bracket Installation 11 Hanging the Range Hood 12 Duct Work Installation 12 Final Electrical Installation 12...

Installation Instructions
Page 31
... servicing or cleaning unit, switch power off at service panel and lock the service disconnecting means to prevent power from cooktop burners, ovens and range hoods. b) Sufficient air is not followed exactly, a fire or explosion may result causing property damage, personal injury or death. warning WARNING ...Also keep items that could explode, such as gasoline) inside or in this or any other appliance. • Always contact the Dacor Customer Service Team about problems and conditions that you have questions, contact the manufacturer. d) Ducted fans must be vented to the ...
... servicing or cleaning unit, switch power off at service panel and lock the service disconnecting means to prevent power from cooktop burners, ovens and range hoods. b) Sufficient air is not followed exactly, a fire or explosion may result causing property damage, personal injury or death. warning WARNING ...Also keep items that could explode, such as gasoline) inside or in this or any other appliance. • Always contact the Dacor Customer Service Team about problems and conditions that you have questions, contact the manufacturer. d) Ducted fans must be vented to the ...
Installation Instructions
Page 32
... coverings that the customer knows where and how to turn the power off. • Before installing or servicing the range hood, switch power off at www.Dacor.com for the range or cooktop being used . 2 Do not allow foreign objects, such as instructed in accordance with the controls. •...; Never allow children to children above or around the cooktop, range or range hood. • The minimum vertical distance between the...
... coverings that the customer knows where and how to turn the power off. • Before installing or servicing the range hood, switch power off at www.Dacor.com for the range or cooktop being used . 2 Do not allow foreign objects, such as instructed in accordance with the controls. •...; Never allow children to children above or around the cooktop, range or range hood. • The minimum vertical distance between the...

Installation Instructions
Page 36
...Vac 60 Hz, 15 Amp. 6 The electrical installation, including minimum supply wire size and grounding, must be higher for the particular range or cooktop in the selected location. Power Supply warning The electric service to be placed for minimum installed distance from : National Fire ...ground circuit. • Connect the hood directly to a dedicated three wire grounded, single phase circuit rated at right angles. • Install the range hood and cooking appliance(s) so that electric power can be installed only by a qualified electrician. E Electrical access 25" Min. (63.5 cm)...
...Vac 60 Hz, 15 Amp. 6 The electrical installation, including minimum supply wire size and grounding, must be higher for the particular range or cooktop in the selected location. Power Supply warning The electric service to be placed for minimum installed distance from : National Fire ...ground circuit. • Connect the hood directly to a dedicated three wire grounded, single phase circuit rated at right angles. • Install the range hood and cooking appliance(s) so that electric power can be installed only by a qualified electrician. E Electrical access 25" Min. (63.5 cm)...

