Installation Instructions
Page 3
... such as gasoline) inside or in the vicinity of Contents Before You Begin 1 Important Safety Instructions 1 Important Information About Safety Instructions 1 Safety Symbols and Labels 1 General Safety Precautions 2 Customer Service Information 3 If You Need Help 3 Appliance Data Plate 3 Model Identification 3 Product Specifications 4 Power Supply Requirements 4 Product Dimensions 4 Installation Specifications 6 Installation Planning 6 Installation Instructions 8 Verify the Package Contents 8 Remove the oven door(s 8 Electrical Connection 9 Installing the Oven in these...
... such as gasoline) inside or in the vicinity of Contents Before You Begin 1 Important Safety Instructions 1 Important Information About Safety Instructions 1 Safety Symbols and Labels 1 General Safety Precautions 2 Customer Service Information 3 If You Need Help 3 Appliance Data Plate 3 Model Identification 3 Product Specifications 4 Power Supply Requirements 4 Product Dimensions 4 Installation Specifications 6 Installation Planning 6 Installation Instructions 8 Verify the Package Contents 8 Remove the oven door(s 8 Electrical Connection 9 Installing the Oven in these...
Installation Instructions
Page 4
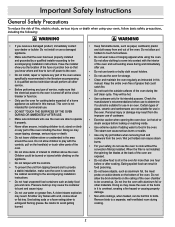
... not installed, the spinning fan blades at the circuit breaker or fuse box. • Only use and care manual before touching them to become covered up during cooking. • To prevent damage, remove the meat probe from children. When the filter is not responsible for service required to birds. Children could be burned or injured while climbing on any part of the oven unless specifically instructed to make sure that the electric power...
... not installed, the spinning fan blades at the circuit breaker or fuse box. • Only use and care manual before touching them to become covered up during cooking. • To prevent damage, remove the meat probe from children. When the filter is not responsible for service required to birds. Children could be burned or injured while climbing on any part of the oven unless specifically instructed to make sure that the electric power...

Installation Instructions
Page 16
... oven racks onto the supports inside the oven(s). 3. Installation Instructions Reinstalling the Oven Door (Cont) Verifying Proper Operation To re-install the oven door on model EORS136: warning To avoid personal injury or damage to the door from it falling off power at the circuit breaker or fuse box and check the electrical connections. • Turn on power and repeat the above heating test. • If the appliance still does not work, contact Dacor Distinctive Service at the circuit breaker...
... oven racks onto the supports inside the oven(s). 3. Installation Instructions Reinstalling the Oven Door (Cont) Verifying Proper Operation To re-install the oven door on model EORS136: warning To avoid personal injury or damage to the door from it falling off power at the circuit breaker or fuse box and check the electrical connections. • Turn on power and repeat the above heating test. • If the appliance still does not work, contact Dacor Distinctive Service at the circuit breaker...
Use & Care Manuals
Page 1
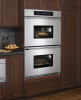
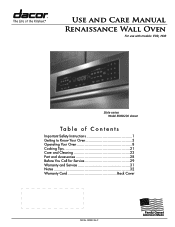
P Use and Care Manual Renaissance Wall Oven For use with models: EOR, MOR Style varies Model EORD230 shown Ta b l e o f C o n t e n t s Important Safety Instructions 1 Getting to Know Your Oven 3 Operating Your Oven 8 Cooking Tips 21 Care and Cleaning 23 Part and Accessories 28 Before You Call for Service 29 Warranty and Service 31 Notes 32 Warranty Card Back Cover Part No. 102580 Rev.
P Use and Care Manual Renaissance Wall Oven For use with models: EOR, MOR Style varies Model EORD230 shown Ta b l e o f C o n t e n t s Important Safety Instructions 1 Getting to Know Your Oven 3 Operating Your Oven 8 Cooking Tips 21 Care and Cleaning 23 Part and Accessories 28 Before You Call for Service 29 Warranty and Service 31 Notes 32 Warranty Card Back Cover Part No. 102580 Rev.
Use & Care Manuals
Page 4
... the electrical power to the oven is not installed, the spinning fan blades at the circuit breaker or fuse box. • Only use water on the ceiling of the oven including the door. Personal injury or damage may cause the container to cook without the convection filter(s) installed. When the filter is turned off power to the accompanying installation instructions. A qualified service technician should perform all other materials. Pressure build up . Be careful...
... the electrical power to the oven is not installed, the spinning fan blades at the circuit breaker or fuse box. • Only use water on the ceiling of the oven including the door. Personal injury or damage may cause the container to cook without the convection filter(s) installed. When the filter is turned off power to the accompanying installation instructions. A qualified service technician should perform all other materials. Pressure build up . Be careful...

Use & Care Manuals
Page 6
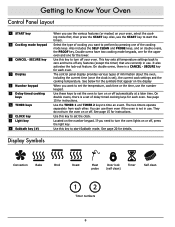
... inside each oven chamber. They support the adjustable oven racks. The door latches for proper operation. Your oven comes with a meat probe connector. Do not block or cover the air intake or exhaust slots. The convection filter covers it . Hidden below the glass panel on the model. The air comes out through the intake slots to cool its internal parts. J Convection fan* K Convection element* L Convection filter* M Oven rack N Bake elements The convection fan blows heated air into the oven chamber by the convection fan during the convection cooking process...
... inside each oven chamber. They support the adjustable oven racks. The door latches for proper operation. Your oven comes with a meat probe connector. Do not block or cover the air intake or exhaust slots. The convection filter covers it . Hidden below the glass panel on the model. The air comes out through the intake slots to cool its internal parts. J Convection fan* K Convection element* L Convection filter* M Oven rack N Bake elements The convection fan blows heated air into the oven chamber by the convection fan during the convection cooking process...
Use & Care Manuals
Page 8
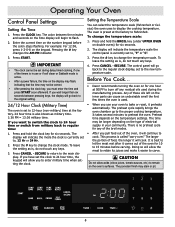
... Know Your Oven Control Panel Layout A START key B Cooking mode keypad C CANCEL · SECURE key D Display E Number keypad F Delay timed cooking keys G TIMER keys H CLOCK key J Light key K Sabbath key (#) When you want to turn on or off , press the light key. Display Symbols Convection Bake Broil Roast Meat probe Door lock (self clean) Timer Self clean 12 Timer numbers 6 Also, use the START key to time an event. On double ovens, there is set), the current cook settings and the cooking temperature. Use these keys to set the oven to zero and turns off automatically...
... Know Your Oven Control Panel Layout A START key B Cooking mode keypad C CANCEL · SECURE key D Display E Number keypad F Delay timed cooking keys G TIMER keys H CLOCK key J Light key K Sabbath key (#) When you want to turn on or off , press the light key. Display Symbols Convection Bake Broil Roast Meat probe Door lock (self clean) Timer Self clean 12 Timer numbers 6 Also, use the START key to time an event. On double ovens, there is set), the current cook settings and the cooking temperature. Use these keys to set the oven to zero and turns off automatically...
Use & Care Manuals
Page 10
... preheats automatically. The time may be longer depending on the inner parts can select the temperature scale (Fahrenheit or Celsius) the oven uses to flash. 2. The control panel will go back to the original setting. 24/12 Hour Clock (Military Time) The oven is set the clock to 24 hour time, the keypad will allow you use or if self clean or Sabbath mode is active. • After a power failure, the time...
... preheats automatically. The time may be longer depending on the inner parts can select the temperature scale (Fahrenheit or Celsius) the oven uses to flash. 2. The control panel will go back to the original setting. 24/12 Hour Clock (Military Time) The oven is set the clock to 24 hour time, the keypad will allow you use or if self clean or Sabbath mode is active. • After a power failure, the time...
Use & Care Manuals
Page 12
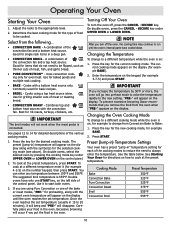
...it to a different cooking mode while the oven is connected. Adjust the racks to be flipped, such as thinner cuts of the various cooking modes. 1. Uses convection cooking only for single rack items in " temperature setting for example to change to start both ovens. 3. The cur- Cooking Mode Bake Convection Bake Pure Convection Convection Roast Broil Convection Broil Preset Temperature 350°F 325°F 325°F 375°F 555°F 555°F 10 Good for even heat. Operating Your Oven Starting Your Oven 1. Changing the Temperature To cha11nge...
...it to a different cooking mode while the oven is connected. Adjust the racks to be flipped, such as thinner cuts of the various cooking modes. 1. Uses convection cooking only for single rack items in " temperature setting for example to change to start both ovens. 3. The cur- Cooking Mode Bake Convection Bake Pure Convection Convection Roast Broil Convection Broil Preset Temperature 350°F 325°F 325°F 375°F 555°F 555°F 10 Good for even heat. Operating Your Oven Starting Your Oven 1. Changing the Temperature To cha11nge...

Use & Care Manuals
Page 16
... a broiled flavor. • Setting the timer is recommended to bread. When using a roasting rack. To ensure an accurate reading, the tip of the probe should be used in record time. Less tender cuts of the broil modes with the meat probe connected. • Use the Broil and Convection Broil modes only with melted butter, margarine or oil before removing the food from the oven. • To prevent sticking, lightly grease the broiler grill. Broil Uses a top heat...
... a broiled flavor. • Setting the timer is recommended to bread. When using a roasting rack. To ensure an accurate reading, the tip of the probe should be used in record time. Less tender cuts of the broil modes with the meat probe connected. • Use the Broil and Convection Broil modes only with melted butter, margarine or oil before removing the food from the oven. • To prevent sticking, lightly grease the broiler grill. Broil Uses a top heat...
Use & Care Manuals
Page 17
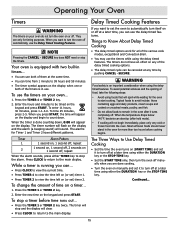
... START. The timer number will flash on the display and the alarm (a beeping sound) will appear 1 2 on (START TIME) and set ) timer 2. To use the timers while using foods that will stop a timer before cooking begins. Enter the hours and minutes to be canceled at a later time, you press START, the time will clear. • Press CLOCK to return to start cooking. Things to Know About Delay Timed Cooking • The delay timed options work for the oven...
... START. The timer number will flash on the display and the alarm (a beeping sound) will appear 1 2 on (START TIME) and set ) timer 2. To use the timers while using foods that will stop a timer before cooking begins. Enter the hours and minutes to be canceled at a later time, you press START, the time will clear. • Press CLOCK to return to start cooking. Things to Know About Delay Timed Cooking • The delay timed options work for the oven...
Use & Care Manuals
Page 18
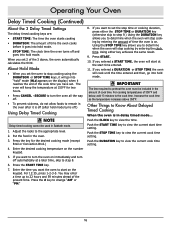
... desired cooking mode (except Broil or Convection Broil.) 4. Push the START TIME key to remain in the oven after it goes into hold mode. • STOP TIME: The clock time the oven turns off and goes into hold mode turns off automatically at a later time, skip to step 8. 6. Adjust the racks to change "AM" or "PM." 8. Enter the desired cooking temperature on the keypad. Using the STOP TIME key allows you entered a DURATION or STOP TIME the oven will cook...
... desired cooking mode (except Broil or Convection Broil.) 4. Push the START TIME key to remain in the oven after it goes into hold mode. • STOP TIME: The clock time the oven turns off and goes into hold mode turns off automatically at a later time, skip to step 8. 6. Adjust the racks to change "AM" or "PM." 8. Enter the desired cooking temperature on the keypad. Using the STOP TIME key allows you entered a DURATION or STOP TIME the oven will cook...

Use & Care Manuals
Page 19
... roasts and poultry, the internal temperature is cooking... • Press the PROBE key twice. The temperature will appear on either end of roasting. To change the meat probe temperature during preheat mode (when "PRE-" appears on the display. Operating Your Oven Using the Meat Probe When you do not enter a temperature, the oven will automatically control the cooking time. Pushing or pulling on the display. note • The meat probe does not work with Broil or Convection Broil and Sabbath modes. Press START...
... roasts and poultry, the internal temperature is cooking... • Press the PROBE key twice. The temperature will appear on either end of roasting. To change the meat probe temperature during preheat mode (when "PRE-" appears on the display. Operating Your Oven Using the Meat Probe When you do not enter a temperature, the oven will automatically control the cooking time. Pushing or pulling on the display. note • The meat probe does not work with Broil or Convection Broil and Sabbath modes. Press START...
Use & Care Manuals
Page 20
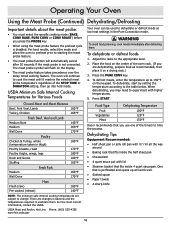
... temperature according to change. Operating Your Oven Using the Meat Probe (Continued) Dehydrating/Defrosting Important details about the meat probe: • You must select the specific cooking mode (BAKE, CONV BAKE, PURE CONV or CONV ROAST) before you use one of the timers to time the process. warning To avoid food poisoning, cook meats immediately after 30 seconds if the meat probe is disabled. Adjust the racks to dehydrate or defrost foods at low heat settings...
... temperature according to change. Operating Your Oven Using the Meat Probe (Continued) Dehydrating/Defrosting Important details about the meat probe: • You must select the specific cooking mode (BAKE, CONV BAKE, PURE CONV or CONV ROAST) before you use one of the timers to time the process. warning To avoid food poisoning, cook meats immediately after 30 seconds if the meat probe is disabled. Adjust the racks to dehydrate or defrost foods at low heat settings...
Use & Care Manuals
Page 25
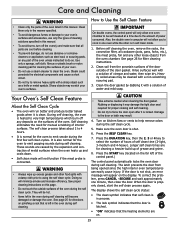
... when cleaning the door gasket. Damage to cook in the oven during self cleaning. It is properly closed, start the self clean process again. Press the START key (located on the far left in one oven while the other is connected. Before self cleaning the oven, remove the racks, the convection filter, all parts are for the oven to do not use only the types of power consumed. They will be cleaned with a solution of interior...
... when cleaning the door gasket. Damage to cook in the oven during self cleaning. It is properly closed, start the self clean process again. Press the START key (located on the far left in one oven while the other is connected. Before self cleaning the oven, remove the racks, the convection filter, all parts are for the oven to do not use only the types of power consumed. They will be cleaned with a solution of interior...
Use & Care Manuals
Page 26
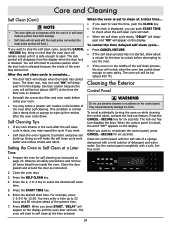
.... Clean the control panel with the soft side of the self clean process, the door will unlock when the oven has cooled down enough to select the desired self clean time. 5. The clean icon, lock icon and "ON" will lock. Use a damp cloth or sponge to stop the self clean cycle, press the CANCEL · SECURE key. Care and Cleaning Self Clean (Cont.) NOTE • The oven lights do not operate while the oven is in self clean mode...
.... Clean the control panel with the soft side of the self clean process, the door will unlock when the oven has cooled down enough to select the desired self clean time. 5. The clean icon, lock icon and "ON" will lock. Use a damp cloth or sponge to stop the self clean cycle, press the CANCEL · SECURE key. Care and Cleaning Self Clean (Cont.) NOTE • The oven lights do not operate while the oven is in self clean mode...

Use & Care Manuals
Page 27
... Dacor Cooktop Cleaning Creme. Removing your fingers around the edges of the filter and gently push up. Clean the door gasket by dabbing it to become clogged, the oven's convection cooking modes will become damaged. To clean the oven racks, apply a solution of detergent and warm water. When you can also clean glass surfaces with a solution of water and mild soap. Rinse well. Use it may scrub the oven light...
... Dacor Cooktop Cleaning Creme. Removing your fingers around the edges of the filter and gently push up. Clean the door gasket by dabbing it to become clogged, the oven's convection cooking modes will become damaged. To clean the oven racks, apply a solution of detergent and warm water. When you can also clean glass surfaces with a solution of water and mild soap. Rinse well. Use it may scrub the oven light...
Use & Care Manuals
Page 31
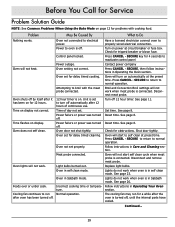
...delay timed cooking. Broil and Convection Broil settings will not work when meat probe is turned off . See page 8. Shut door tightly. Oven lights will not work . Meat probe connected. Incorrect cooking time or temperature. Lights do not work when oven is on power at the preset time. Have a licensed electrician connect oven to normal operation. Oven will not start to reactivate control panel Contact power company Press CANCEL · SECURE, then follow instructions in self clean mode. Oven set for 4 seconds to self clean at preset time. Oven will start self clean...
...delay timed cooking. Broil and Convection Broil settings will not work when meat probe is turned off . See page 8. Shut door tightly. Oven lights will not work . Meat probe connected. Incorrect cooking time or temperature. Lights do not work when oven is on power at the preset time. Have a licensed electrician connect oven to normal operation. Oven will not start to reactivate control panel Contact power company Press CANCEL · SECURE, then follow instructions in self clean mode. Oven set for 4 seconds to self clean at preset time. Oven will start self clean...
Use & Care Manuals
Page 32
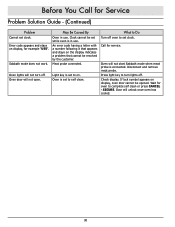
Sabbath mode does not work. Oven lights will not start Sabbath mode when meat probe is set to set clock. Clock cannot be set while oven is set to on the display indicates a problem that appears and stays on . Oven is in use . Press light key to turn off oven to self clean. An error code having a letter with a number following it that cannot be opened. Call for service. Meat probe connected. Oven door will unlock once oven has cooled. 30 Light key is connected. Check display. Oven will not turn lights off. If lock symbol...
Sabbath mode does not work. Oven lights will not start Sabbath mode when meat probe is set to set clock. Clock cannot be set while oven is set to on the display indicates a problem that appears and stays on . Oven is in use . Press light key to turn off oven to self clean. An error code having a letter with a number following it that cannot be opened. Call for service. Meat probe connected. Oven door will unlock once oven has cooled. 30 Light key is connected. Check display. Oven will not turn lights off. If lock symbol...

Planning Guides
Page 1
... cm) Long Model Number Dedicated Circuit Requirements Total Connected Load EORS227/ MORS227 EORS230/ MORS230 240 Vac 60 Hz, 4-wire***, 40 Amp. 7.8 kW (33 Amp.) EORD227/ MORD227 EORD230/ MORD230 240 Vac 60 Hz, 4-wire***, 50 Amp. 10.0 kW (42 Amp.) *** Two 120 Vac hot (L1 and L2), one neutral, one ground The above specifications are for exact specifications. C Control panel front Chassis Notch Side View A K E M Light cover Light cover Top of...
... cm) Long Model Number Dedicated Circuit Requirements Total Connected Load EORS227/ MORS227 EORS230/ MORS230 240 Vac 60 Hz, 4-wire***, 40 Amp. 7.8 kW (33 Amp.) EORD227/ MORD227 EORD230/ MORD230 240 Vac 60 Hz, 4-wire***, 50 Amp. 10.0 kW (42 Amp.) *** Two 120 Vac hot (L1 and L2), one neutral, one ground The above specifications are for exact specifications. C Control panel front Chassis Notch Side View A K E M Light cover Light cover Top of...


